Payroll
Organizing Employee Payroll With flair
Manage all your payment data in one place, create clear payroll runs, and ensure employees get paid on time.
What is Payroll?
Payroll is the process by which an organization compensates its employees for work completed during a set amount of time or by a certain date. It involves collating information required to calculate employee net pay, such as hourly rate, tax status, insurance, and paid leave.
A payroll run is the act of processing and distributing pay to employees. It consolidates all the necessary data to prepare payments, which can then be sent to external payroll systems, payroll processors, and accountants.
Key Features
- Payroll Runs - Create comprehensive payroll runs with employee compensation data
- Payroll Territories - Organize employees by payment jurisdiction for multi-country operations
- Deductions Management - Track deductions like taxes and insurance contributions
- Document Generation - Automatically generate payslips and payroll summaries
- DATEV Integration - Direct integration with DATEV for German payroll processing
- Compensation Rules - Set up recurring compensation rules for bonuses and allowances
- Dynamic Formulas - Create compensation based on employee data like years of service
- Payroll Run Rules - Automate compensation for overtime and public holiday hours
- Status Tracking - Monitor payroll runs through Draft, Pending, Submitted, and Completed stages
Getting Started
To get started with payroll management in flair:
- Set up payroll territories - Define payment jurisdictions for your employees
- Create payroll runs - Generate payroll runs for specific periods
- Add employees - Include employees in the appropriate payroll runs
- Configure compensation rules - Set up recurring bonuses and deductions
- Generate documents - Create payslips and export data for processing
Use the navigation on the right to explore specific topics in payroll management.
Introduction to Payroll
Payroll must be managed accurately to ensure all employees are provided with the correct amount of compensation for their work.
The act of processing and distributing pay to employees is known as a payroll run. It involves collating information required to calculate employee net pay, such as hourly rate, tax status, insurance and paid leave.
flair makes it possible for users to gather all this important information in neatly generated documents. The documents can then be exported and sent to, say, an accountant managing company financials.
A pay date is the scheduled time or day funds are released to the employee. For most companies, it is typically the same day every week or month. Depending on the country, employee pay can be liable to different rules, regulations, and taxes.
Through Salesforce, the flair HR app makes it easy to gather this payroll data and set payment parameters.
Have you seen the flair HR Blog?
Creating a Payroll Run
Creating a payroll run is necessary to pay employees who receive a salary. It's a collection of all the information you need to complete payments. For example, who is due a payment? How much are individual staff members owed?
You need to gather data on how much each employee earns, how many hours they worked, their tax status, and any other deductions. A flair payroll run can help you automate this process by consolidating the necessary data you need to prepare your payroll. You can then send it to external payroll systems, payroll processors, and accountants.
To create a payroll run in flair:
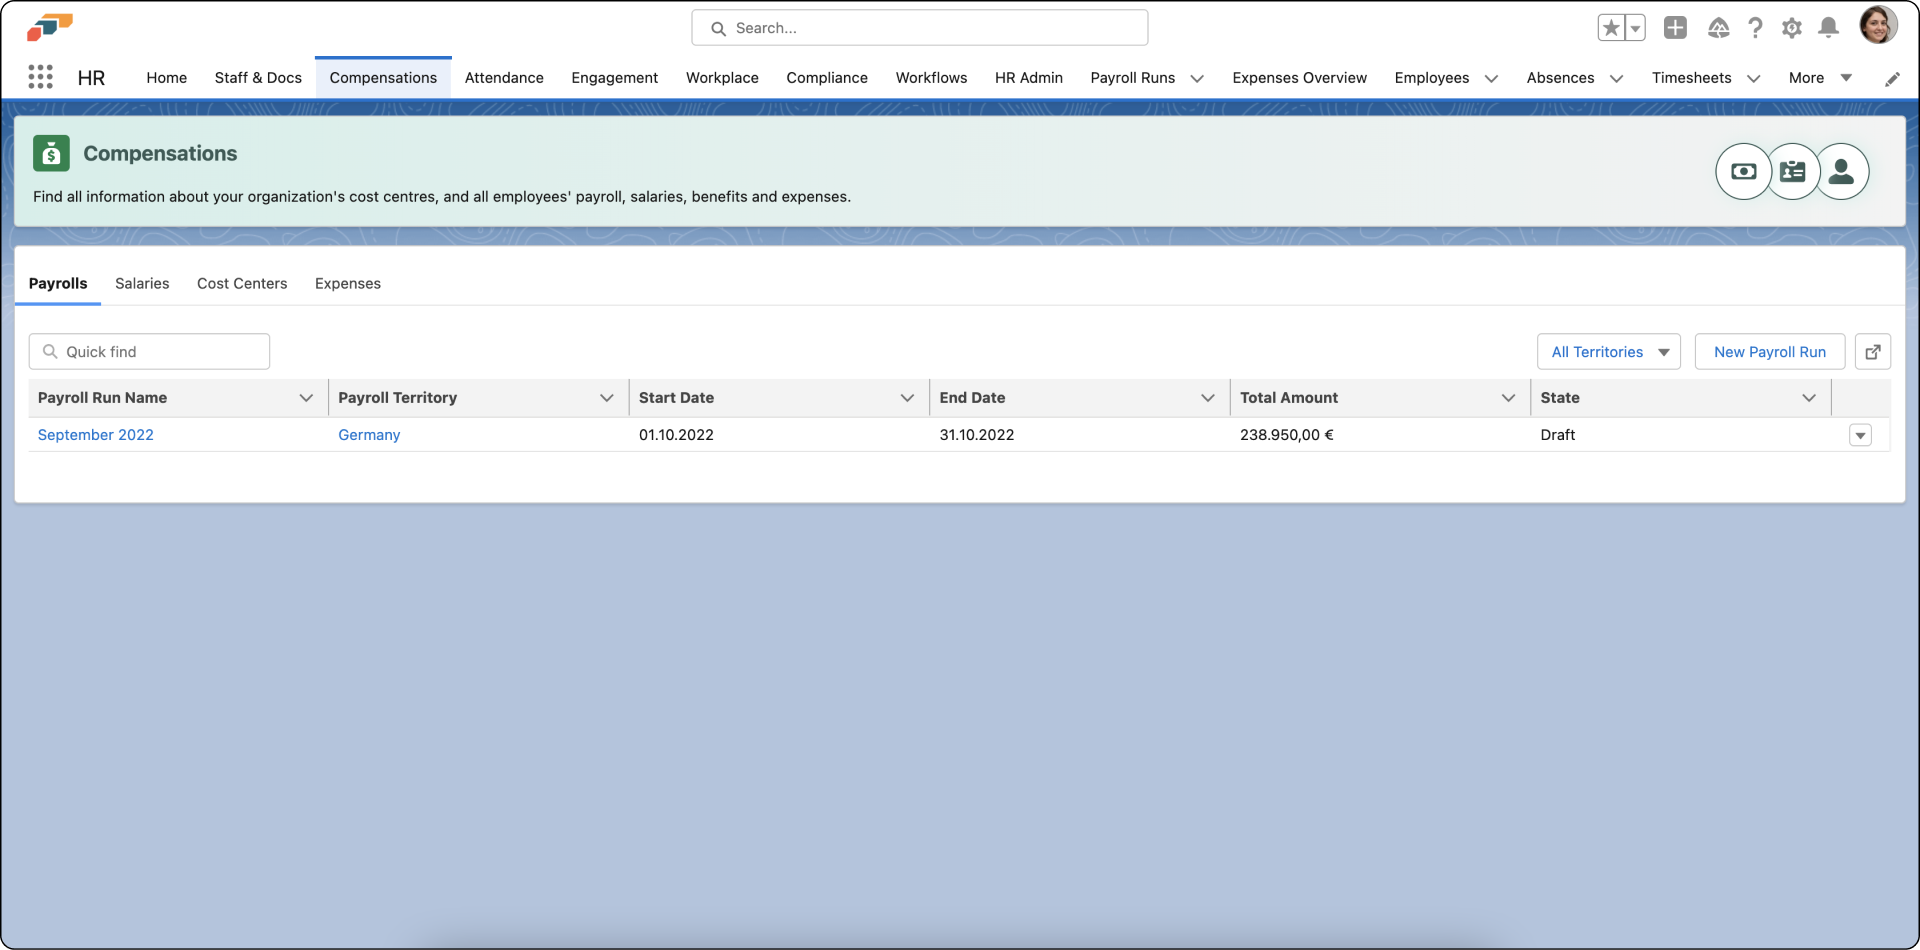
- Open the Payroll Runs page in the flair HR app from the top navigation bar or by using the App Launcher.
- Alternatively, you can create a new payroll run via the Payrolls tab on the Compensations page.
- Click New to create a payroll run. Give your payroll run a name, a Start Date and End Date, and choose a Payroll Territory.
- Then click Save to create the new payroll run.
- Now click Add Employees and select all the employees that should be included in this payroll run.
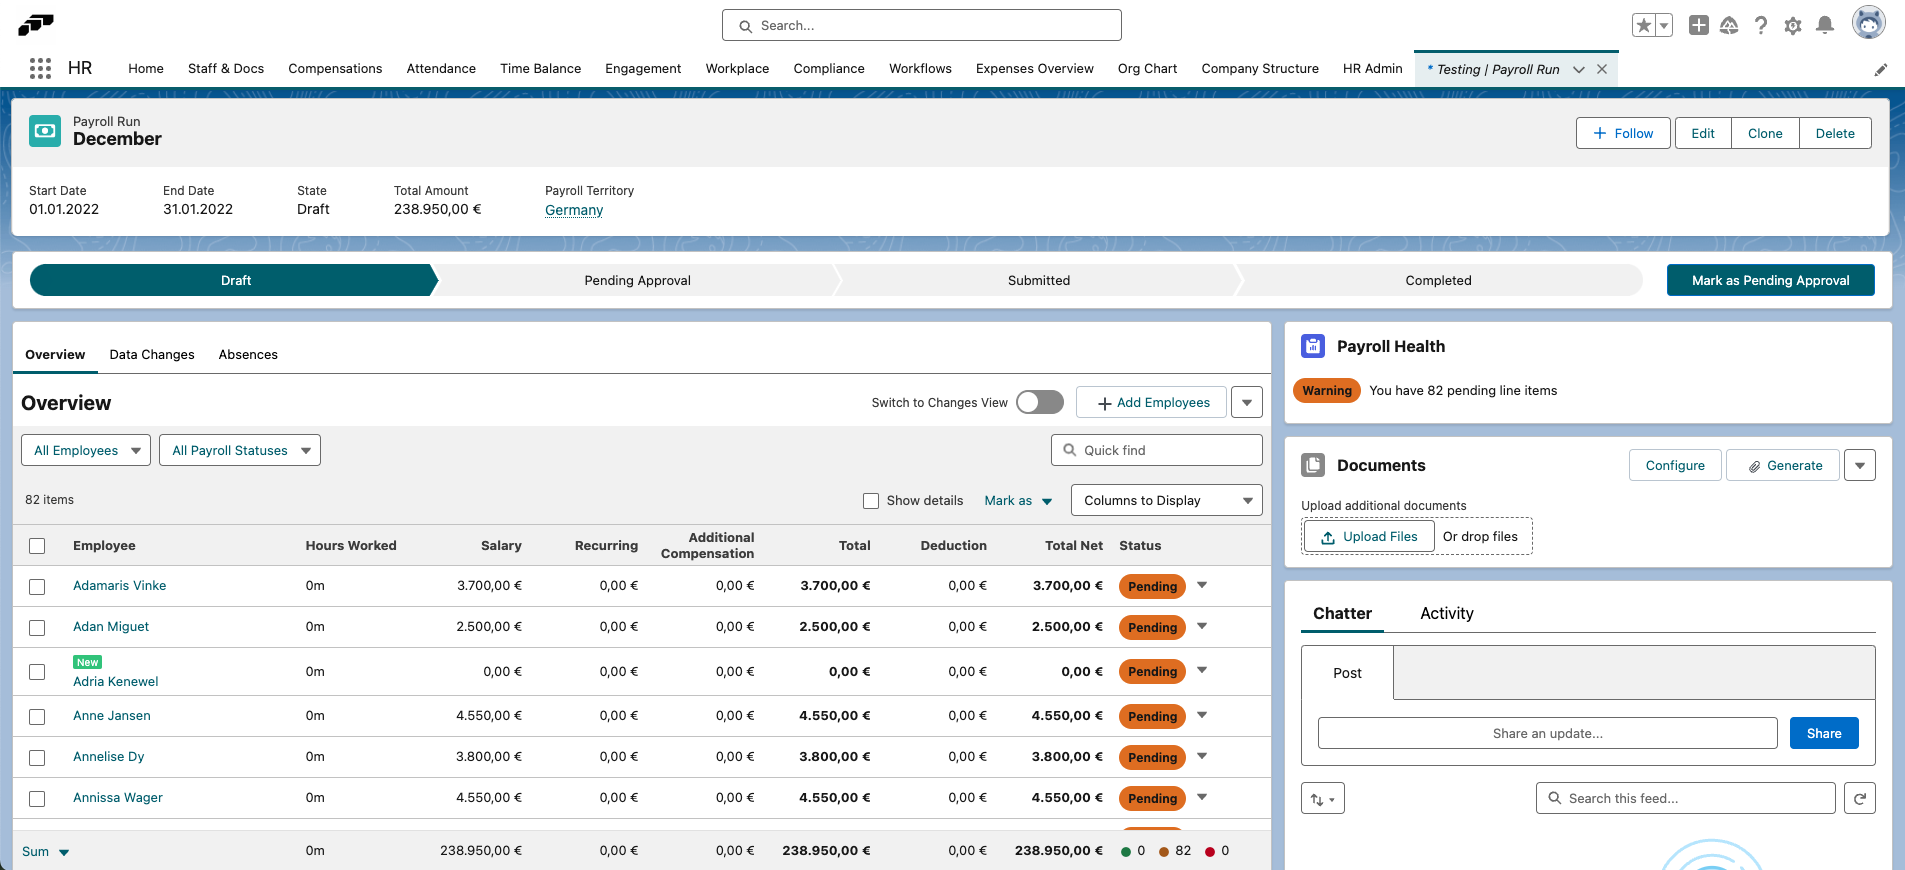
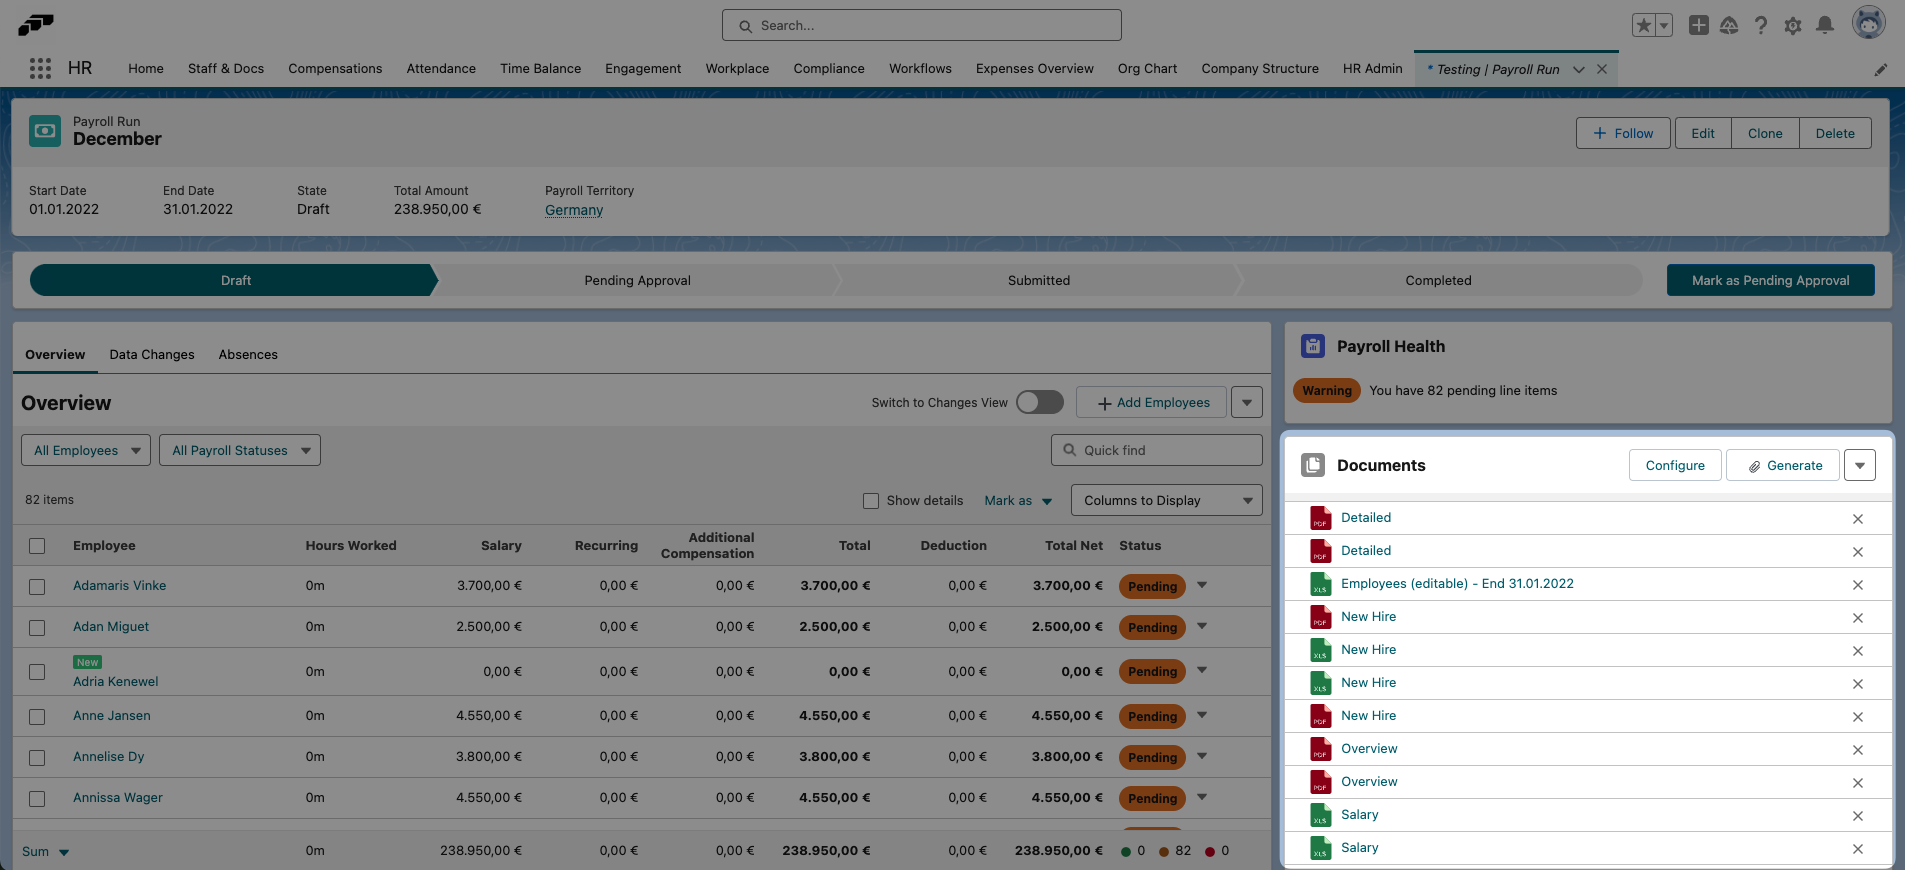
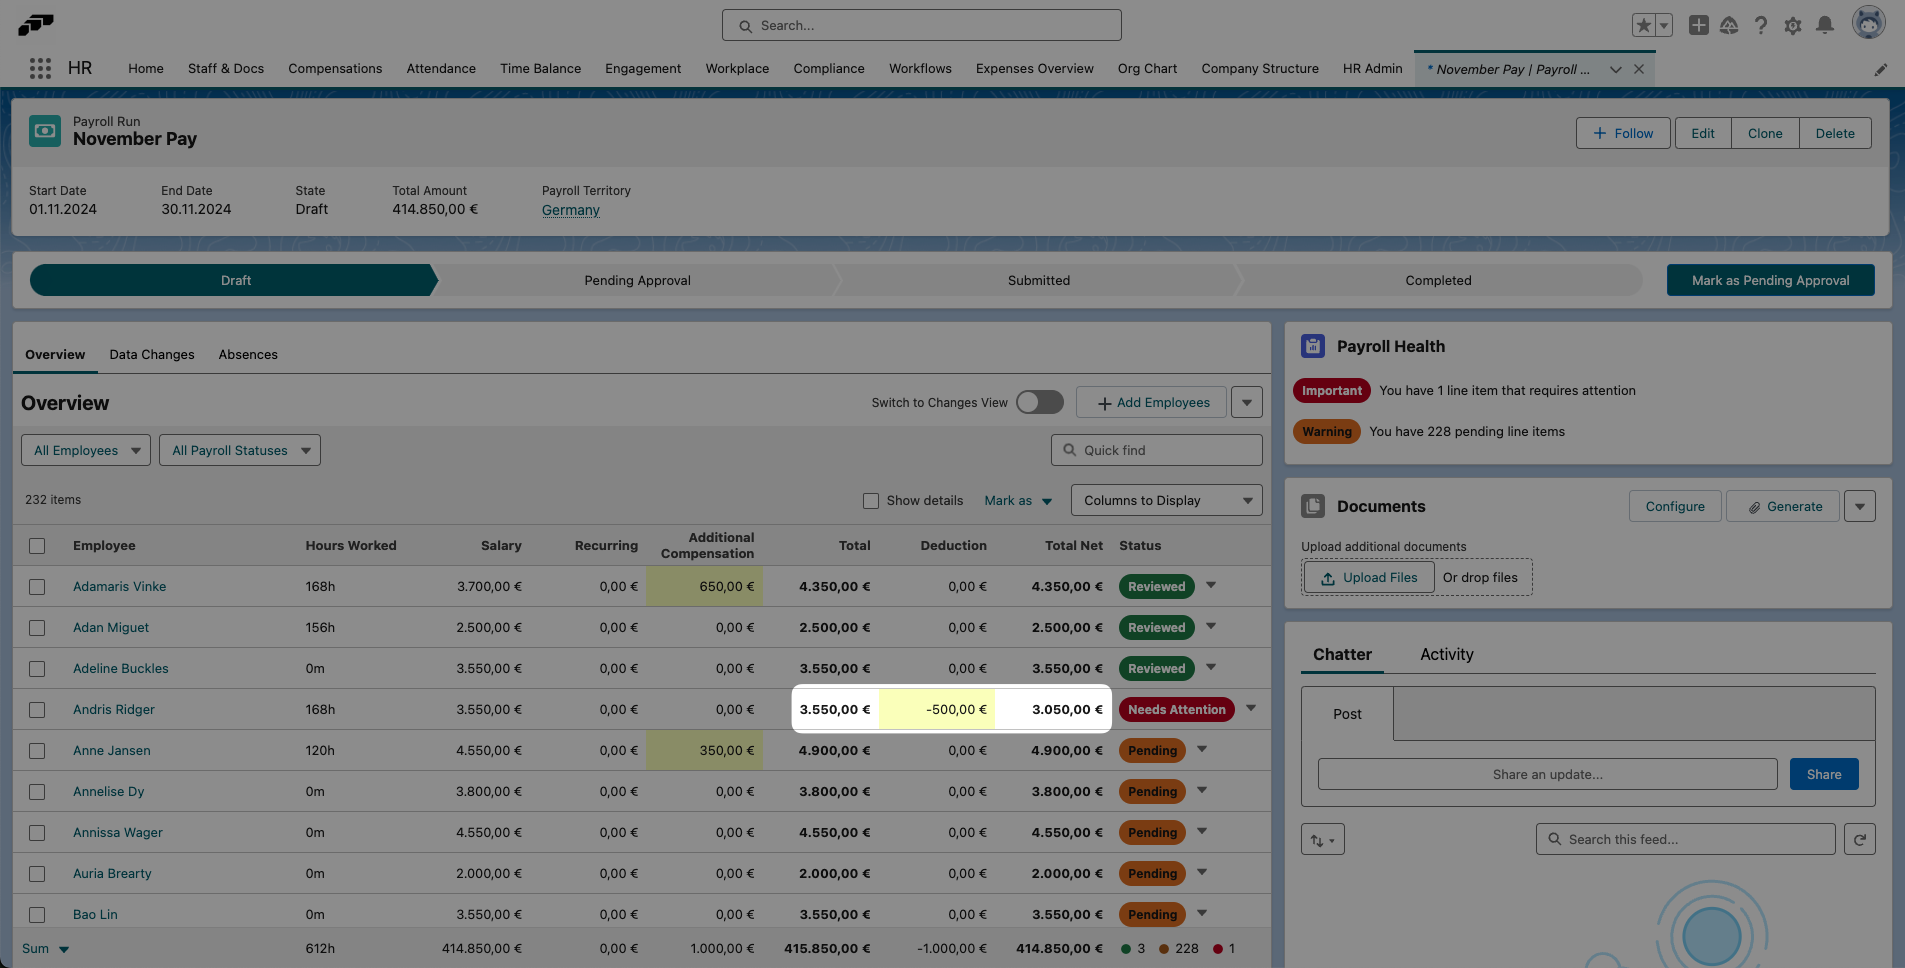
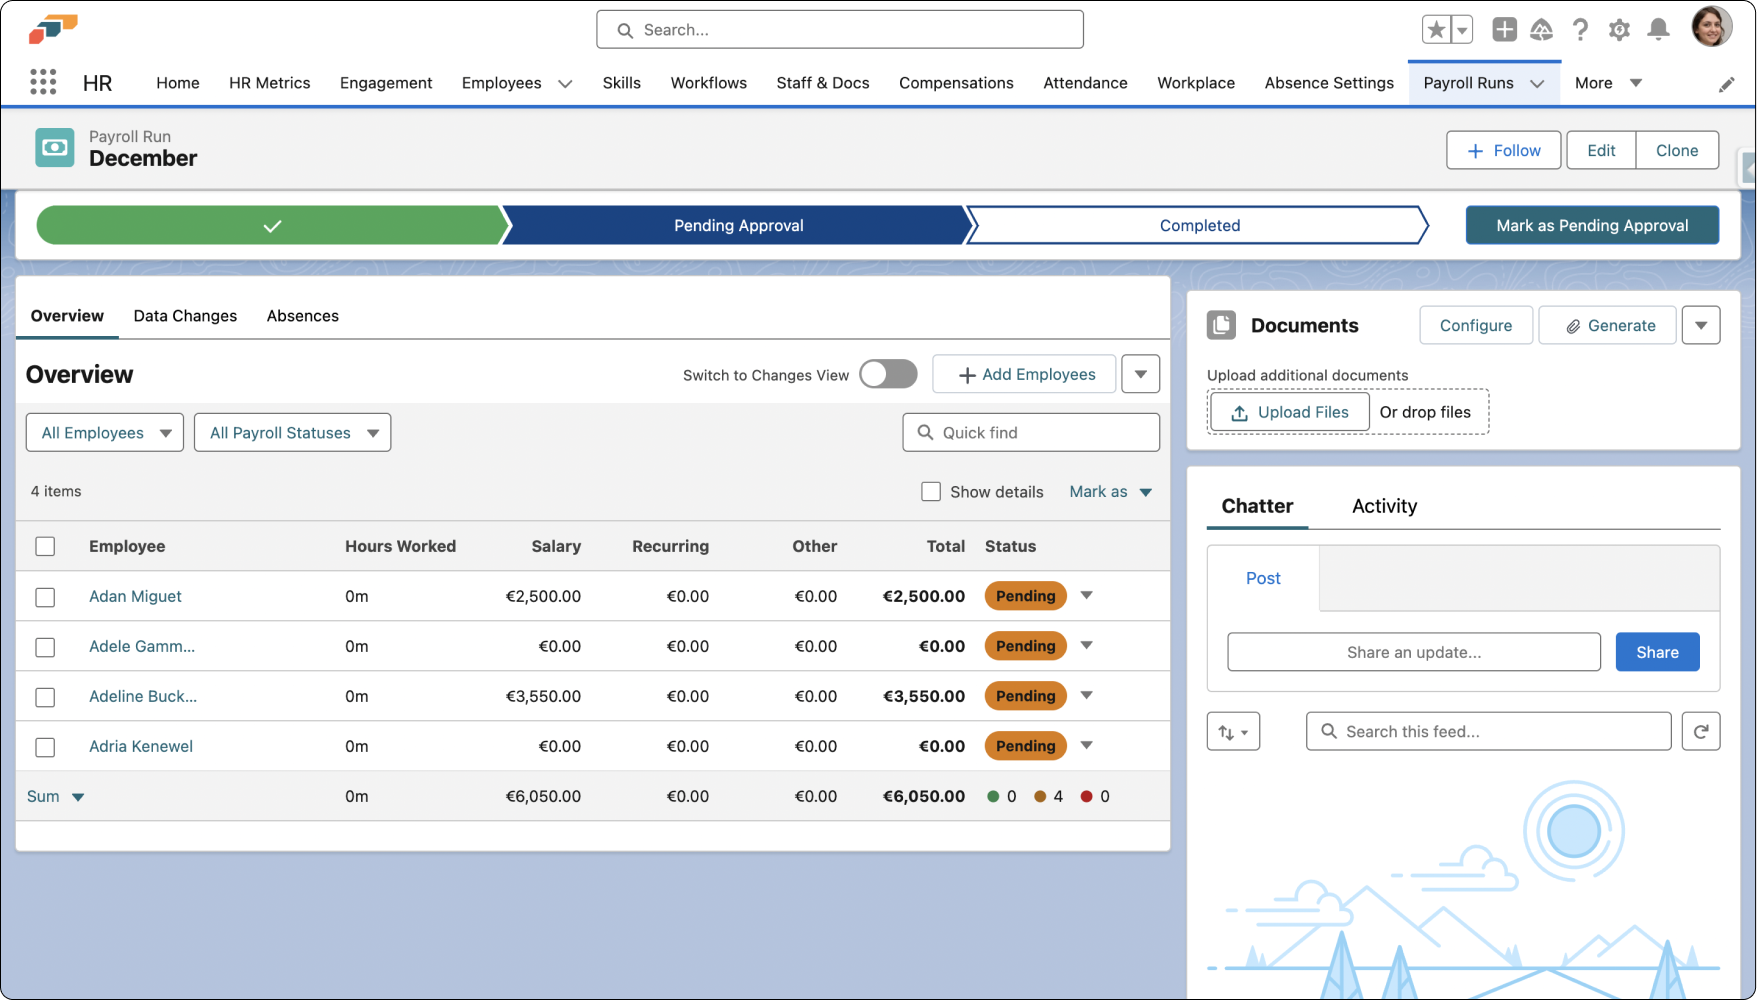
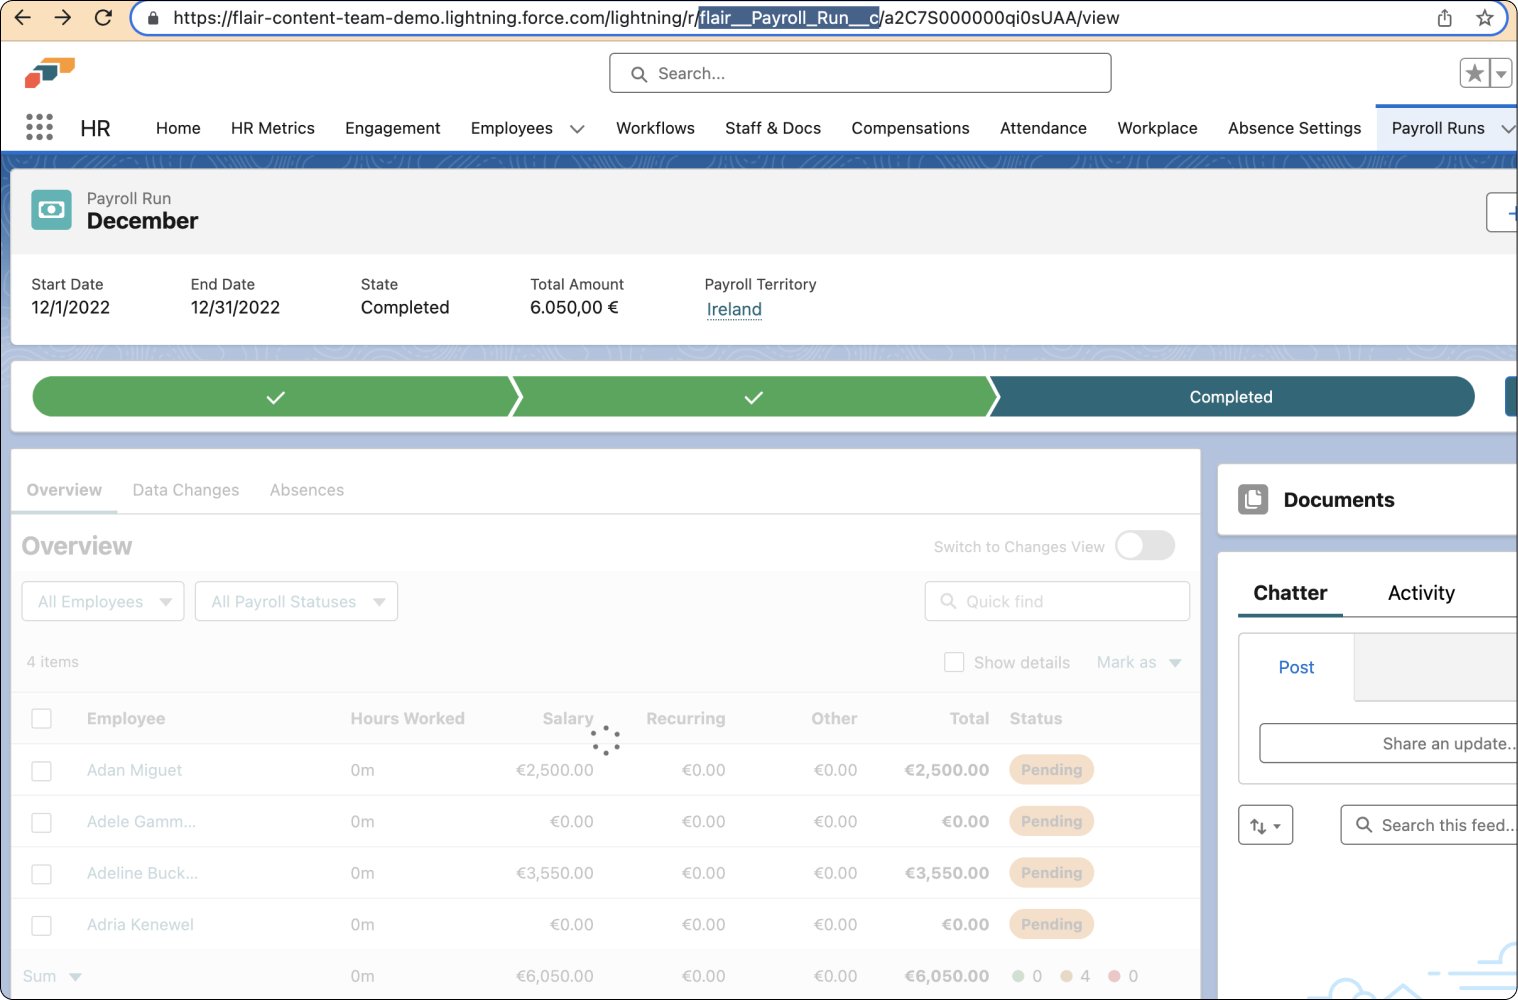
flair will then automatically collate all the information needed and create a table, including information such as salary, hours worked, additional compensation, and total amount. You can then automatically generate payroll documents by clicking the Generate button in the Documents pane on the right.
Along the top the screen, you can see the status of your payroll run, which can be either Draft, Pending Approval, Submitted, or Completed.
Using the Columns To Display dropdown, you can change which columns are displayed in your payroll run.
By default, all entries in the payroll run will be set to Pending. You can now review the details and make any amendments necessary before submitting your payroll information.
Since taxes are country-specific, flair does not automatically calculate tax deductions. Instead, the platform facilitates the generation of documents that may be used by an accountant or tax application to calculate net pay after deductions.
Setting Up Payroll Territories
The Payroll Territories page helps you to select employees for each payment jurisdiction and configure documents during payroll runs. This is useful if your company and employees operate in multiple countries.
Payroll territories ensure that each payroll run only contains employees from a single territory.
- In the flair HR app, navigate to the Payroll Territories tab on the top menu bar.
- Select New to begin creating a Payroll territory. For example, you may want to create a payroll run for employees based in the UK.
- Once you have filled out the fields and clicked Save, you can begin to assign employees to a specific Payroll Territory via the Employees page.
- If later an employee is not displaying on the Payroll Runs page, you need to ensure they have been added to the correct Payroll Territory.
Adding Deductions
Deductions are individual amounts that are subtracted from the gross salary, such as tax and health insurance contributions. Note that while this primarily involves deductions, it can also represent additional compensation (positive amounts).
Overview
This section explains how to upload and manage compensations that are deducted from an employee's salary after taxes and insurances but are transferred by the company.
Available Options in the Payroll Module
There are several ways to add deductions to your payroll:
1. Employee Recurring Compensation
- Use this for deductions that occur every month with the same amount.
- The Payroll Run Line Item will be added automatically to the Payroll Run.
- To set this up, open an employee's page in flair, select the Salary tab, and click New in the Employee Recurring Compensations pane.
- Enter the compensation date, the recurring period, and enter a negative amount in the Amount field.
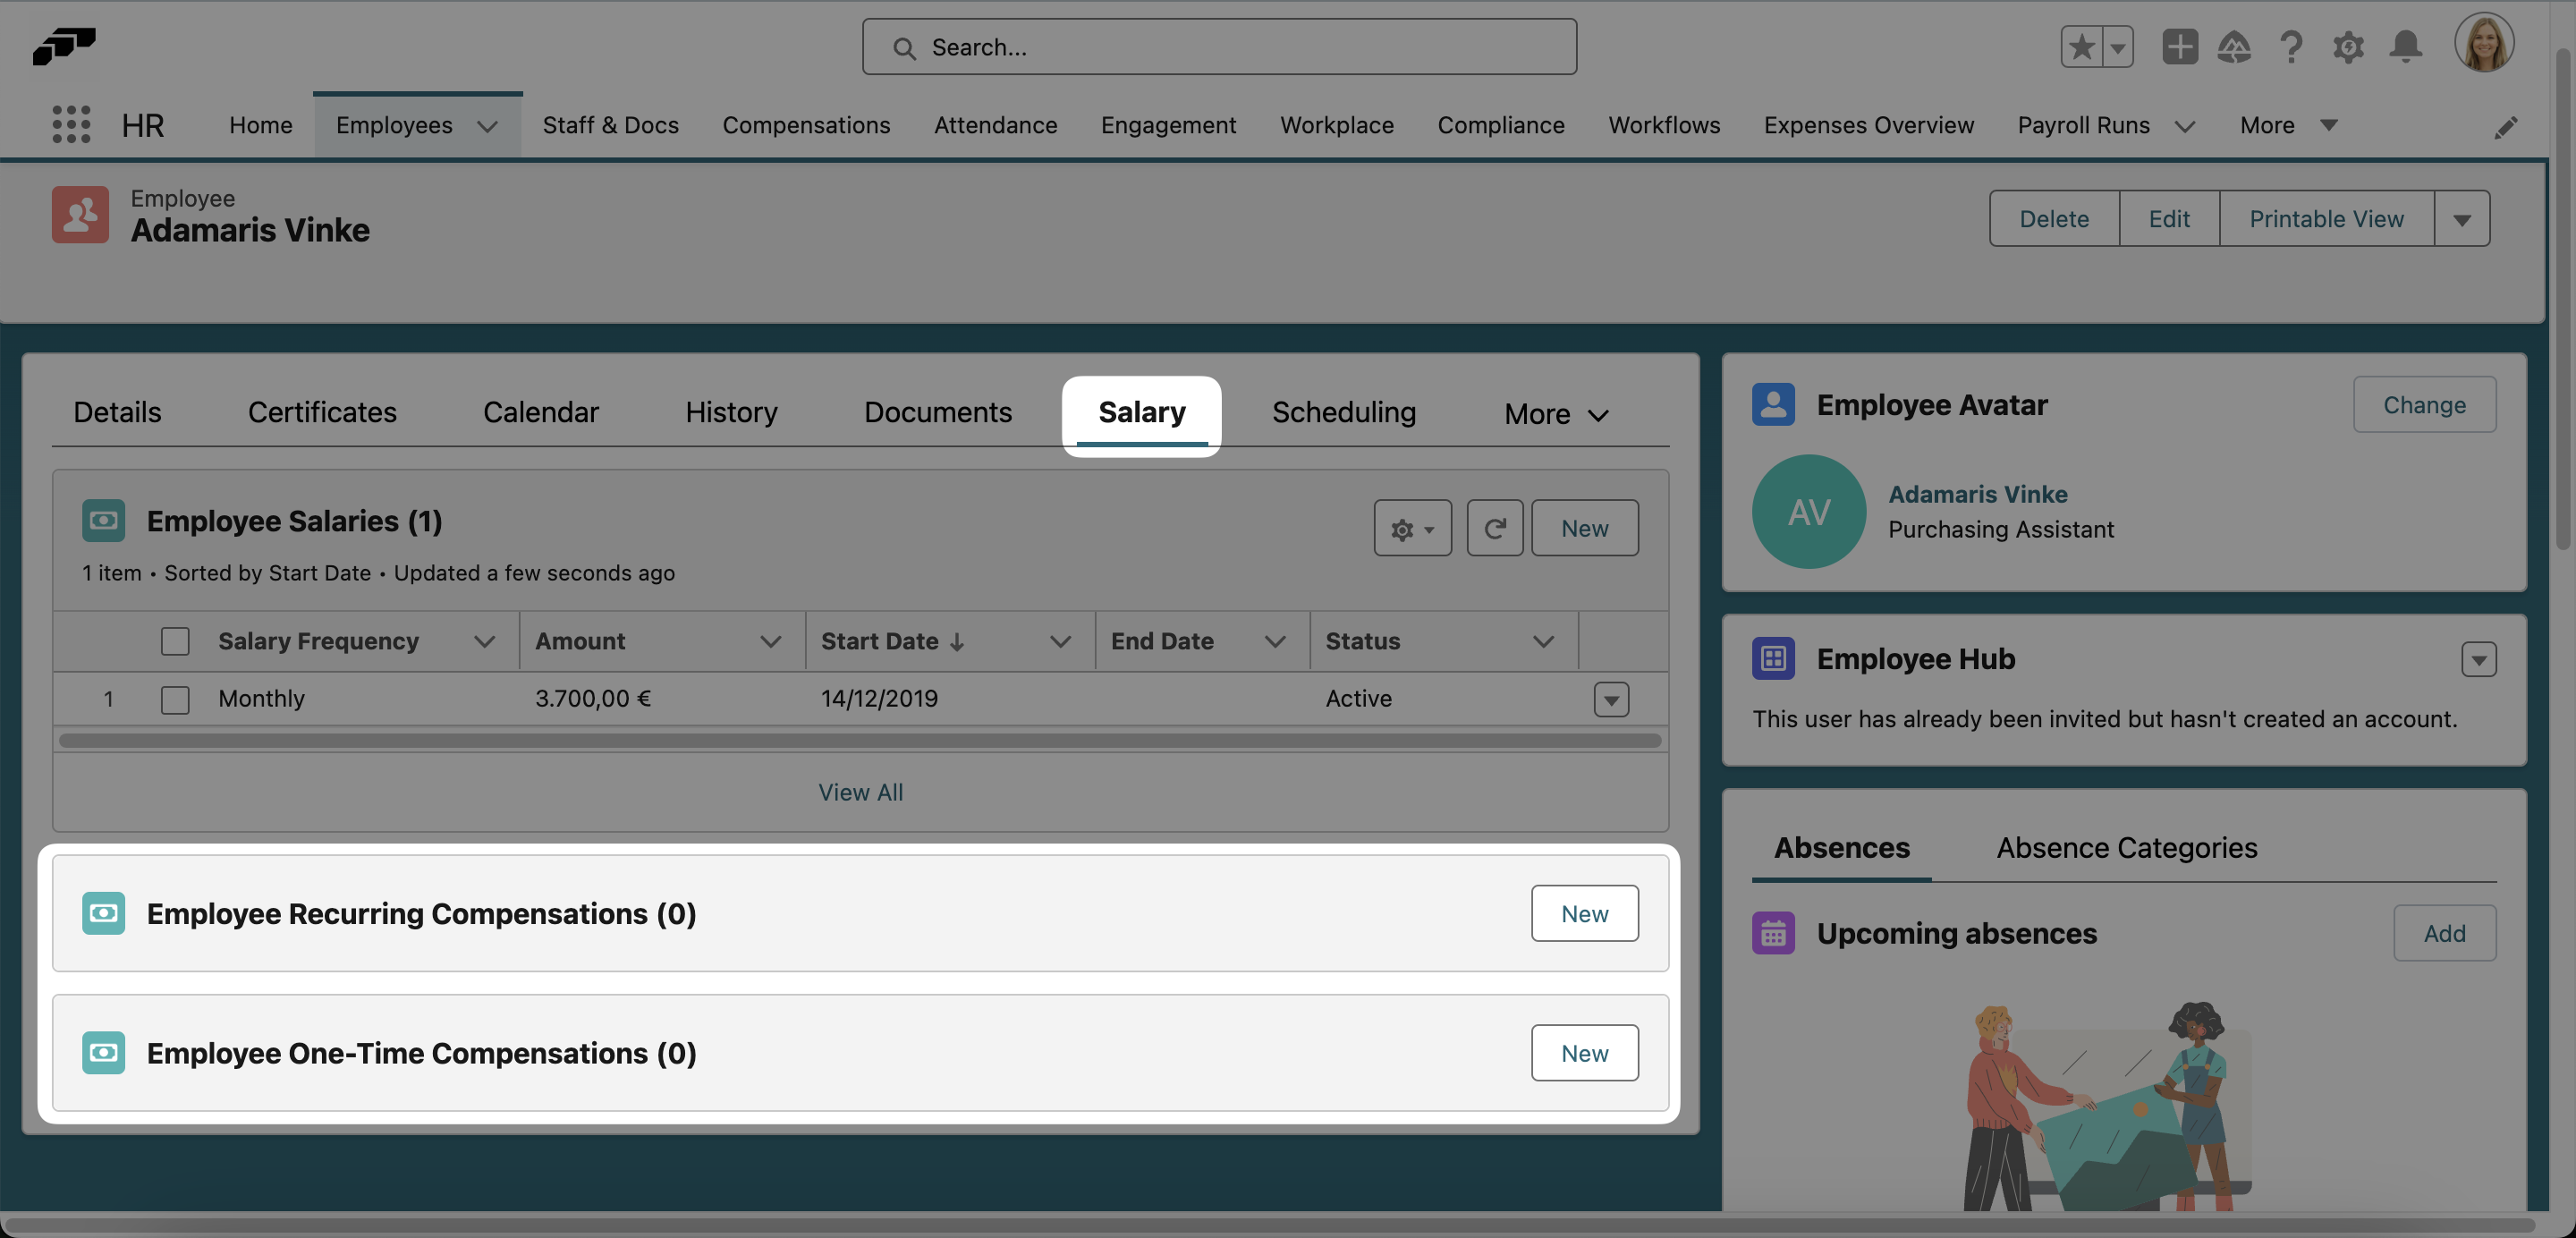
2. Employee One-time Compensation
- Use this for one-time deductions with a specific amount.
- The Payroll Run Line Item will be added automatically to the Payroll Run.
- To set this up, open an employee's page in flair, select the Salary tab, and click New in the Employee One-Time Compensations pane.
- Enter the compensation date and enter a negative amount in the Amount field.
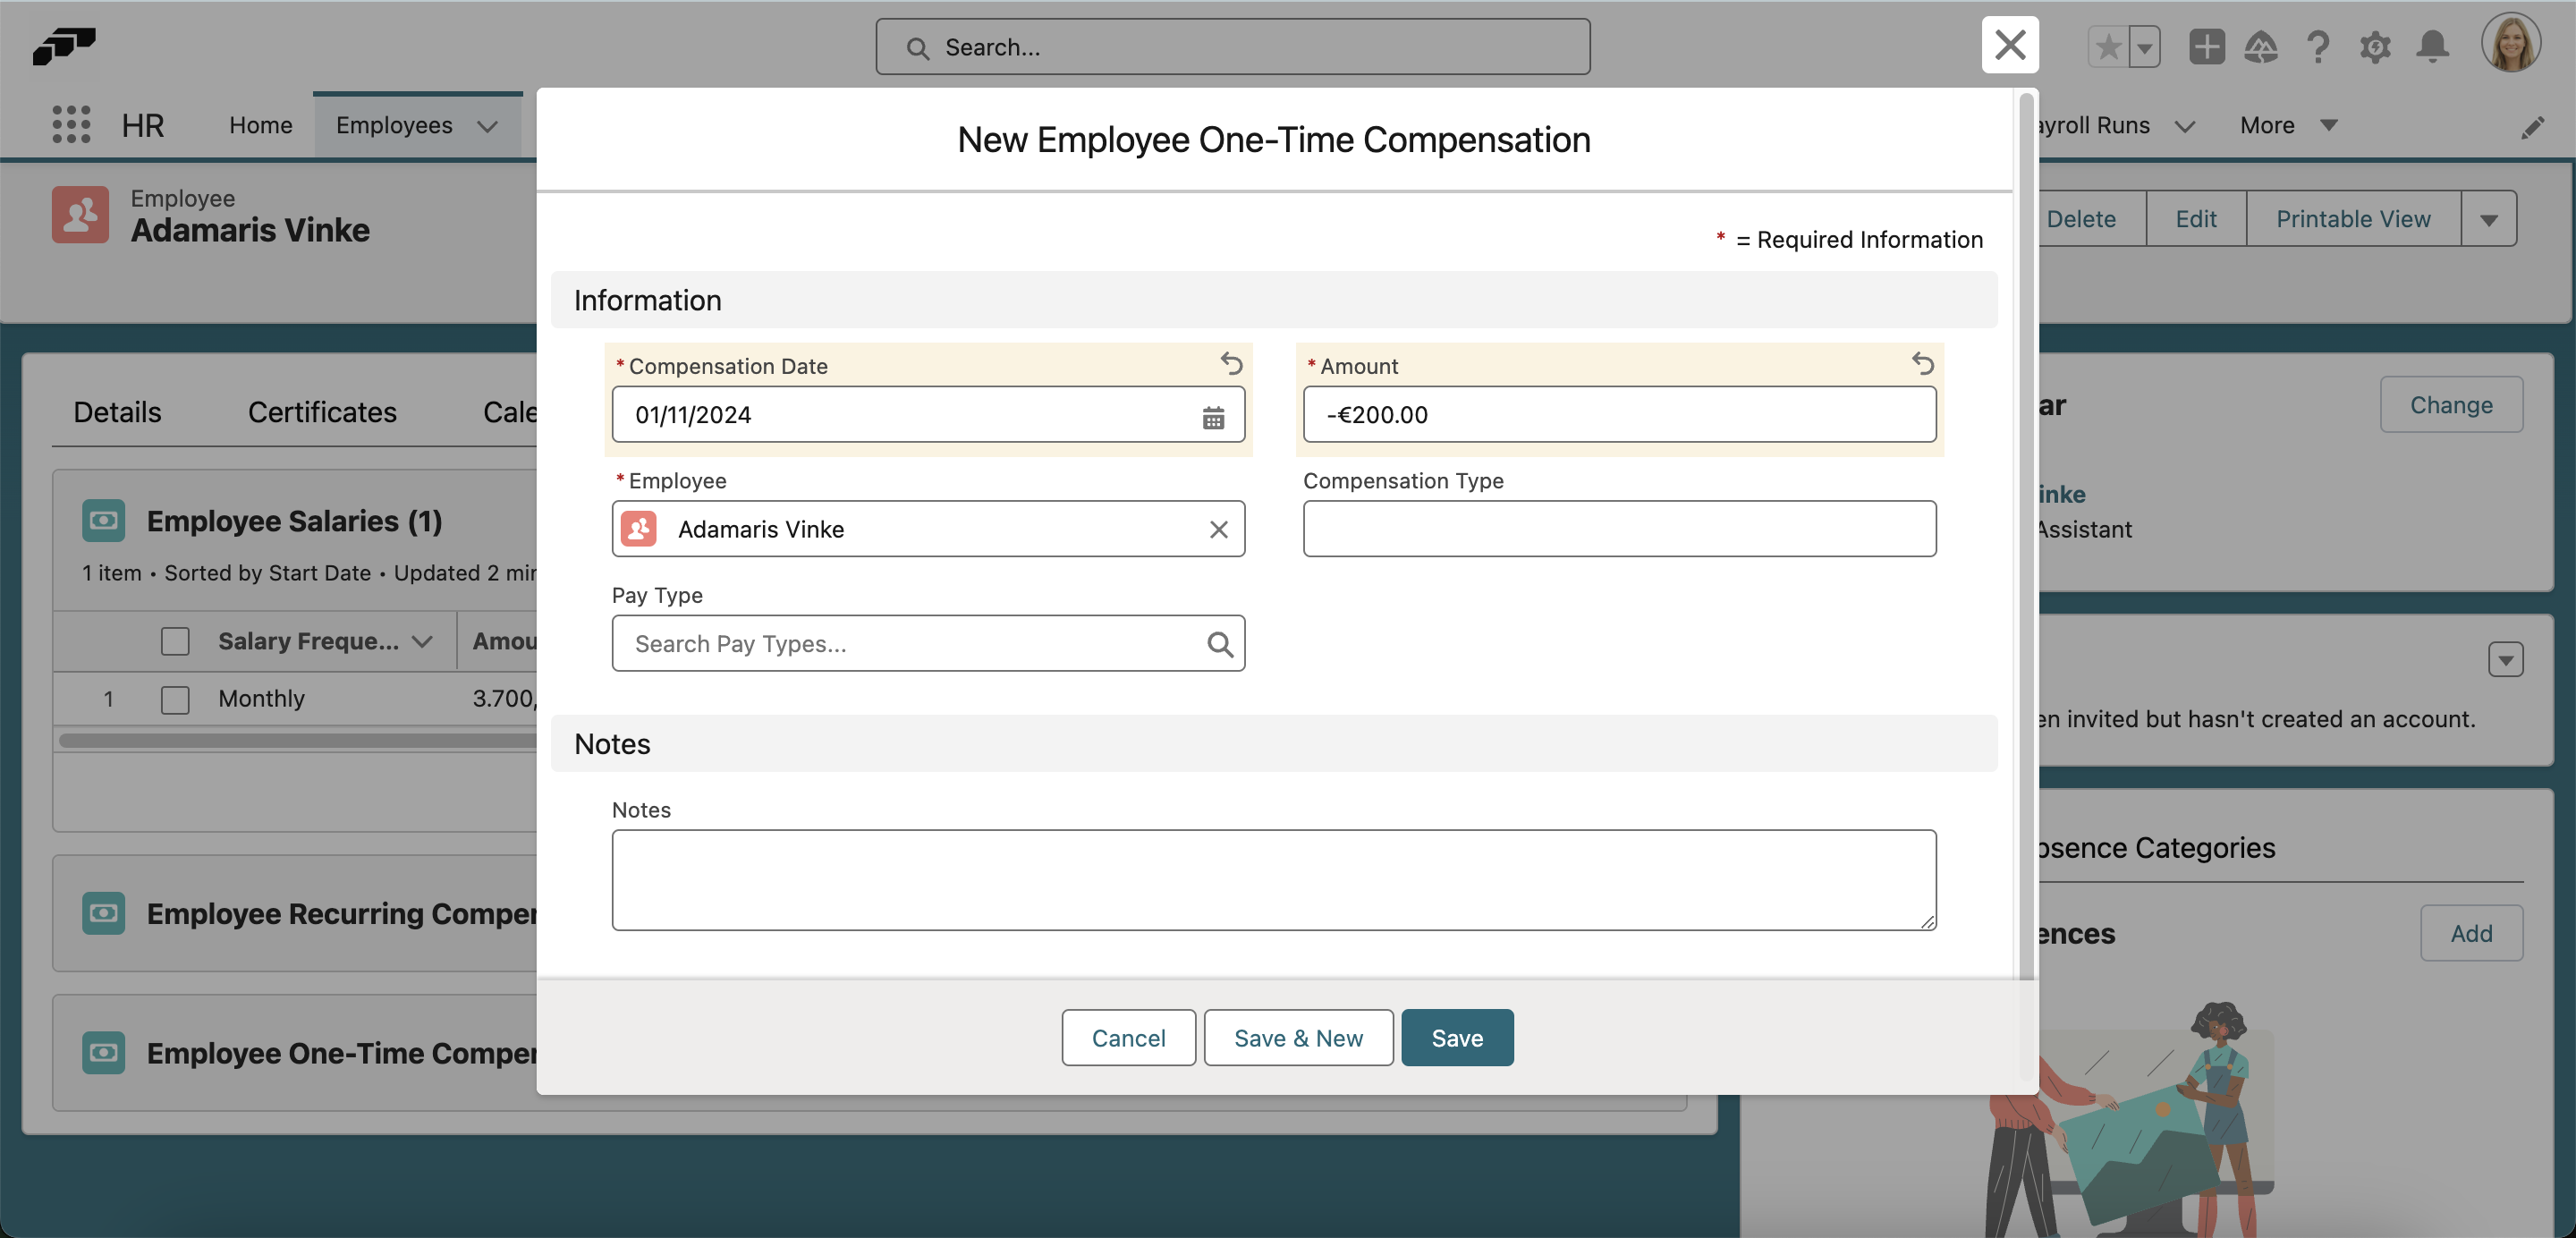
3. Payroll Run Line Item
- These are the individual entries visible in the Payroll Run.
- They are generated from Salary, Employee Recurring Compensation, and Employee One-time Compensation.
- If needed, they can also be manually created, which is useful for importing additional payroll data from external systems (e.g., tax calculations).
- To manually add a deduction to your payroll run:
- Click on an employee's name within the payroll run and select Add New Compensation in the pane that opens on the right.
- Enter a name for the deduction in the Other Compensations field. For deductions, enter a negative amount in the Amount field. Entering a positive amount will add a one-time compensation, such as a bonus, to the payroll run.
- Click Save and the deduction will show up in the Deductions column. The Total Net column will be updated to reflect this deduction.
4. Compensation Rules (Optional)
- These rules allow for dynamic calculations within Salesforce based on predefined conditions.
- If the deduction amount varies each month and is calculated automatically, Compensation Rules might be a suitable solution.
- For more details, refer to Compensation Rules.
Best Practice for Importing Deductions
If the deduction is a fixed recurring amount, the best approach is to use Employee Recurring Compensation, as it simplifies the process and ensures automatic inclusion in the payroll.
Adding Deductions via API
Another way to add deductions is via an API with your payroll system. To do this, change the status of the payroll run to Submitted, which will then lock the data so you can export it. You will also need to assign a custom permission to the integration user that is using the API integration. This will allow the external payroll system to push data to the payroll run, even when it is in a locked state such as Submitted.
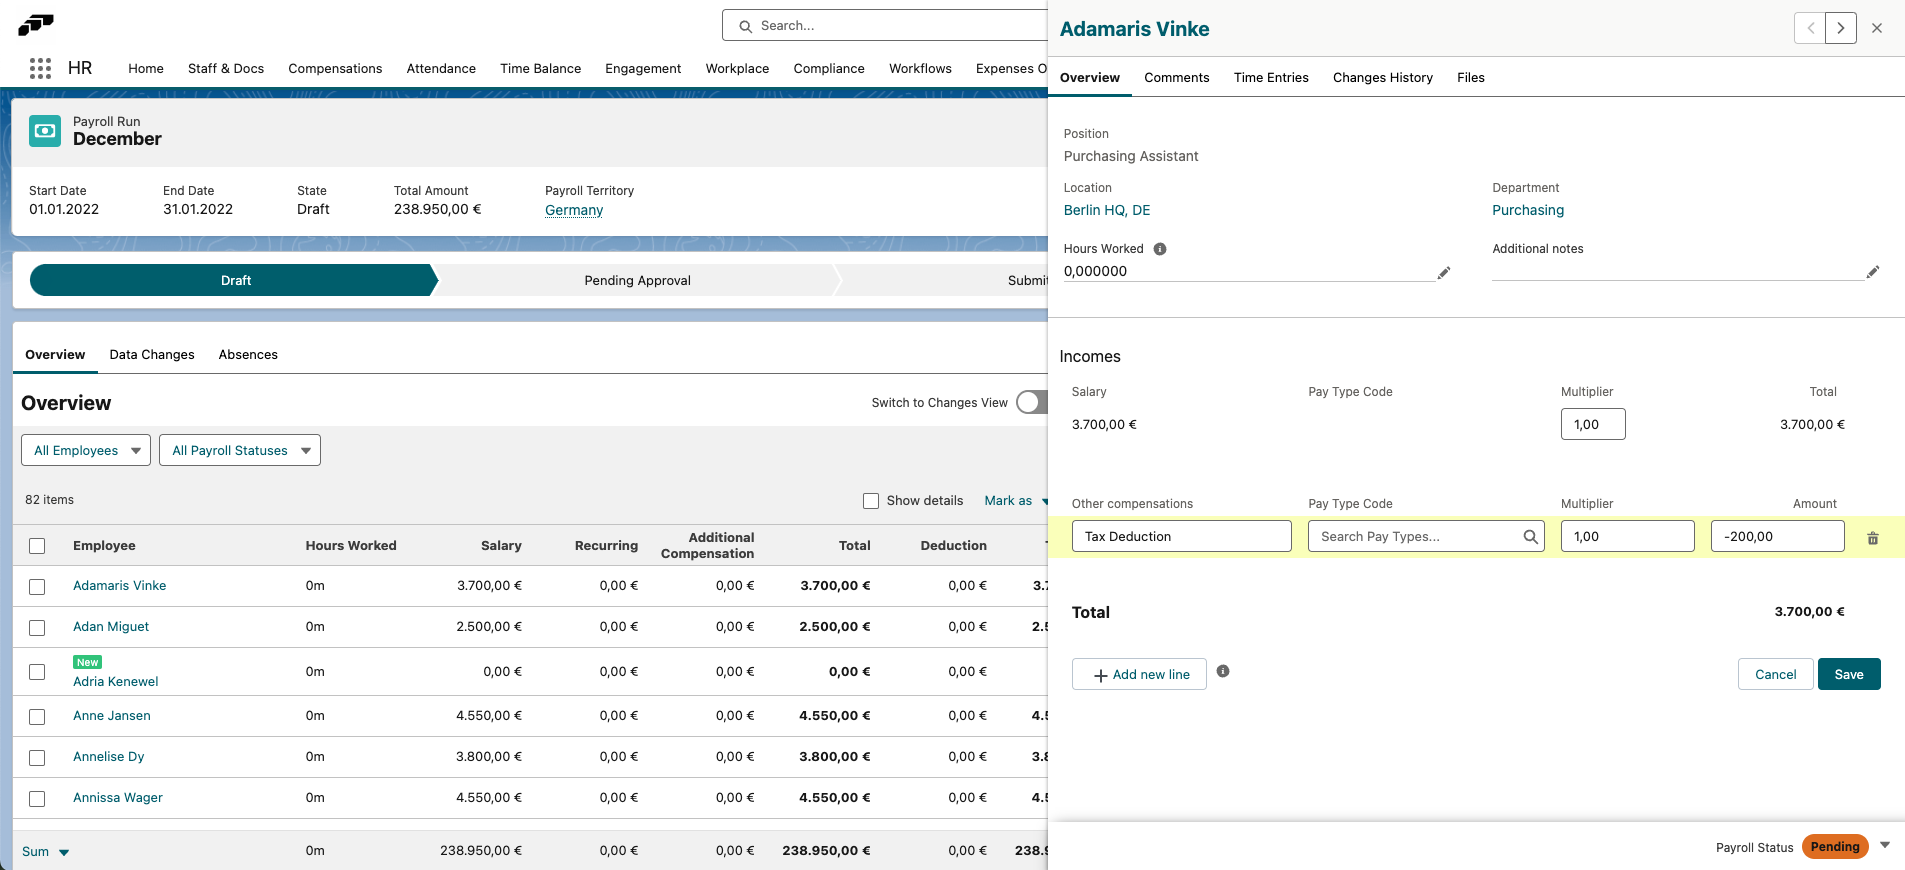
Previously, negative amounts were subtracted directly before being added to the payroll run. For example, if you had an employee with a €100 one-time compensation and a -€50 one-time compensation, only €50 was added to the Total column in the payroll run.
Now, negative amounts are added to the Deductions column in the payroll run. This means the Total column reflects the total compensation before deductions and the Total Net column shows the total after deductions.
We are planning to introduce a new feature specifically for handling deductions. For now, treating negative compensation as a deduction serves as a temporary but effective workaround.
The Submitted payroll run stage may not appear for all customers. If the status bar in your payroll run does not include Submitted and you wish to add deductions via API, follow the steps below.
Adding Stages to Payroll Runs
If you want to add another payroll run stage, such as Submitted, you can do so in a few easy steps.
- Click the Gear icon in the top-right corner of the screen and open Setup.
- In the new window, use Quick Find in the left side panel to search for Object Manager.
- Use Quick Find in the top navigation bar to find the Payroll Run object.
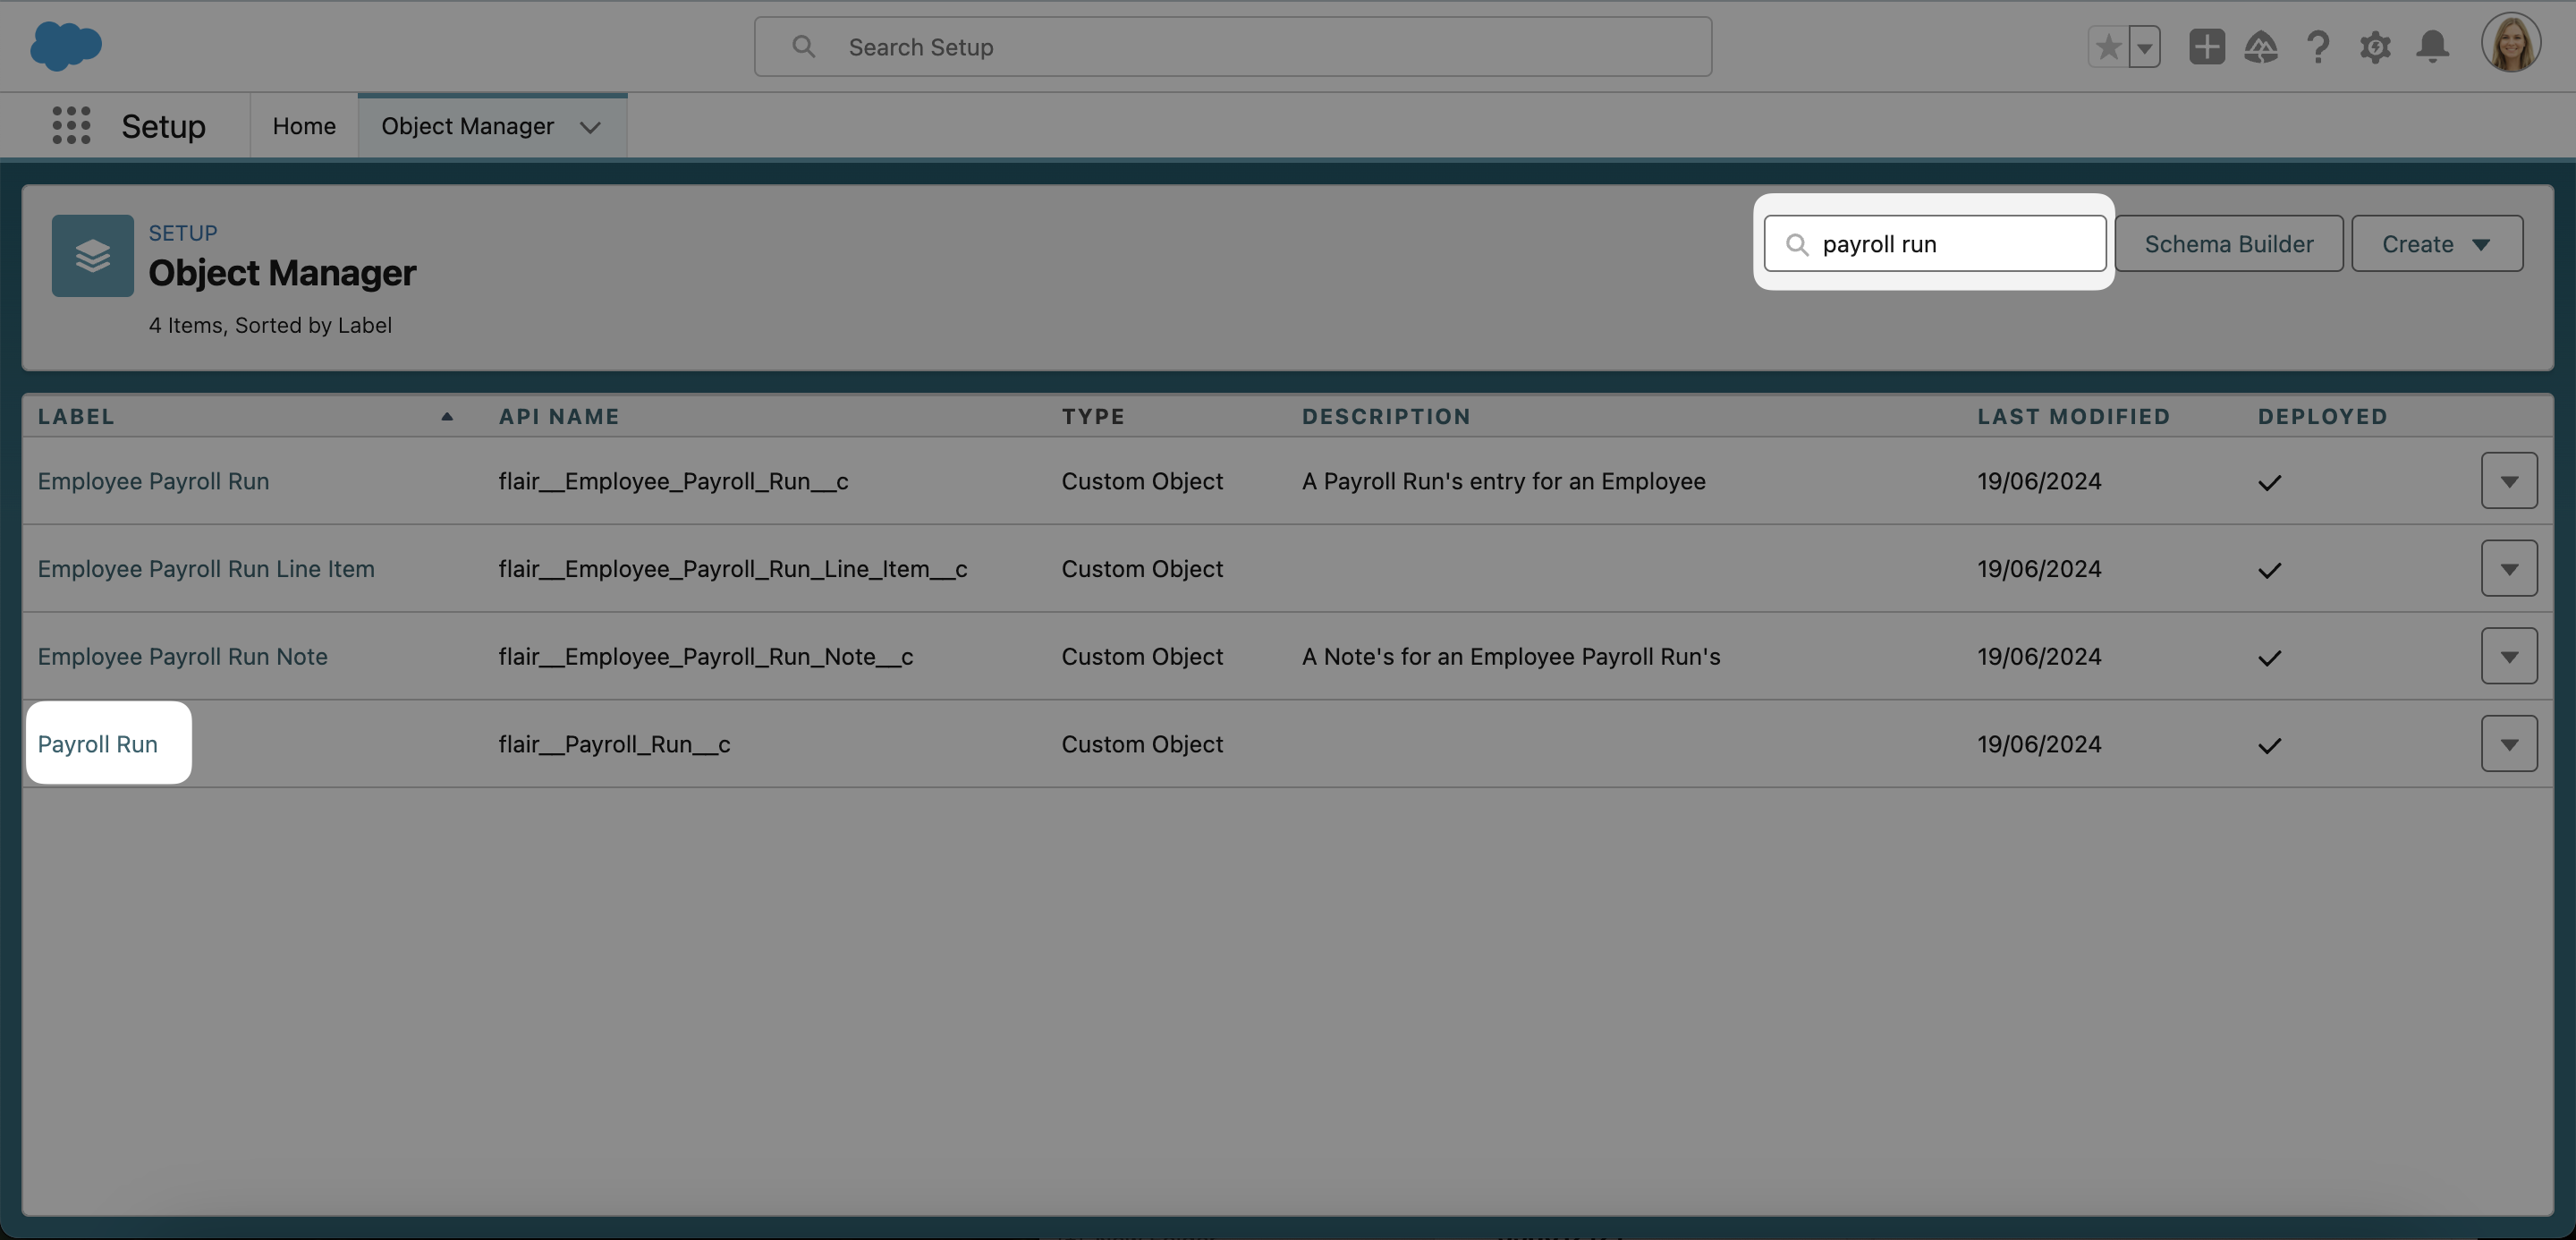
- Select Fields & Relationships in the left side panel, then scroll down and click on State.
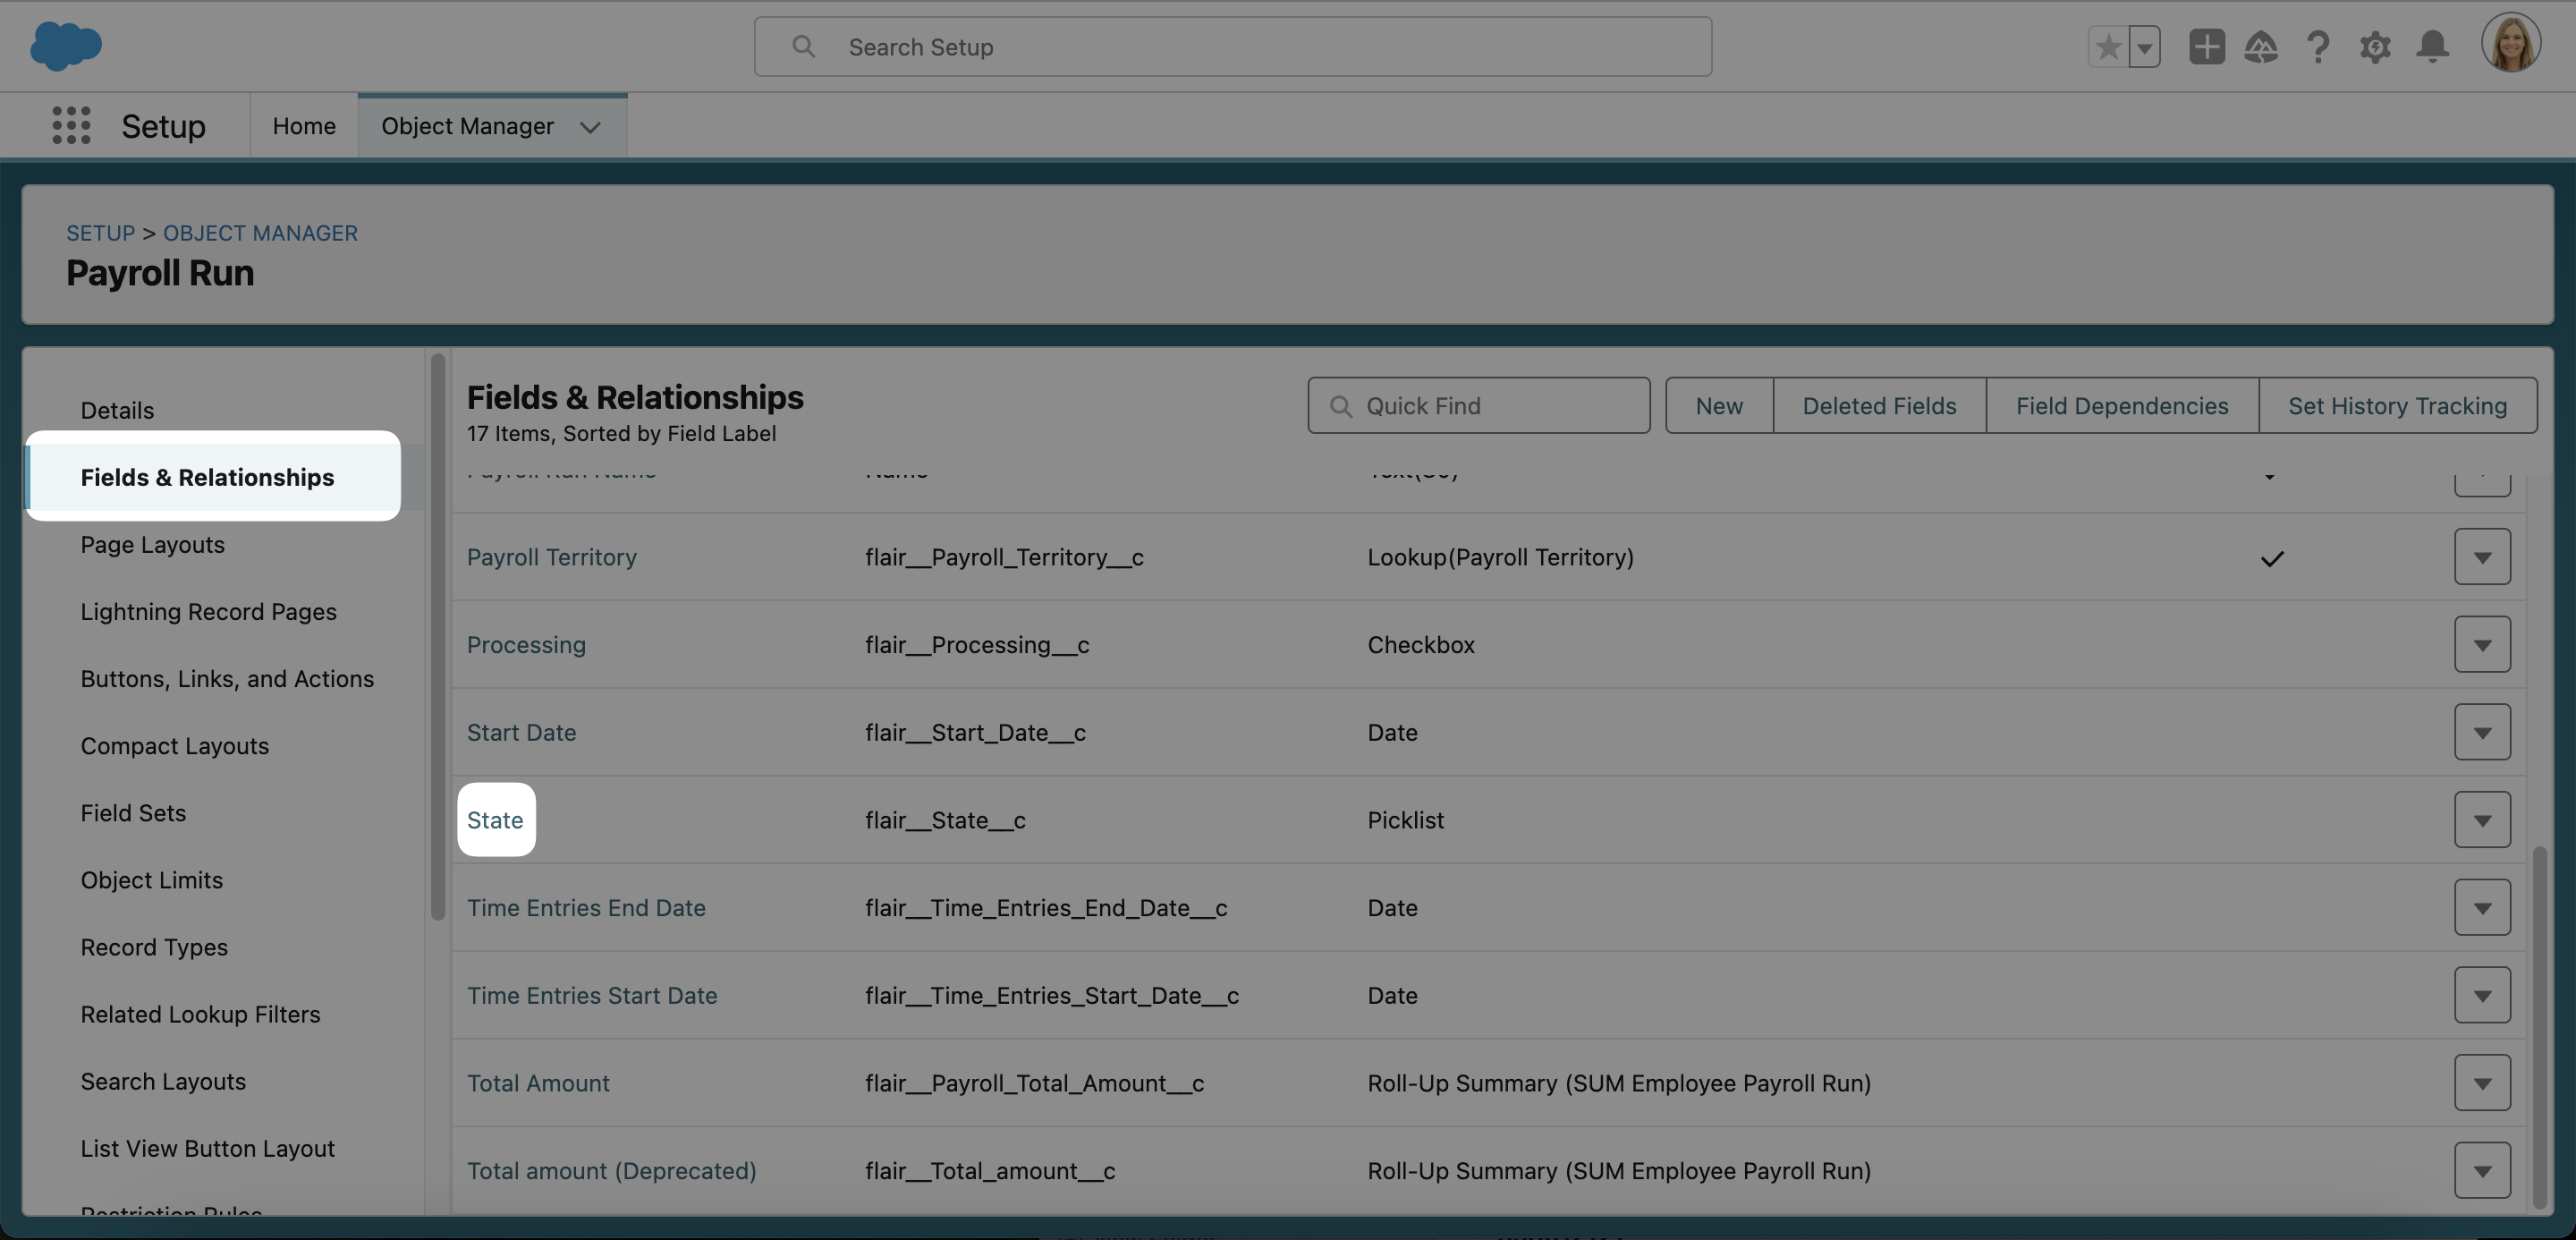
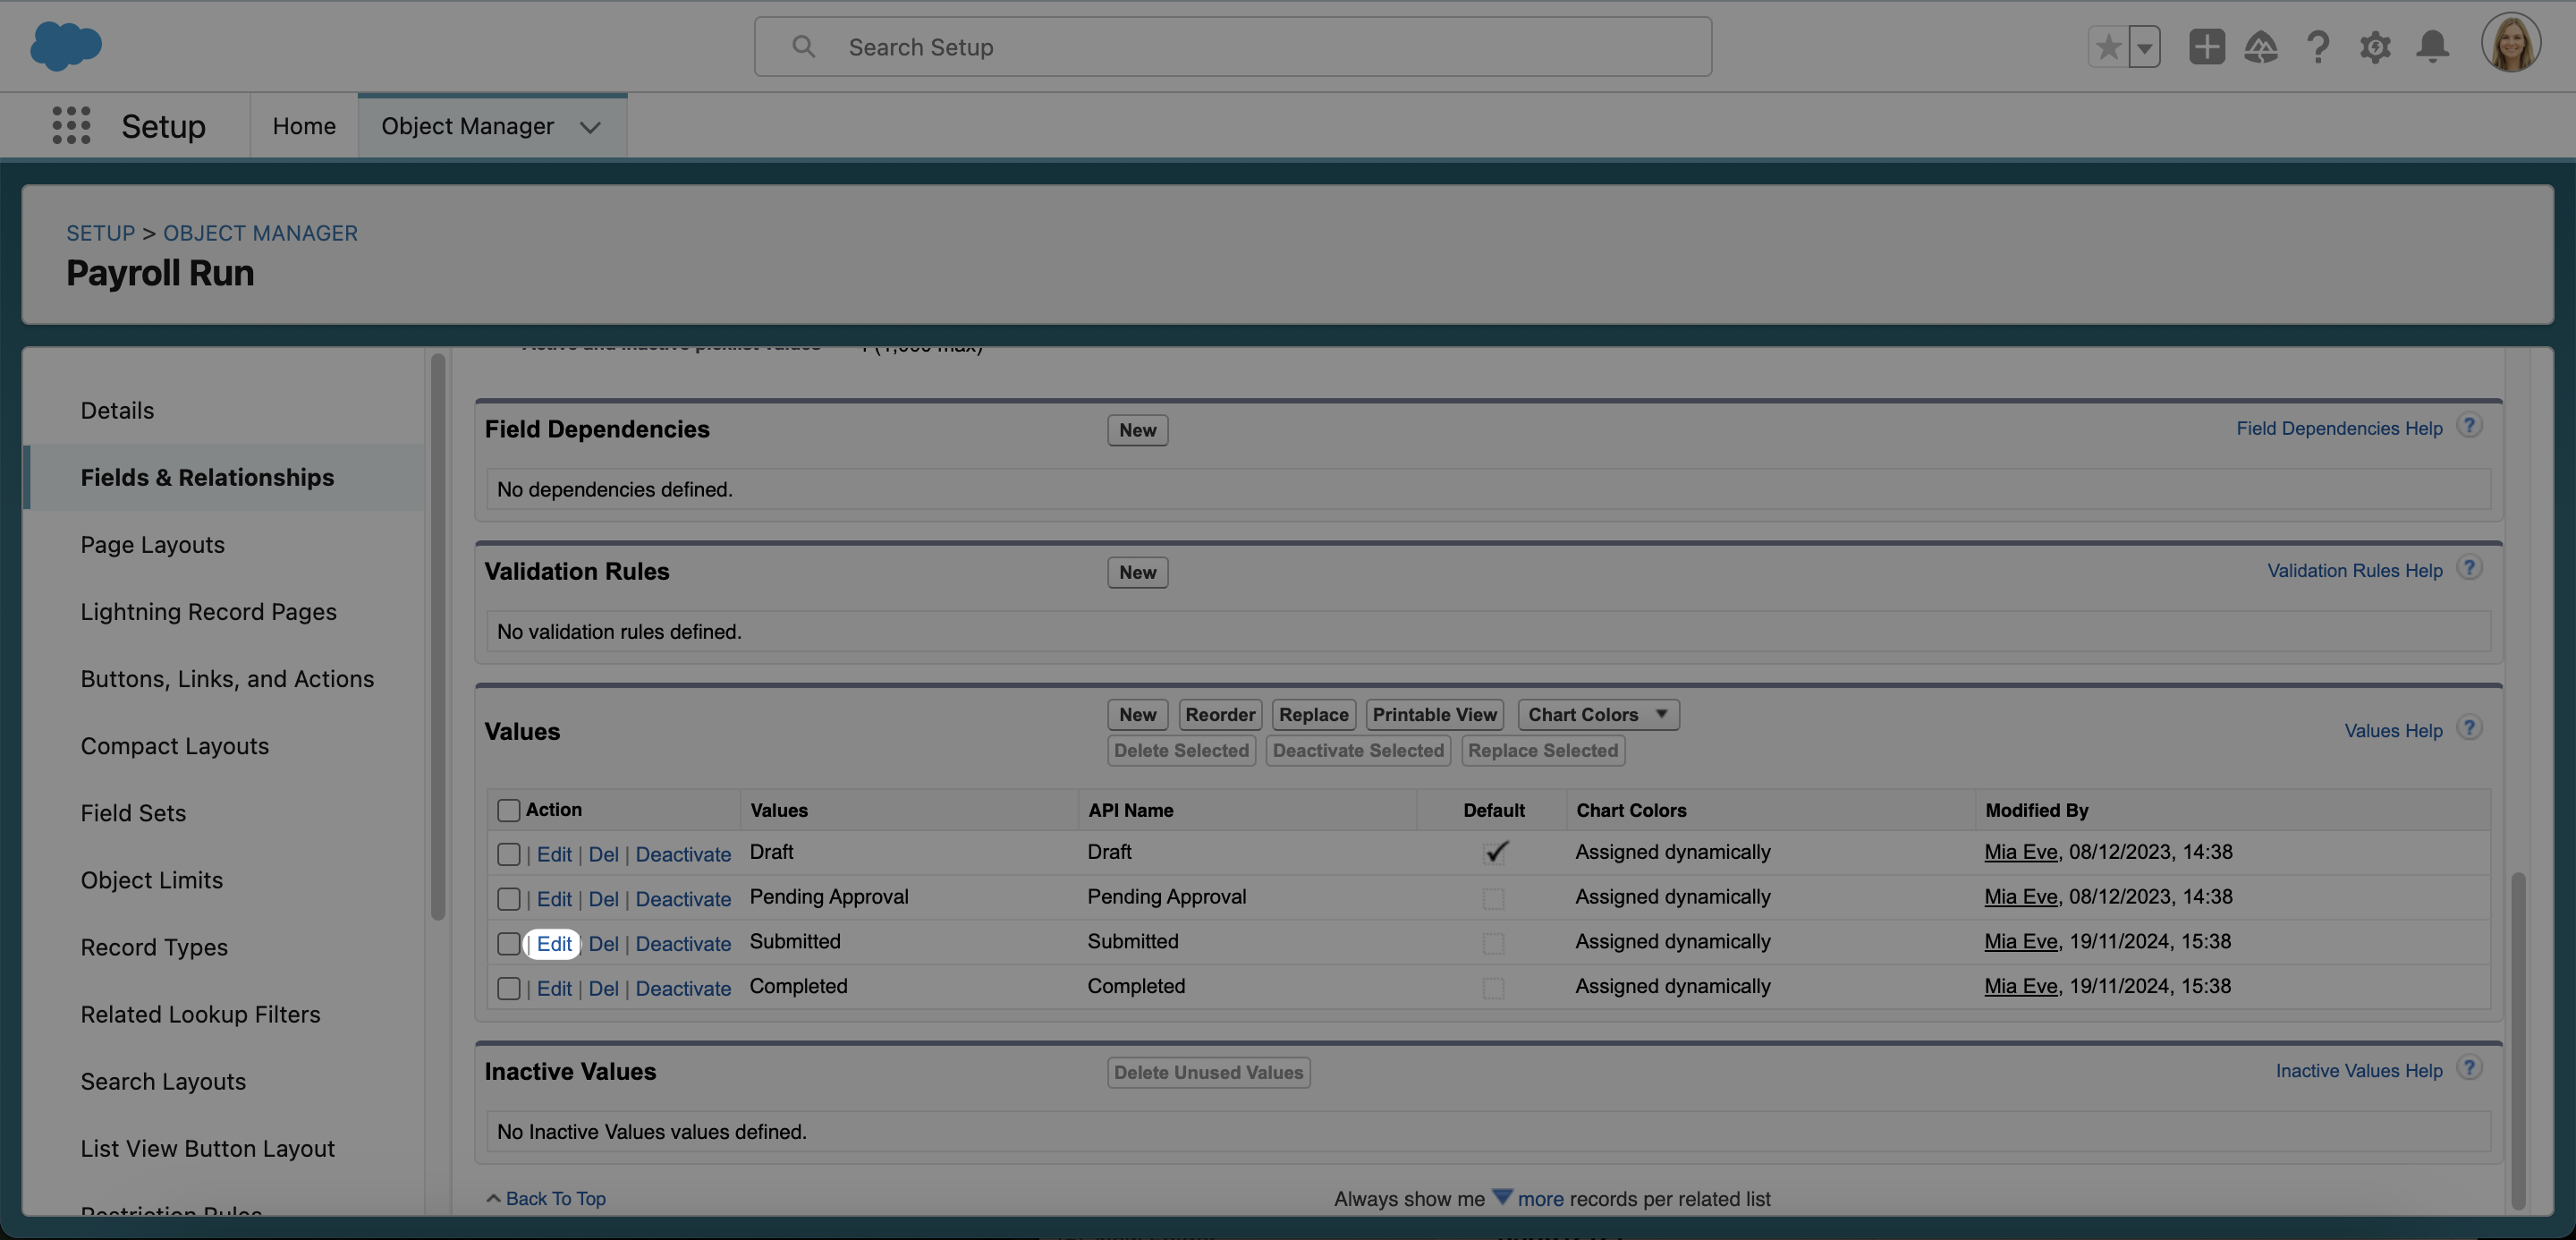
- Scroll down to Values and click New.
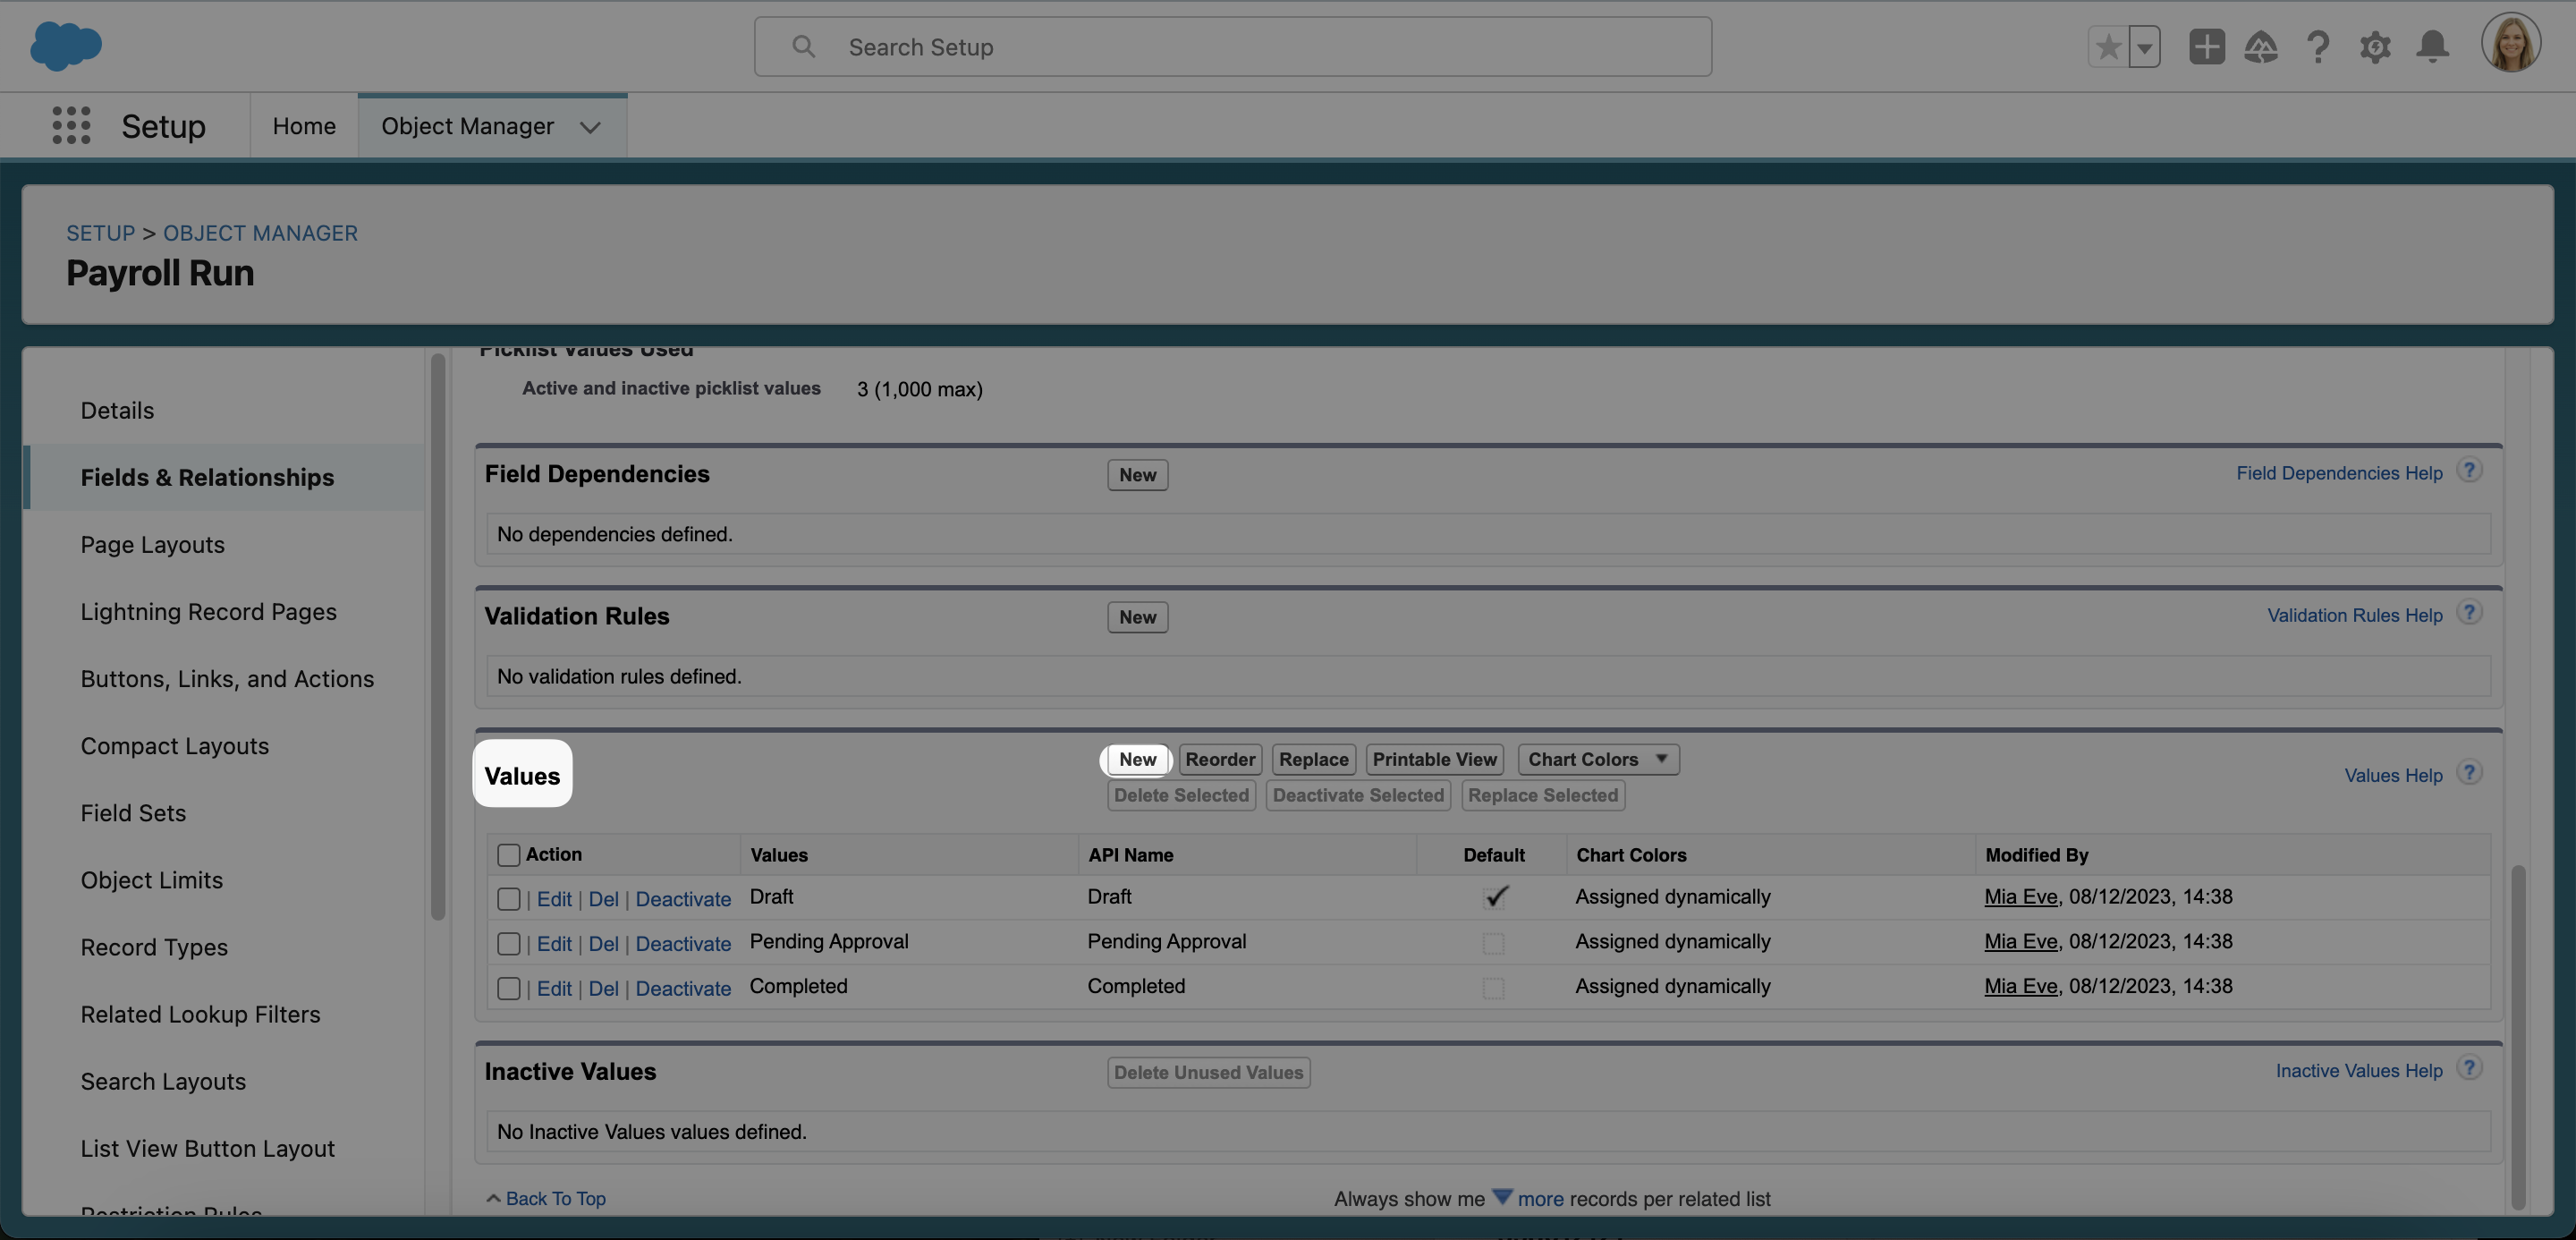
- Enter the name of your new State in the text box, then click Save.
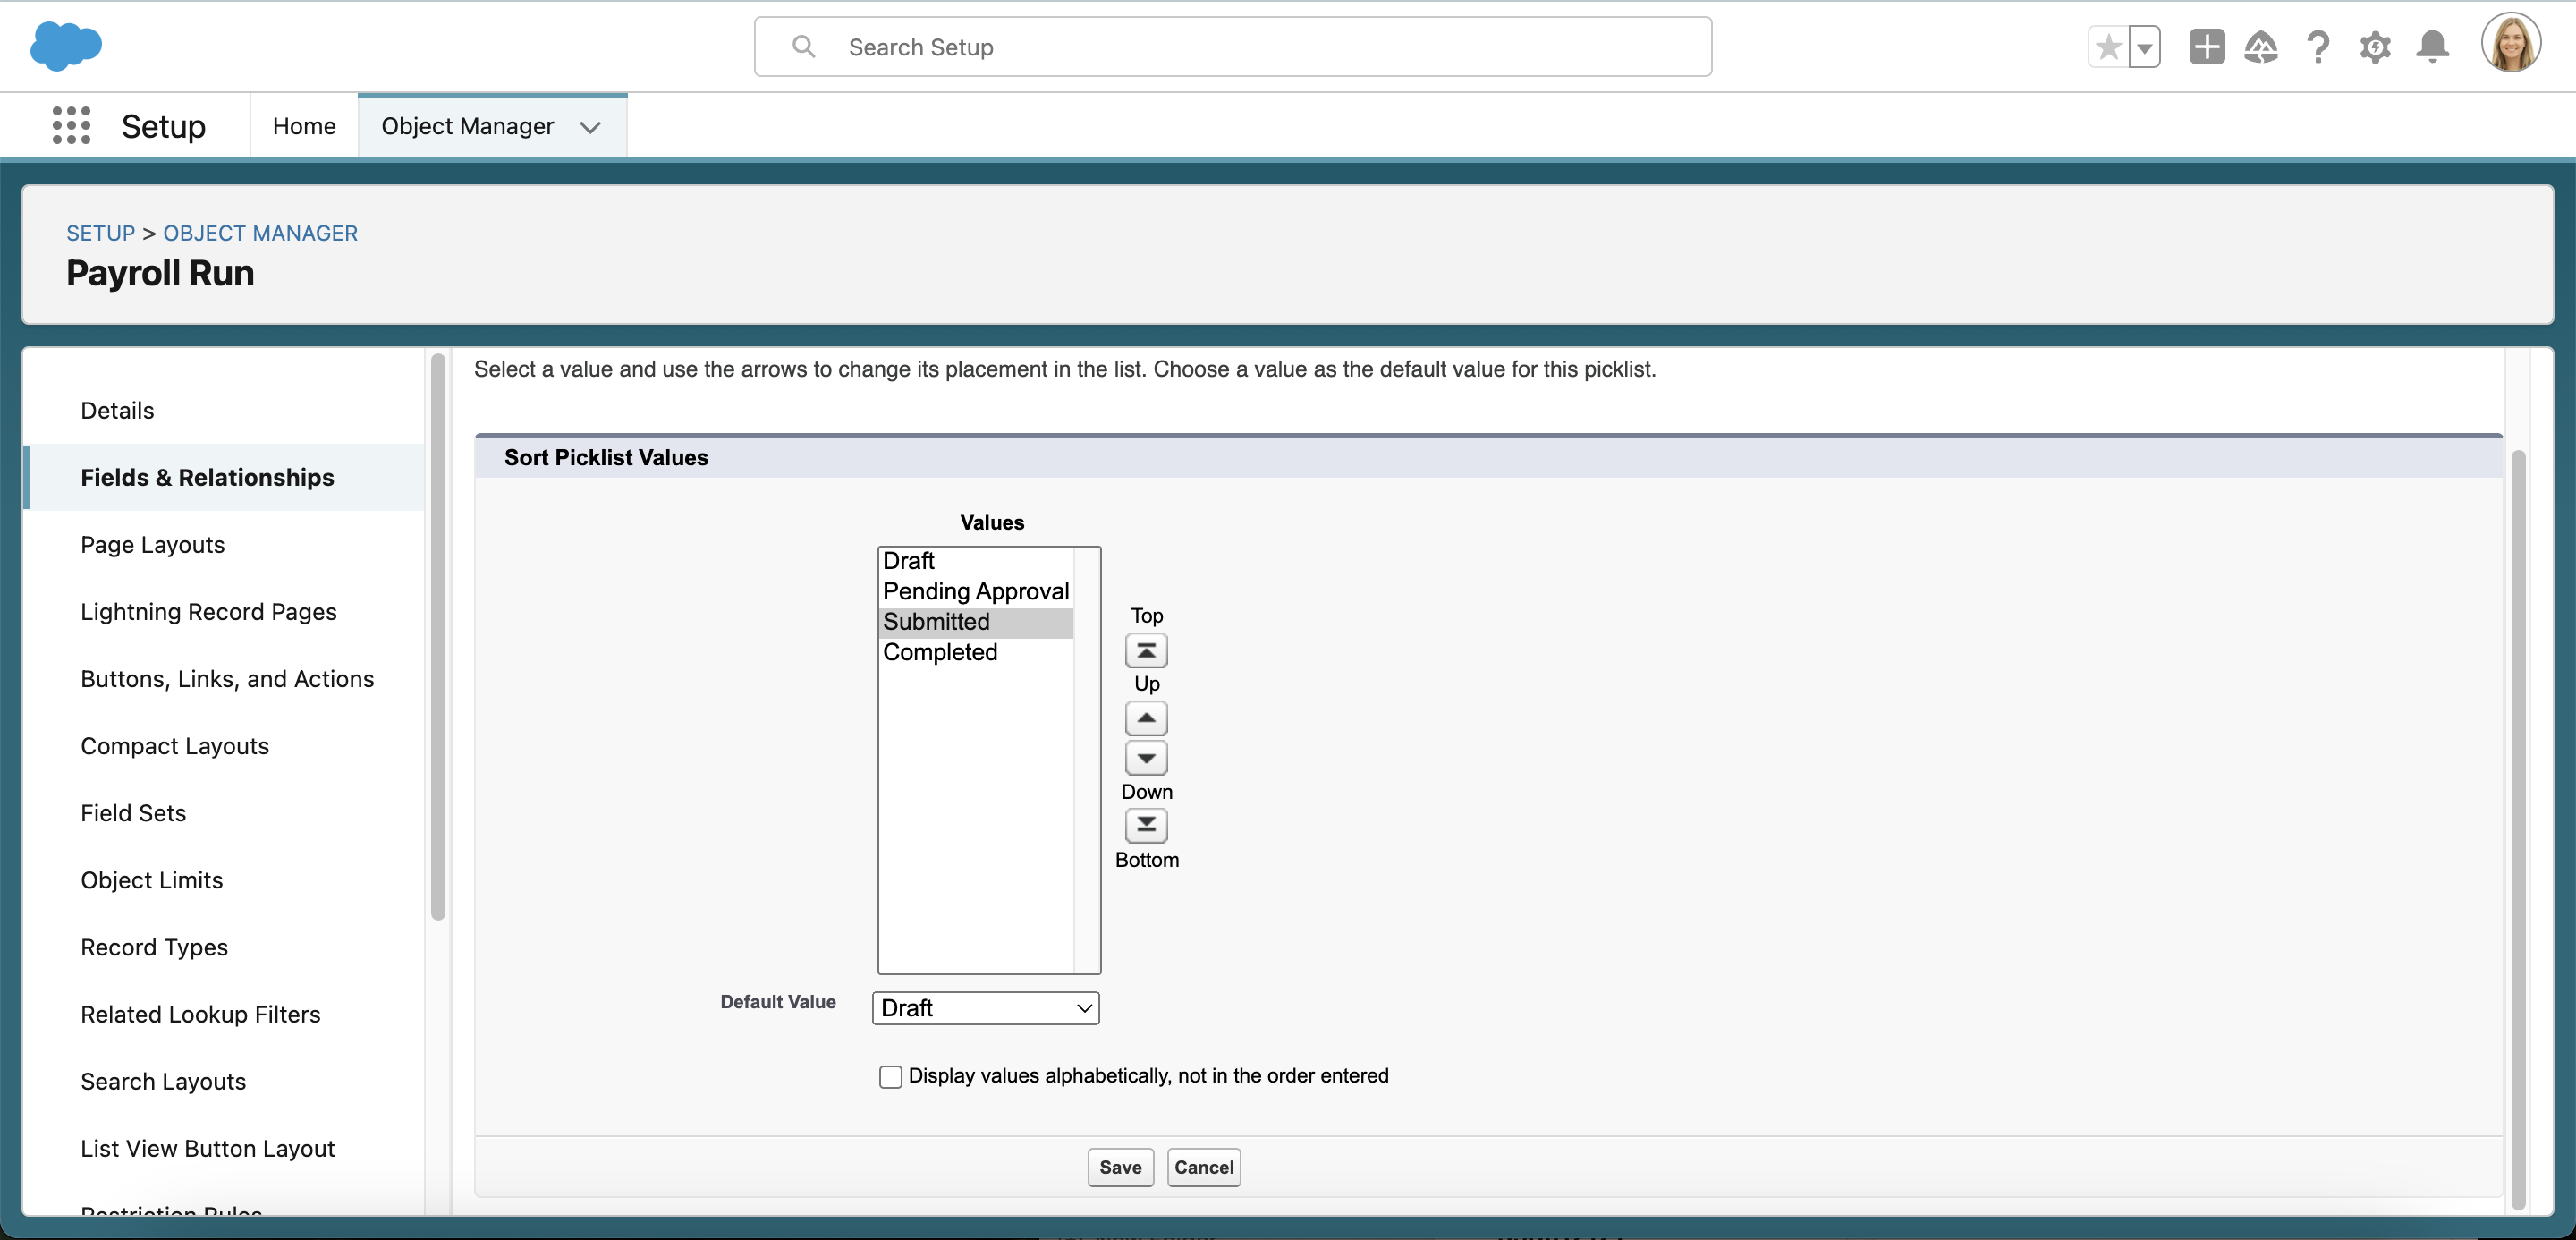
- If you need to change the order of your States, click the Reorder button. Then use the Up, Down, Top, and Bottom buttons to rearrange the States. In this example, we have move the new state Submitted up one position so that it comes before Completed.
- If your new State should lock the payroll run data, preventing any changes, click on Edit.
- Now add _locked to the end of the API Name and click Save.
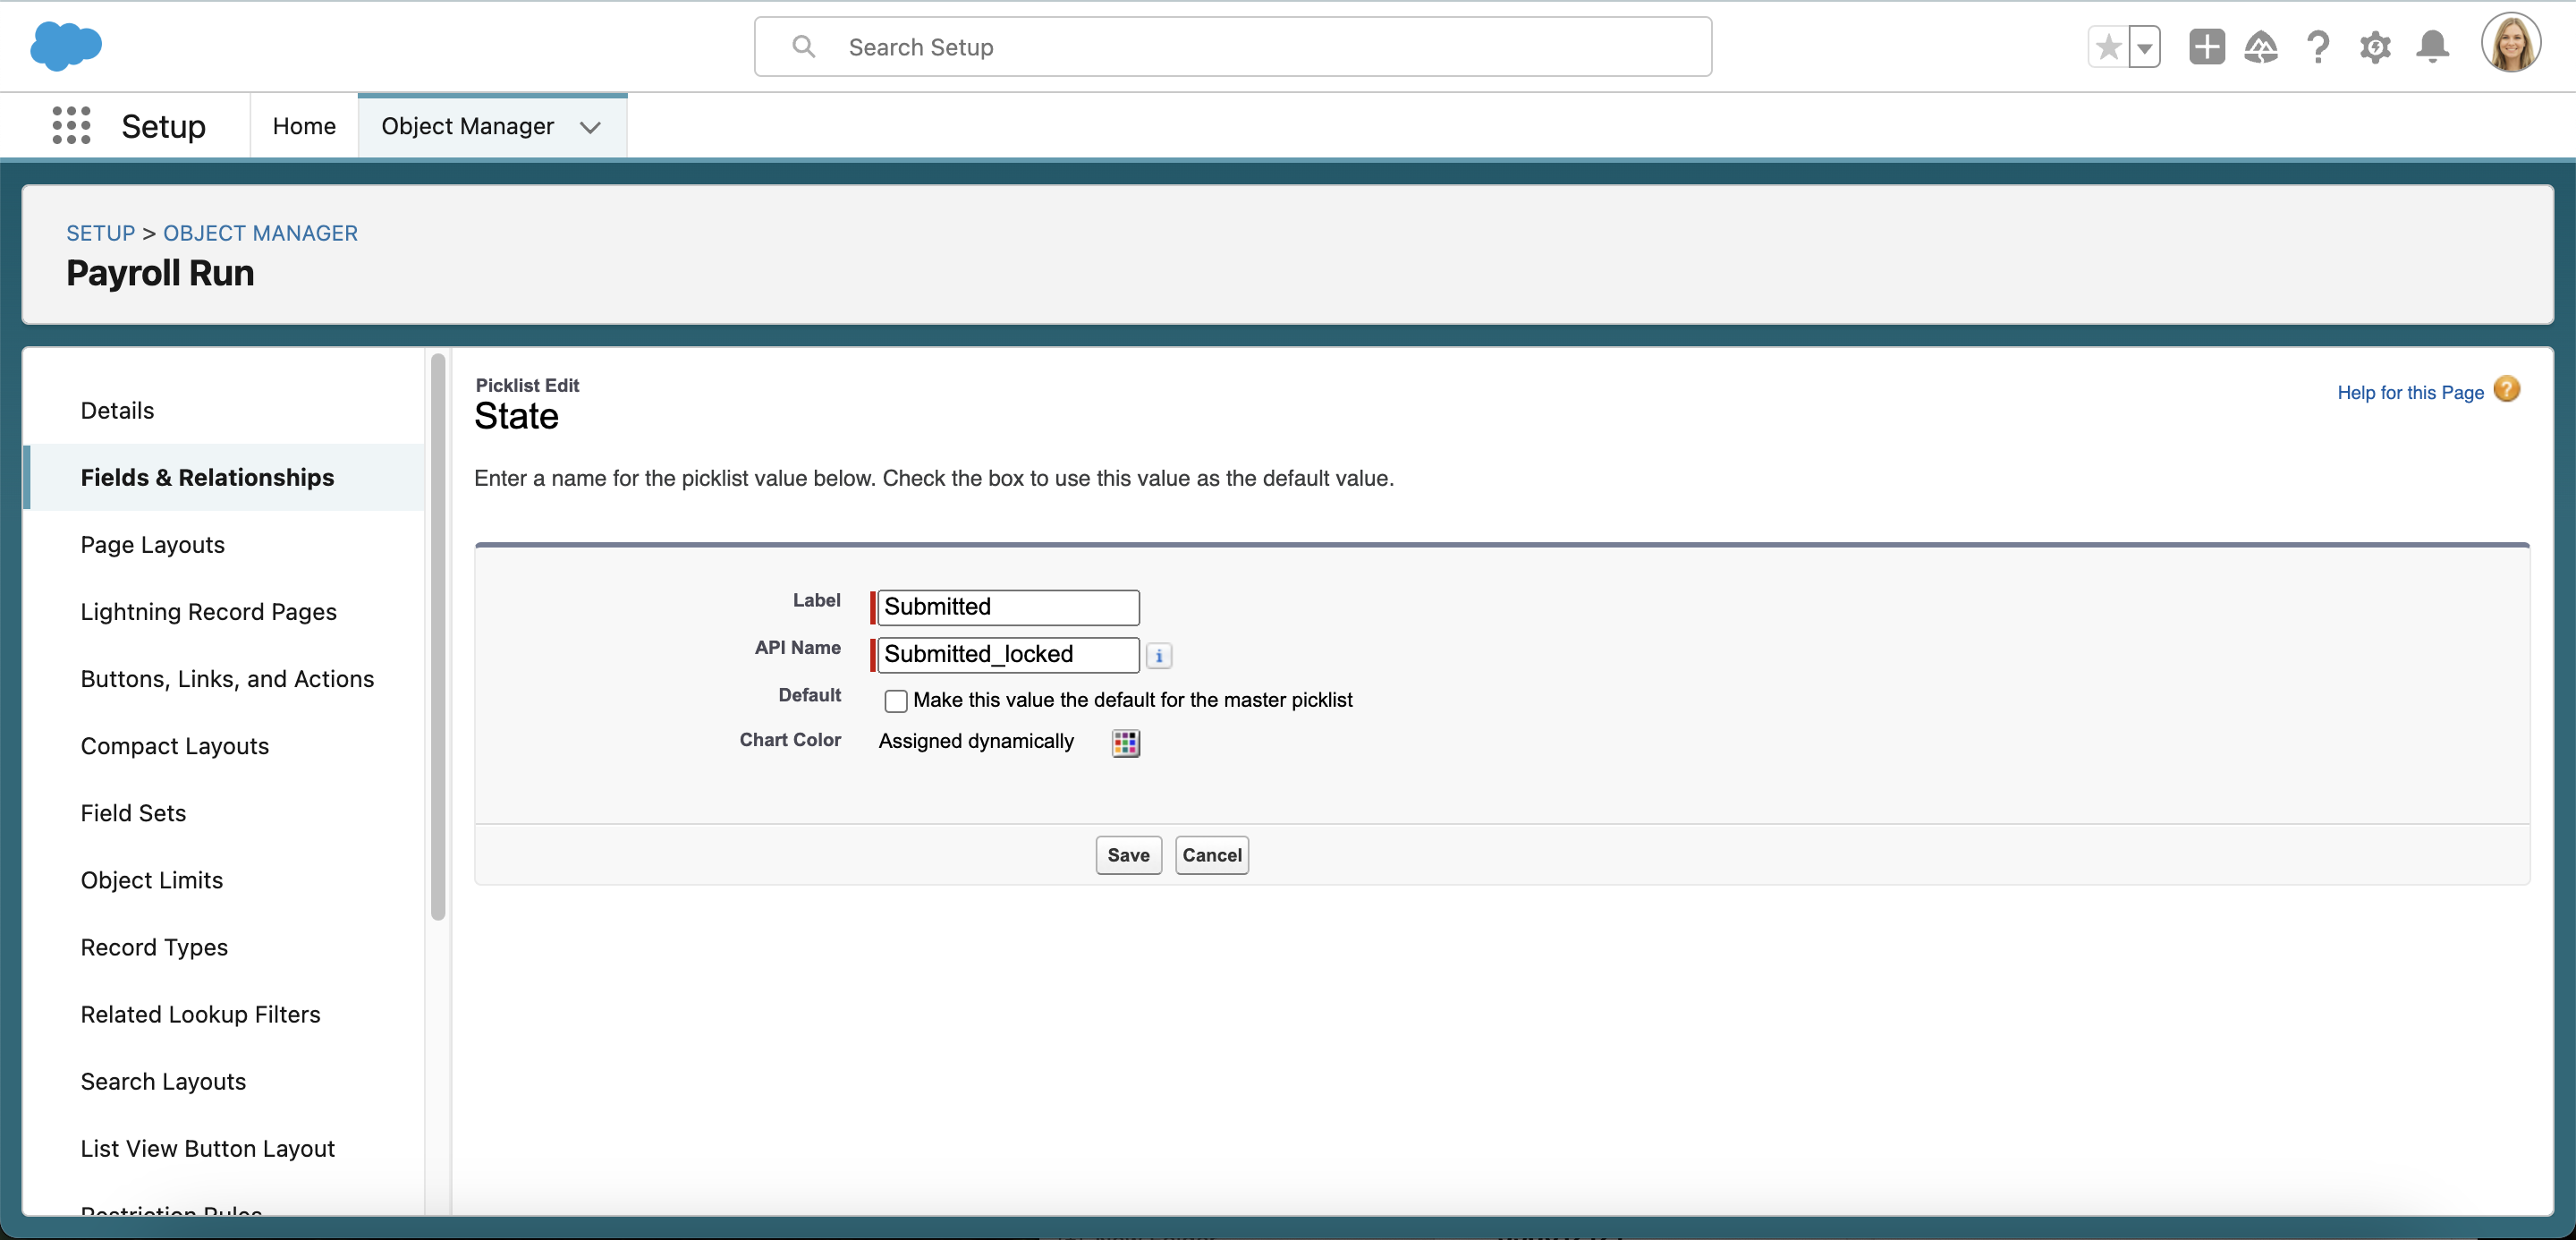
If you want to add deductions via API, we recommend adding a new state named Submitted and making it locked.
The Completed state is locked by default and you do not need to change the API name.
How To Reverse Payroll Run Status to Pending Approval
Let's take a look at how to change the payroll status from Completed to Pending Approval in situations where it is necessary to reverse the status change.
Method 1: Using Salesforce Inspector
- Go to the relevant Payroll Run on the flair HR app on Salesforce.
- Download the Salesforce Inspector tool as a Chrome Extension.
- Click on the option to Show All Data using the Salesforce Inspector extension menu.
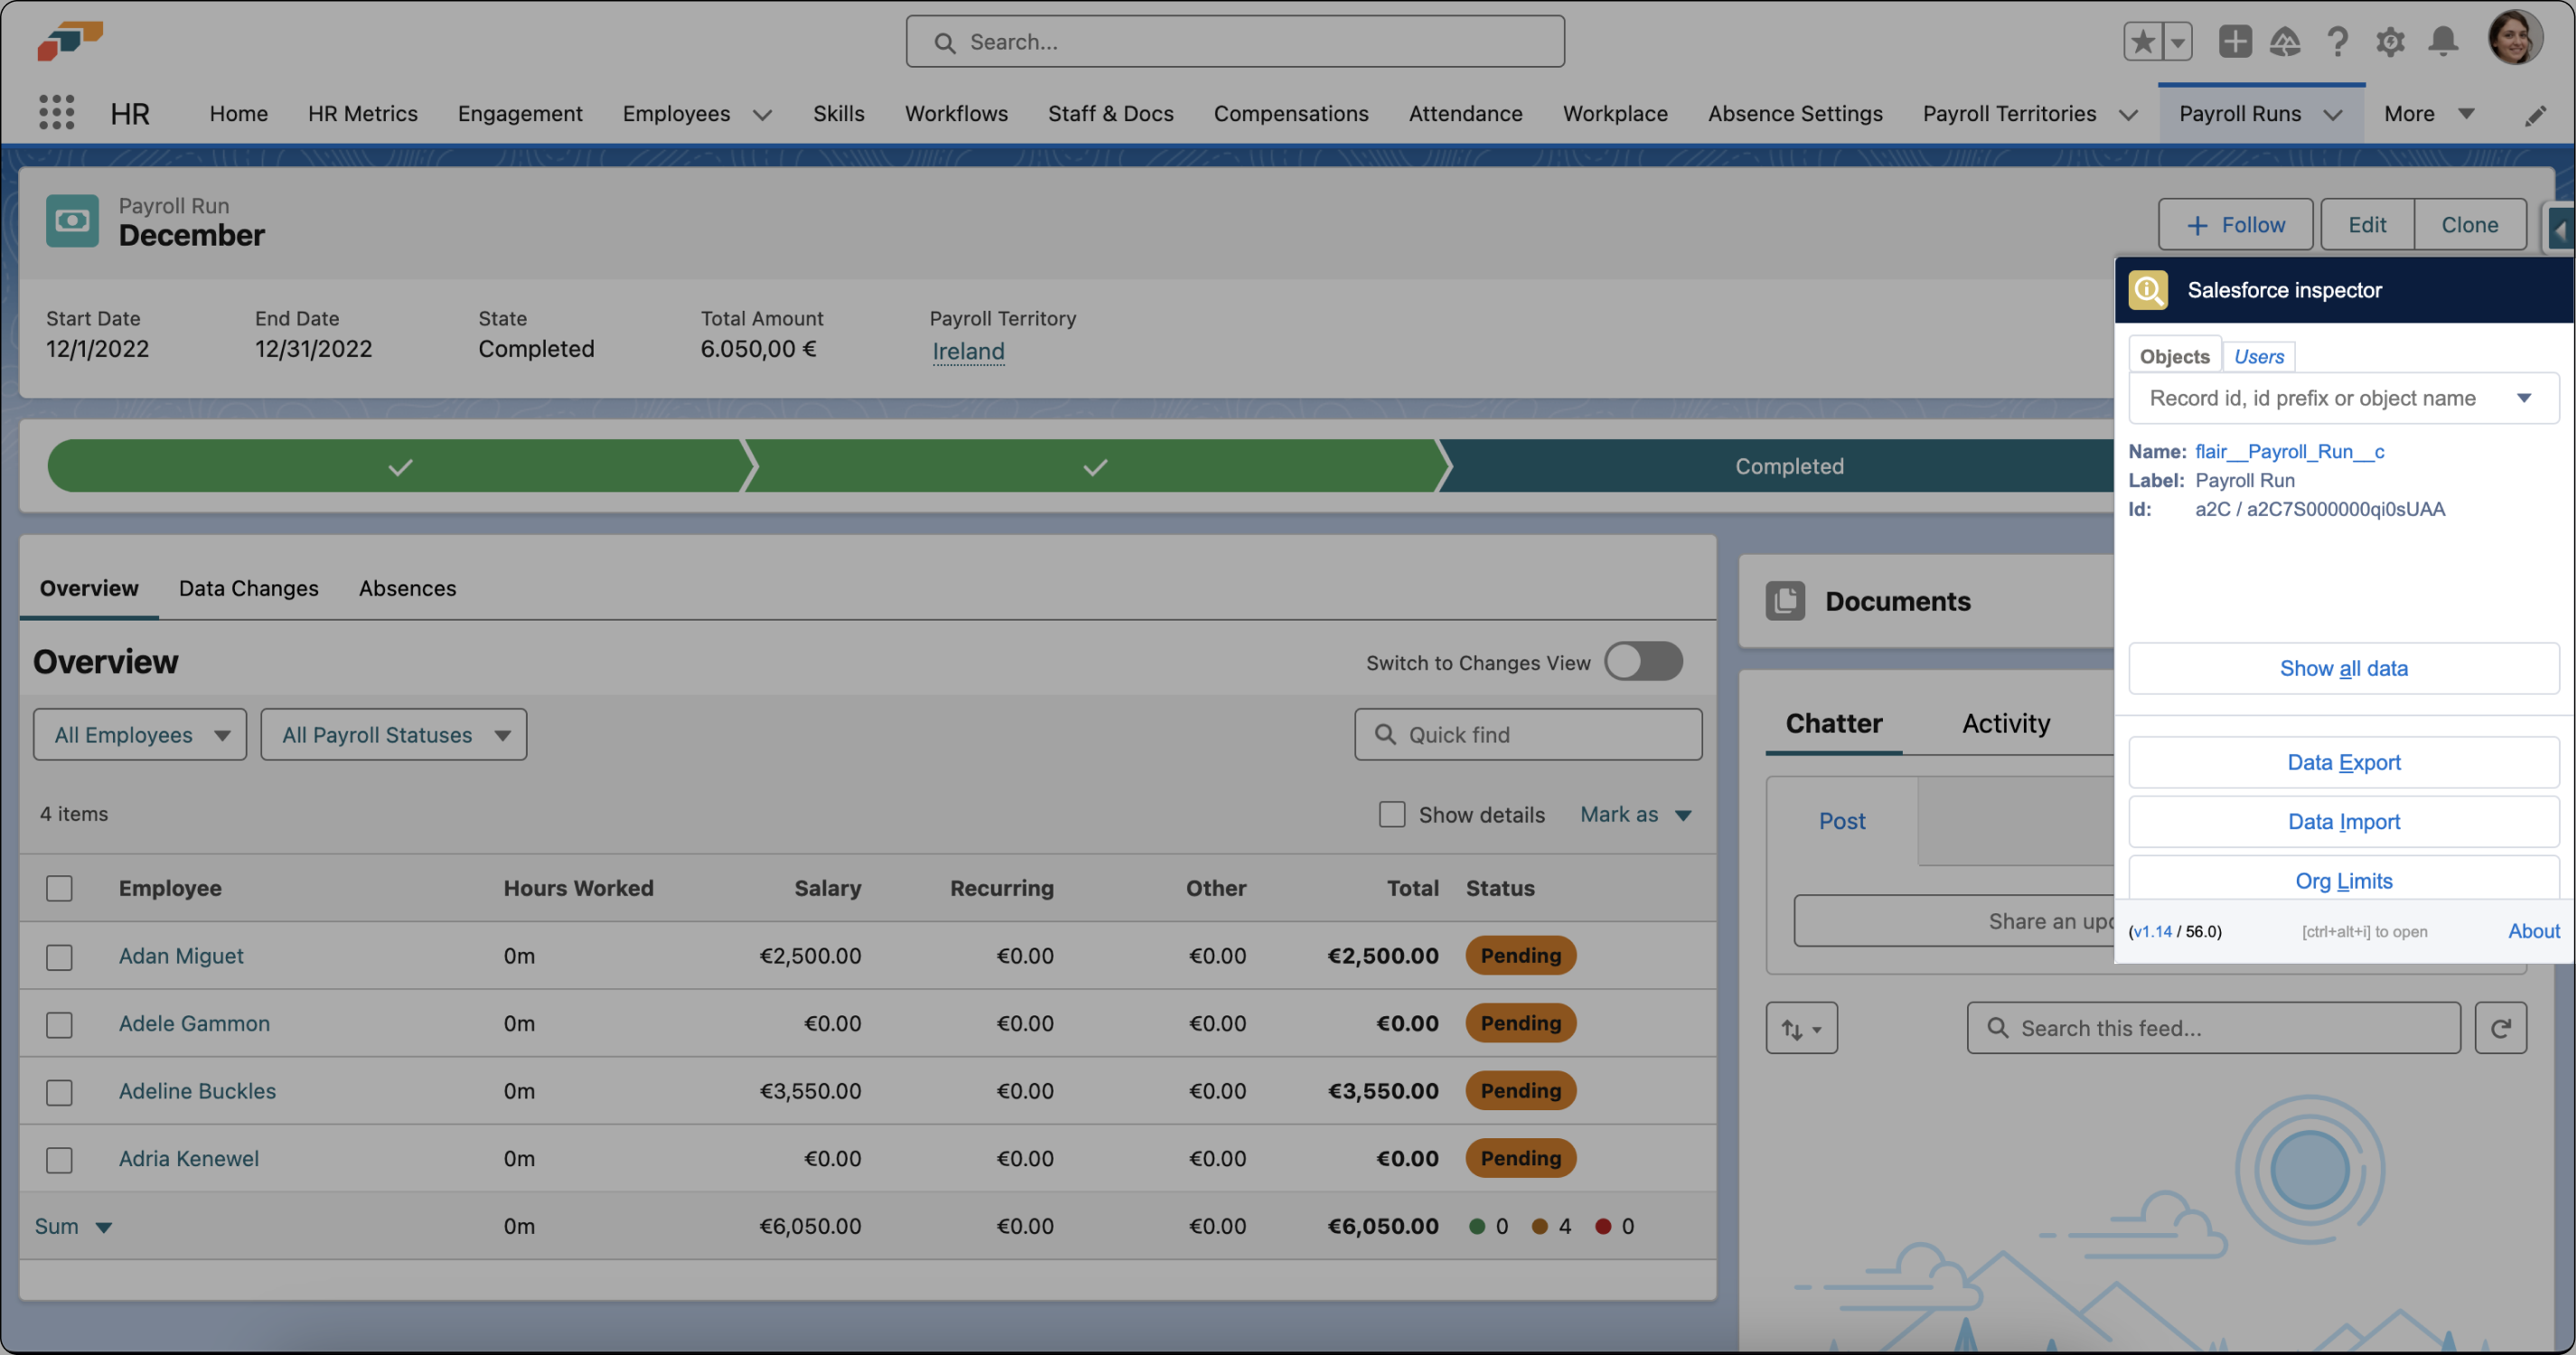
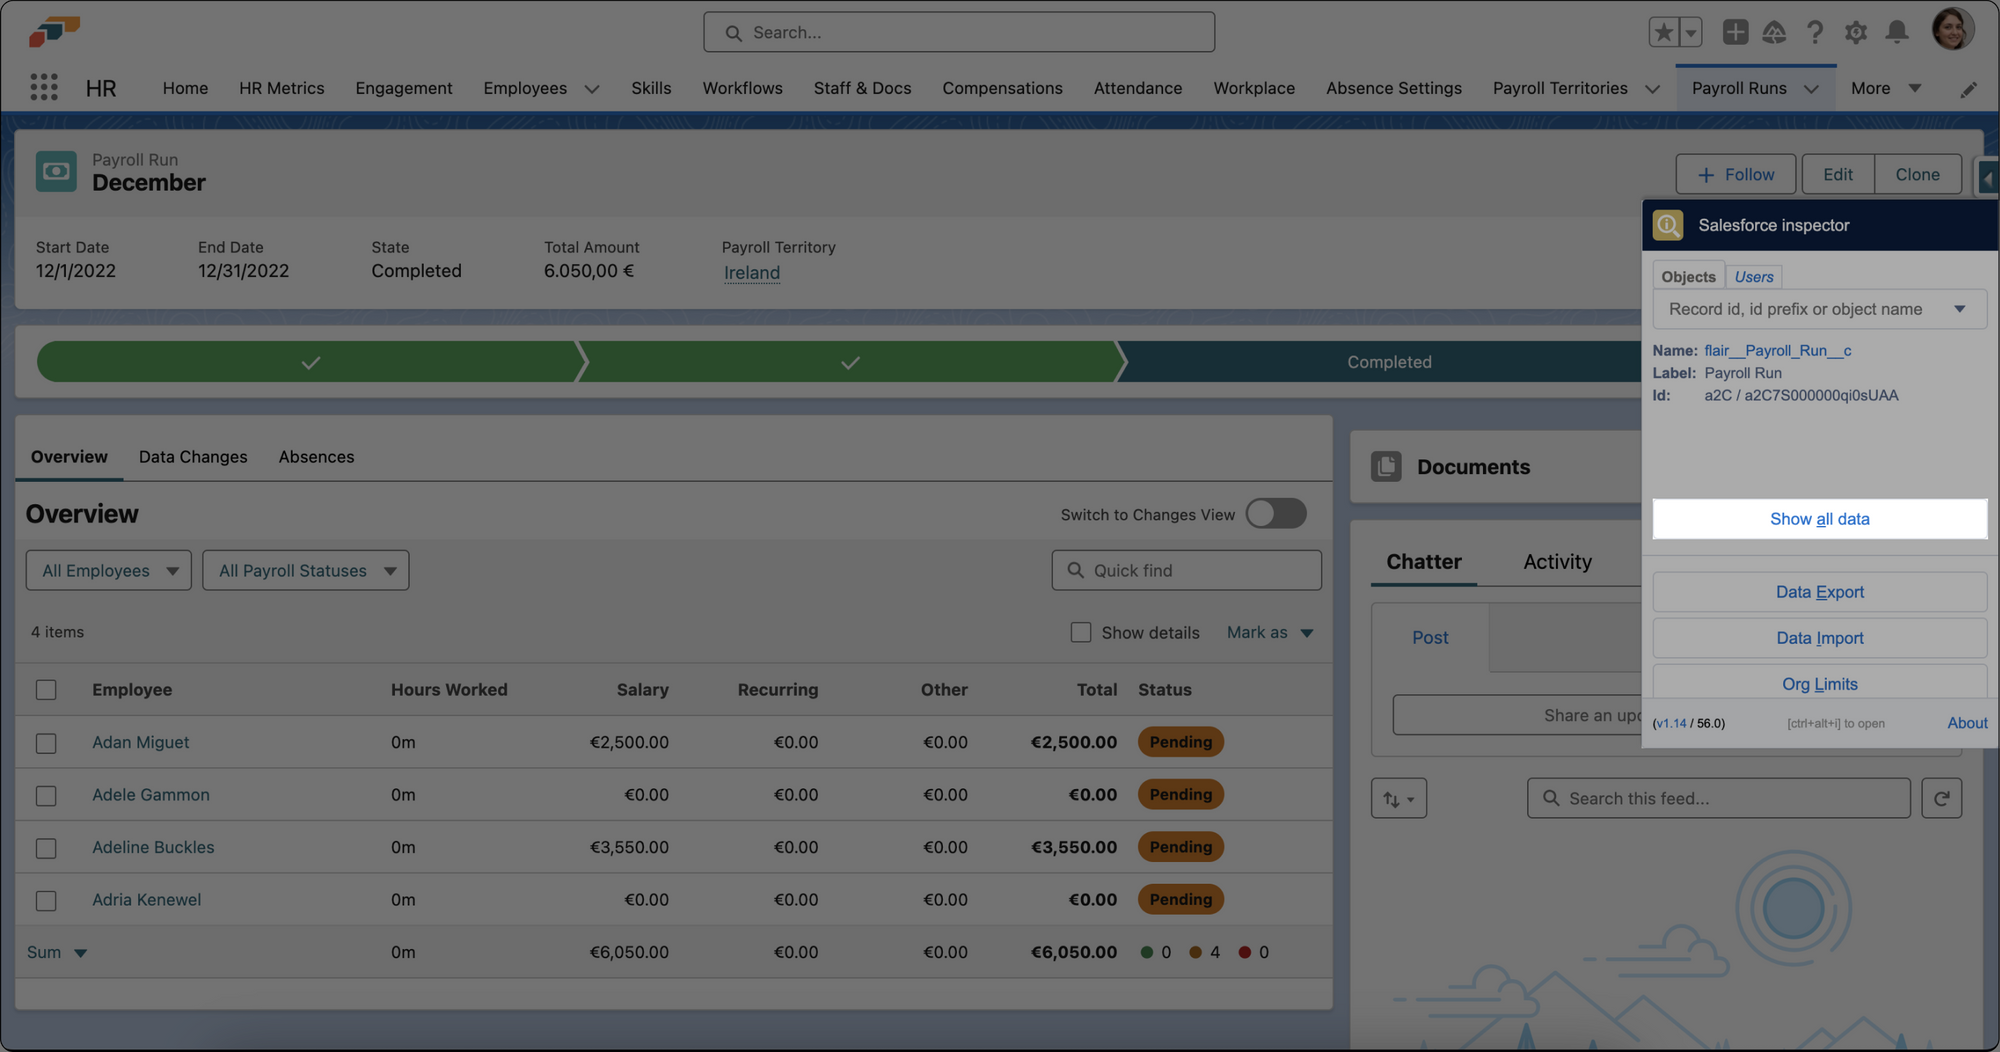
- Next, look for the Completed At field on the data page. In this case, we will amend the Field API Name:
flair__Completed_At2__c - Remove the Value in the Completed At field and click Save.
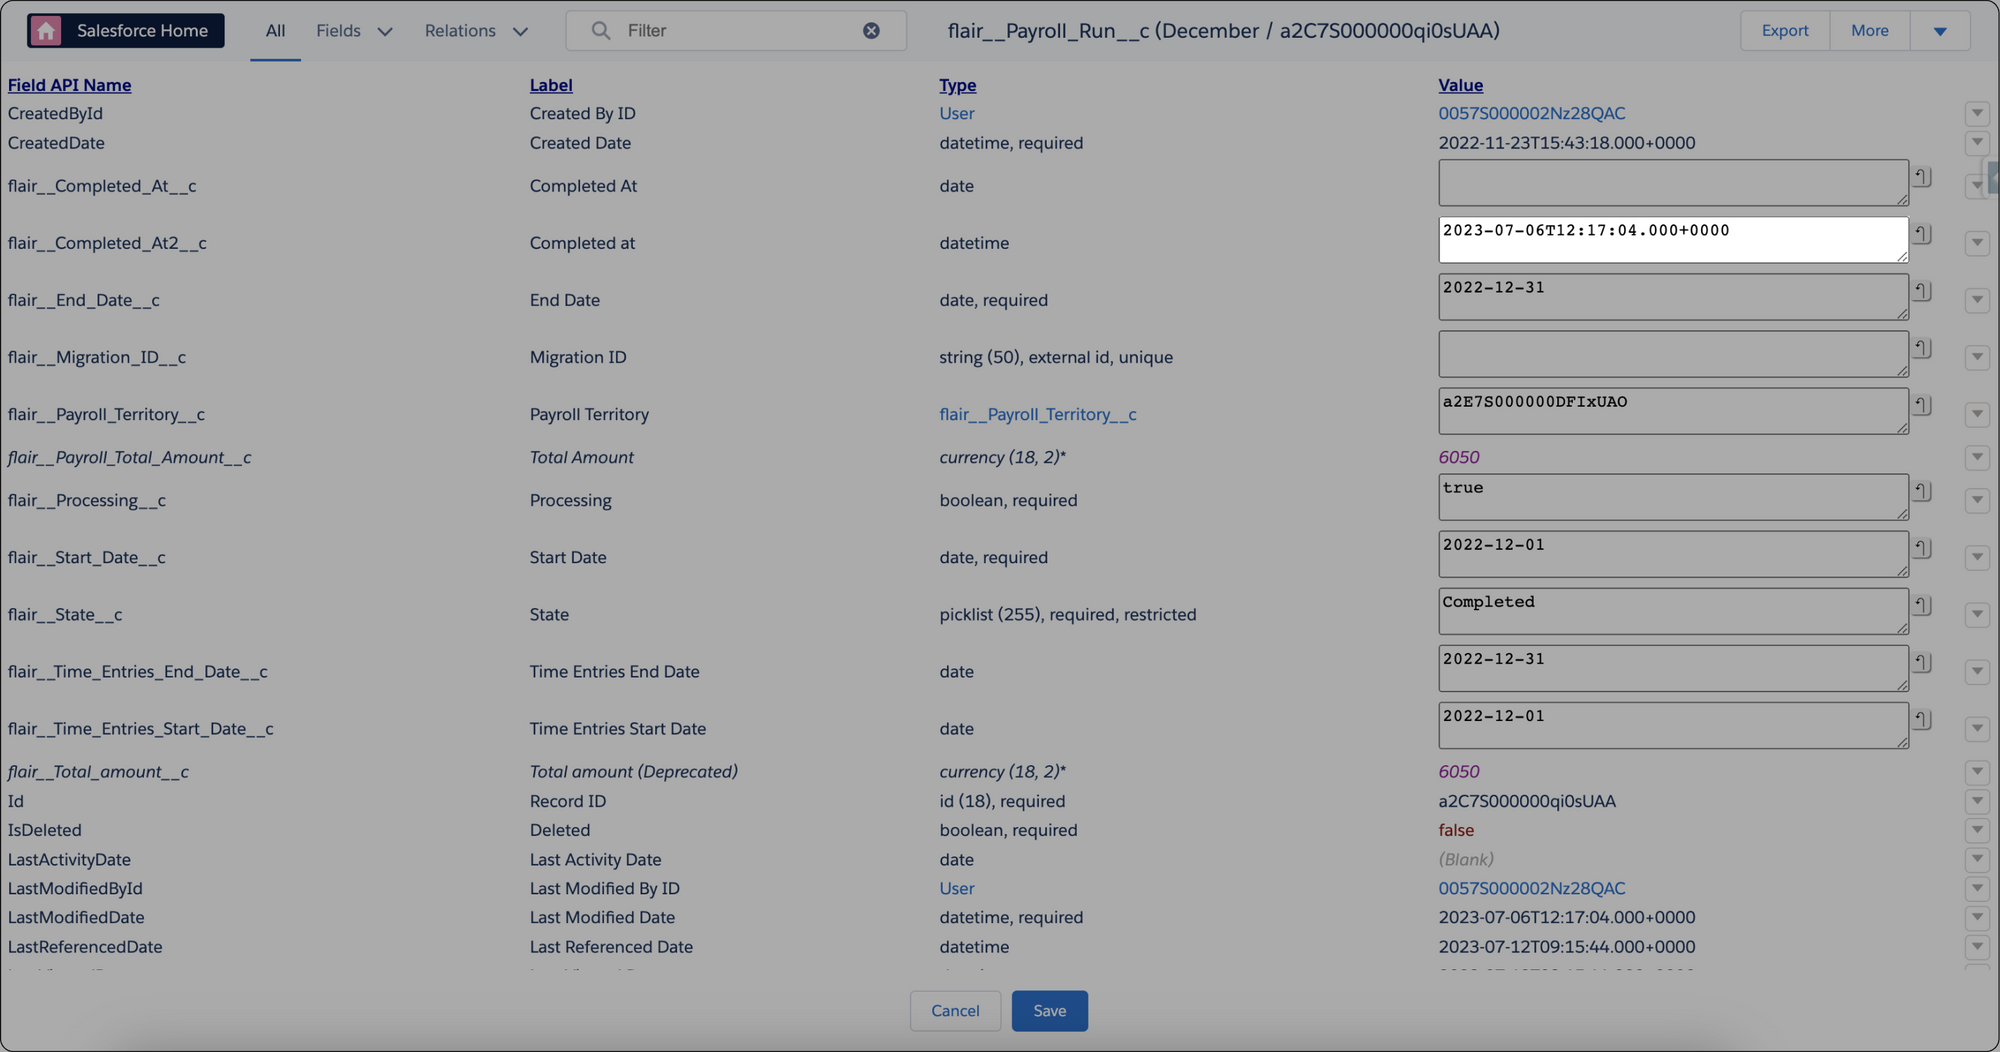
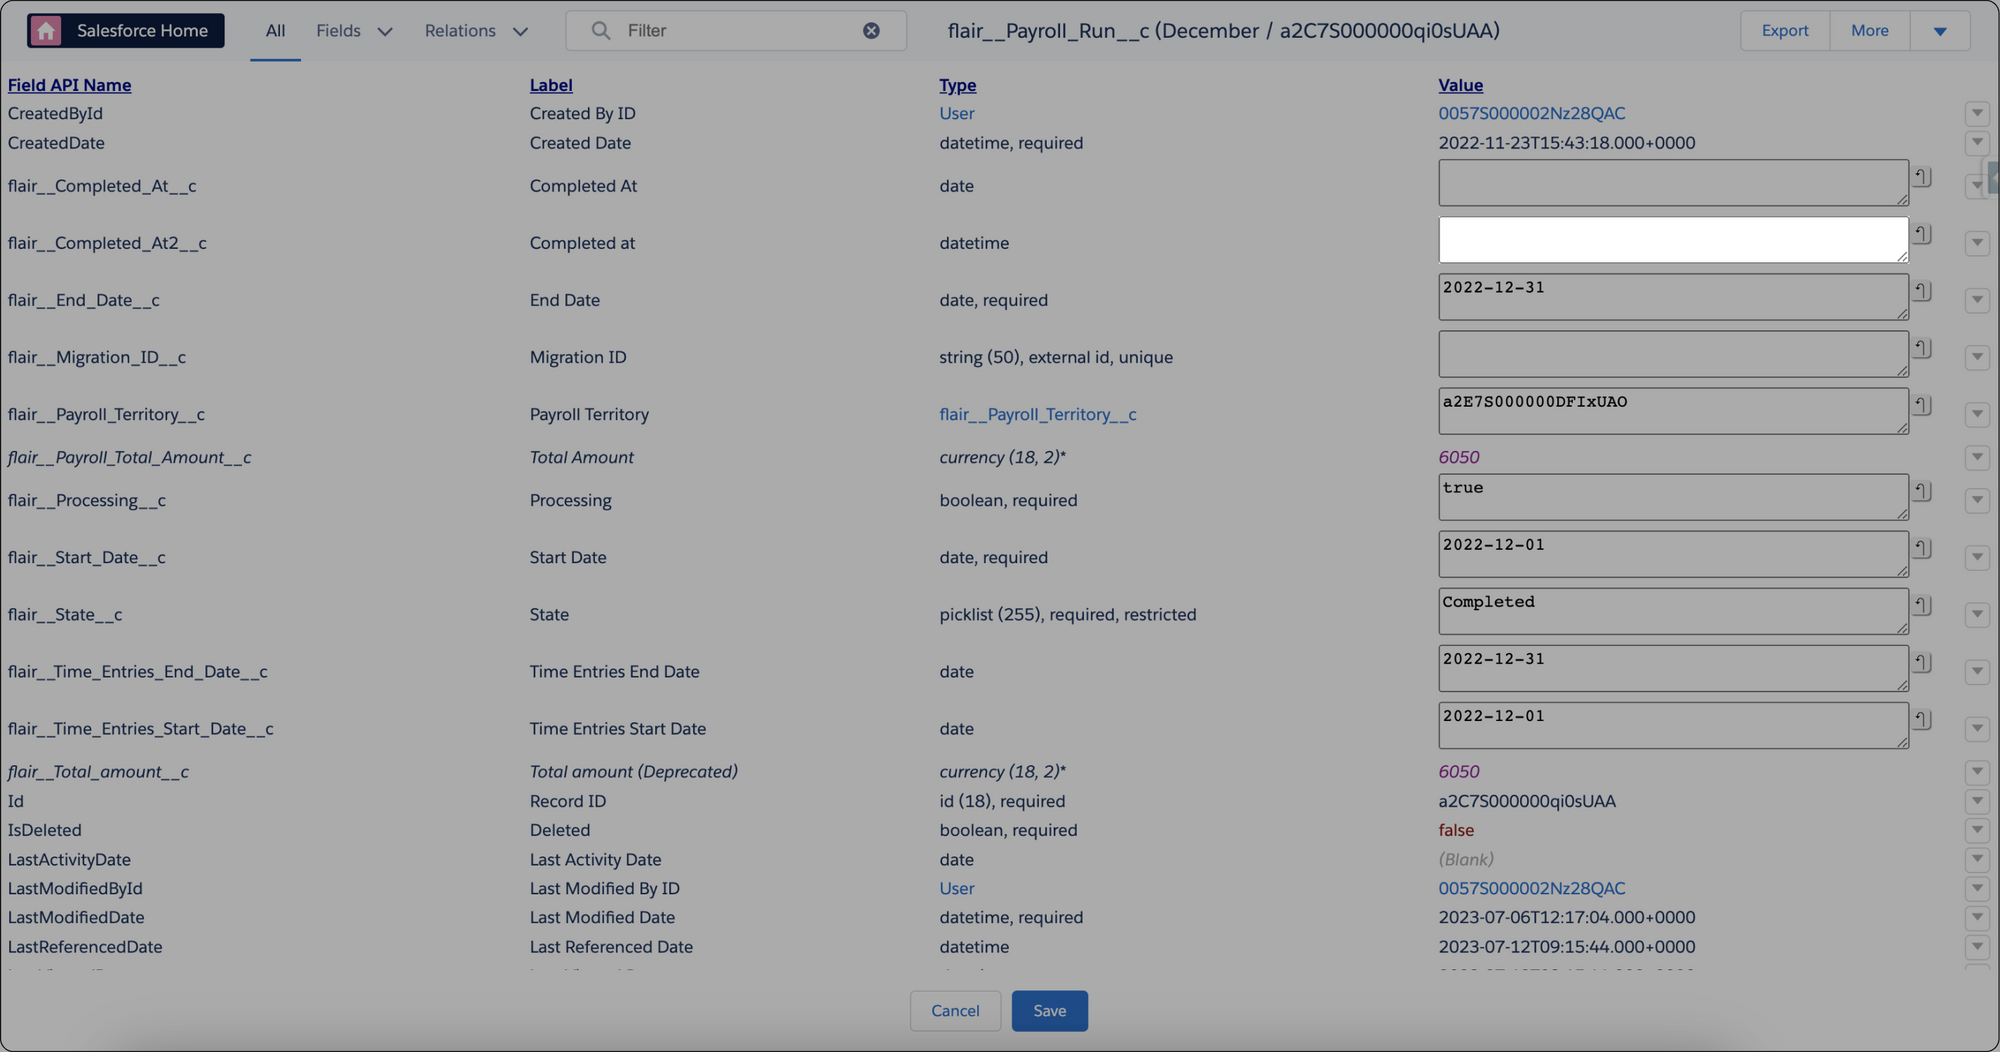
- Return to the payroll run and it will be possible to revert to an earlier step.
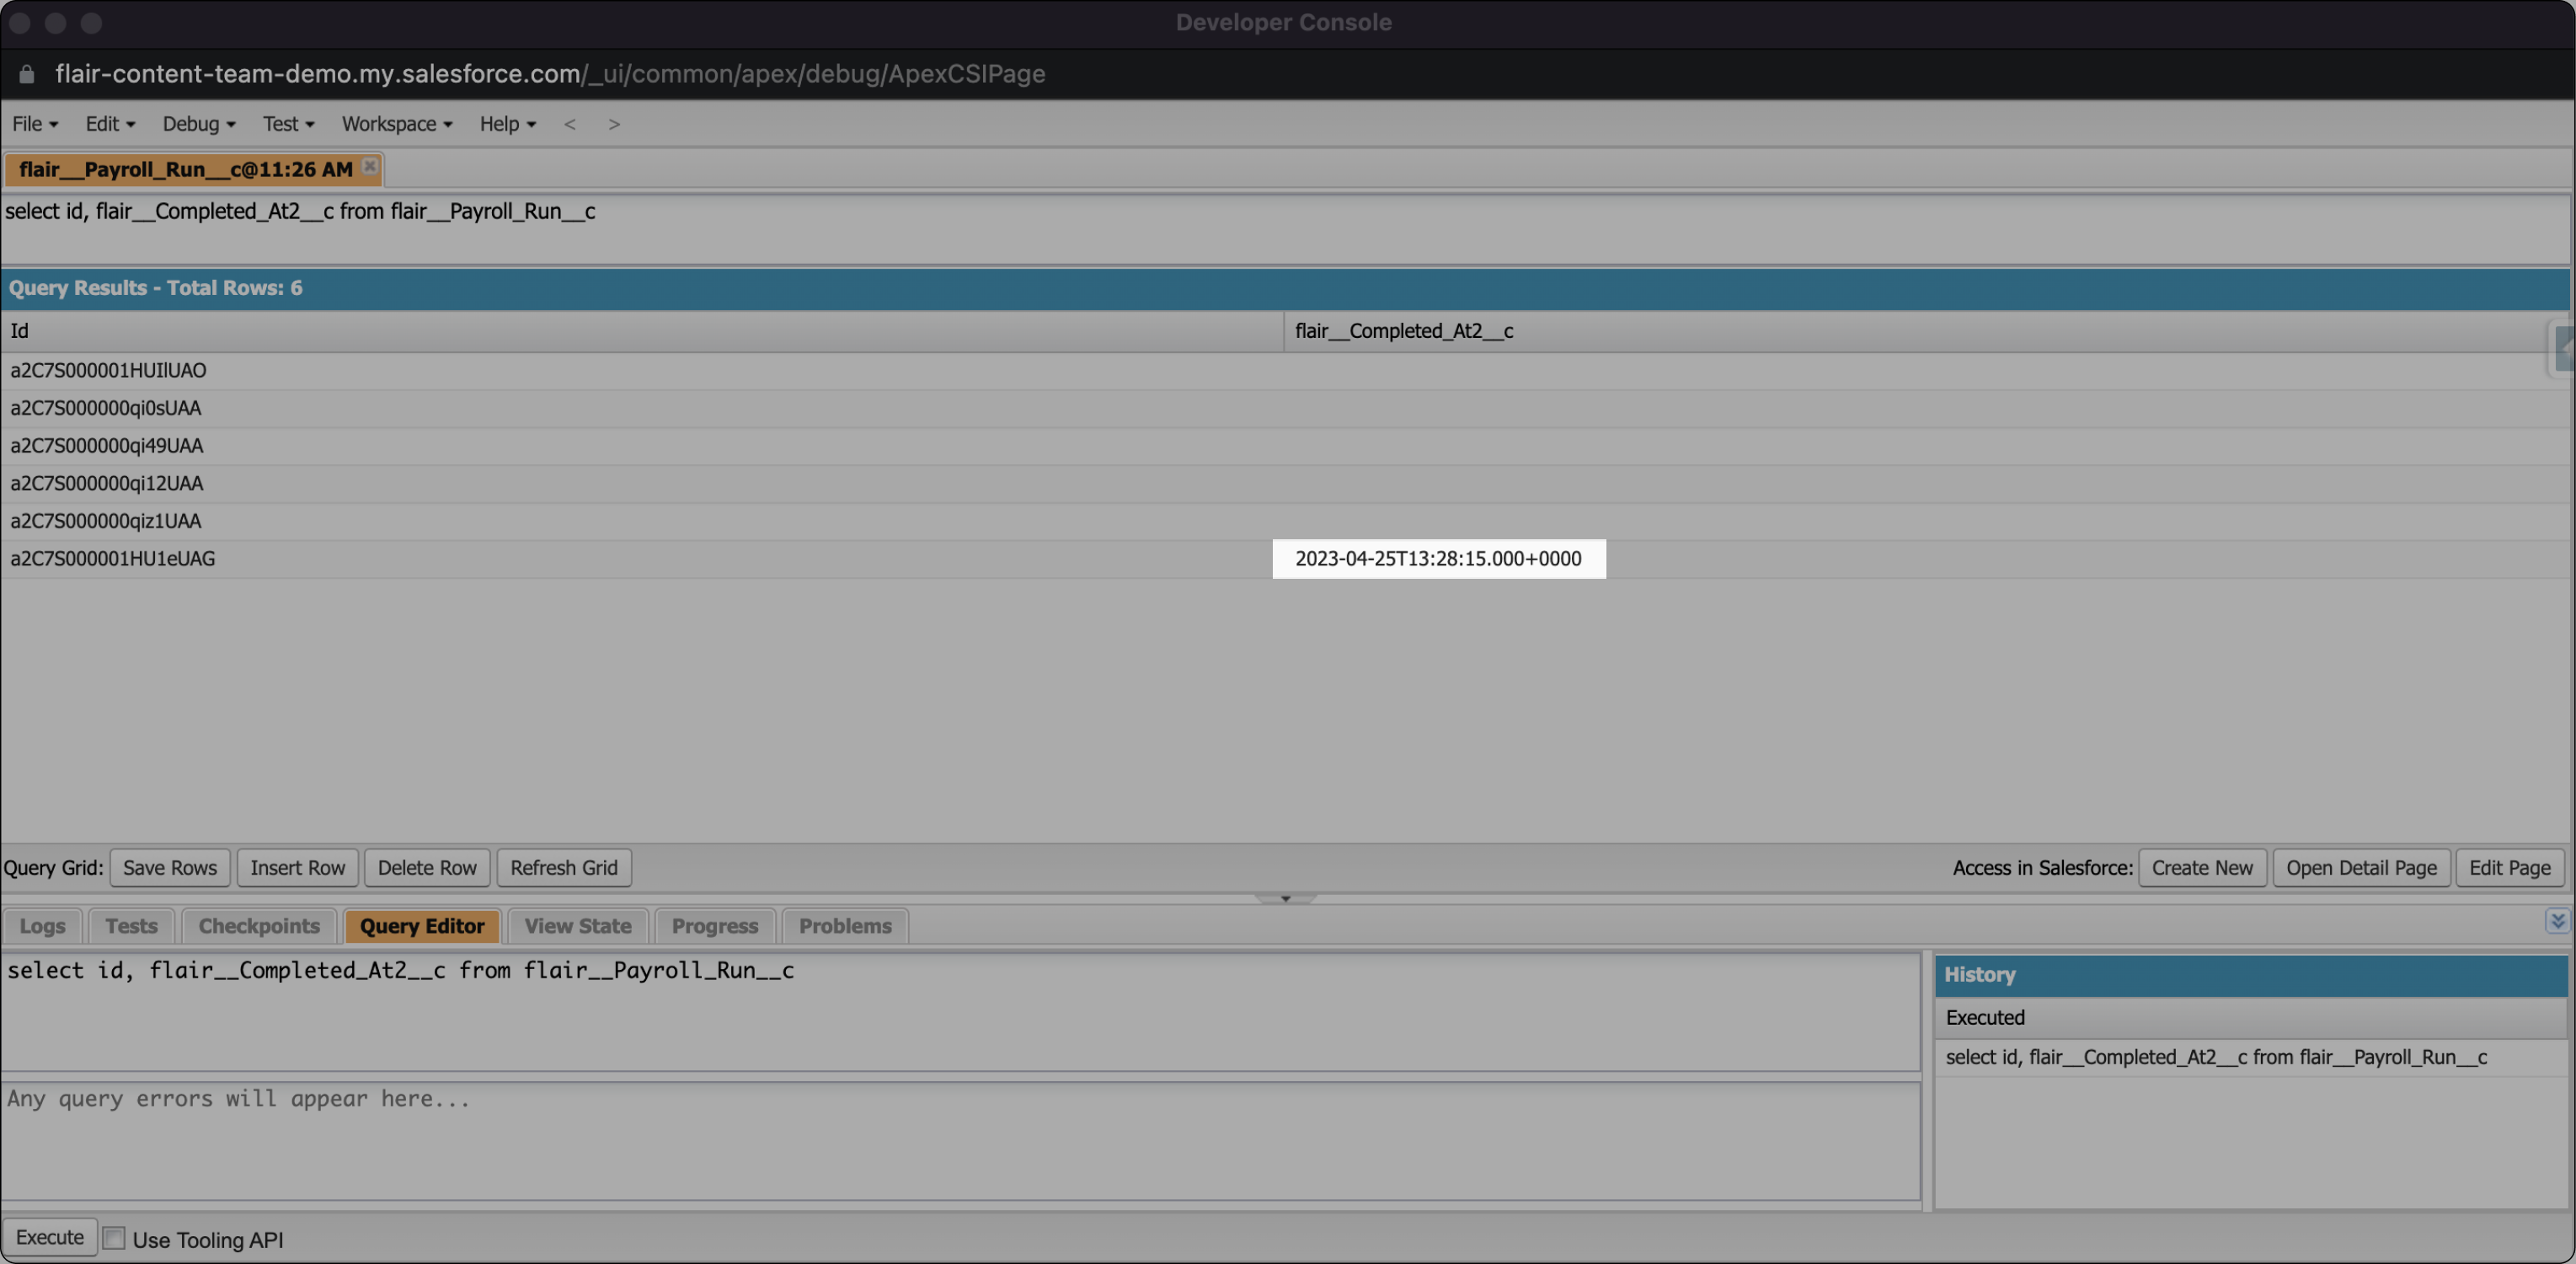
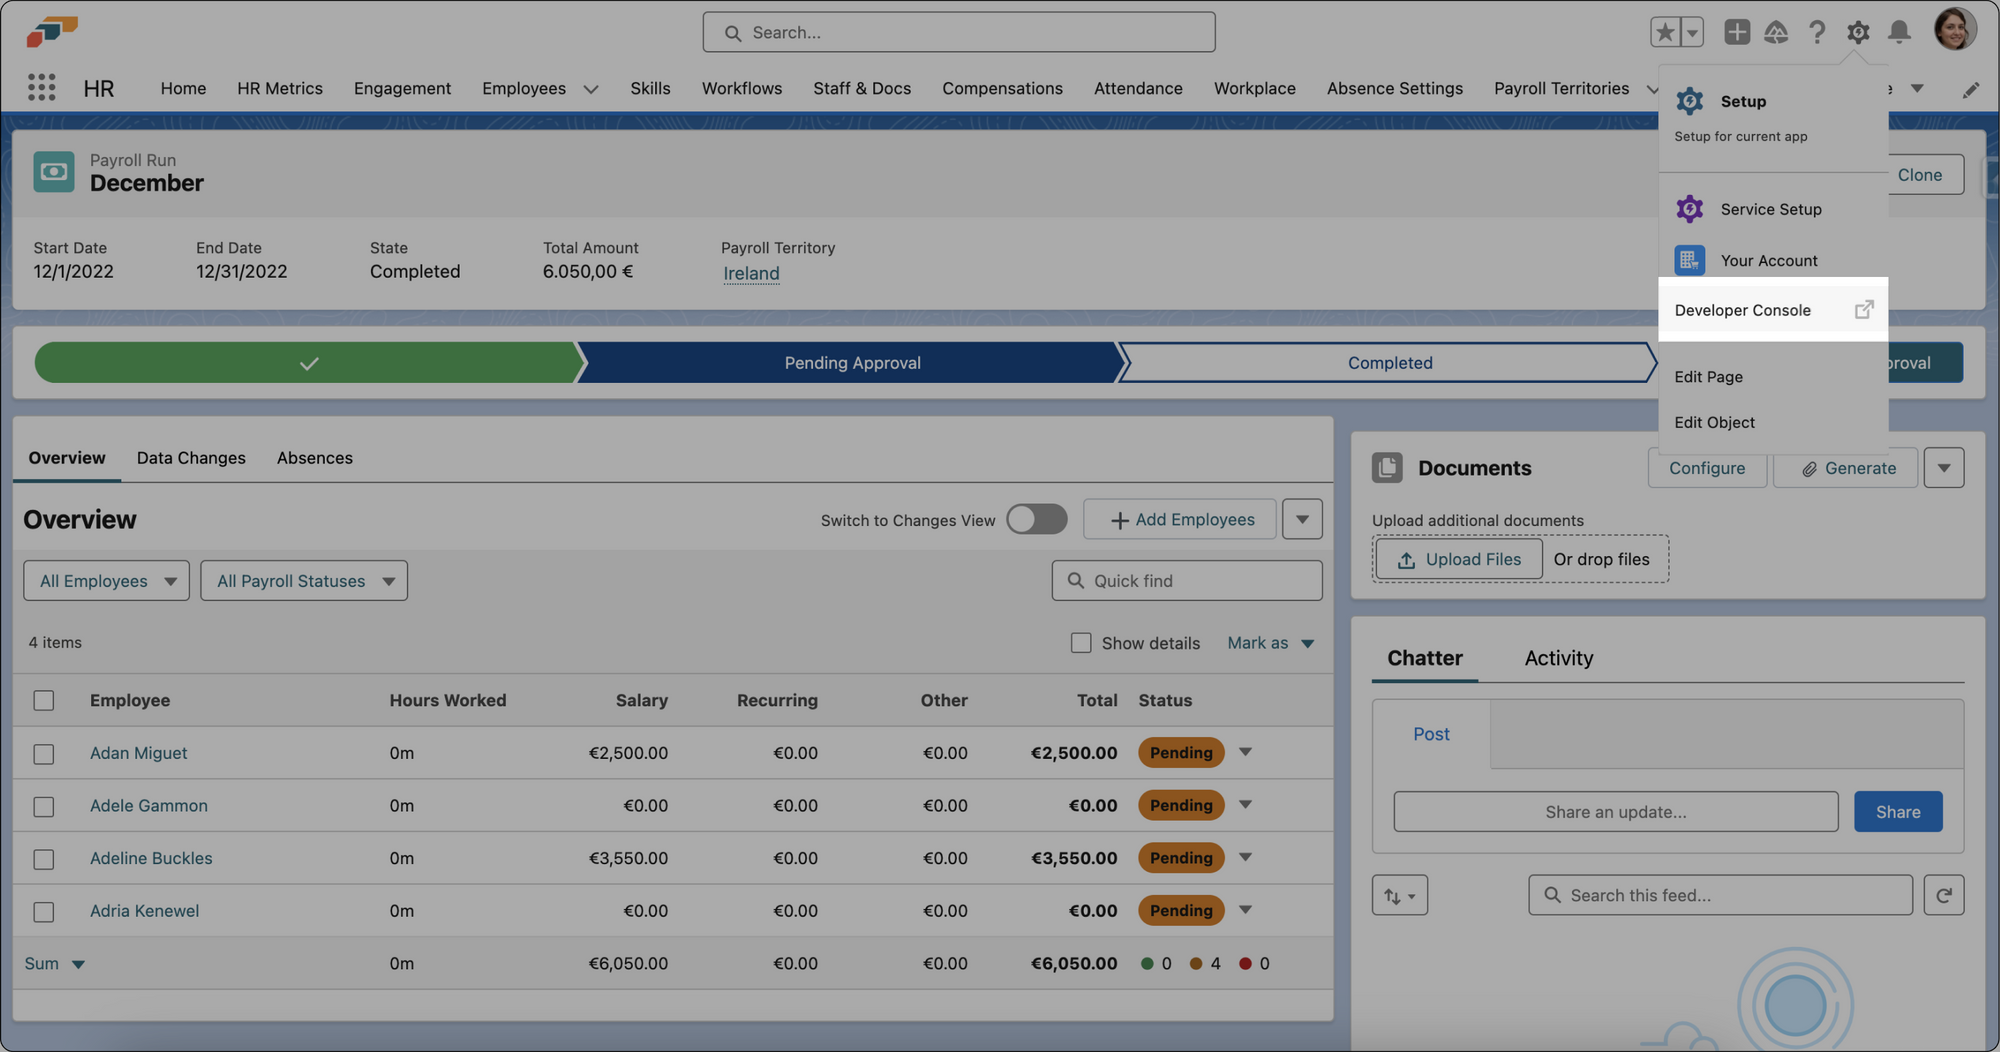
Method 2: Using Developer Console
Another way to revert the payroll status, this time without the Salesforce Inspector extension, is to use the Developer Console on Salesforce.
- Open the Developer Console via the Salesforce Settings tab on the flair HR app.
- Next, navigate to the Query Editor section.
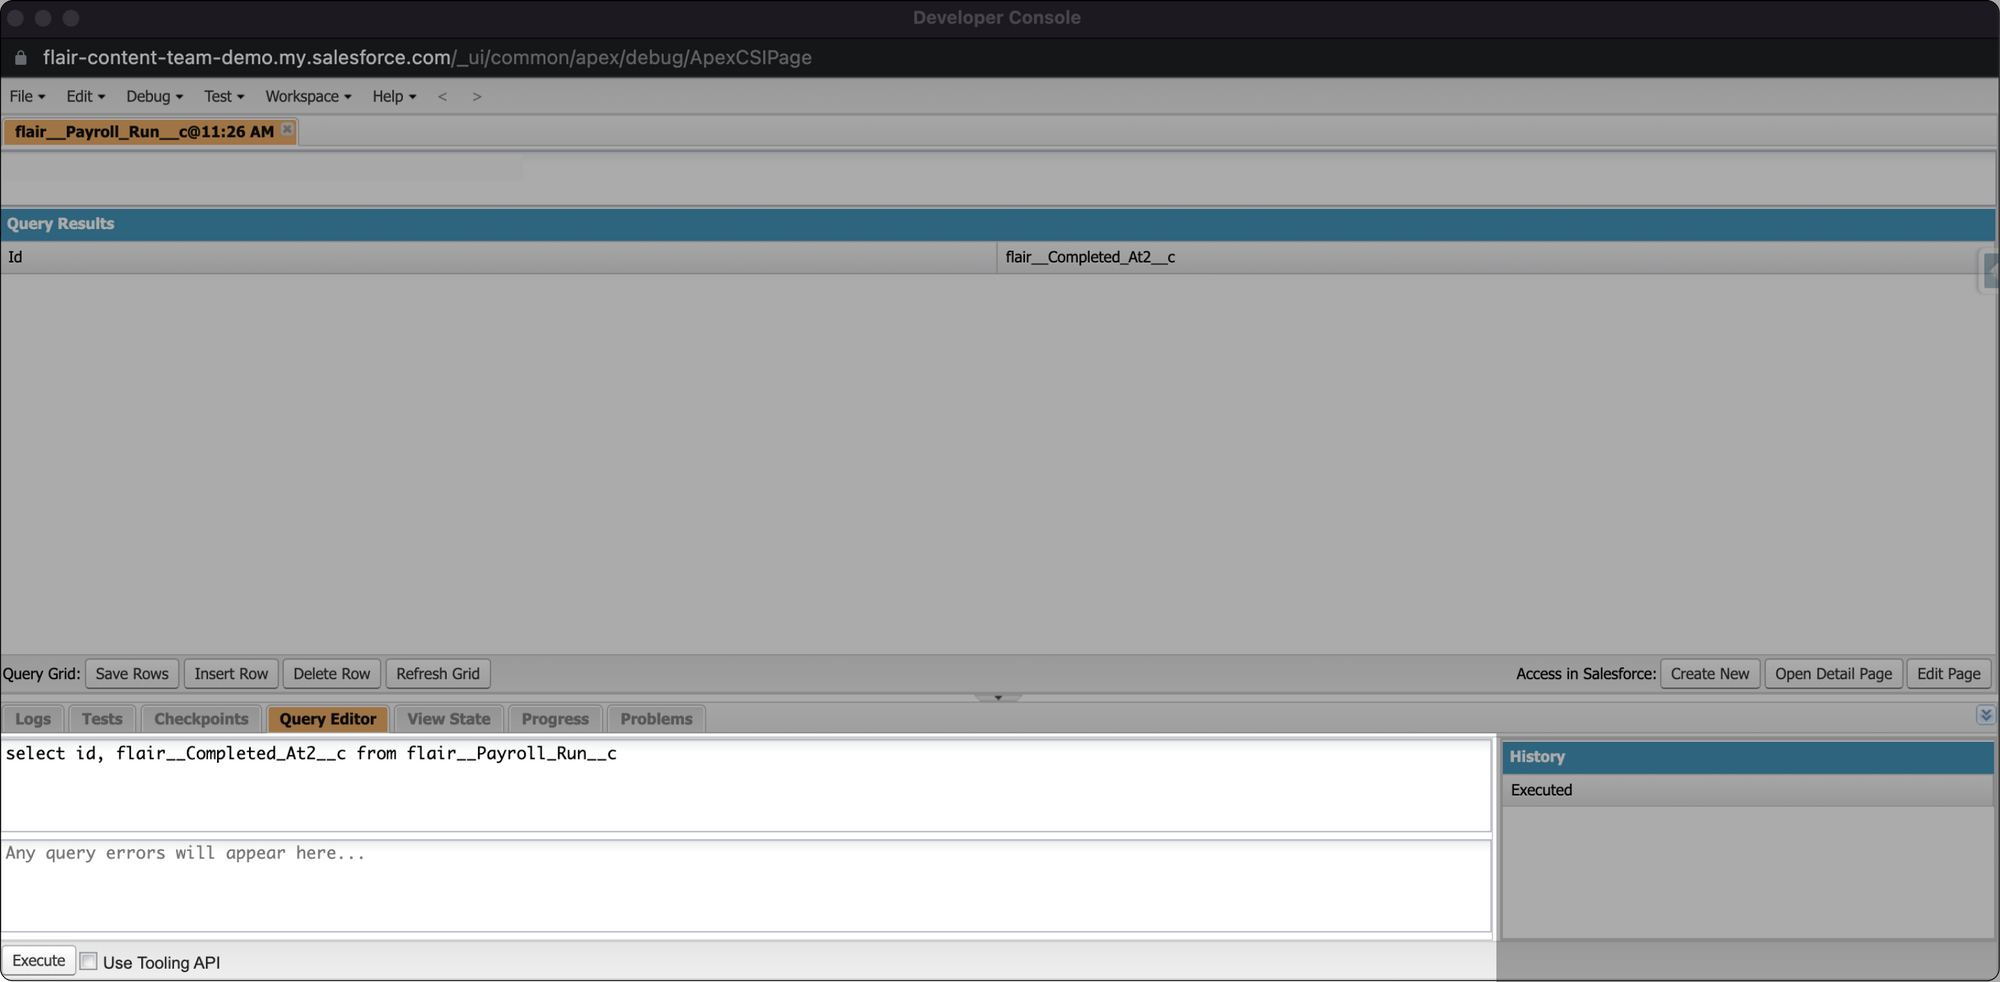
- Two codes are important in this next step: the Field API Name of the payroll run from earlier:
flair__Completed_At2__cand the payroll run description which can be found in the payroll run page's URL:flair__Payroll_Run__c
- Type in the following query into the Query Editor section:
Select ID, Name, flair__Completed_At2__c from flair__Payroll_Run__c - Then click on the Execute button.
- Next, delete the date value that will appear under the Completed At field.
- Save the changes and exit the Developer Console.
By following the steps outlined above, you can successfully move the payroll status back to Pending Approval even after it has been marked as Completed. Please note that these methods involve using the Salesforce Inspector tool or the Developer Console.
To find out how to enable the Developer Console for new users, check out the flair Developer Hub.