Adding Expenses
Expenses can be added in two ways: HR administrators can create them on behalf of employees using Salesforce, or employees can submit their own expense claims through the Employee Hub.
The expense framework has been enhanced with Expense Groups and Expense Items to better organize related expenses and provide more detailed tracking. This guide covers both the new enhanced workflow and the legacy single-expense workflow for customers who haven't migrated yet.
HR Admin: Creating Expenses on Salesforce
HR administrators and managers can create expenses on behalf of employees using Salesforce. This is useful when employees submit paper receipts or when expenses need to be entered by someone other than the employee.
Creating New Expenses
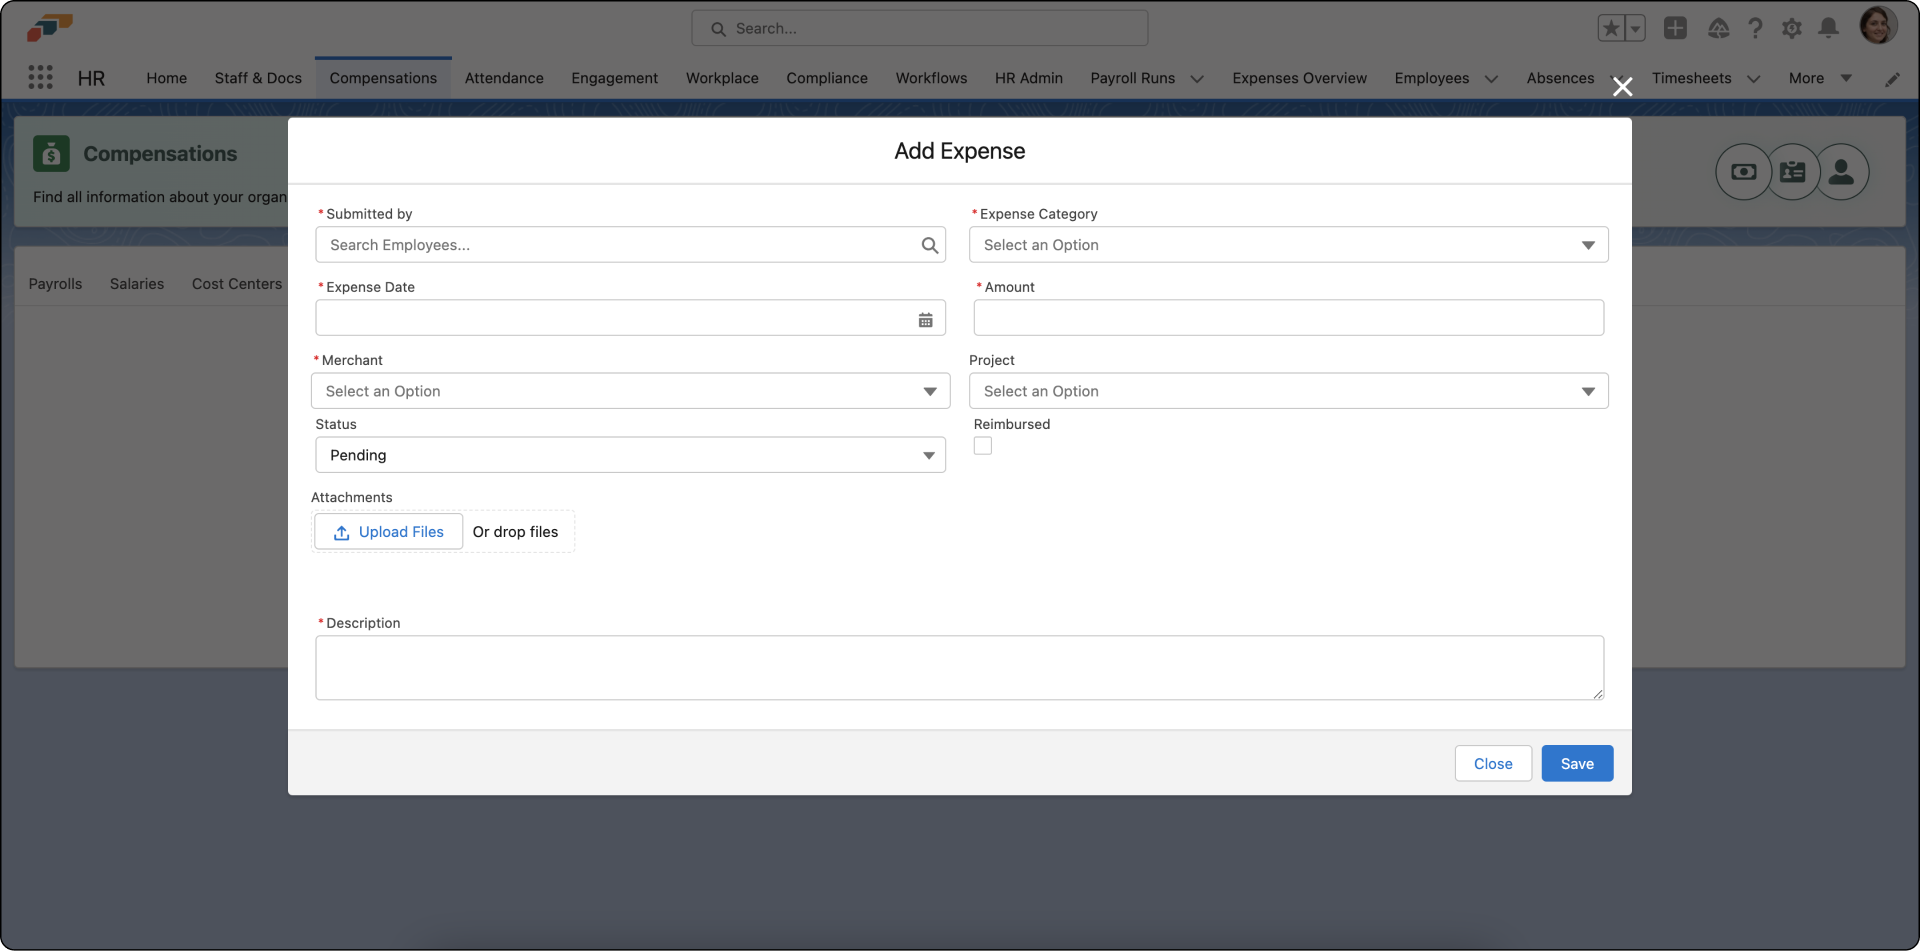
To create a new expense on the flair HR app:
- Navigate to the Expenses Overview tab on the top bar menu within the flair workspace
- Click on Add Expense
- Fill out the expense details:
- Submitted By - The employee making the expense claim
- Expense Date - When the expense was incurred
- Amount - The expense amount
- Merchant - Select from your predetermined merchant list
- Category - Choose the appropriate expense category
- Project (optional) - Link the expense to a pending project
- Description - Add details about the expense
- Click Save to confirm the added expense
Required Fields
When adding an expense, make sure to fill in all required information:
- Submitted By - Always specify which employee this expense is for
- Expense Date - Use the actual date the expense was incurred, not the date you're entering it
- Amount - Enter the exact amount from the receipt
- Merchant - Choose from existing merchants or add a new one if needed
- Category - Proper categorization ensures accurate reporting
- Description - Include context about what was purchased and why
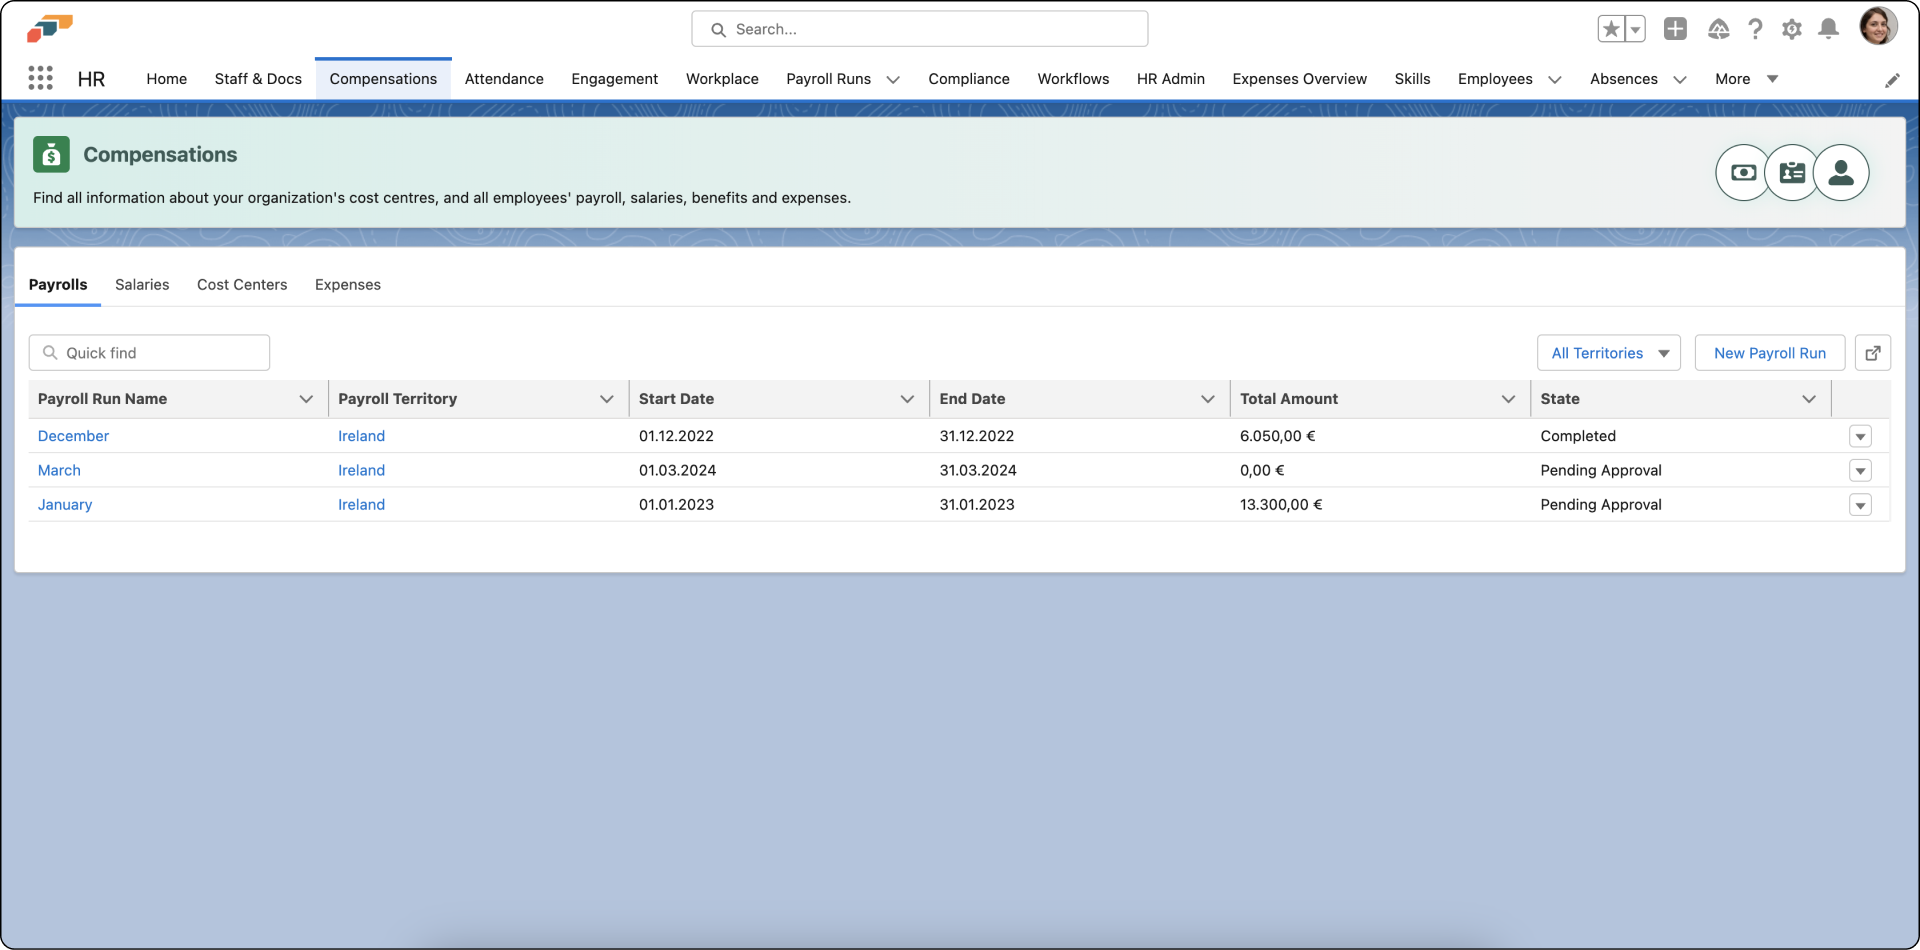
Alternative Method: Compensations Tab
Expenses may also be managed through the Compensations tab in Salesforce. This provides an alternative view and allows you to manage expenses alongside other compensation-related items like payroll.
Best Practices for HR Admins
Verify Receipt Documentation
Before entering an expense claim, ensure you have proper documentation (receipts, invoices) from the employee.
Enter Expenses Promptly
Don't let expense claims accumulate. Enter them regularly to ensure timely reimbursement and accurate financial reporting.
Double-Check Categories
Make sure you're selecting the correct expense category. This impacts reporting and budget tracking.
Include Detailed Descriptions
When entering expenses on behalf of employees, include comprehensive descriptions to provide context for approvers and for future reference.
Employee: Submitting Expenses in the Employee Hub
In the flair Employee Hub, employees can easily submit their expense claims. The enhanced expense framework allows you to organize related expenses into groups and add detailed line items for better tracking and compliance.
Expense Groups: Organizing Related Expenses
Expense Groups allow you to collect related expenses together, making it easier to manage business trips or multiple expenses from the same event.
Creating an Expense Group
You can create two types of expense groups:
- Trip - For business travel with a specific location
- Group - For any collection of related expenses
To create an expense group:
- Open the Employee Hub
- Select Expenses from the main sidebar
- Click New Expense Group
- Choose Trip or Group
- If creating a trip:
- Enter the Trip Location (e.g., "Prague")
- The trip will display with a trip icon
- If creating a group:
- Enter a descriptive name
- Click Save
The expense group starts in Draft status, allowing you to add multiple expenses before submitting.
Adding Expenses to a Group
Once you've created an expense group, you can add expenses to it:
- Click Add Expense within the group, or
- Click Add Expense below the group (this automatically fills in the expense group field)
- Create your expense as described in the sections below
- The expense will automatically appear under the selected group
While an expense group is in Draft status, you can add, edit, or remove expenses. Once submitted, you cannot add new expenses to the group.
Creating Expenses with Expense Items
The enhanced expense framework uses Expense Items to provide detailed tracking. An expense acts as an "envelope" containing multiple expense items underneath it.
Creating a New Expense
- Open the Employee Hub
- Select Expenses from the main sidebar
- Click New Expense (or add to an existing expense group)
- Fill out the expense details:
Expense-Level Fields
- Start Date / End Date - For multi-day expenses (e.g., business trips)
- Only the date is required; time is optional
- Use this for trips spanning multiple days
- Start Time / End Time - Optional time specifications
- Category - Select the appropriate expense category
- Project - Link to a specific project (optional)
- Merchant - Select or create the vendor/merchant
- Description - Overall description of the expense purpose
- Expense Group - If adding to a group, this is automatically filled
Adding Expense Items (Required)
You cannot submit an expense without at least one expense item. Expense items contain the detailed line items with specific information.
To add an expense item:
- Click Add Item within your expense
- Fill in the item details:
Item-Level Fields
- Record Type - Choose from:
- Travel - For transportation costs (mileage, flights, trains, etc.)
- Meal - For food expenses
- Per Diem - For daily meal allowances
- Other - For miscellaneous expenses
- Manual Amount - Enter the exact amount from your receipt/invoice
- Description - Specific details for this item
- Attachments - Upload receipts at the item level
- Tax - Automatically assigned based on record type (configurable by admins)
Travel-Specific Fields
For Travel record type items:
- Distance (Kilometers) - For mileage reimbursement
- Means of Transport - Select vehicle type:
- Own Car
- Company Car
- Other transport methods
- From Location / To Location - Starting and ending locations
- The system uses Google Maps API to calculate distance automatically
- You can verify and adjust the calculated distance
- Provided Meals - Track which meals were provided (affects per diem calculations)
Per Diem-Specific Fields
For Per Diem record type items:
- Start Date/Time - When your stay began
- End Date/Time - When your stay ended
- Meal Allowances - Select which meals you're claiming:
- Breakfast
- Lunch
- Dinner
- The system automatically calculates per diem amounts based on:
- Number of days
- Which meals were provided by employer/hotel
- Company expense rules
Automatic Calculations
If your organization has Expense Rules Templates configured:
- Mileage expenses - Automatically calculated based on kilometers × rate (e.g., €0.30/km)
- Per diem expenses - Automatically calculated based on days and meal allowances
- Final Amount - Combines manual amount + calculated allowances
The Amount field shows the total (manual + calculated), while Manual Amount shows only what you entered.
Reimbursement Expenses
For expenses with multiple items on a single invoice (e.g., a receipt with meals, supplies, and entertainment):
- Create a new expense
- Upload the invoice/receipt
- The system creates the first expense item automatically
- Add additional items to break down the invoice:
- Enter the amount for each line item
- Select the appropriate record type
- Add merchant and description
- Ensure the total of all items matches the invoice total
You can add as many items as needed and remove items if necessary.
Custom Fields
Your organization may have configured custom fields for expenses or expense items. These appear in the creation form and can be marked as required or optional by your administrator.
Draft vs. Submitted Expenses
Draft Expenses
- Expenses and expense groups start in Draft status
- You can save work in progress and return later
- Perfect for:
- Quick expense entry when you're busy
- Collecting receipts before finalizing
- Multi-day trips where you're still incurring expenses
Submitting Expenses
To submit an expense:
- Ensure all required fields are filled
- Add at least one expense item (if using the new framework)
- Click Submit
For Expense Groups:
- You can only submit if the group contains at least one expense
- Submitting the group submits all expenses within it
- All expenses change status to Pending together
For Single Expenses:
- You can submit directly from the expense
- The expense moves to Pending status for approval
Legacy Workflow: Single Expenses (Without Items)
If your organization hasn't migrated to the new expense framework, you may still see the legacy single-expense workflow. This section covers that process.
To submit a simple expense claim (legacy workflow):
- Open the Employee Hub
- Select Expenses from the main sidebar
- Click New Expense in the top right corner
- Fill out the required fields:
- Date - When the expense was incurred
- Amount - The expense amount
- Category - Select the appropriate category
- Merchant - Choose from the approved list or add a new one
- Description - Explain the expense (mandatory)
- Upload a relevant invoice or receipt
- Click Submit
Required Information
When submitting an expense claim, make sure to include:
Date and Time
- Use the actual date you incurred the expense, not the date you're submitting the claim
- For multi-day expenses, specify both start and end dates
- Time fields are optional but helpful for accurate per diem calculations
Amount
- Enter the exact amount from your receipt for each expense item
- Include any applicable taxes
- The system will add calculated allowances (mileage, per diem) automatically if rules are configured
Category
Choose the category that best fits your expense:
- Travel
- Meals & Entertainment
- Supplies
- Professional Development
- Equipment
- Utilities
- Other categories as defined by your organization
Merchant
- Select from the pre-approved merchant list or add a new one
- Note: In the new framework, merchants are selected at the expense level
Employees can add new merchants directly when submitting expense claims in the Employee Hub, even if they're not on the pre-approved list. This provides flexibility while maintaining oversight.
Managing Merchants (HR Admin)
HR administrators can manage the list of available merchants:
- In the flair HR app on Salesforce, navigate to the HR Admin tab.
- Under the Attendance section, select Merchants.
- Click New to add a new merchant.
- Enter the merchant name and any additional details.
- Click Save.
Description
Provide a clear explanation of:
- What was purchased
- Why it was necessary for business
- Any relevant context
A good description helps approvers understand your expense quickly.
Receipts
- Always attach clear photos or PDFs of your receipts
- In the new framework, receipts are attached at the expense item level
- For reimbursement expenses with multiple items, attach the full invoice
Tracking Expense Status
After submitting an expense claim, you can track its status in the Expenses section:
- Draft - Work in progress; you can still edit and add items
- Pending - Awaiting manager review
- Approved - Accepted and awaiting reimbursement
- Declined - Rejected with feedback (check comments to see why)
- Reimbursed - Payment has been processed
For expense groups, the group status reflects the status of all expenses within it. When you submit a group, all expenses move to Pending together.
Commenting on Expenses
Colleagues can comment on expenses in the Employee Hub to discuss or clarify expense claims. To add a comment:
- Open the Expenses section in the Employee Hub.
- Click on an existing expense to view its details.
- Select the Comments tab.
- Type your comment and press Enter to send.
Comments are visible to all colleagues who have access to the expense record.
Viewing Your Expenses
In the Employee Hub Expenses section, you can:
- See all your submitted expenses
- Filter by year, category, or status
- View details of each expense
- Check when expenses were approved or reimbursed
- Read any comments from your manager or HR
Deleting Expense Claims and Groups
You can delete expense claims and groups, but only during certain stages:
- ✅ Can delete:
- Draft expenses and groups
- Claims with Pending status
- ❌ Cannot delete: Approved, declined, or reimbursed claims
For Expense Groups:
- Deleting a group will delete all expenses within it
- You can delete individual expenses from a draft group
- Once submitted, you cannot remove expenses from a group
If you need to make changes to a non-pending claim, contact your manager or HR administrator.
Best Practices
For HR Administrators
- Verify documentation - Ensure you have proper receipts before entering claims
- Enter promptly - Don't let expenses accumulate
- Use detailed descriptions - Provide context for approvers
- Double-check categories - Accurate categorization helps with reporting
For Employees
- Submit promptly - Don't wait too long to submit expense claims
- Include receipts - Always attach proper documentation
- Be detailed - Provide clear descriptions of what was purchased and why
- Follow policies - Familiarize yourself with company expense policies
- Choose approved merchants - Use pre-approved vendors when possible
- Keep records - Keep copies of receipts until expenses are reimbursed
What Happens Next?
After an expense is added or submitted:
- For Draft expenses: You can continue editing and adding items until you're ready to submit
- After submission: The expense (or expense group) appears in the system with Pending status
- Approval process:
- For expense groups, the approval process is triggered at the group level
- For single expenses, approval is at the expense level
- The employee's manager receives a notification
- Manager review: The manager reviews and approves/declines the expense or group
- Reimbursement: Once approved, finance processes reimbursement
- Completion: The expense is marked as Reimbursed when payment is complete
When an expense group is approved or declined, all expenses within the group are affected together. This ensures consistent handling of related expenses.