Workflows
A workflow is a series of tasks that you can assign to an employee. Workflows are an effective way to make recurring processes more efficient and consistent.
One good example of where you might use a workflow template is for onboarding. By setting up a workflow template for onboarding, new hires are automatically assigned a list of tasks to complete to help them familiarize themselves with their new company and role.
How To Create a Workflow Template
Workflow templates allow you to define a list of tasks for repetitive processes. With a workflow template, you can improve consistency and notify everyone involved in the process when a task is due.
- To start, open the flair HR app in Salesforce and click on Workflows in the navigation bar or via the App Launcher 𓃑.
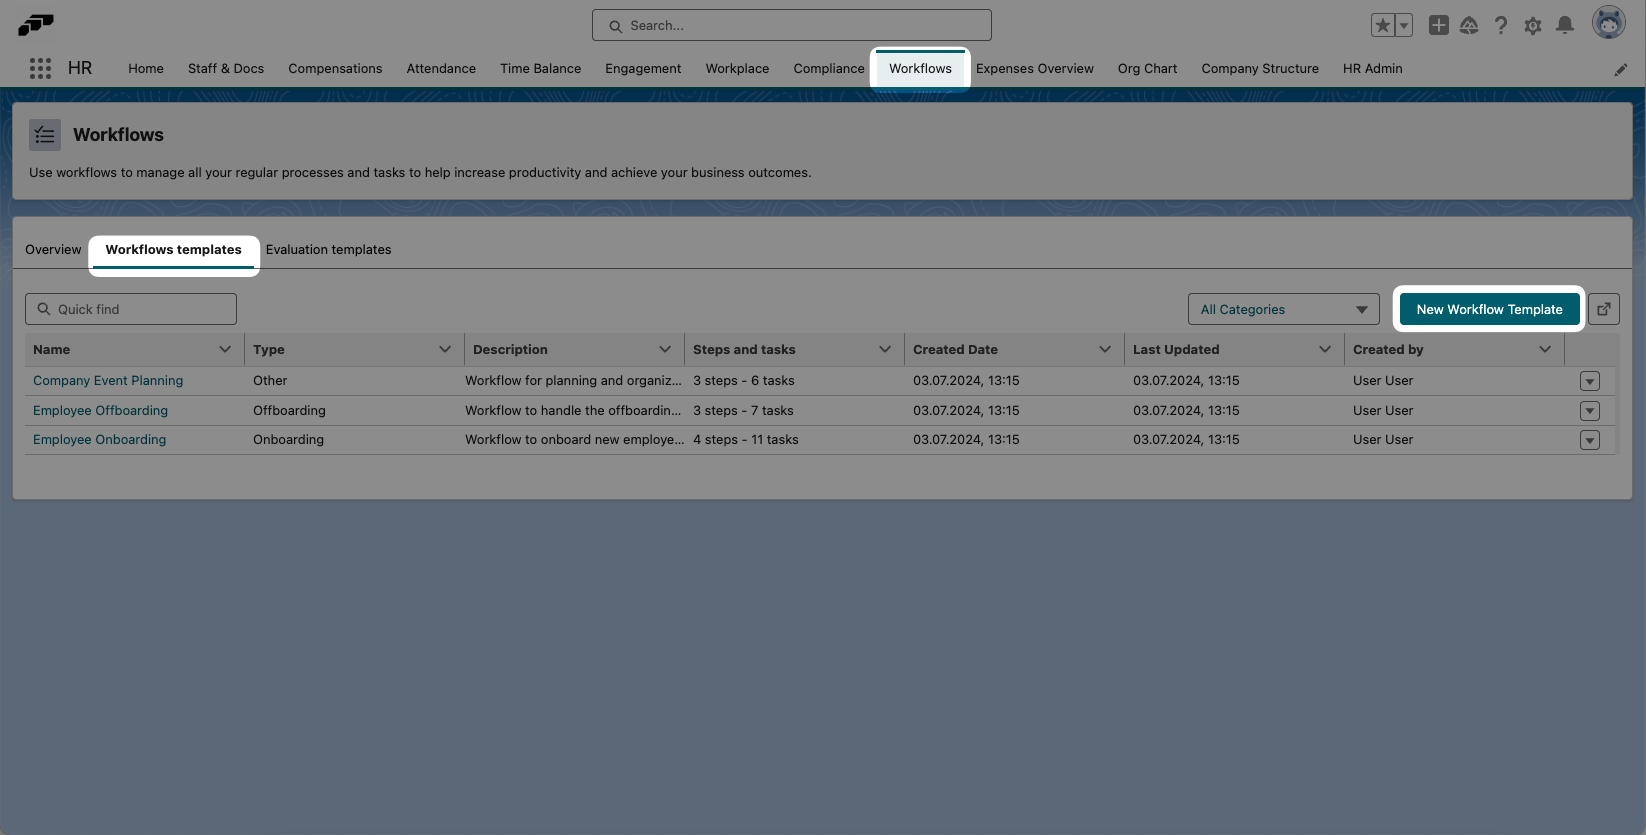
- You will now see an overview of your existing workflows. Click on the Workflow Templates tab.
- Now click the New Workflow Template button.
- Give your workflow template a name so you can easily identify it later. Select a workflow type from the dropdown – you can choose from Onboarding, Offboarding, and Other. Onboarding workflows can also include an optional widget that the new employee will see on their Employee Hub Dashboard.
- Optionally, you can also add a Description to provide additional info for users.
Adding Steps to Workflow Templates
Once you have saved your workflow template, you can add steps and tasks. A step is like a phase of a workflow, and can contain multiple tasks. A task is a specific action to be carried out, such as uploading a document or filling in missing information.
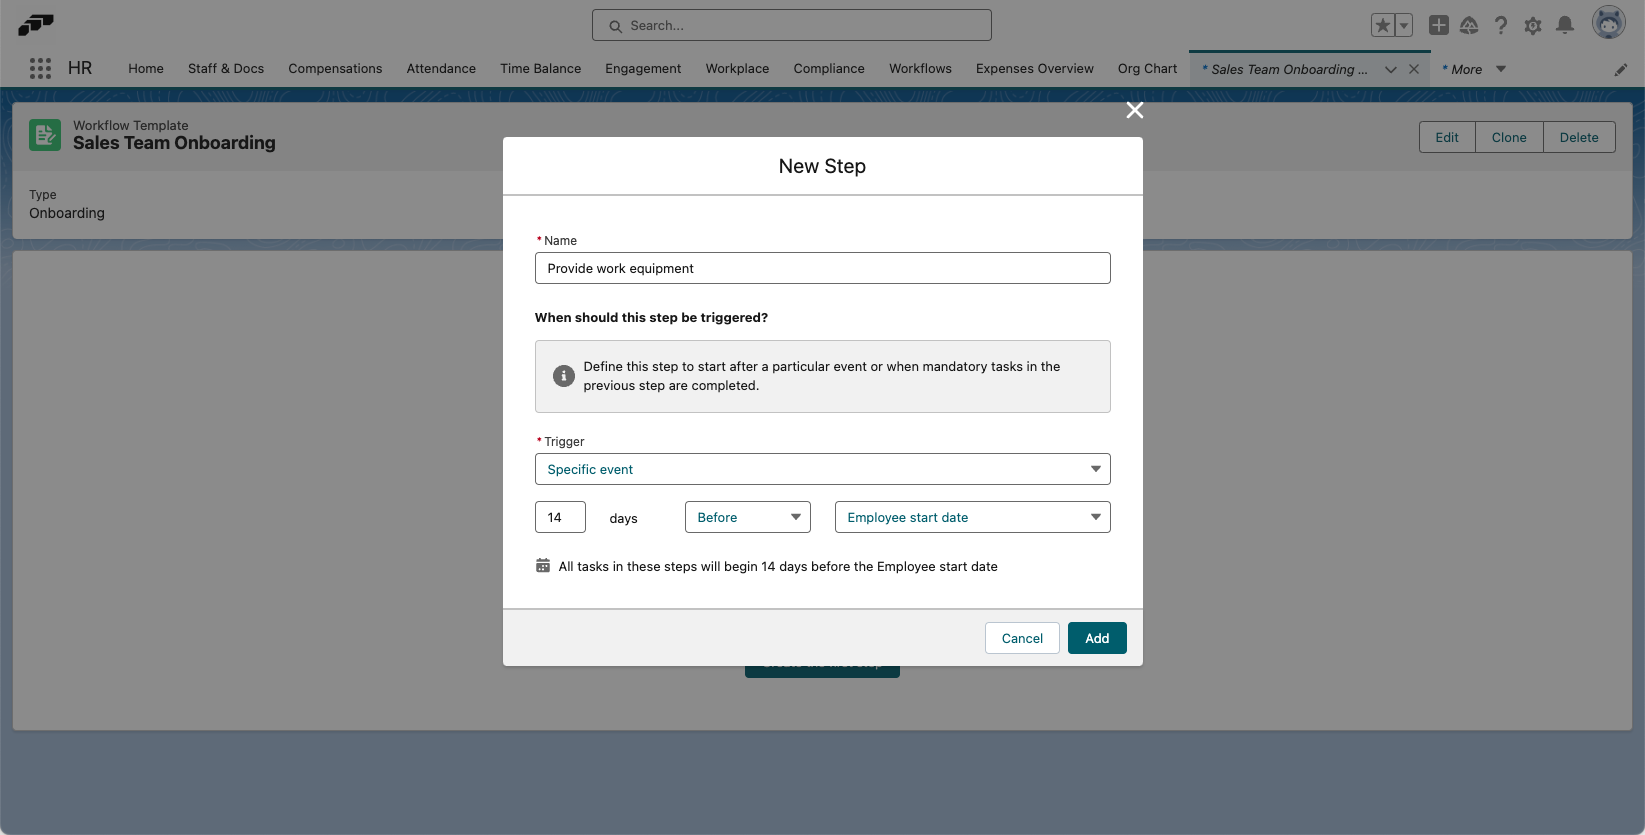
Open your workflow template. Click Create the First Step. Give your step a name and then select a trigger. You can trigger a step after all mandatory tasks in the previous step have been completed.
Alternatively, you can set the step to trigger a certain amount of time before or after a specific event, such as the Workflow Start Date or Employee Start Date. Once you have set the trigger, click Add.
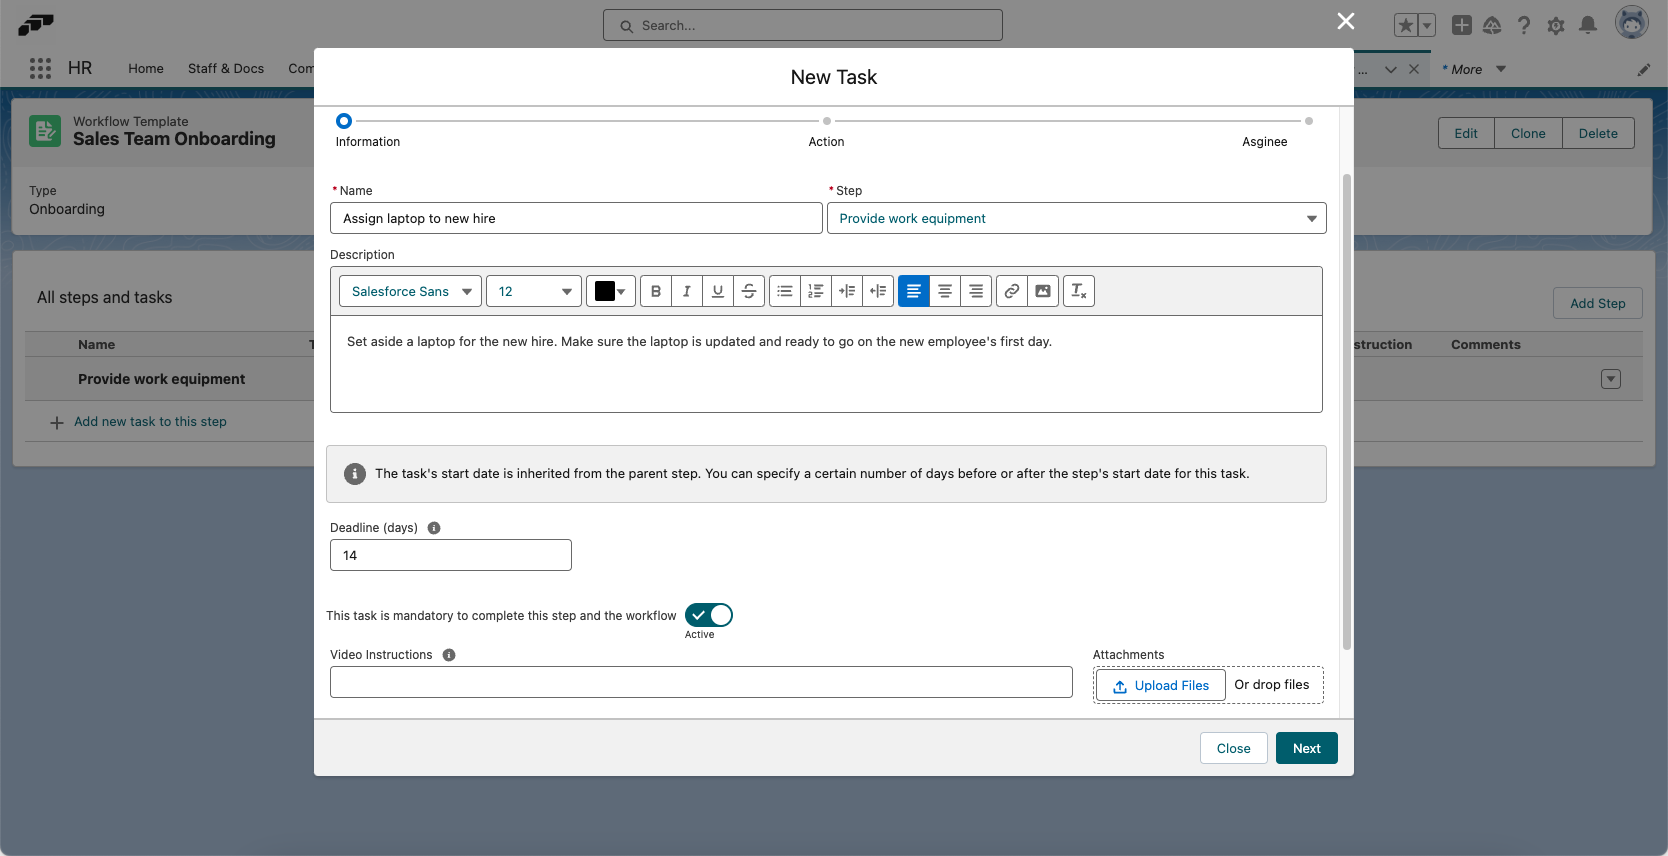
To create a task, click Add New Task To This Step below your newly created step. Give your task a name, select which parent step it should belong to, and write a description if needed. Define a deadline and choose whether the task is mandatory.
You can also add video instructions by entering a video URL or attaching a video file to help the user complete the task.
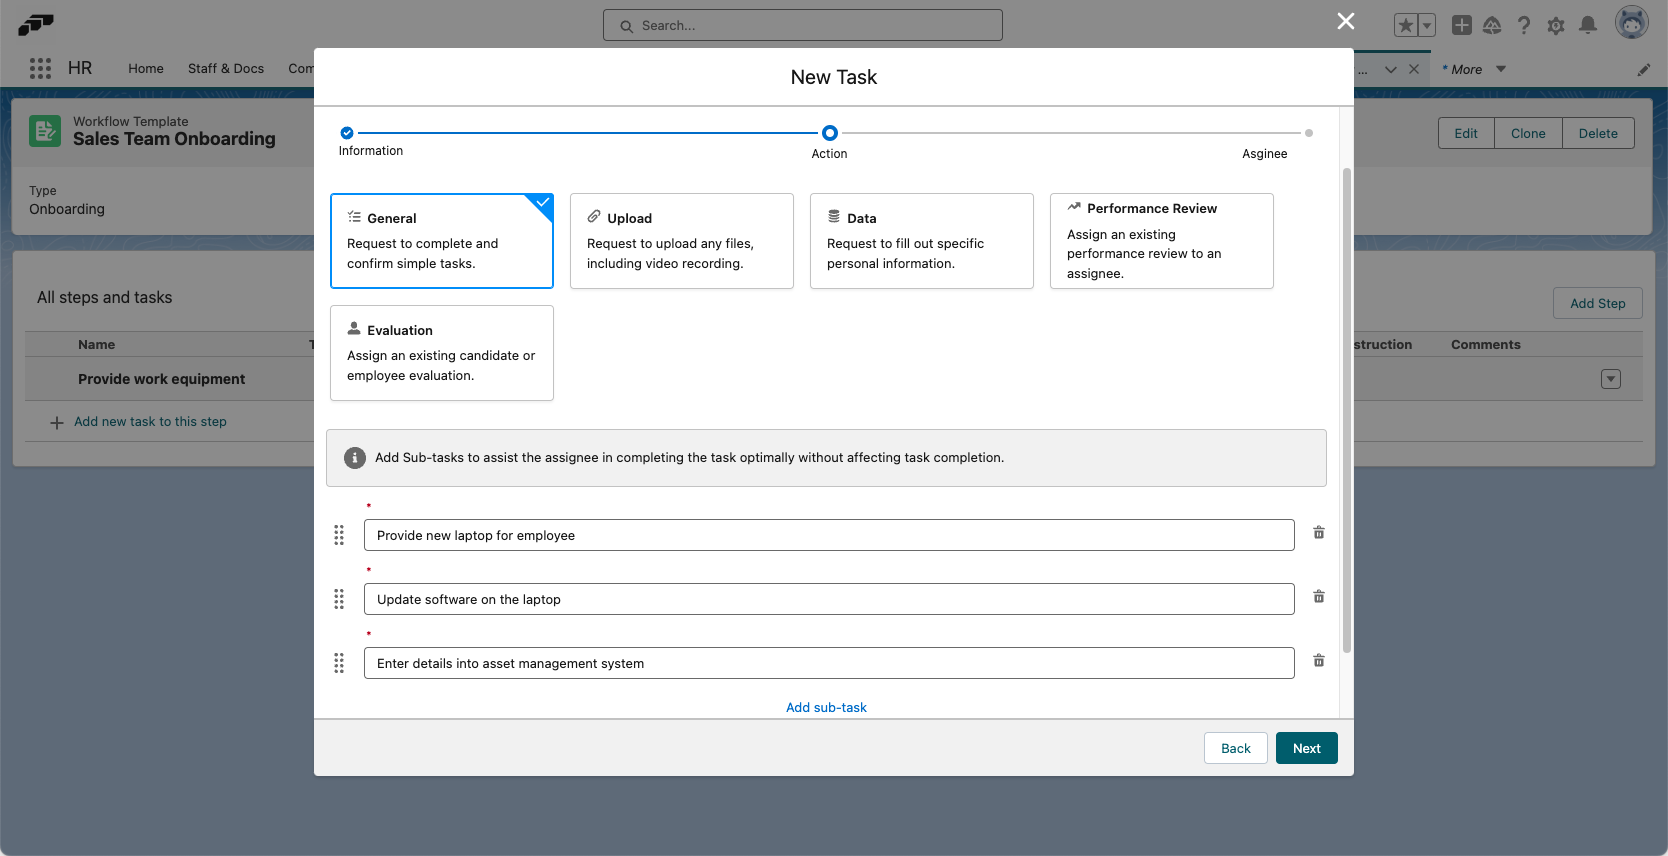
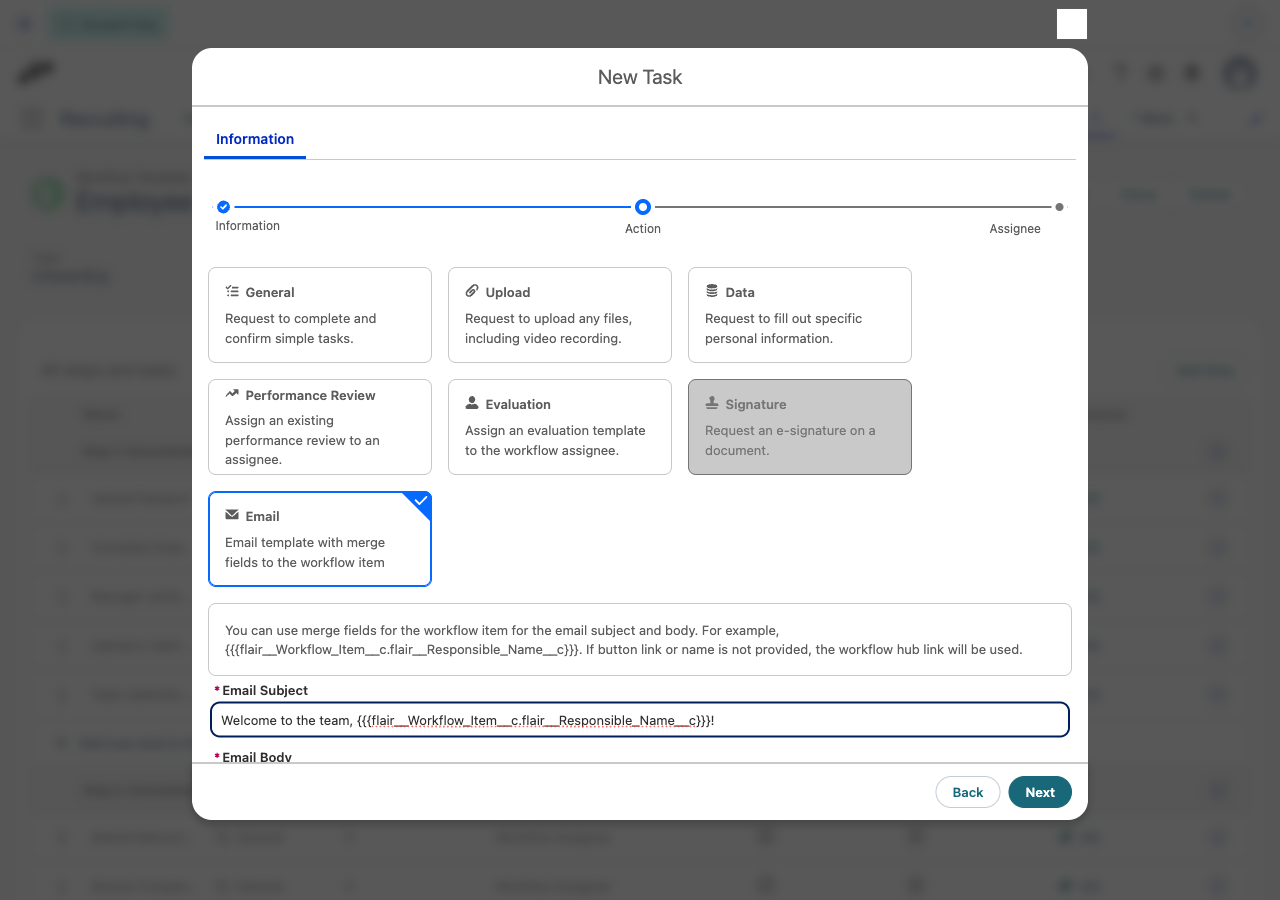
Clicking Next, you can select from various types of tasks, including Upload, Data, Performance Review, Evaluation, Signature, or Email.
Each task has a slightly different structure:
-
General: A simple task to be completed, e.g. "Write a message to your new team on Slack". These tasks are completed simply by marking them as done.
-
Upload: For when a file or document needs to be uploaded, e.g. "Sign and upload work contract". You will need to define the document's Type, Category, and File Format. The task will contain an upload field for the assignee to use.
infoSupported File Types: At present, the supported file types for uploads in workflow tasks are as follows: PDF, PNG, JPG, JPEG, GIF
-
Data: For when you require information, e.g. "Enter bank details". You can define data Fields for this item type. The assignee will see these fields in the task in the Employee Hub.
-
Performance Review: Assign a previously created performance review and a reviewer.
-
Evaluation: Assign an existing evaluation template to an employee to assess employees or candidates.
-
Signature: If you are using the flair eSign integration, you can request e-signatures on documents.
-
Email: Send an automated email to the task's responsible person when the task becomes active. You can write the subject and body using merge fields and add a call-to-action button. See Email Tasks below.
You can also add subtasks to guide the user. While subtasks are not mandatory to complete the step, they will appear in a checklist in the Employee Hub, giving the assignee a step-by-step to-do list to aid them in completing the task.
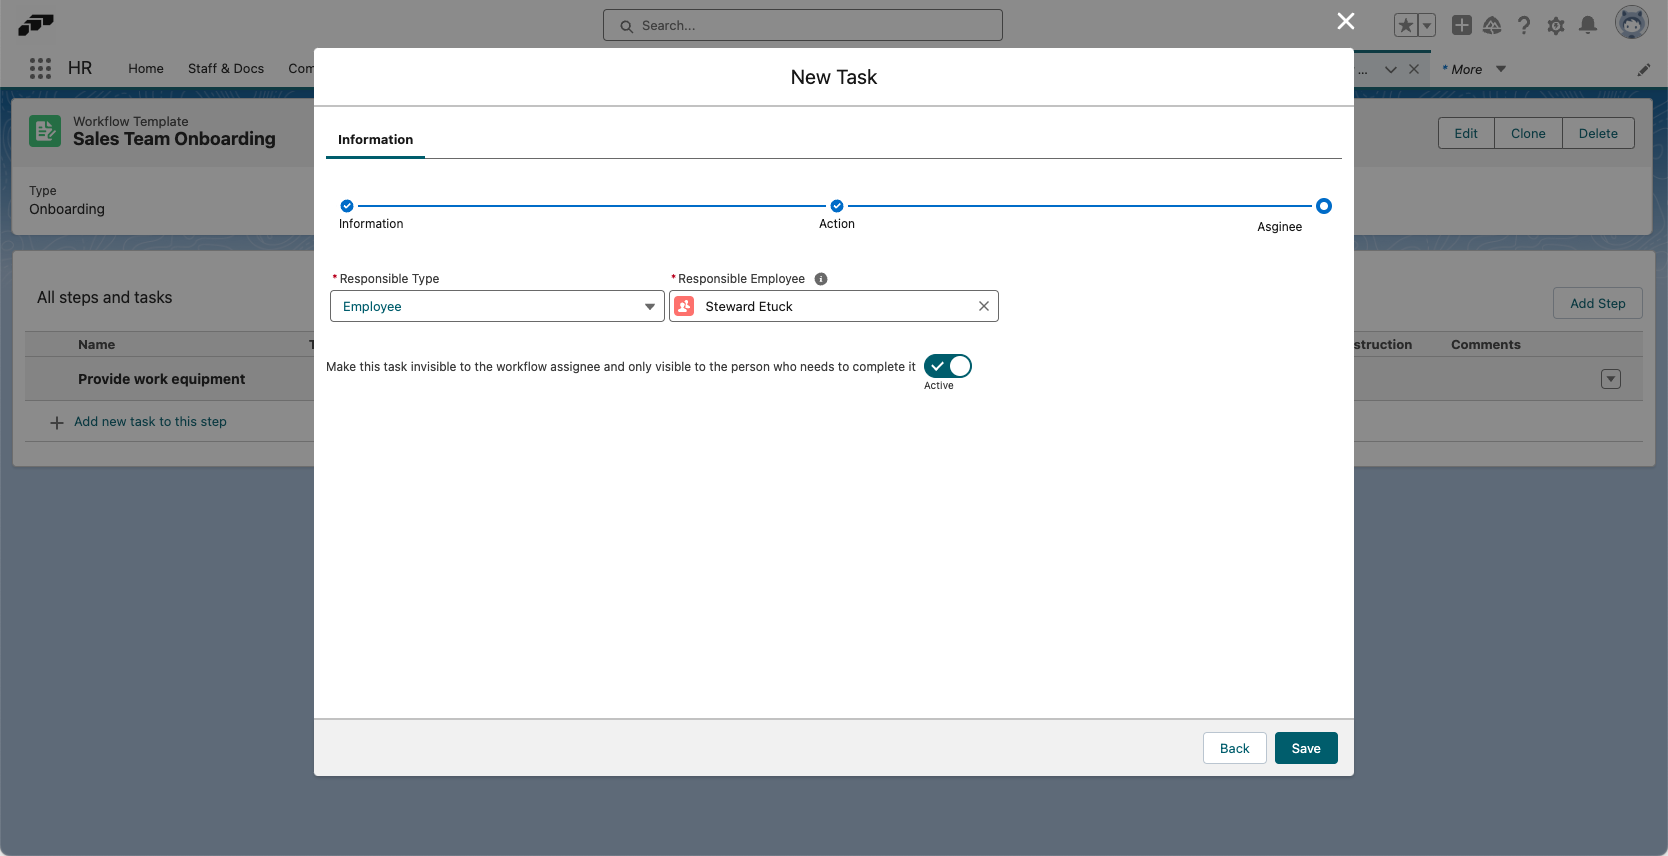
Clicking Next to the final screen will allow you to select which role is responsible for completing the task:
- Manager: The manager of the person this workflow is assigned to.
- Performance Manager: The performance manager of the person this workflow is assigned to.
- Workflow Assignee: The person this workflow is assigned to, which you will define once you have finished creating your workflow template.
- Employee: Choose any employee to assign this task to.
- Team: Choose a team to assign this task to.
- SOQL Filter: Resolve the responsible person dynamically with a filter, based on a field on the workflow assignee's record. See Assigning a Responsible via SOQL Filter below.
You can also adjust the visibility of the task using the toggle.
If your workflow includes a task that is assigned to a manager, the manager will be able to view and edit tasks assigned to employees.
Assigning a Responsible via SOQL Filter
When you choose SOQL Filter as the responsible type, flair works out who is responsible at the moment the workflow is assigned, based on data on the assignee's own employee record. This is useful when the right person differs from employee to employee — for example, when each employee has their own HR specialist, buddy, or recruiter stored in a lookup field, and you want the task to go to that person automatically.
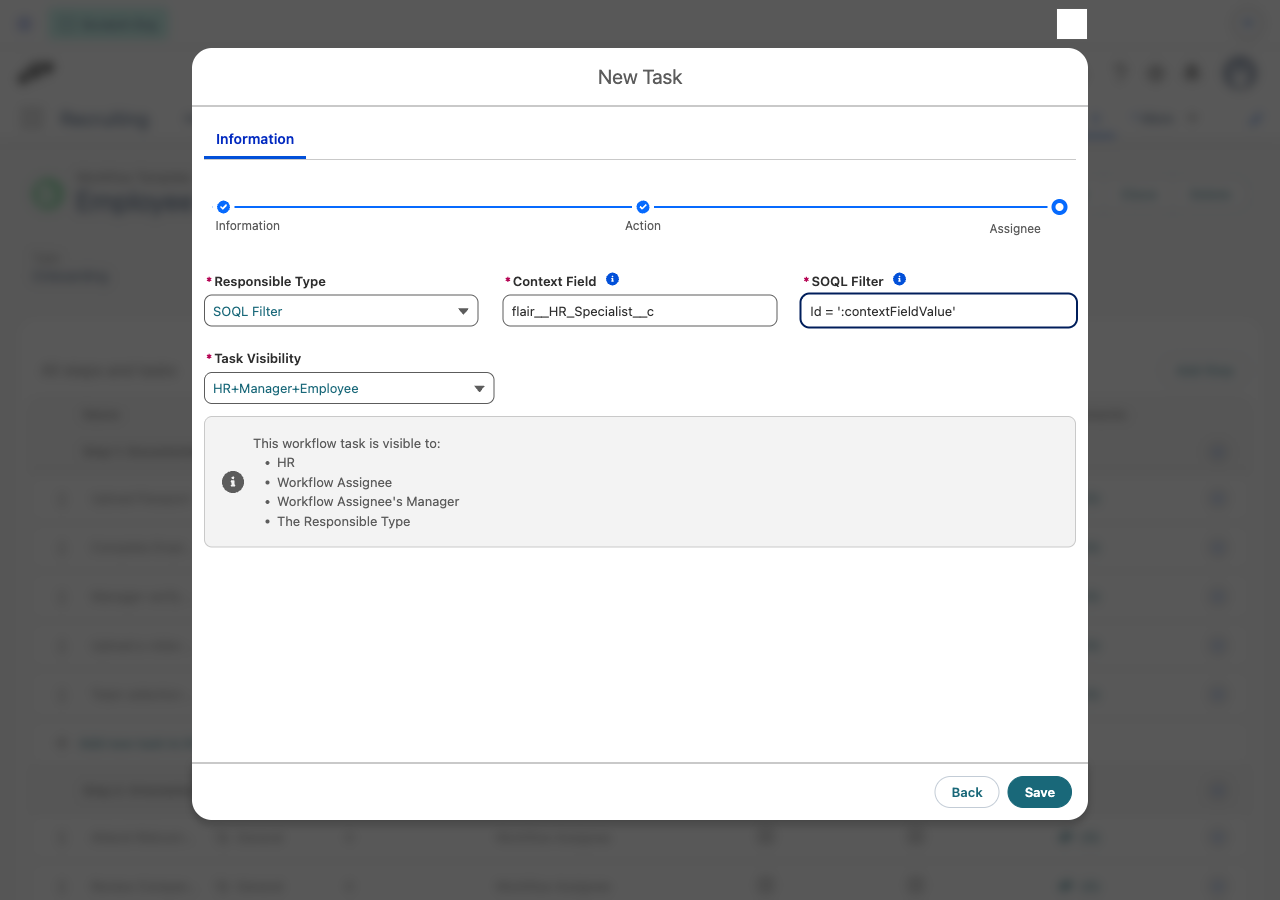
Selecting SOQL Filter reveals two inputs:
- Context Field — the API name of a field on the assignee's Employee record whose value you want to use in the filter. It defaults to
Id(the assignee's own record). To route the task to the person in a lookup field, enter that lookup's API name, e.g.flair__Manager__c. - SOQL Filter — a SOQL
WHEREclause that is run against the Employee object to find the responsible person. Inside the filter, use the placeholder:contextFieldValueto reference the value of the Context Field. Because the placeholder is replaced with the raw field value, you must wrap it in single quotes.
:contextFieldValue in single quotesThe placeholder is substituted as plain text, so Id = :contextFieldValue produces invalid SOQL and silently resolves no one — the responsible is left empty with no visible error. Always quote it: Id = ':contextFieldValue'. Curly-brace syntax such as {contextFieldValue} is not supported.
Example: route the task to the assignee's HR specialist
Say each employee has a custom lookup field flair__HR_Specialist__c (a lookup to another Employee) and you want the task assigned to that HR specialist:
- Context Field:
flair__HR_Specialist__c - SOQL Filter:
Id = ':contextFieldValue'
When the workflow is assigned, flair reads the assignee's flair__HR_Specialist__c value and finds the Employee whose Id matches it — the HR specialist becomes the responsible person.
You are not limited to matching on Id. Because the filter runs against the Employee object, you can match on any Employee field. For example, with Context Field flair__Manager__c you could assign the task to every employee who shares the same manager as the assignee:
flair__Manager__c = ':contextFieldValue'
The filter queries the Employee object (flair__Employee__c), so use Employee field API names (including the flair__ namespace where applicable). If the filter resolves more than one employee, each becomes a responsible person for the task.
e-Signature Requests
When creating or editing a workflow template, you can select the Signature task to request e-signatures from the workflow assignee and other employees.
To use Signature workflow tasks, you need to enable the flair eSign integration. To do this, go to HR Admin > Integrations > eSign. This integration is an optional paid add-on.
You can choose to request an e-signature on an existing document template using the dropdown. Or you can select Upload a Document to add a new document for signing.
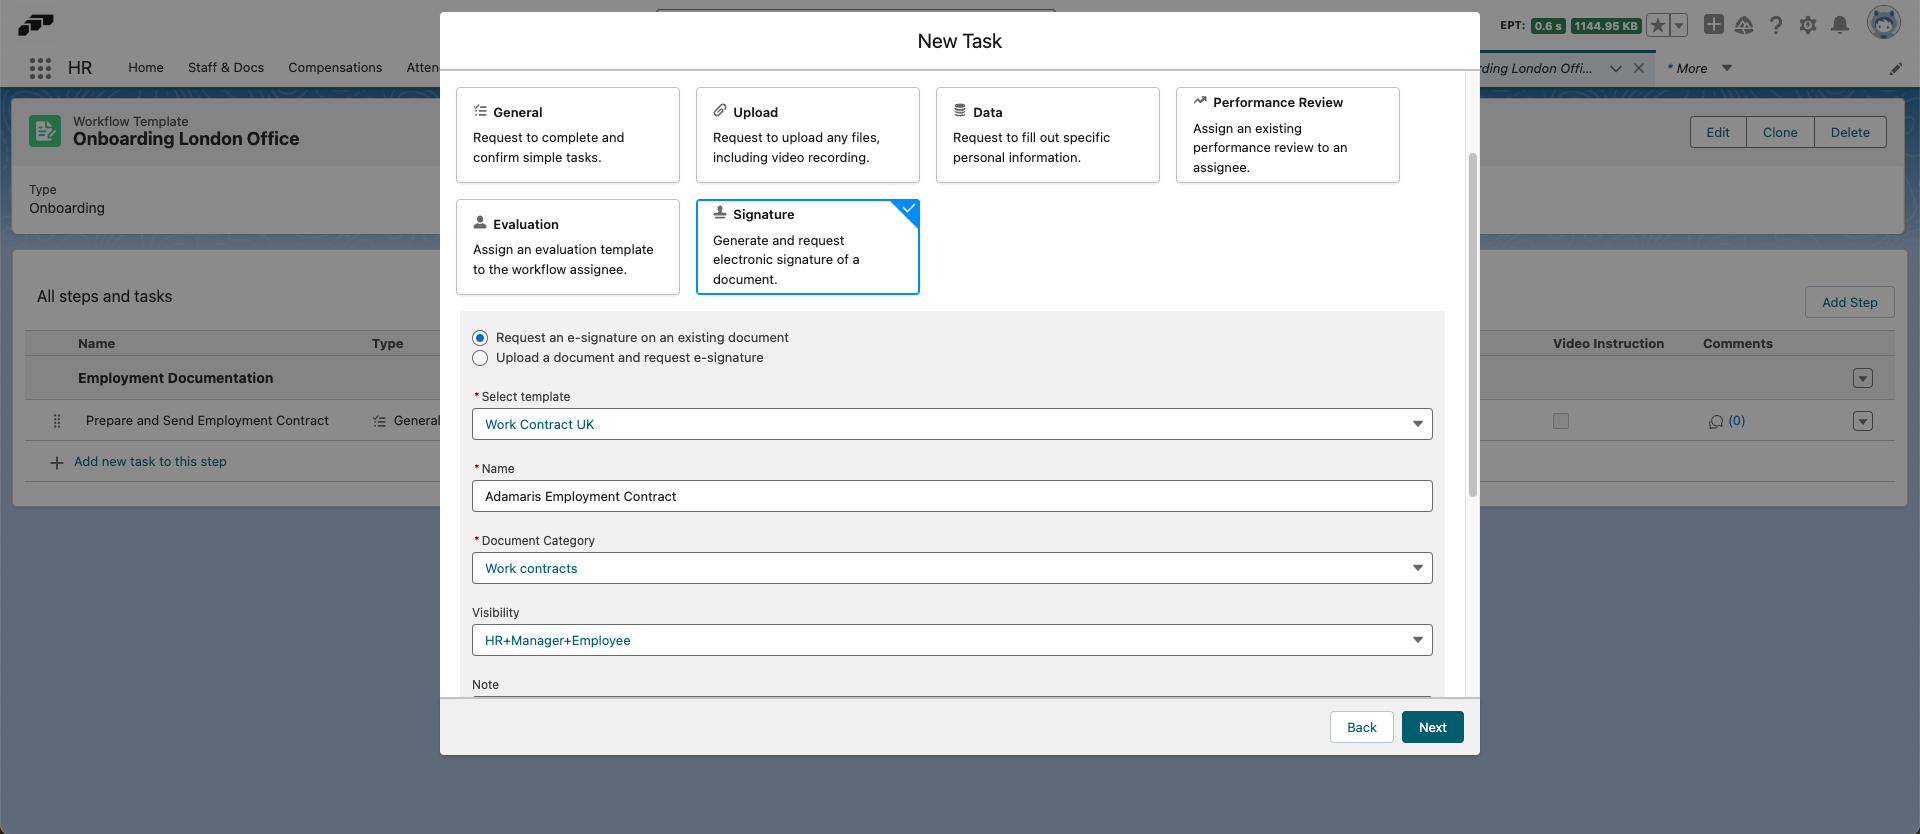
Once you have chosen your document to be signed, you need to give the task a name, choose a Document Category, and define who can see the document in the Visibility dropdown. Optionally you can also add notes and sub-tasks to help the assignee complete the task.
On the next screen, you can select who is responsible for completing the task. This should be the main signer of the document. You can also click Add a Signer if multiple people need to sign the document.
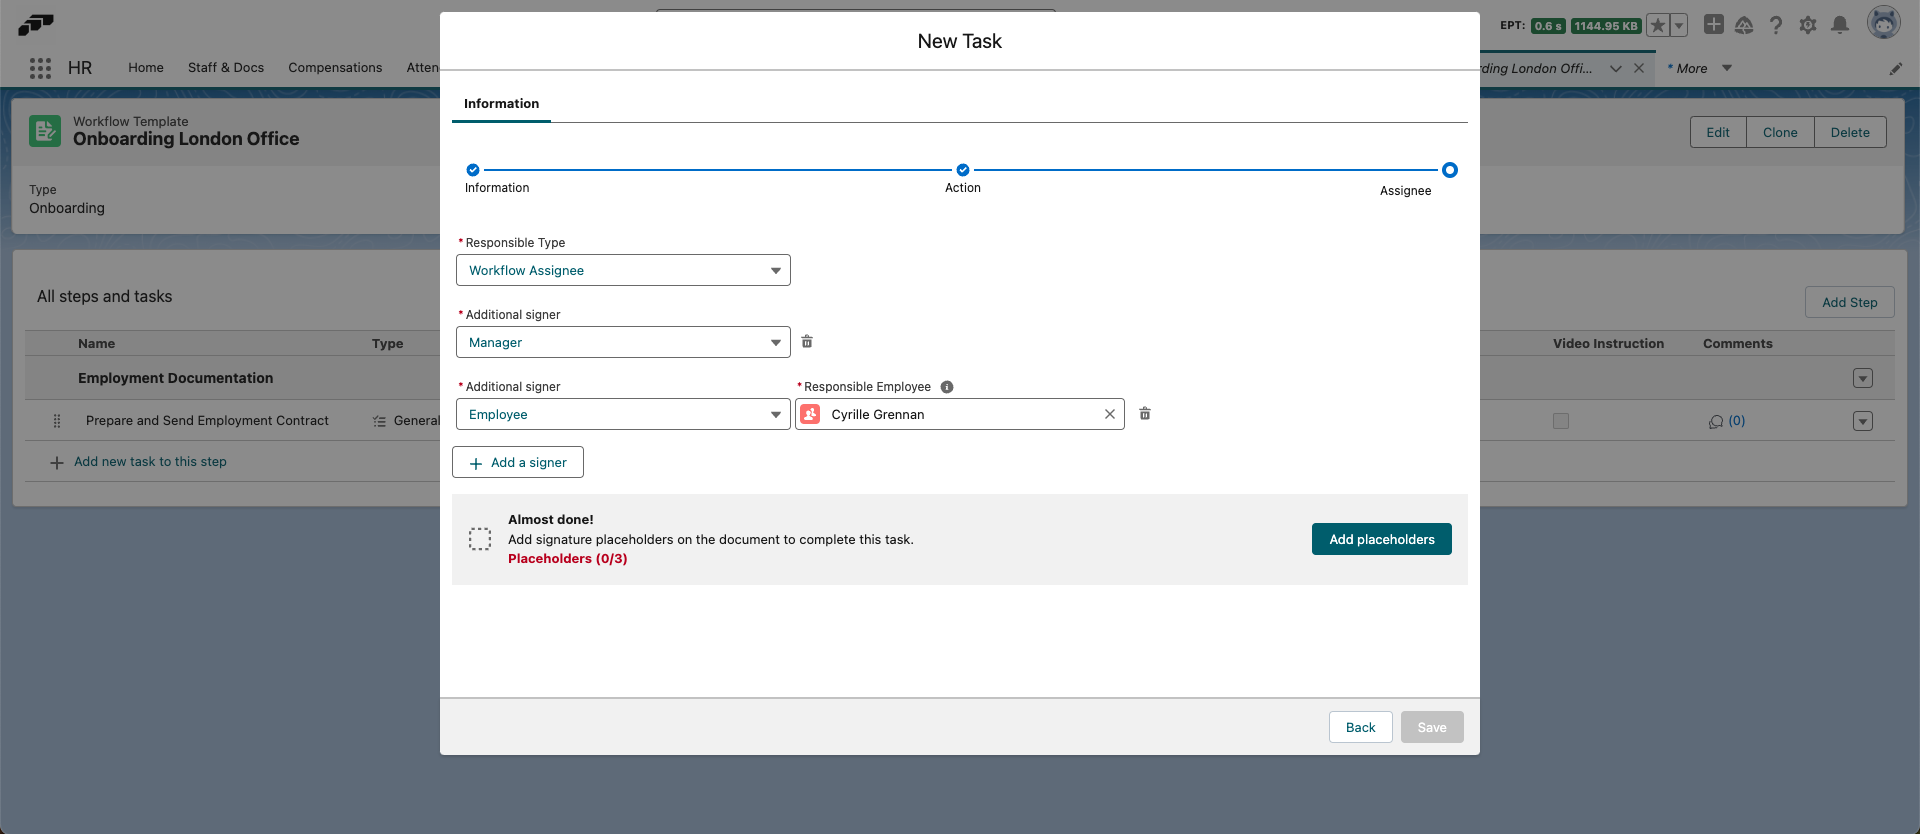
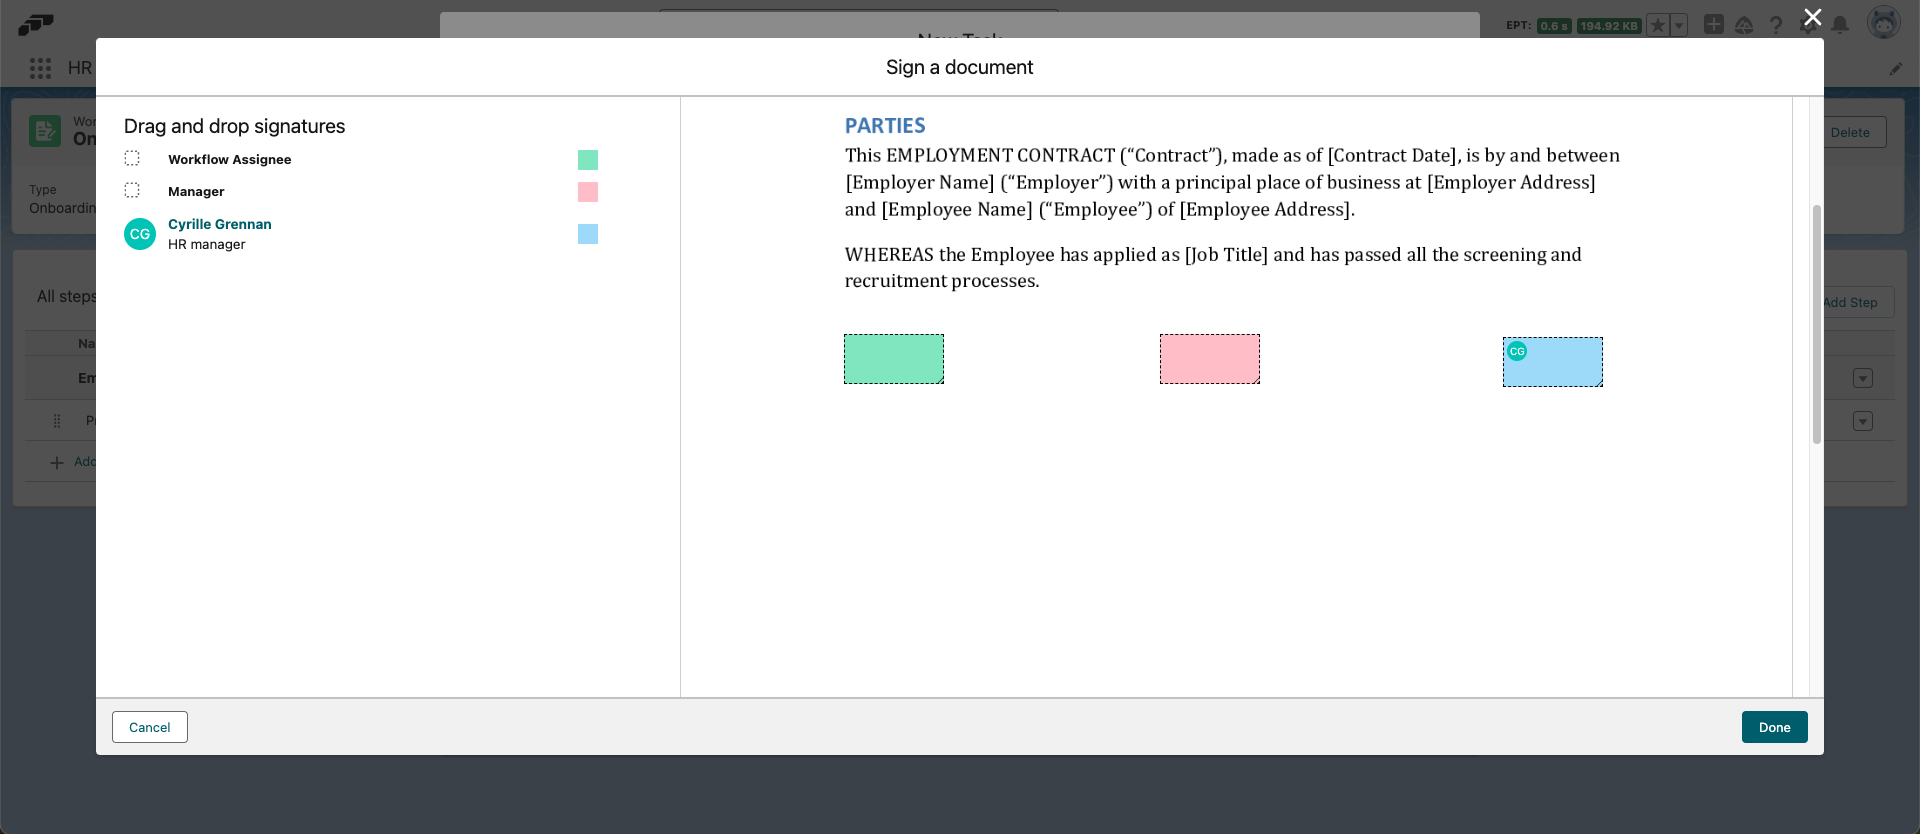
Next, click Add Placeholders. This will open a preview of the document to be signed. You can drag and drop a placeholder for each signer's signature in the document. Now click Done and then Save to finalize. Now, once you assign the workflow template to an employee, the workflow assignee and all other signers will receive a request to sign the document.
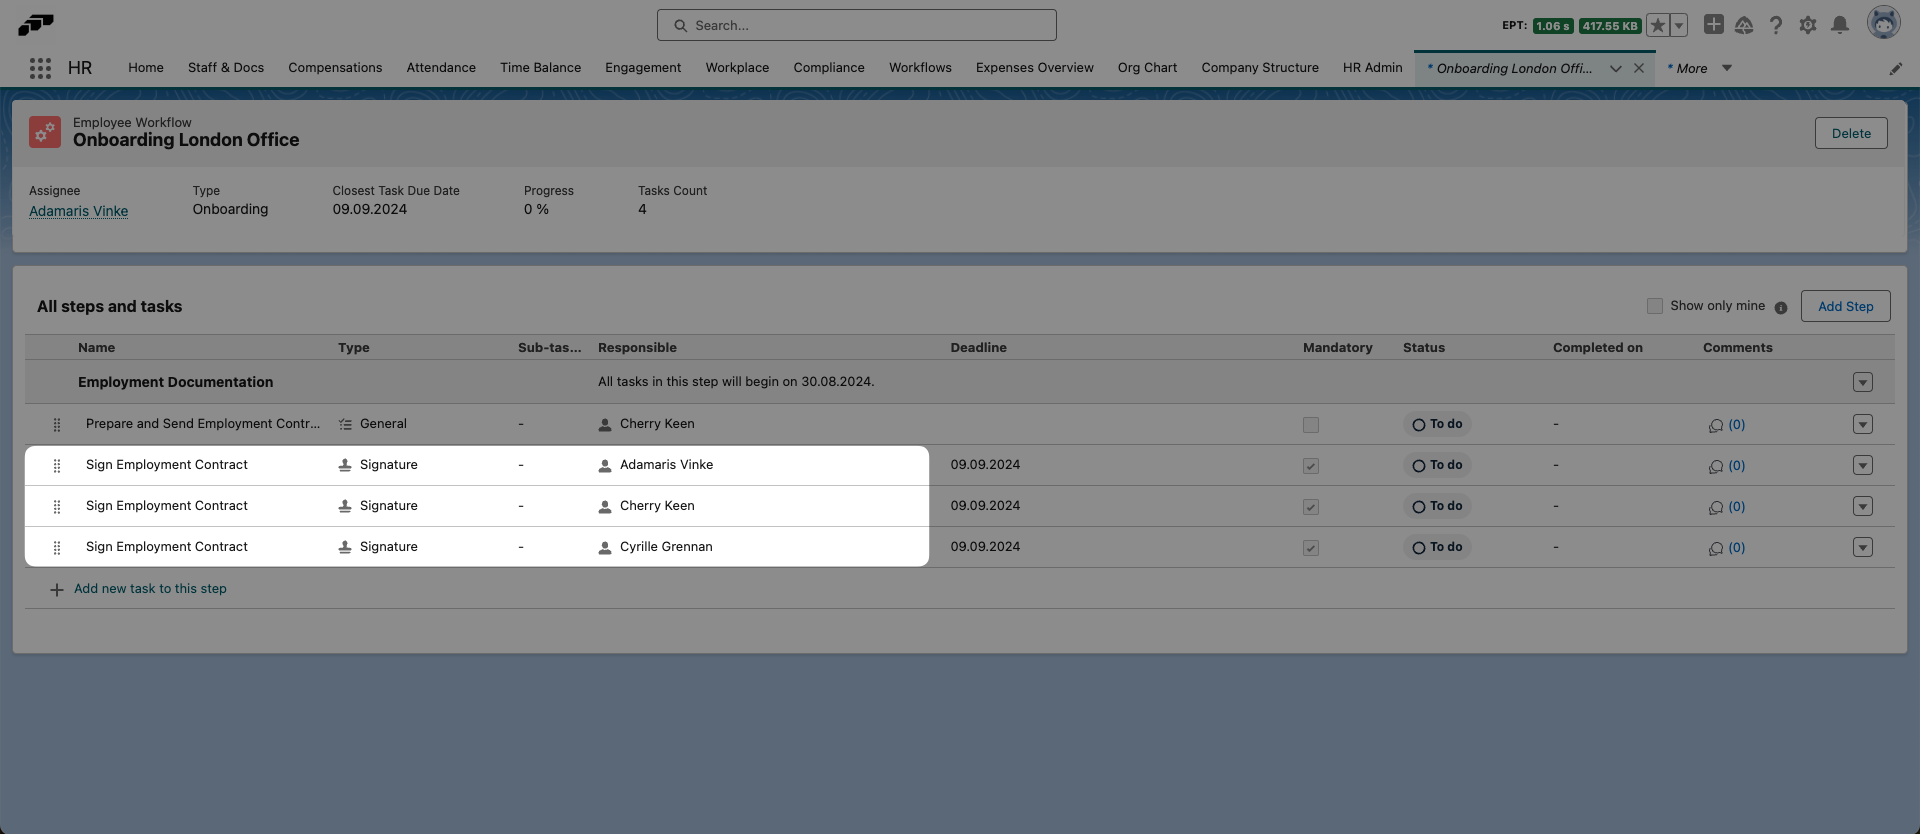
If there are multiple signers, the workflow will include one signature task for each signer once the workflow template has been assigned.
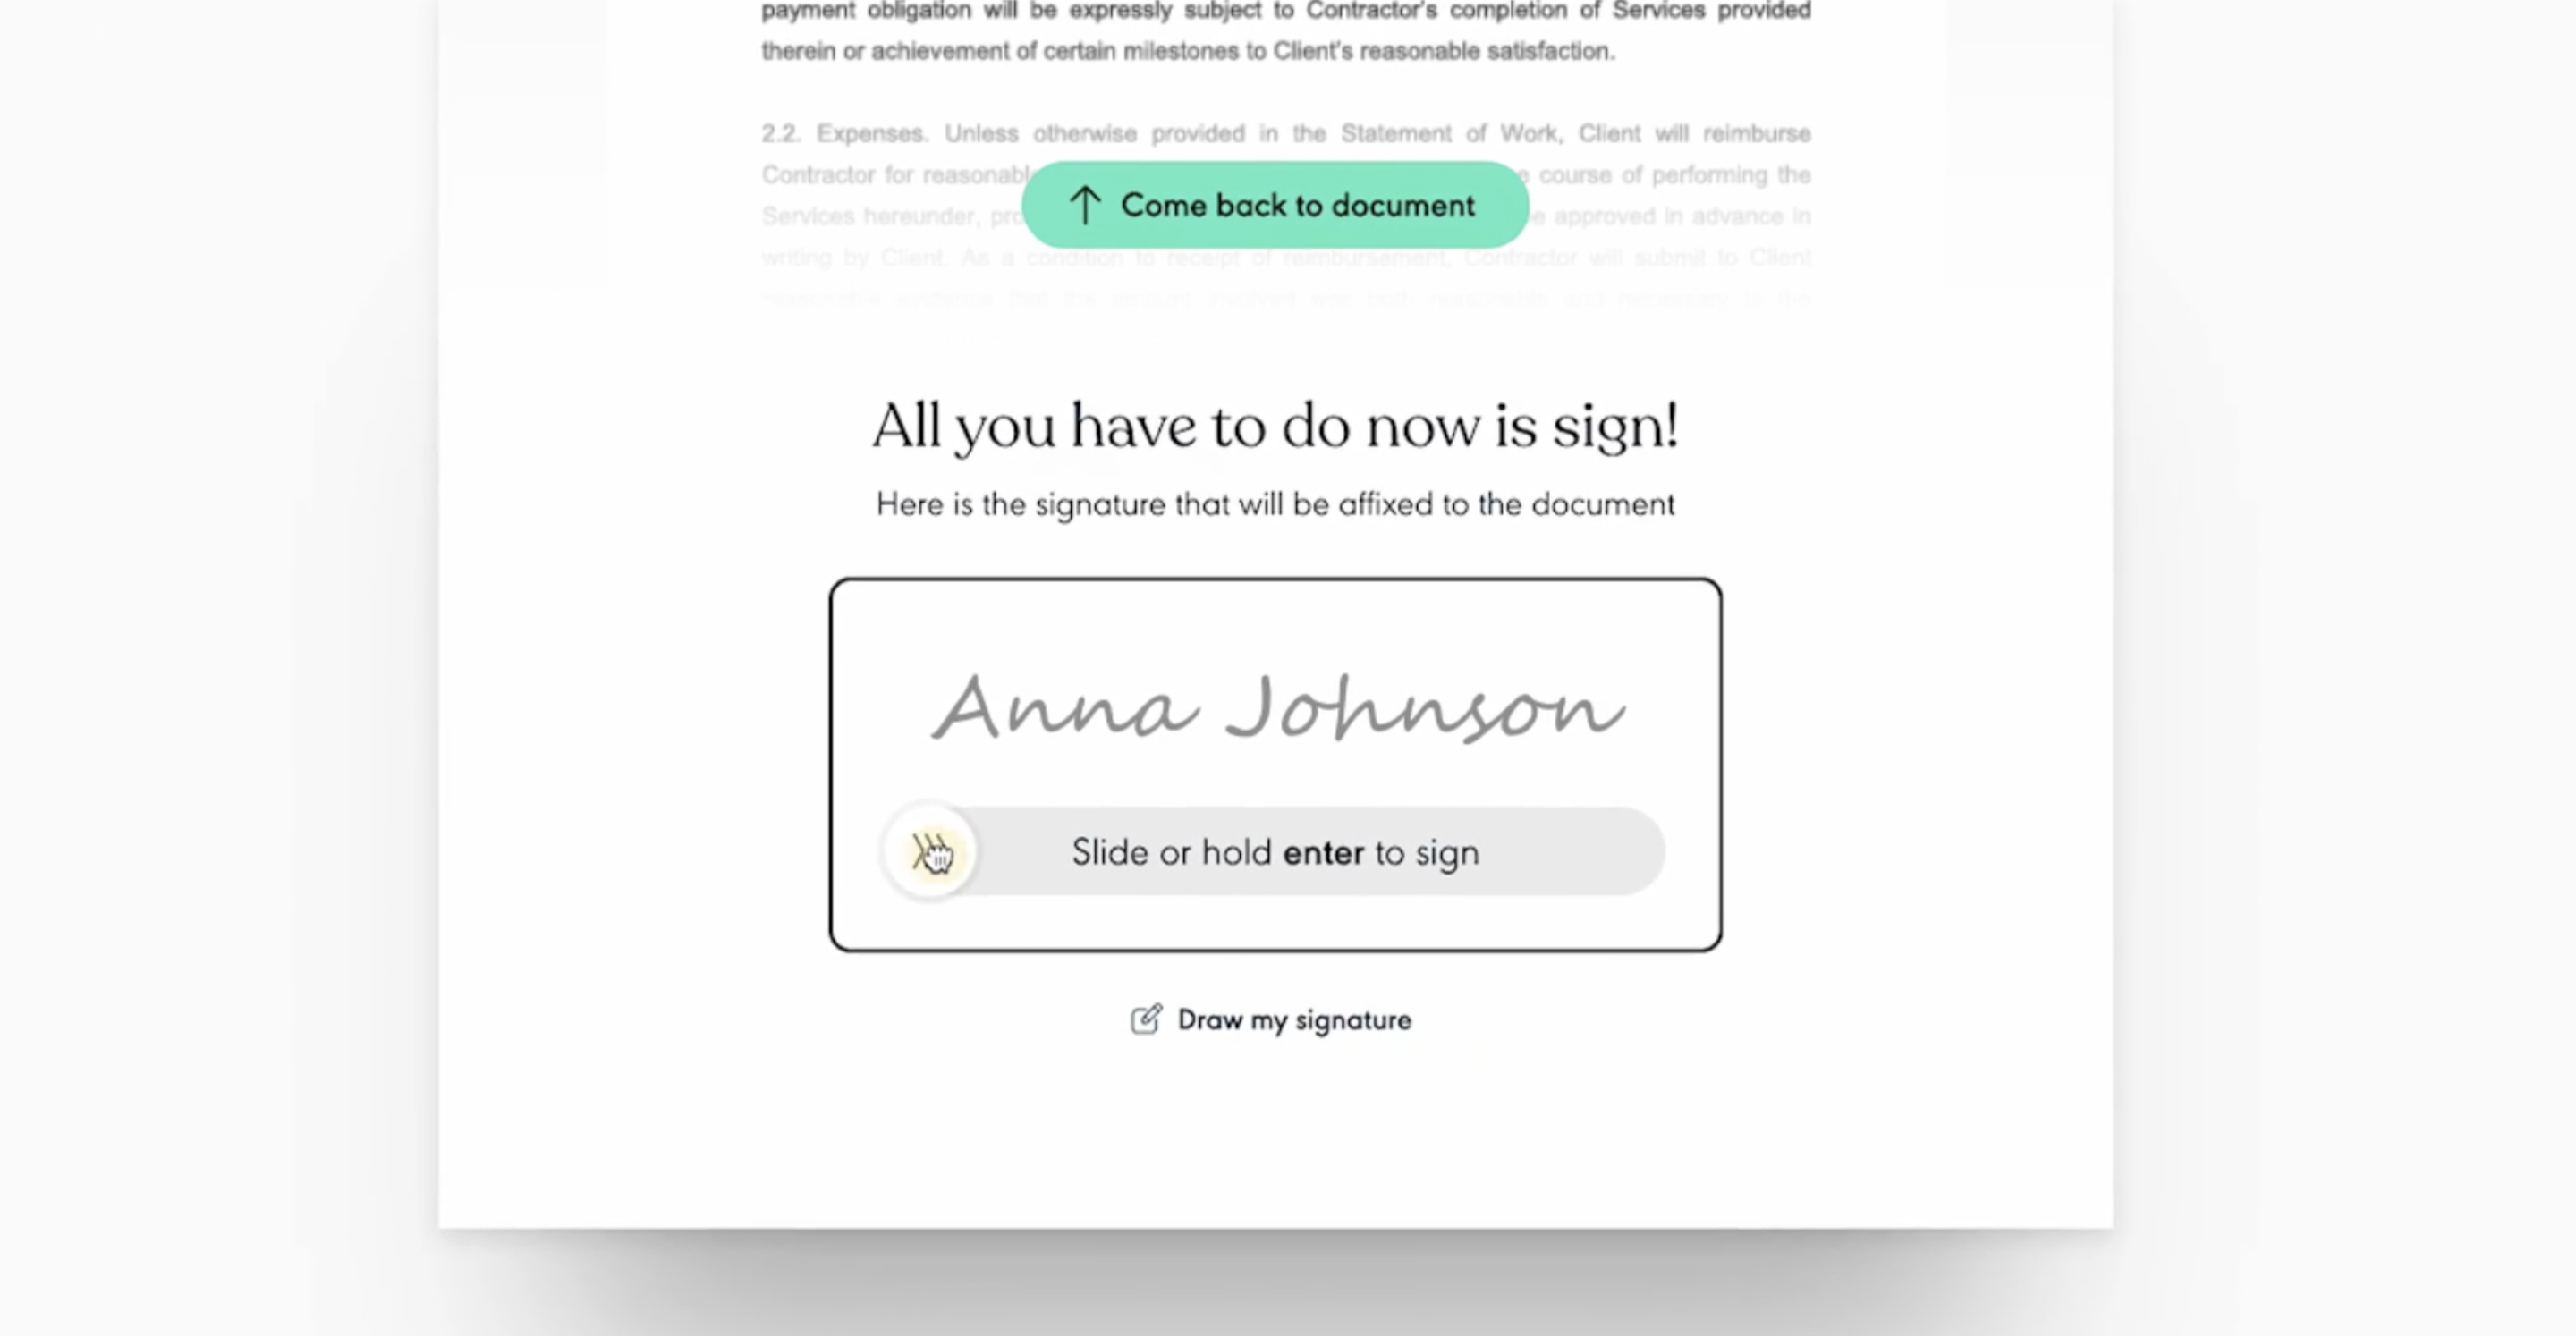
To complete a signature workflow task in the Employee Hub, click on the task name to open it and then click the Sign Document button. This will open a new browser tab where you can review the document and add your signature. You can either insert a standard signature of your full name or draw your own signature on the document.
Email Tasks
An Email task automatically sends an email to the task's responsible person when the task becomes active in the workflow. This is handy for notifying a buddy, manager, or HR specialist that it's their turn to act, or for sending the new hire a welcome message at the right point in their onboarding.
When you create a task and select the Email type, you can fill in the following fields:
- Email Subject — the subject line of the email.
- Email Body — the message content.
- Email Button Name — the label for an optional call-to-action button.
- Email Button Link — the URL the button points to.
If you leave the button name and link empty, the email includes a button linking to the workflow in the Employee Hub by default, so the recipient can jump straight to their tasks.
Using merge fields
You can personalize the subject and body with merge fields that pull values from the workflow item. Merge fields use triple curly braces and the field's full API path:
{{{flair__Workflow_Item__c.flair__Responsible_Name__c}}}
For example, a body of:
Hi {{{flair__Workflow_Item__c.flair__Responsible_Name__c}}}, you have a new onboarding task to complete.
is sent with the responsible person's name filled in. The email is delivered to the responsible person's Company Email address, so make sure that field is populated on their employee record.
Adding Videos To Workflows
Sometimes it's easier to show someone a process rather than explain it in writing. In cases like this, videos can be a great informational format.
There are two ways to add a video to a workflow task. Firstly, you can attach a video file in the Attachments section at the bottom of a new workflow item.
Alternatively, you add paste a video URL in the Video Instructions field. This field supports URLs from video platforms such as YouTube, Loom, and Wistia. Once you assign the workflow to an employee, your video will be embedded in the workflow item in the Employee Hub.
How To Assign Workflows
Once you have created a workflow template, you can now assign it to people within your organization. To get started, open the Workflows page in the flair HR app and, from the Overview tab, click the Assign Workflows button.
The Overview tab shows you all of your workflows, including workflow assignees, categories, progress, closest task due date, and which template the workflow is based on. You can also edit or delete workflows by clicking the down arrow ▼.
Next, select the workflow you want to assign. Choose the appropriate template type from the All Categories dropdown within the Template field and use the template search function.
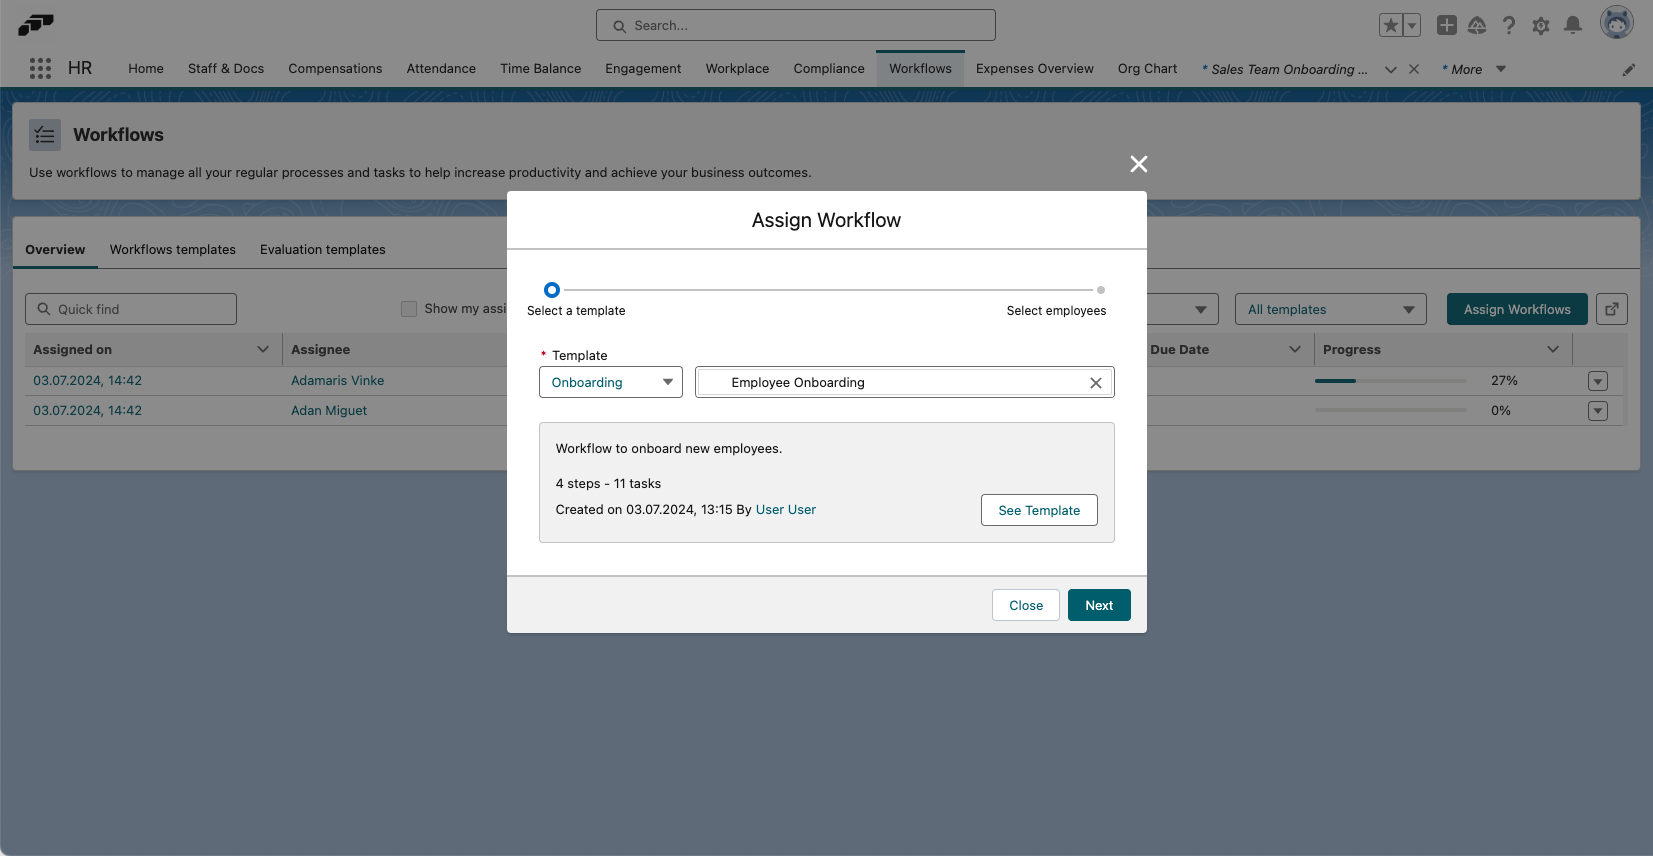
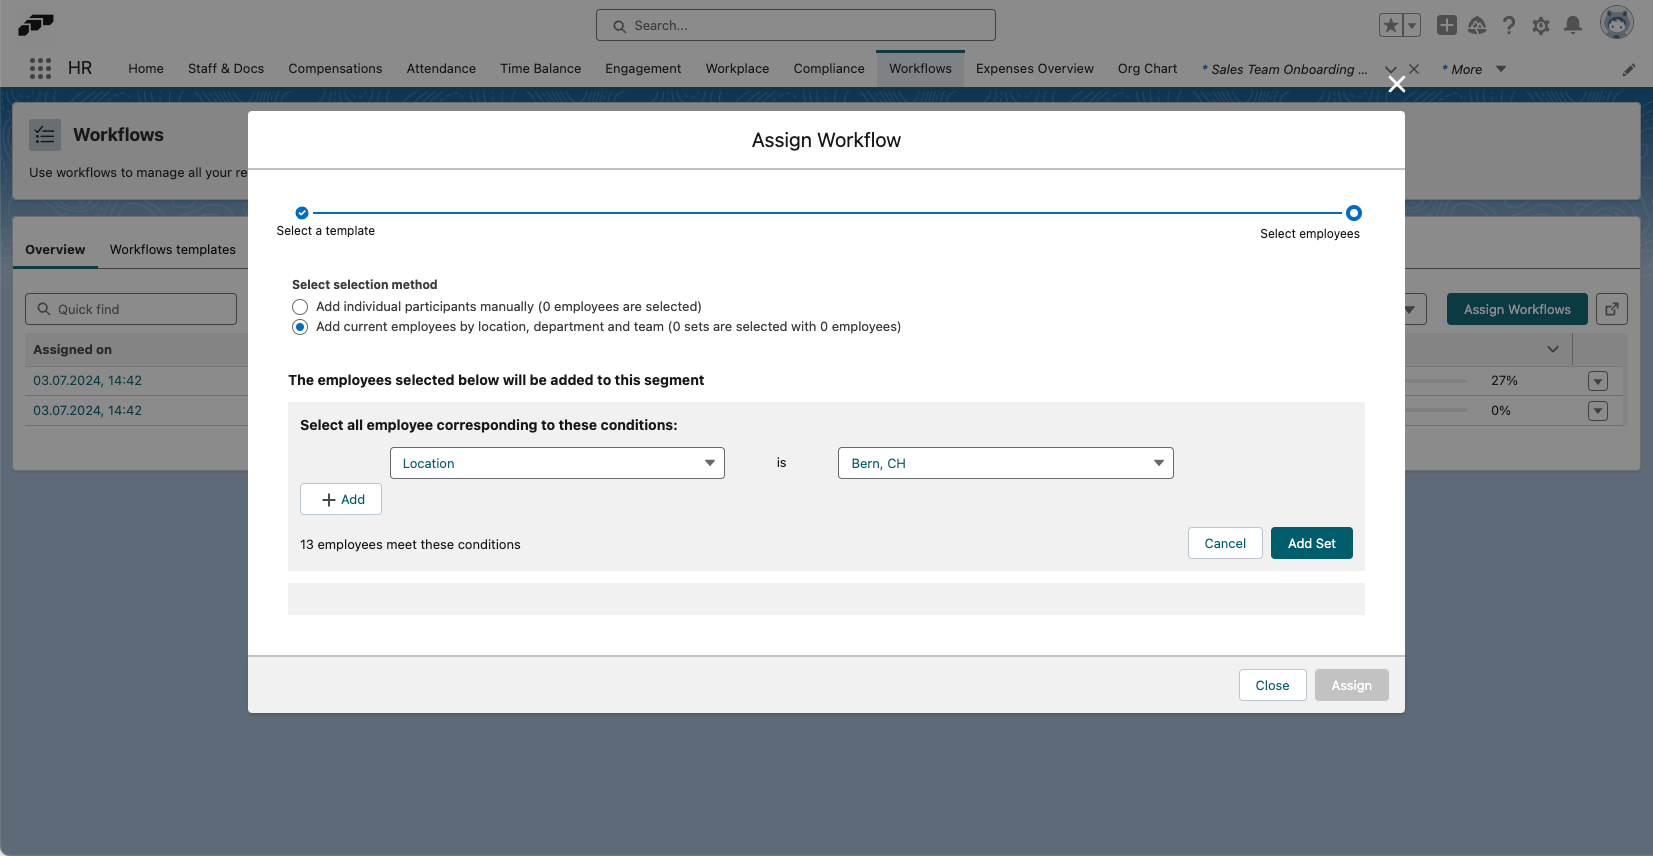
Click Next to assign workflows individually or to multiple people at the same time based on location, department, or team.
Once you have assigned a workflow to an employee, they will be notified in the Employee Hub. Depending on their notification settings, they may also receive notifications and reminders via Slack and email.
Please note that you can only assign workflows that contain at least one task.
Automatically Assigning Workflows to Employees
You can automatically assign workflows to employees when they join a team or meet certain criteria. This is useful for onboarding new team members or ensuring consistent task completion.
Prerequisites
Before setting up automatic workflow assignment:
- Create a workflow template in the flair HR app
- Create your team in the Teams section of the app
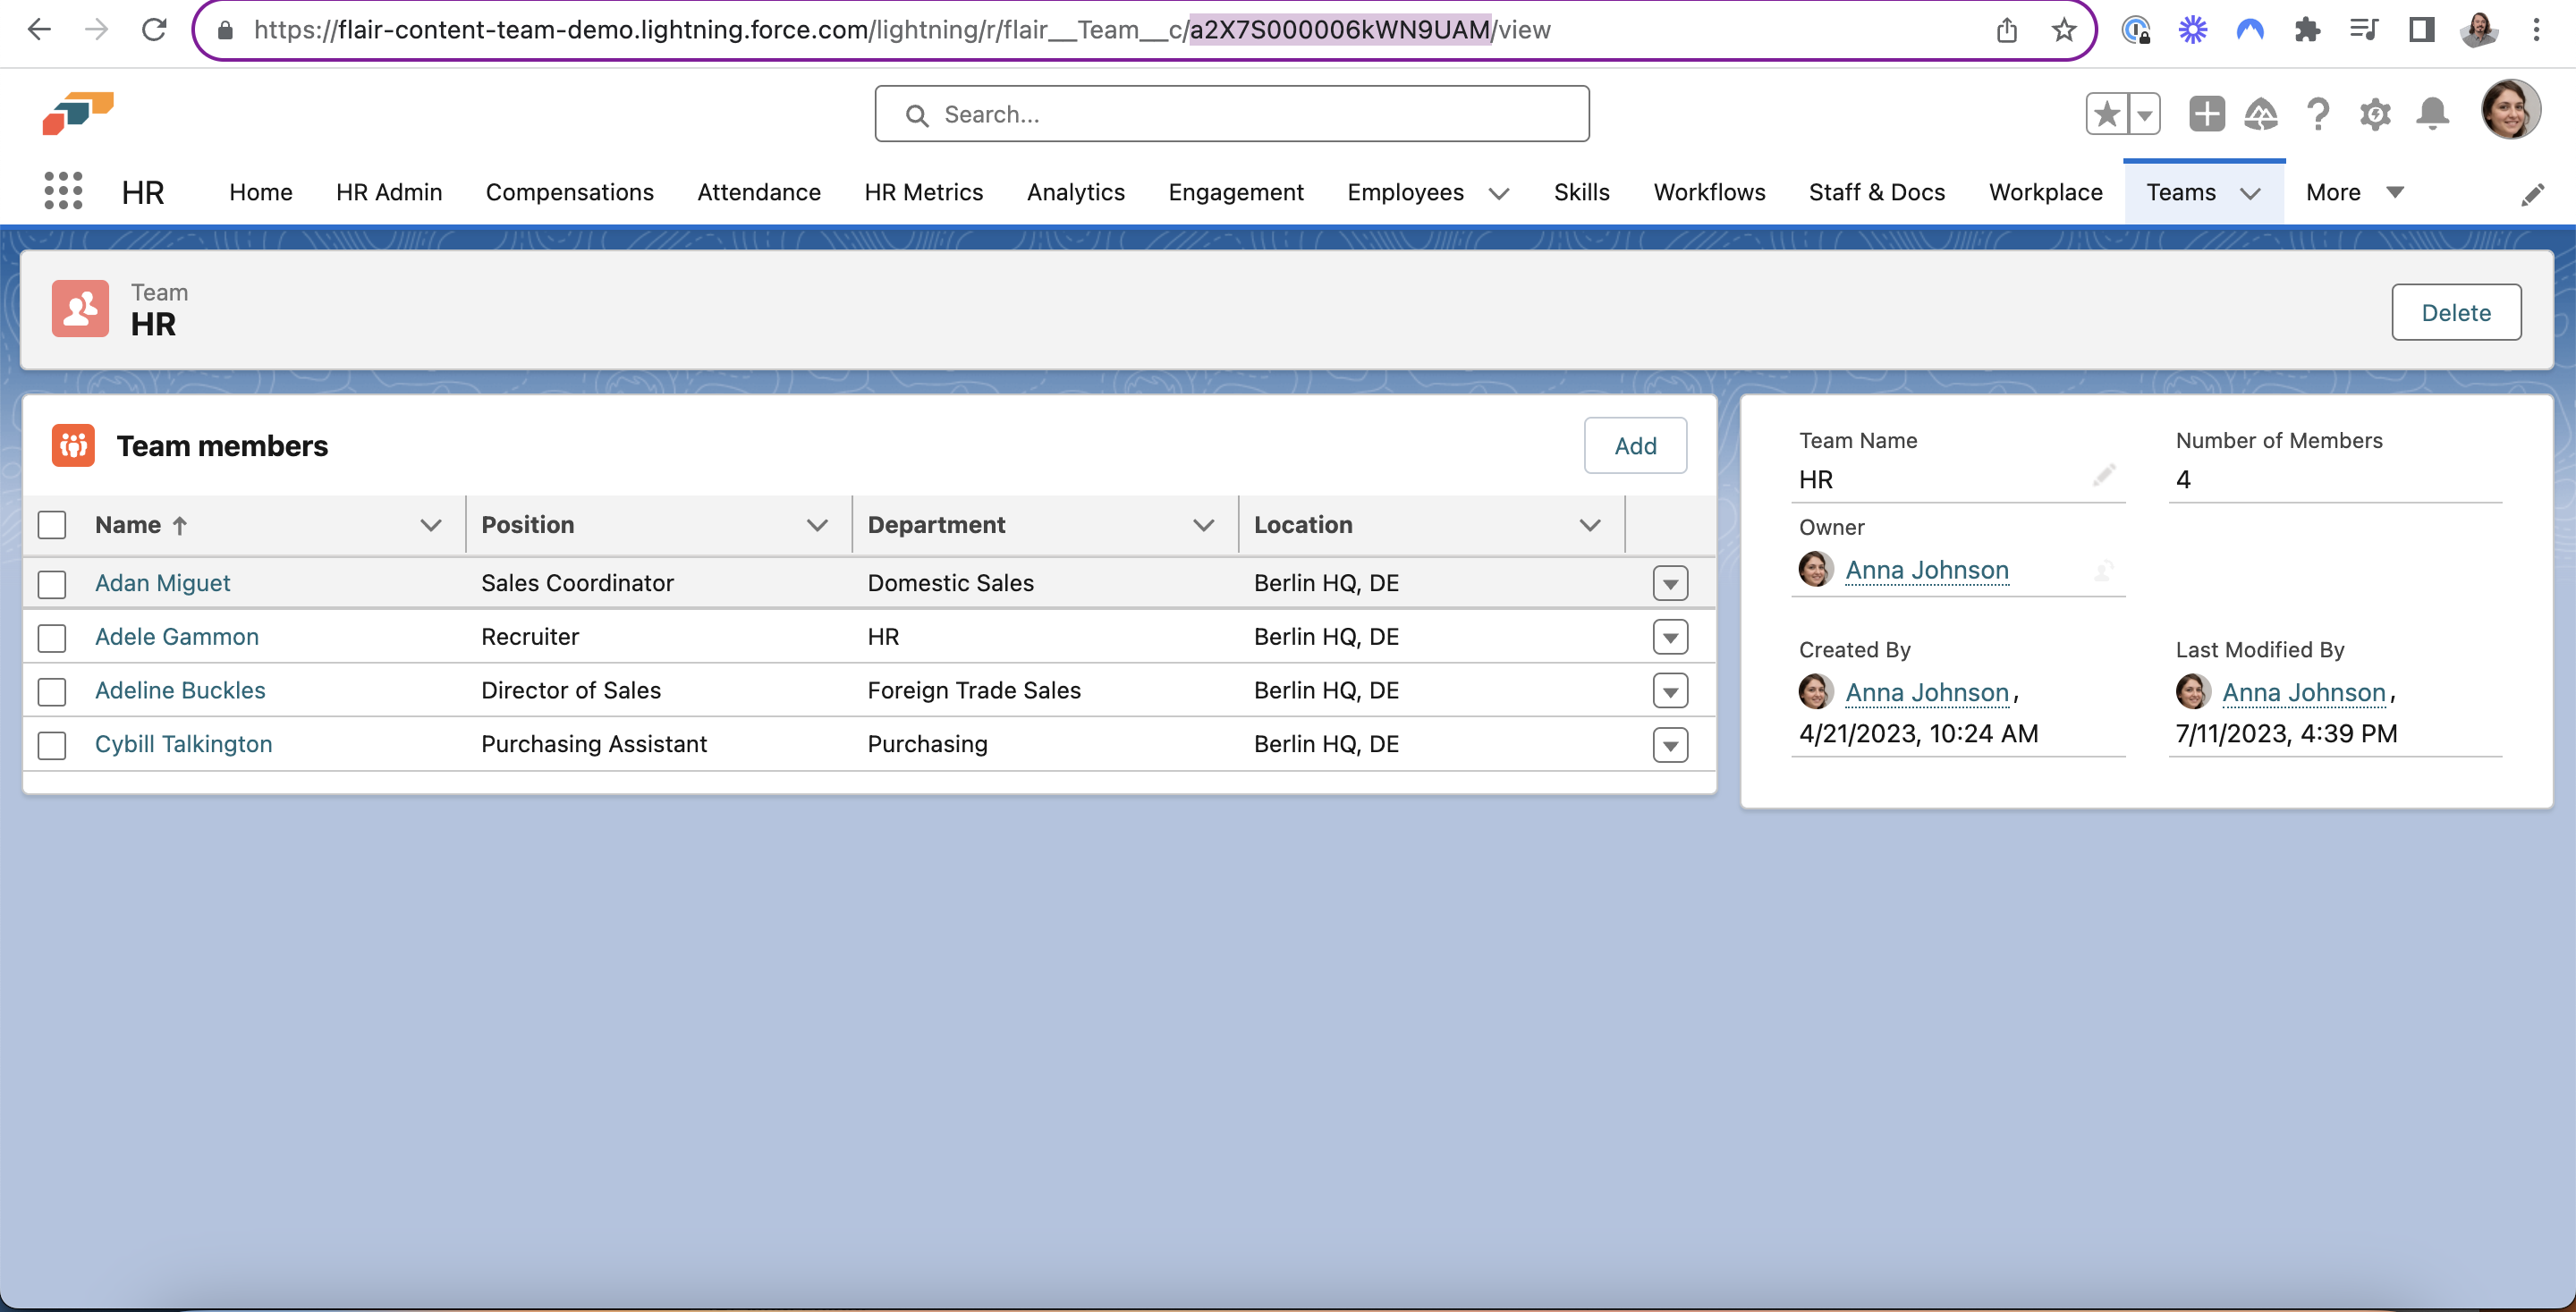
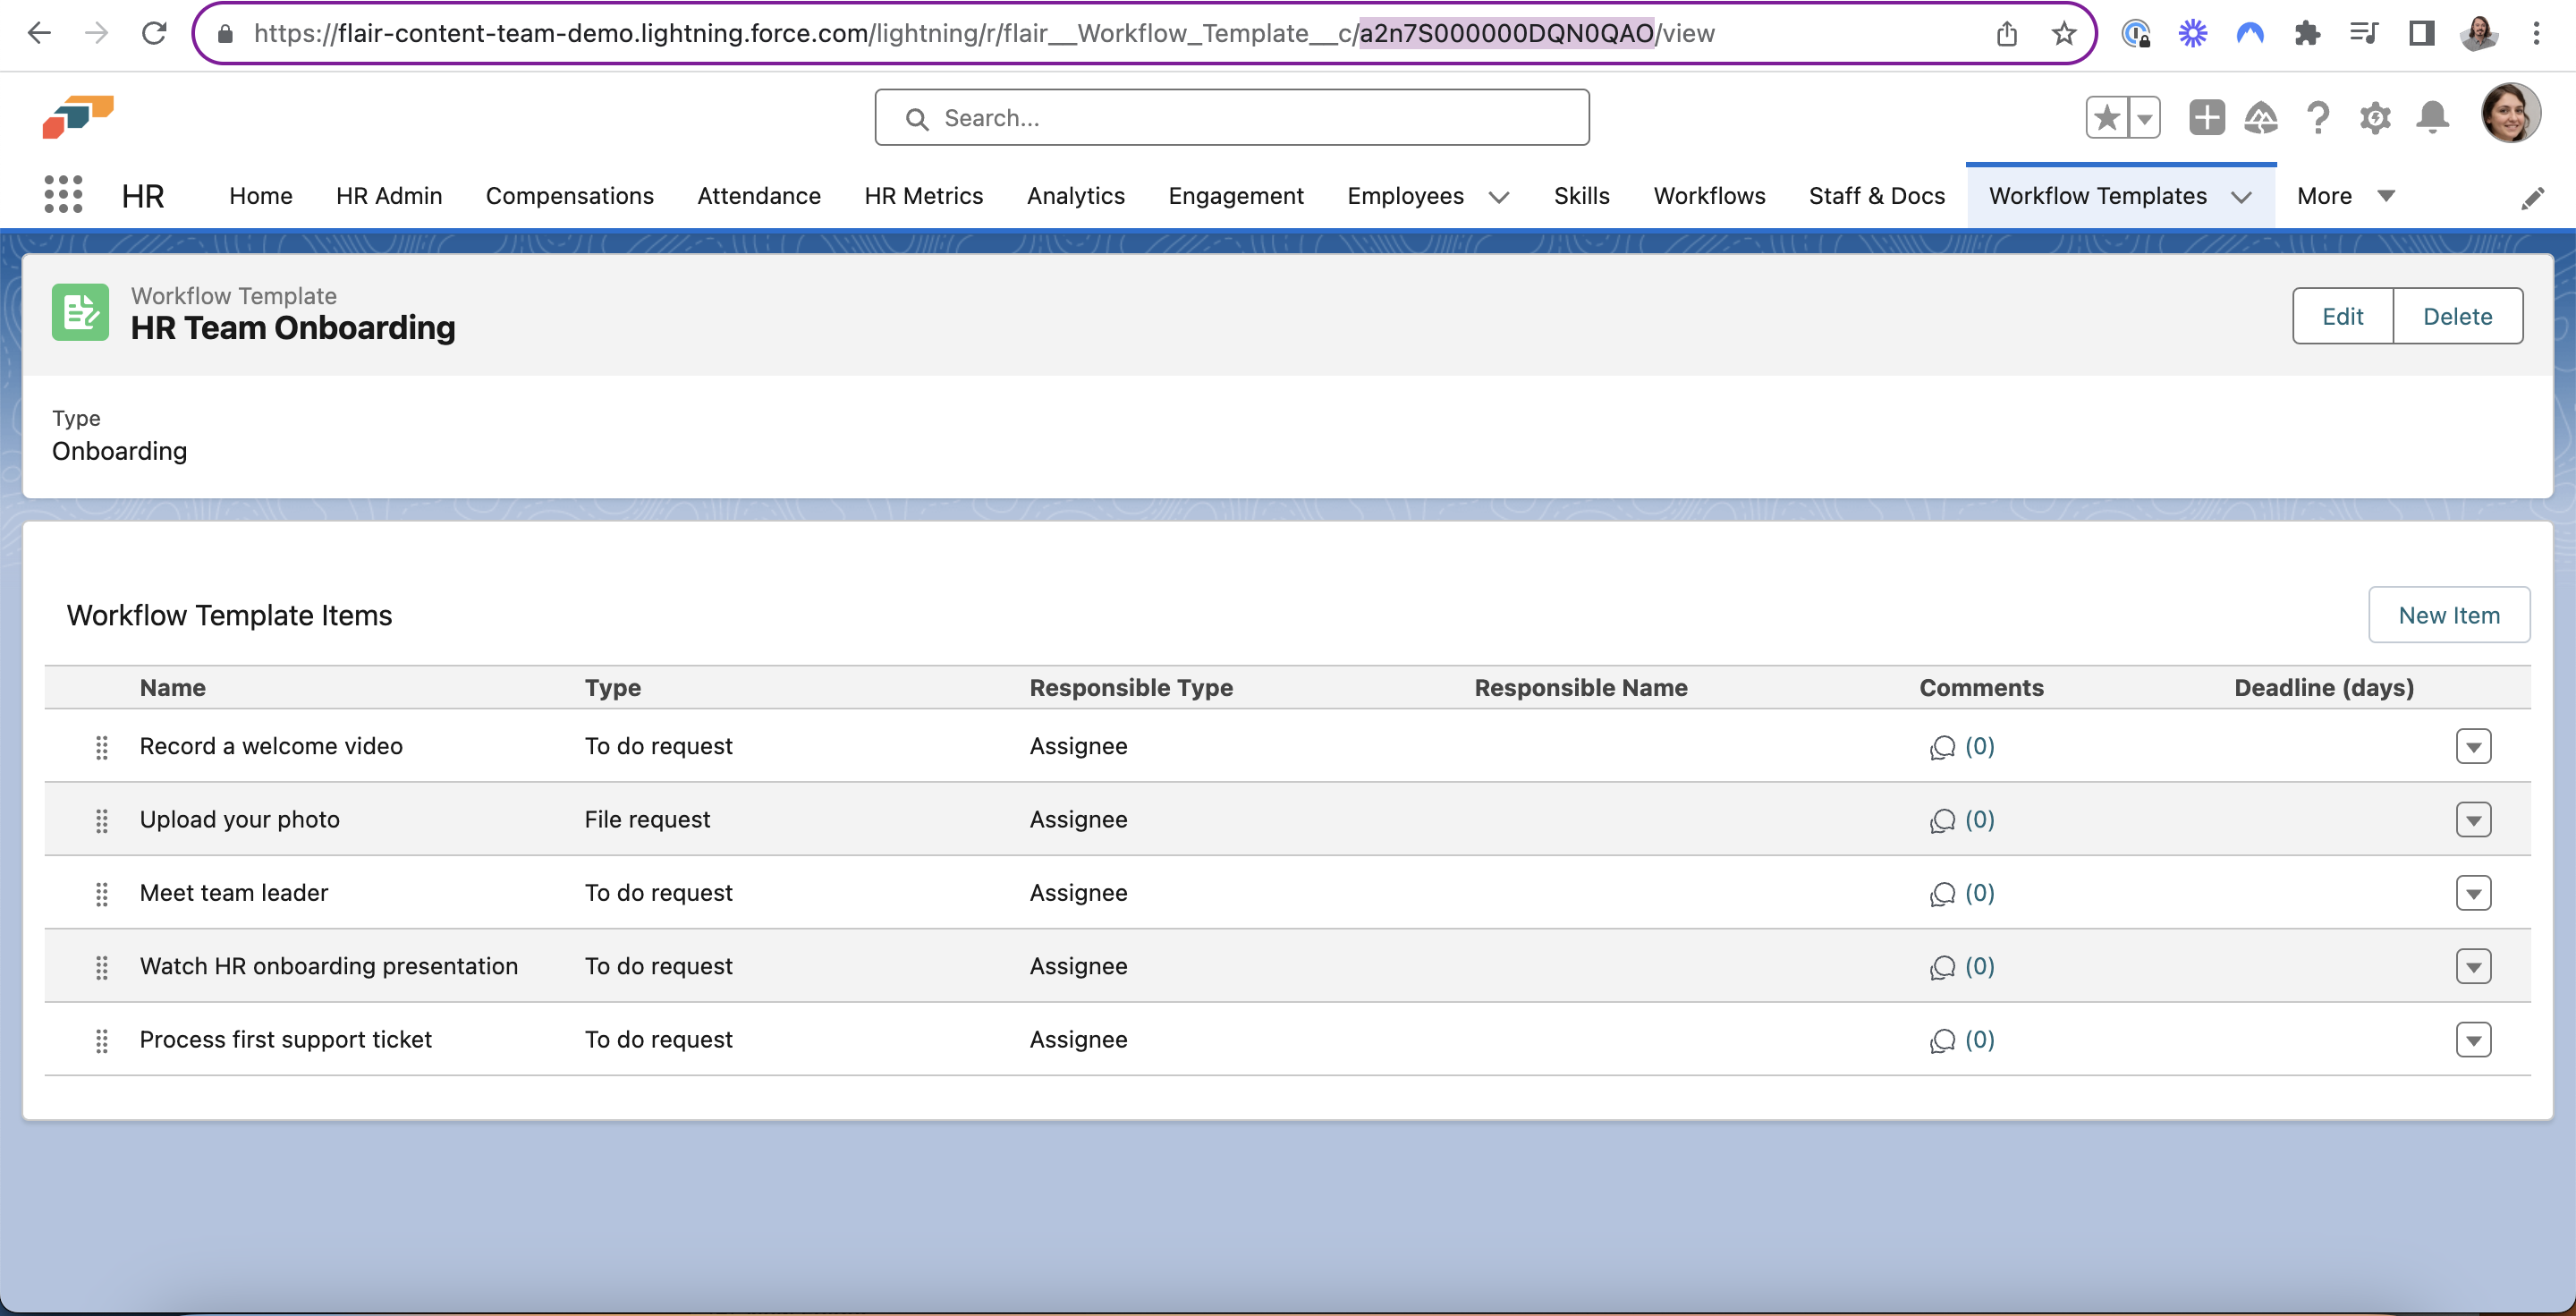
- Copy the team ID (the alphanumeric code between c/ and /view in your address bar)
Setting Up Automatic Assignment Using Salesforce Flows
First of all, use the flair HR app to create a workflow template for newcomers to your HR team. Next, make sure you have created your team in the Teams section of the app. Click on the team to find and copy the team ID as you will need this later. The ID is the alphanumeric code between c/ and /view in your address bar.
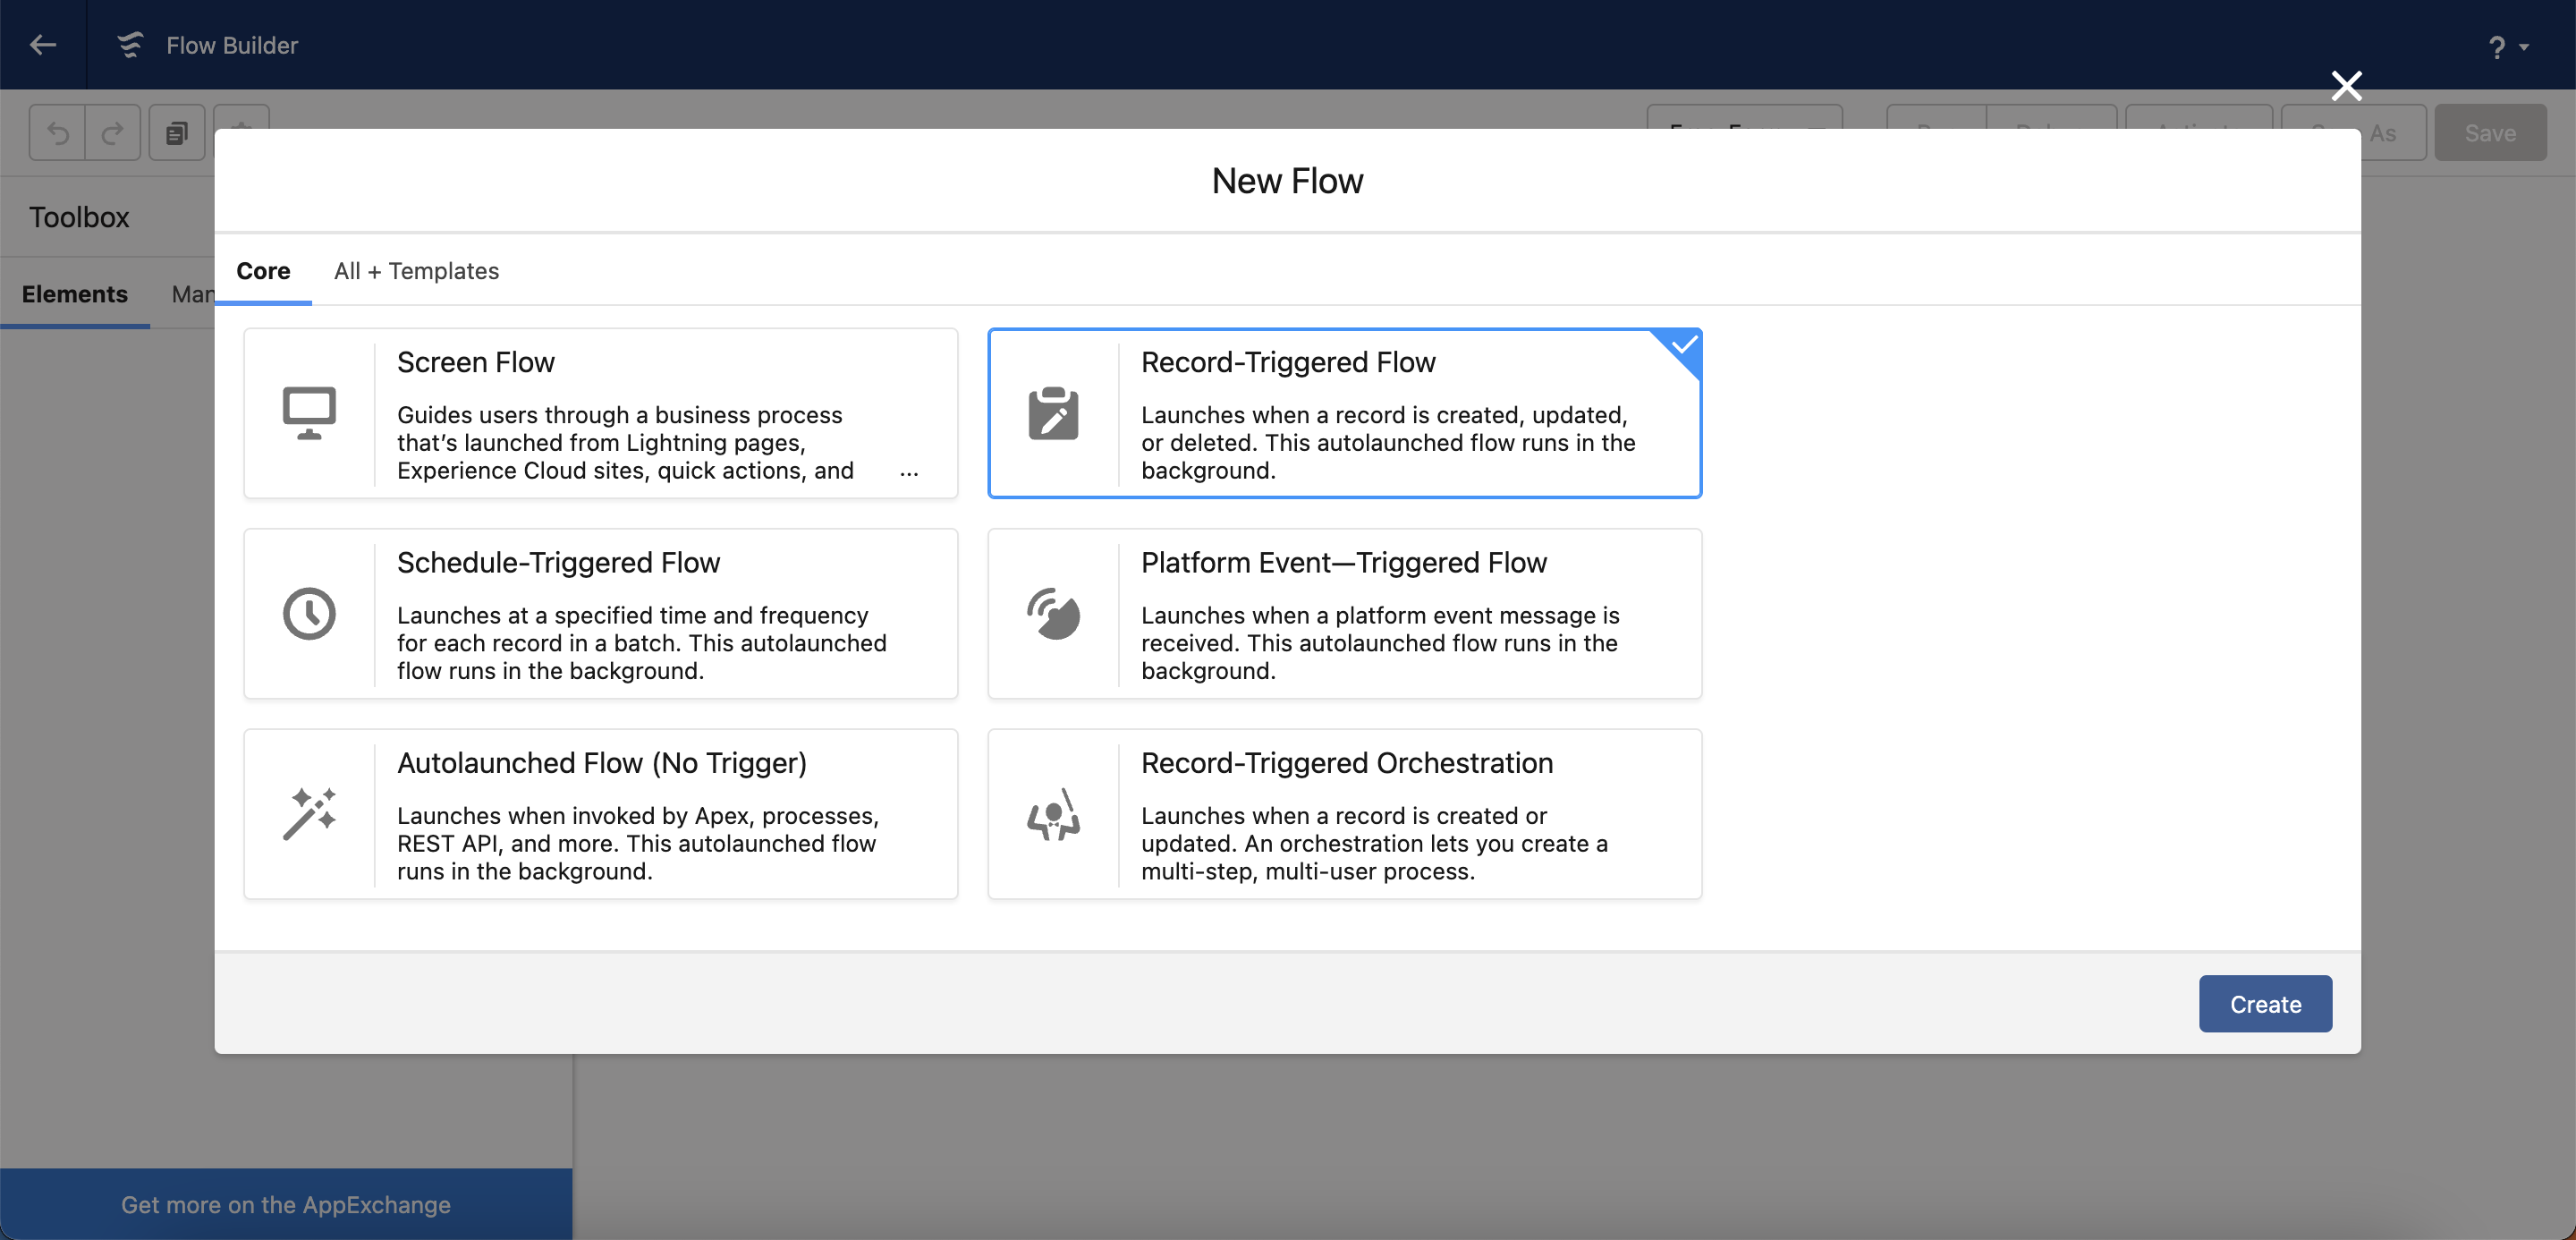
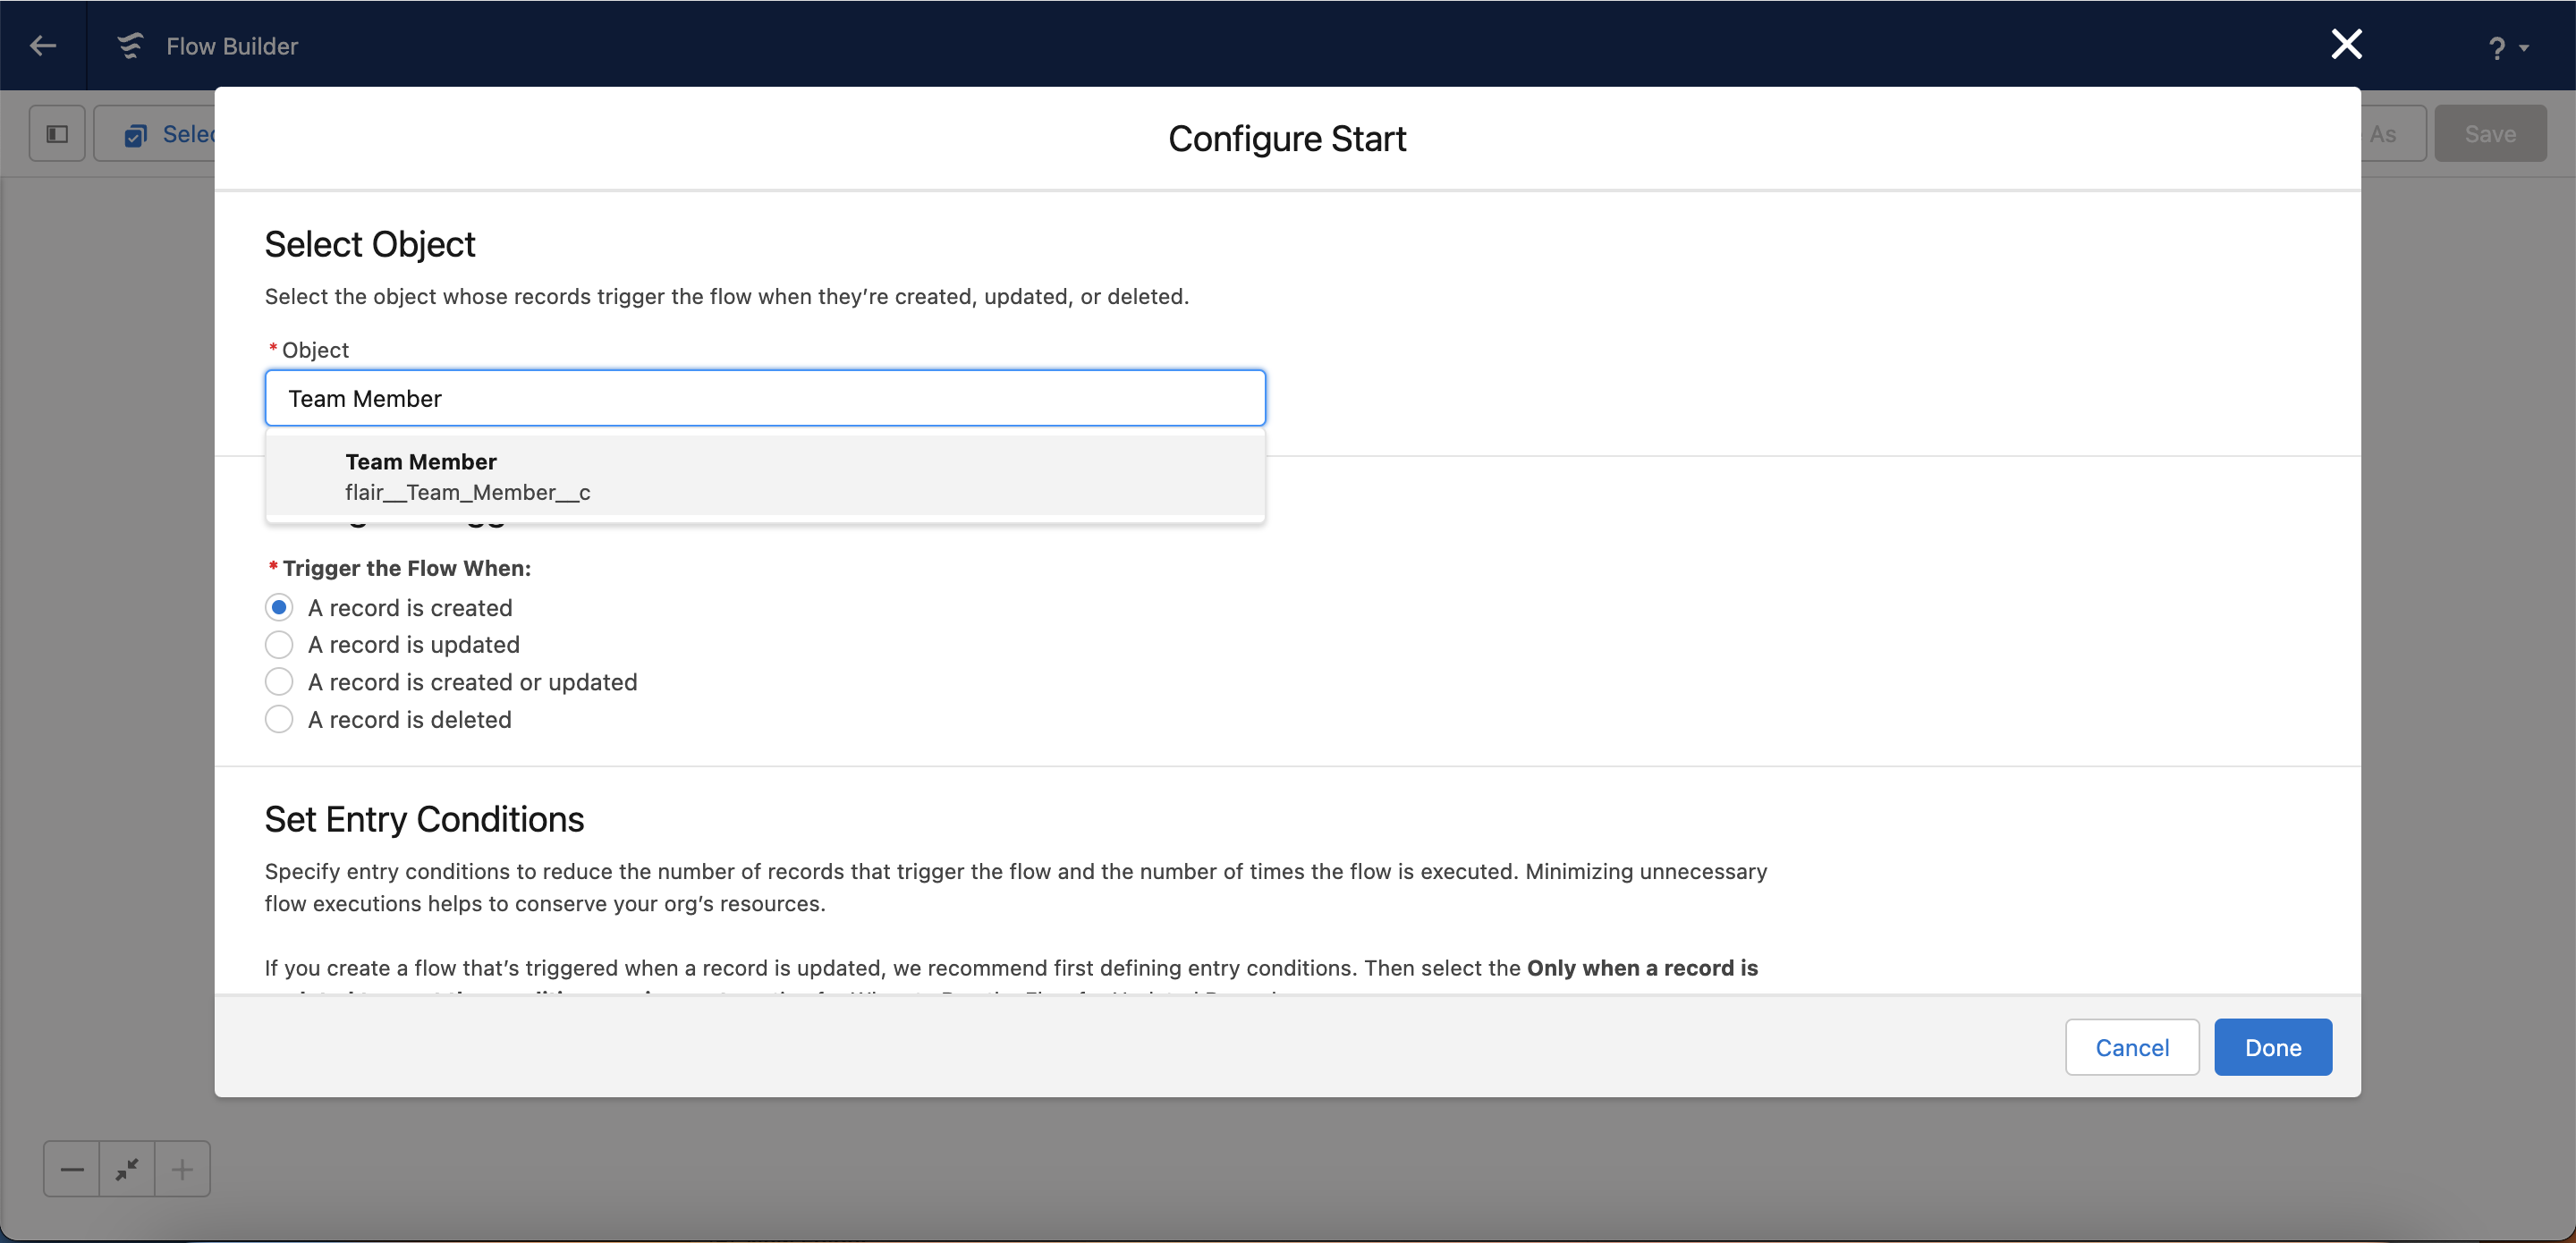
Now open Salesforce Setup and select Flows from the navigation bar on the left. Click New Flow to open the Flow Builder. Select Record-Triggered Flow and click Create.
Enter Team Member into the Object field and select "Trigger the flow when a record is created".
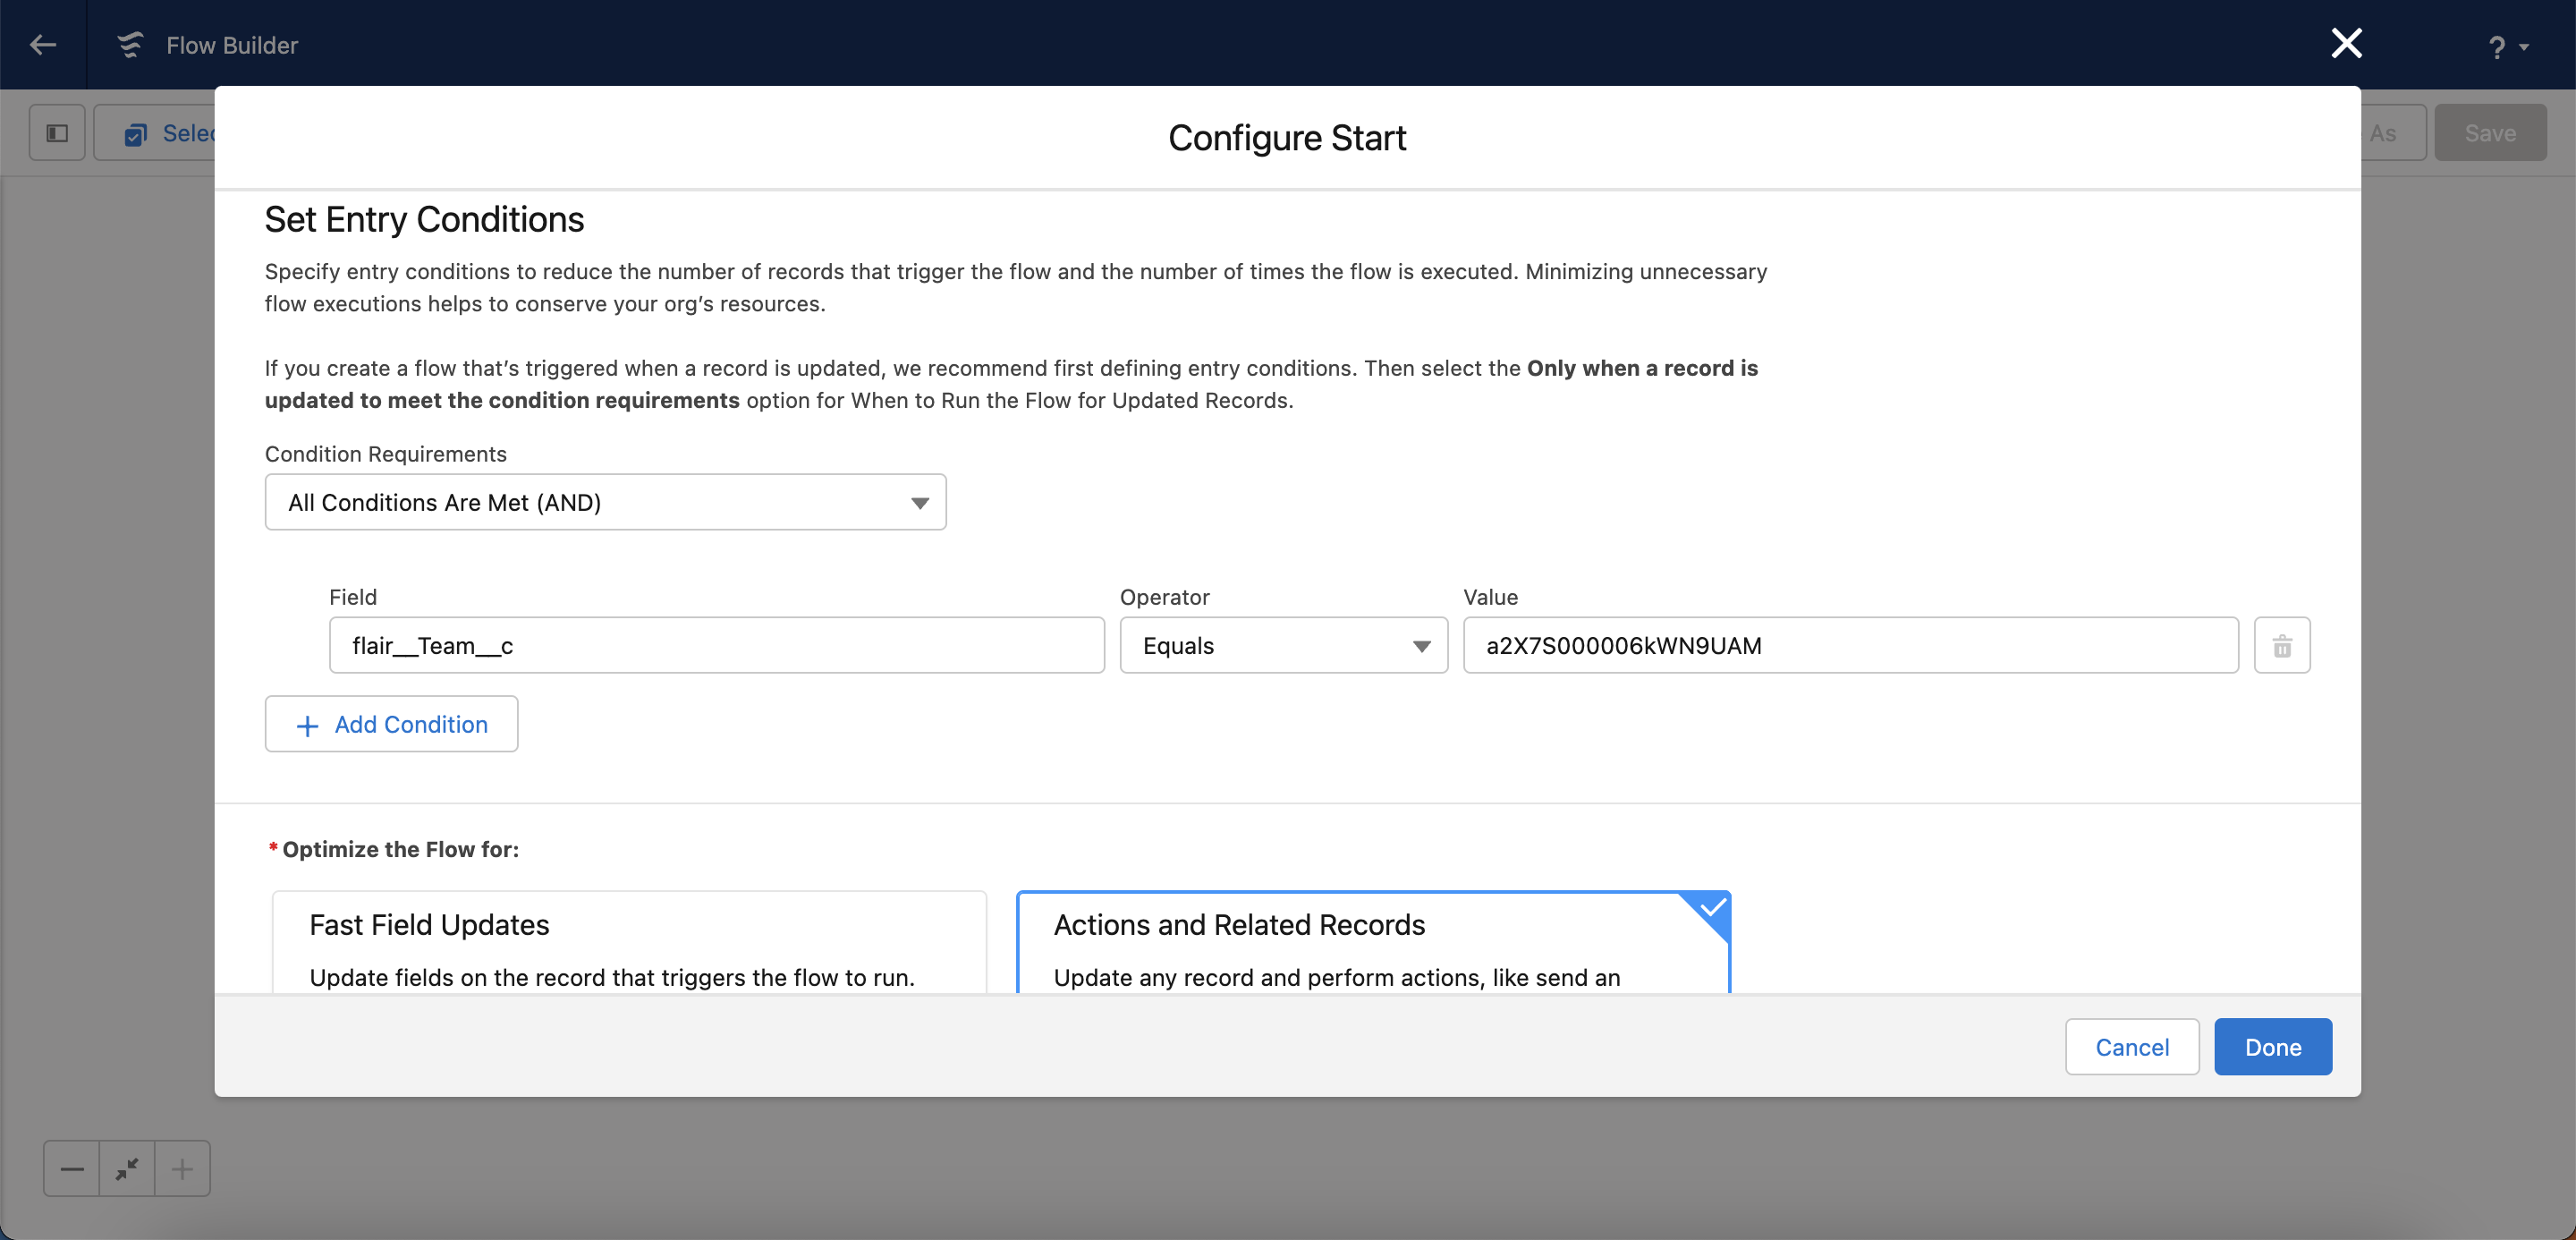
In the Condition Requirements dropdown, select All Conditions Are Met (AND) and enter the following conditions:
Field: flair__Team__c
Operator: Equals
Value: This should be the ID of the team you want to assign workflows to, which you copied from the Teams page earlier. For example, a2X7S000006kWN9UAM.
Now click Done to create the Flow.
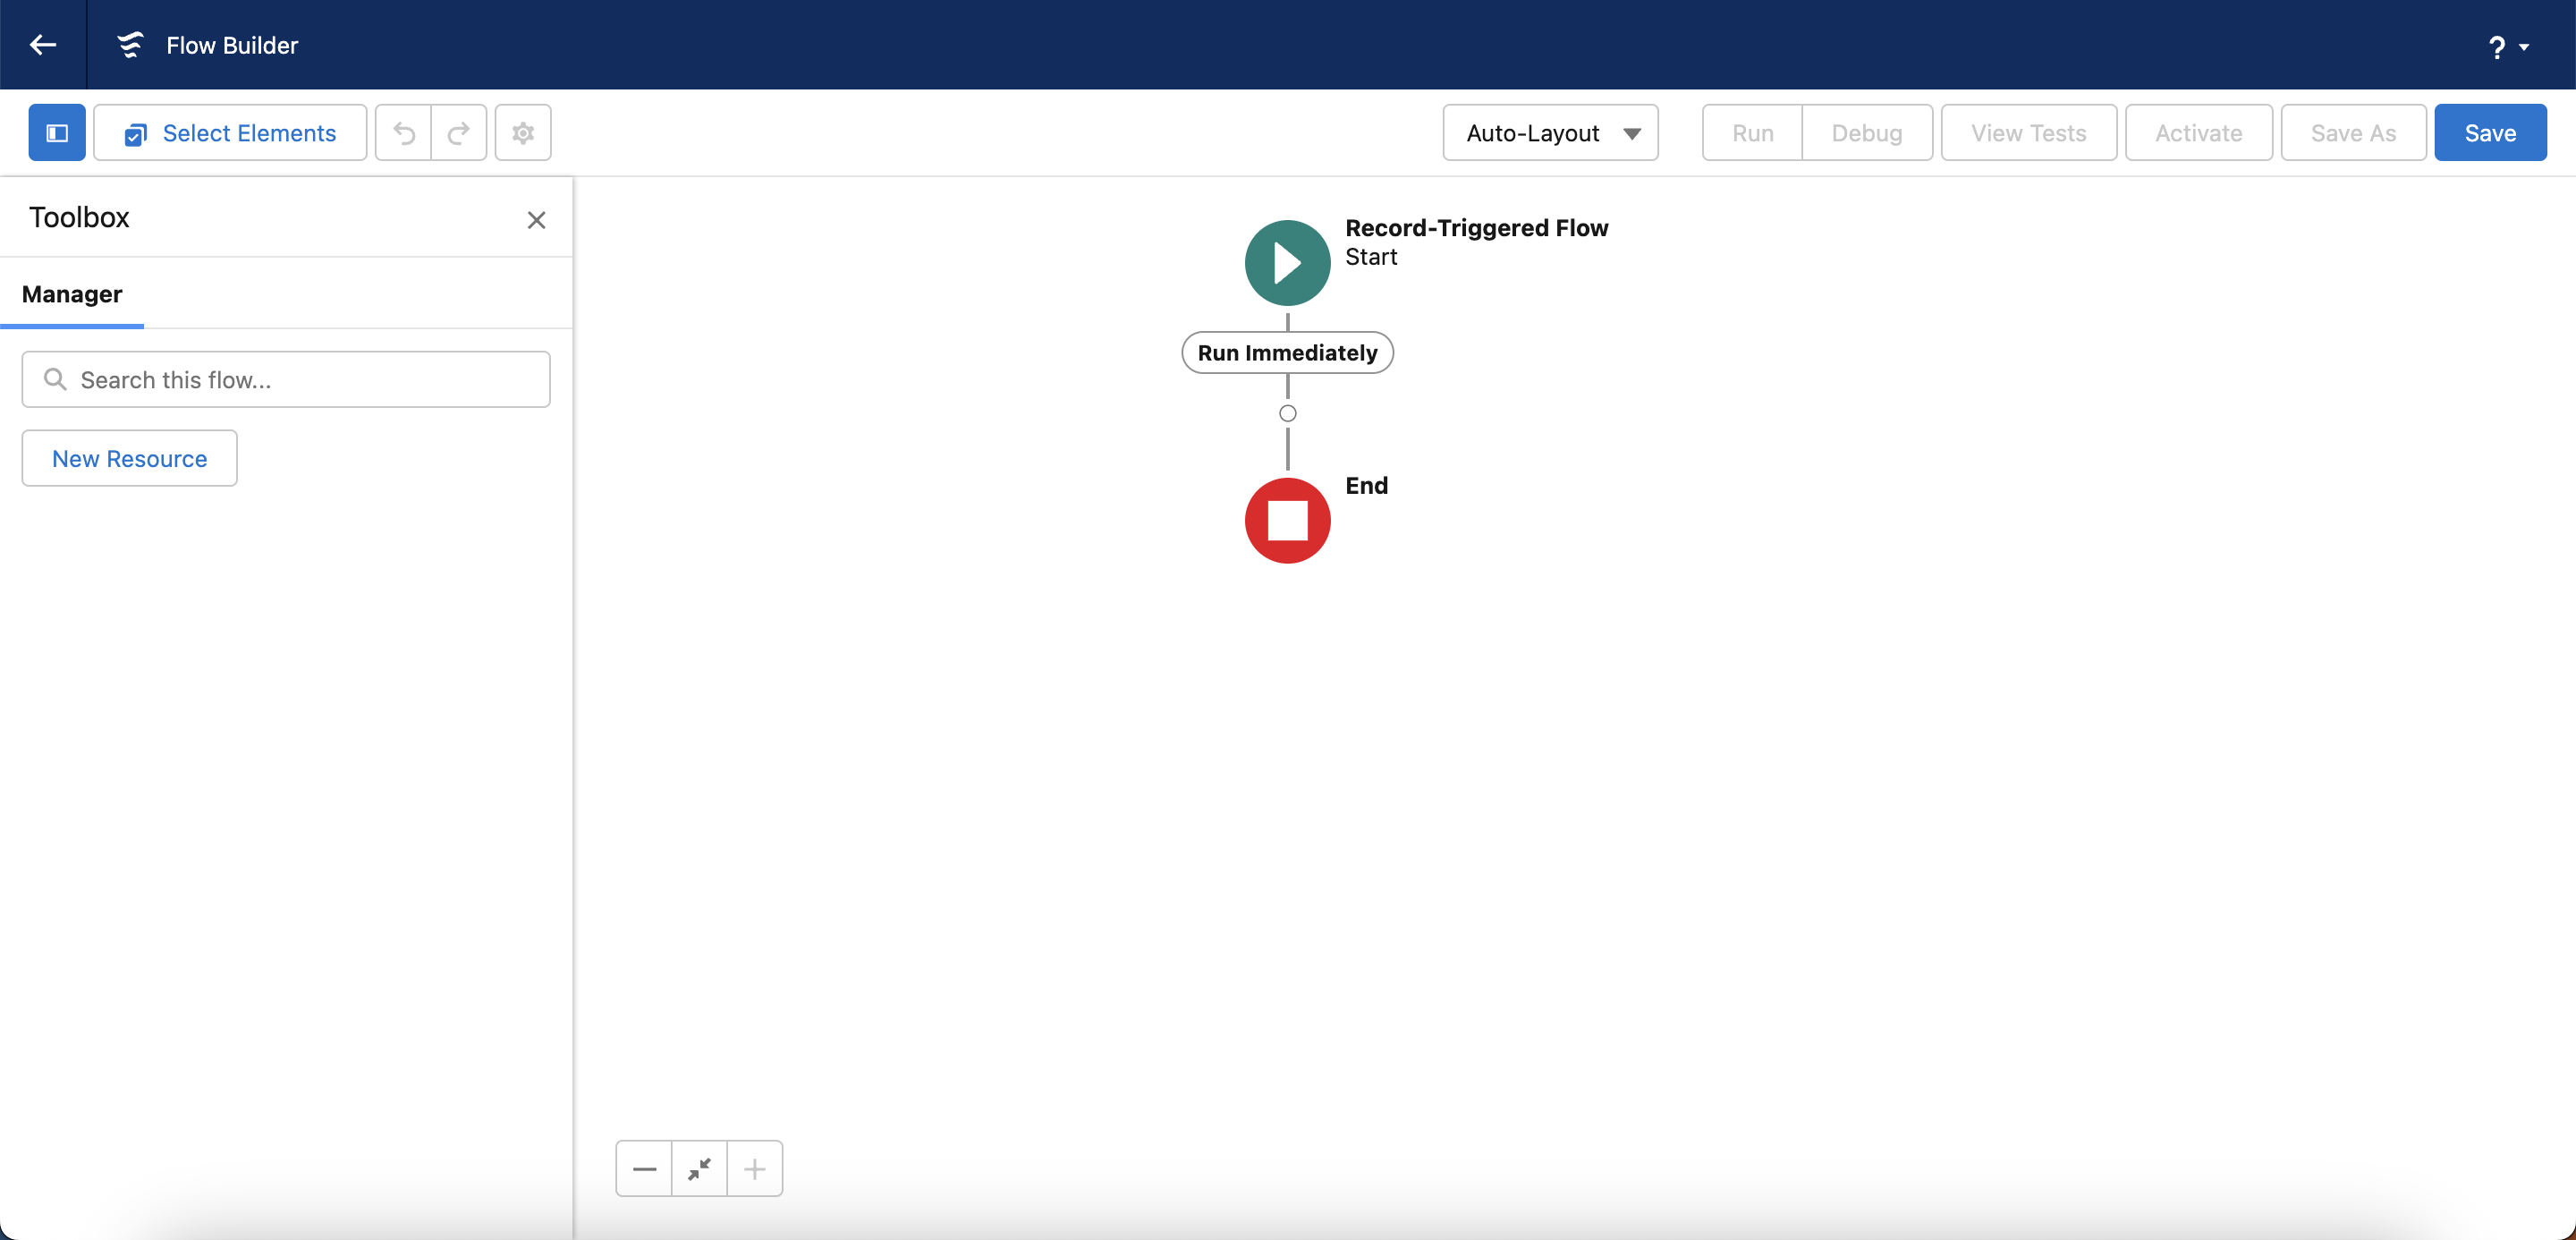
In the Flow Builder, open the Toolbox by clicking the Toggle Toolbox button in the top-left corner of the navigation bar. Then click New Resource.
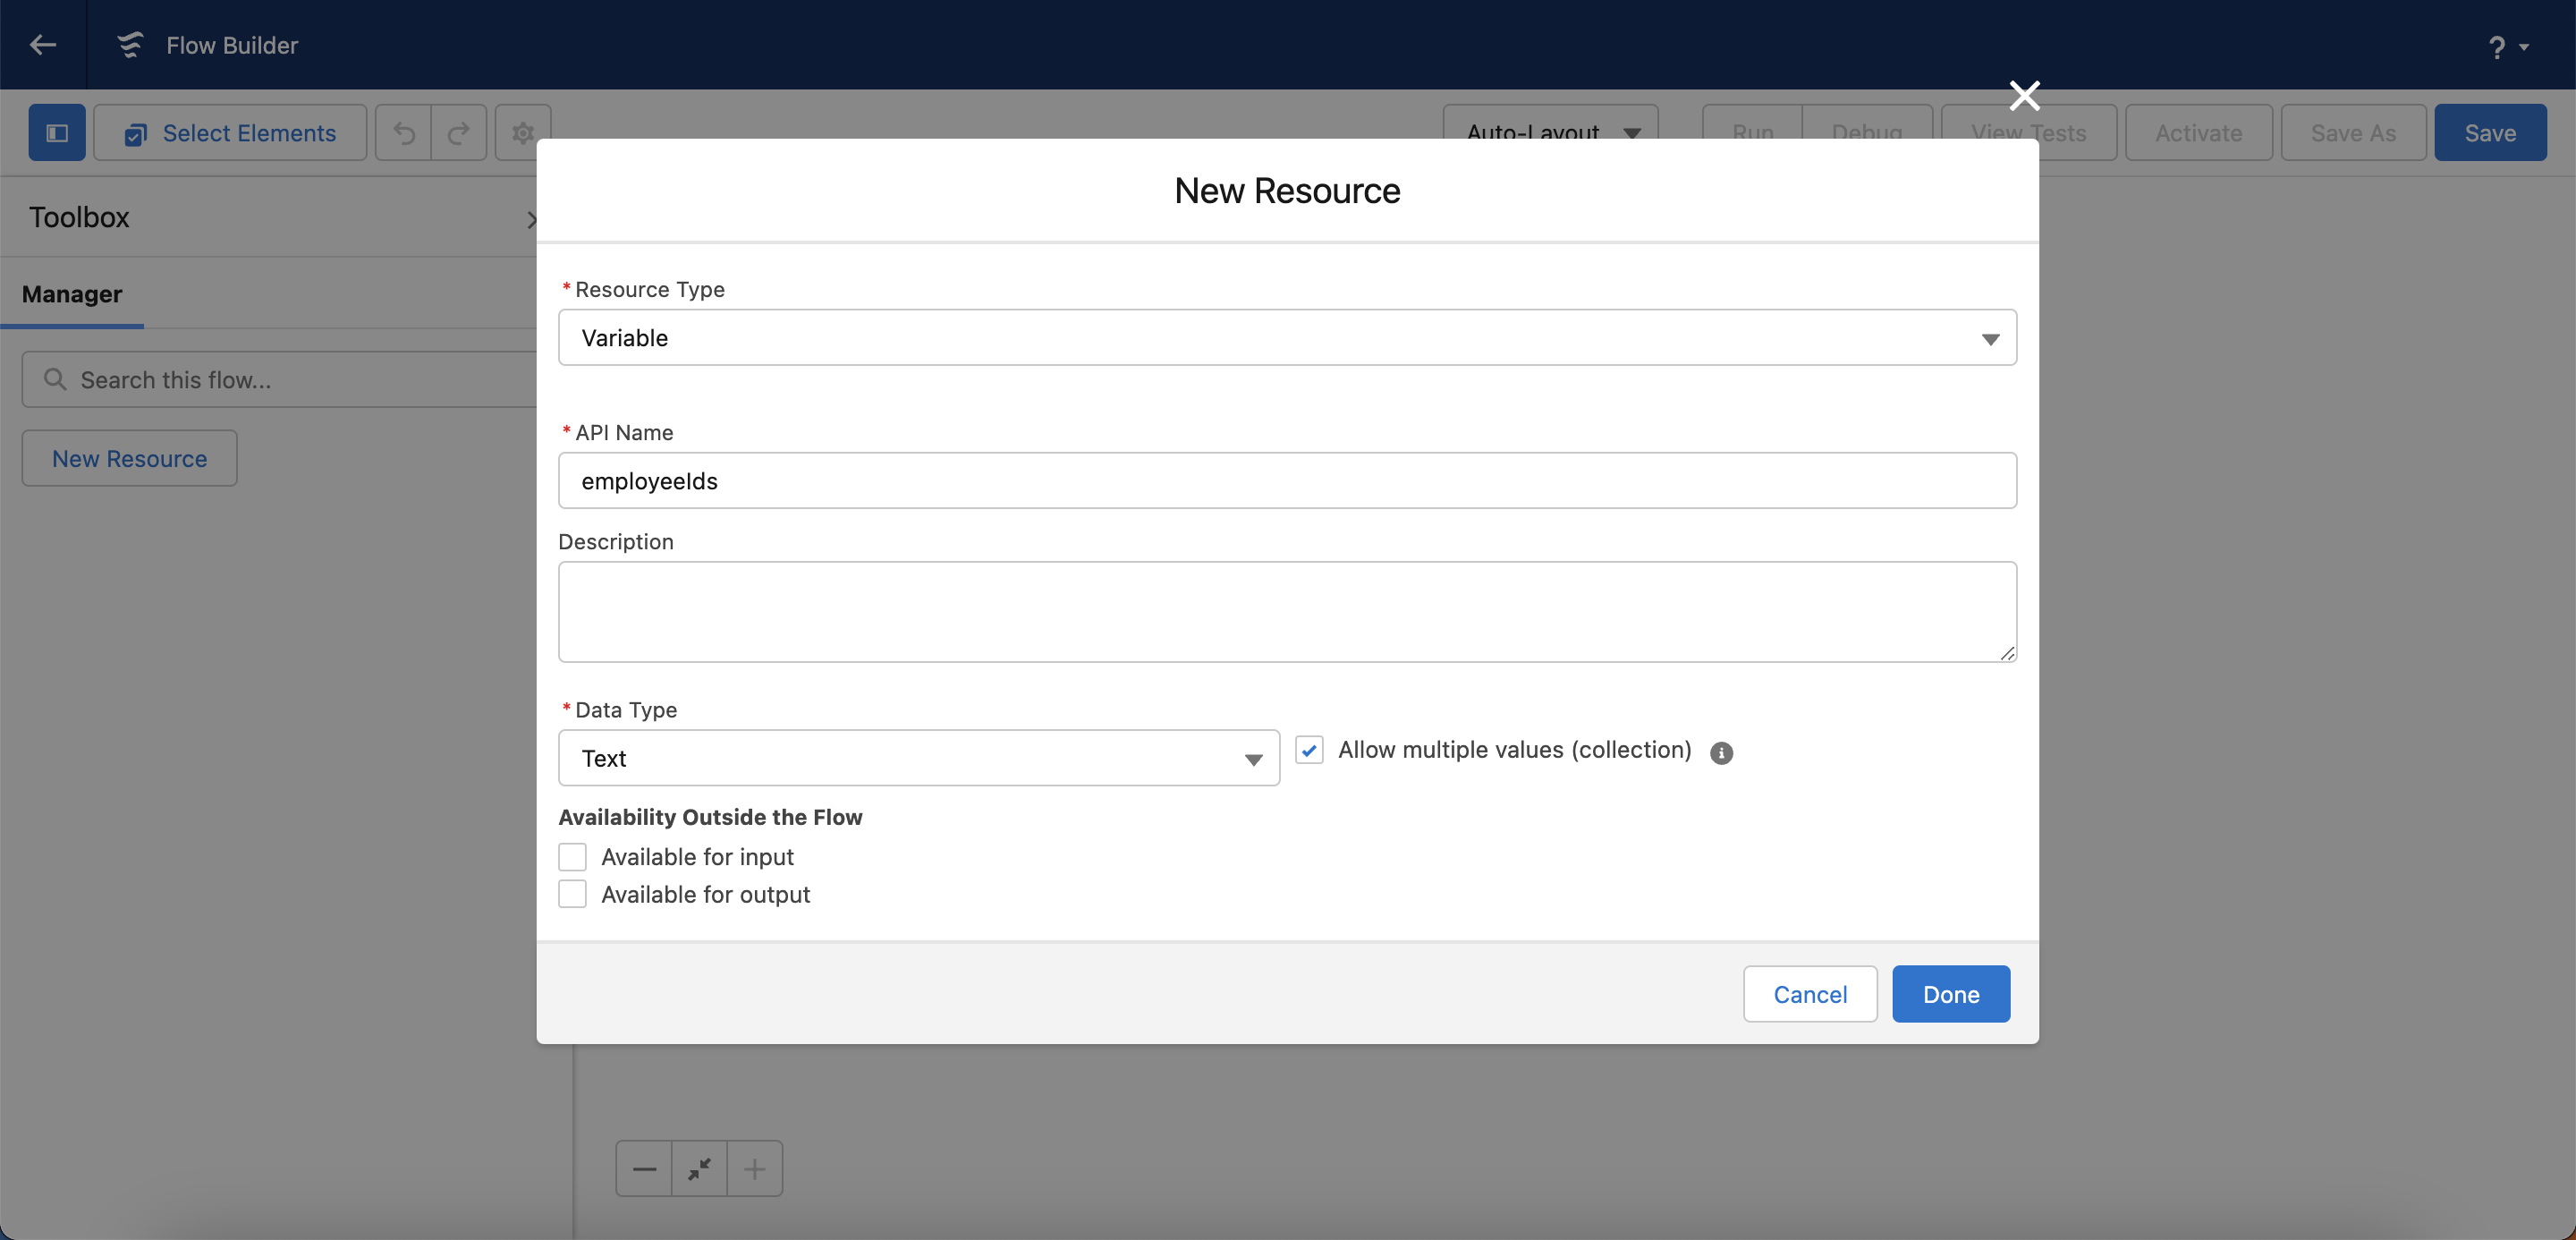
Fill in the fields as follows:
Resource Type:Variable
API Name: employeeIds
Description: (Optional)
Data Type: Text
Check the "Allow multiple values (collection)" box and click Done.
Now click the circle between the Start and End of the flow to add an Assignment.
Fill in the fields as follows:
Label: Add Id to Employee Id
Variable: {!employeeIds}
Operator: Add
Value: {!$Record.flair__Employee__r.Id}
Now click Done.
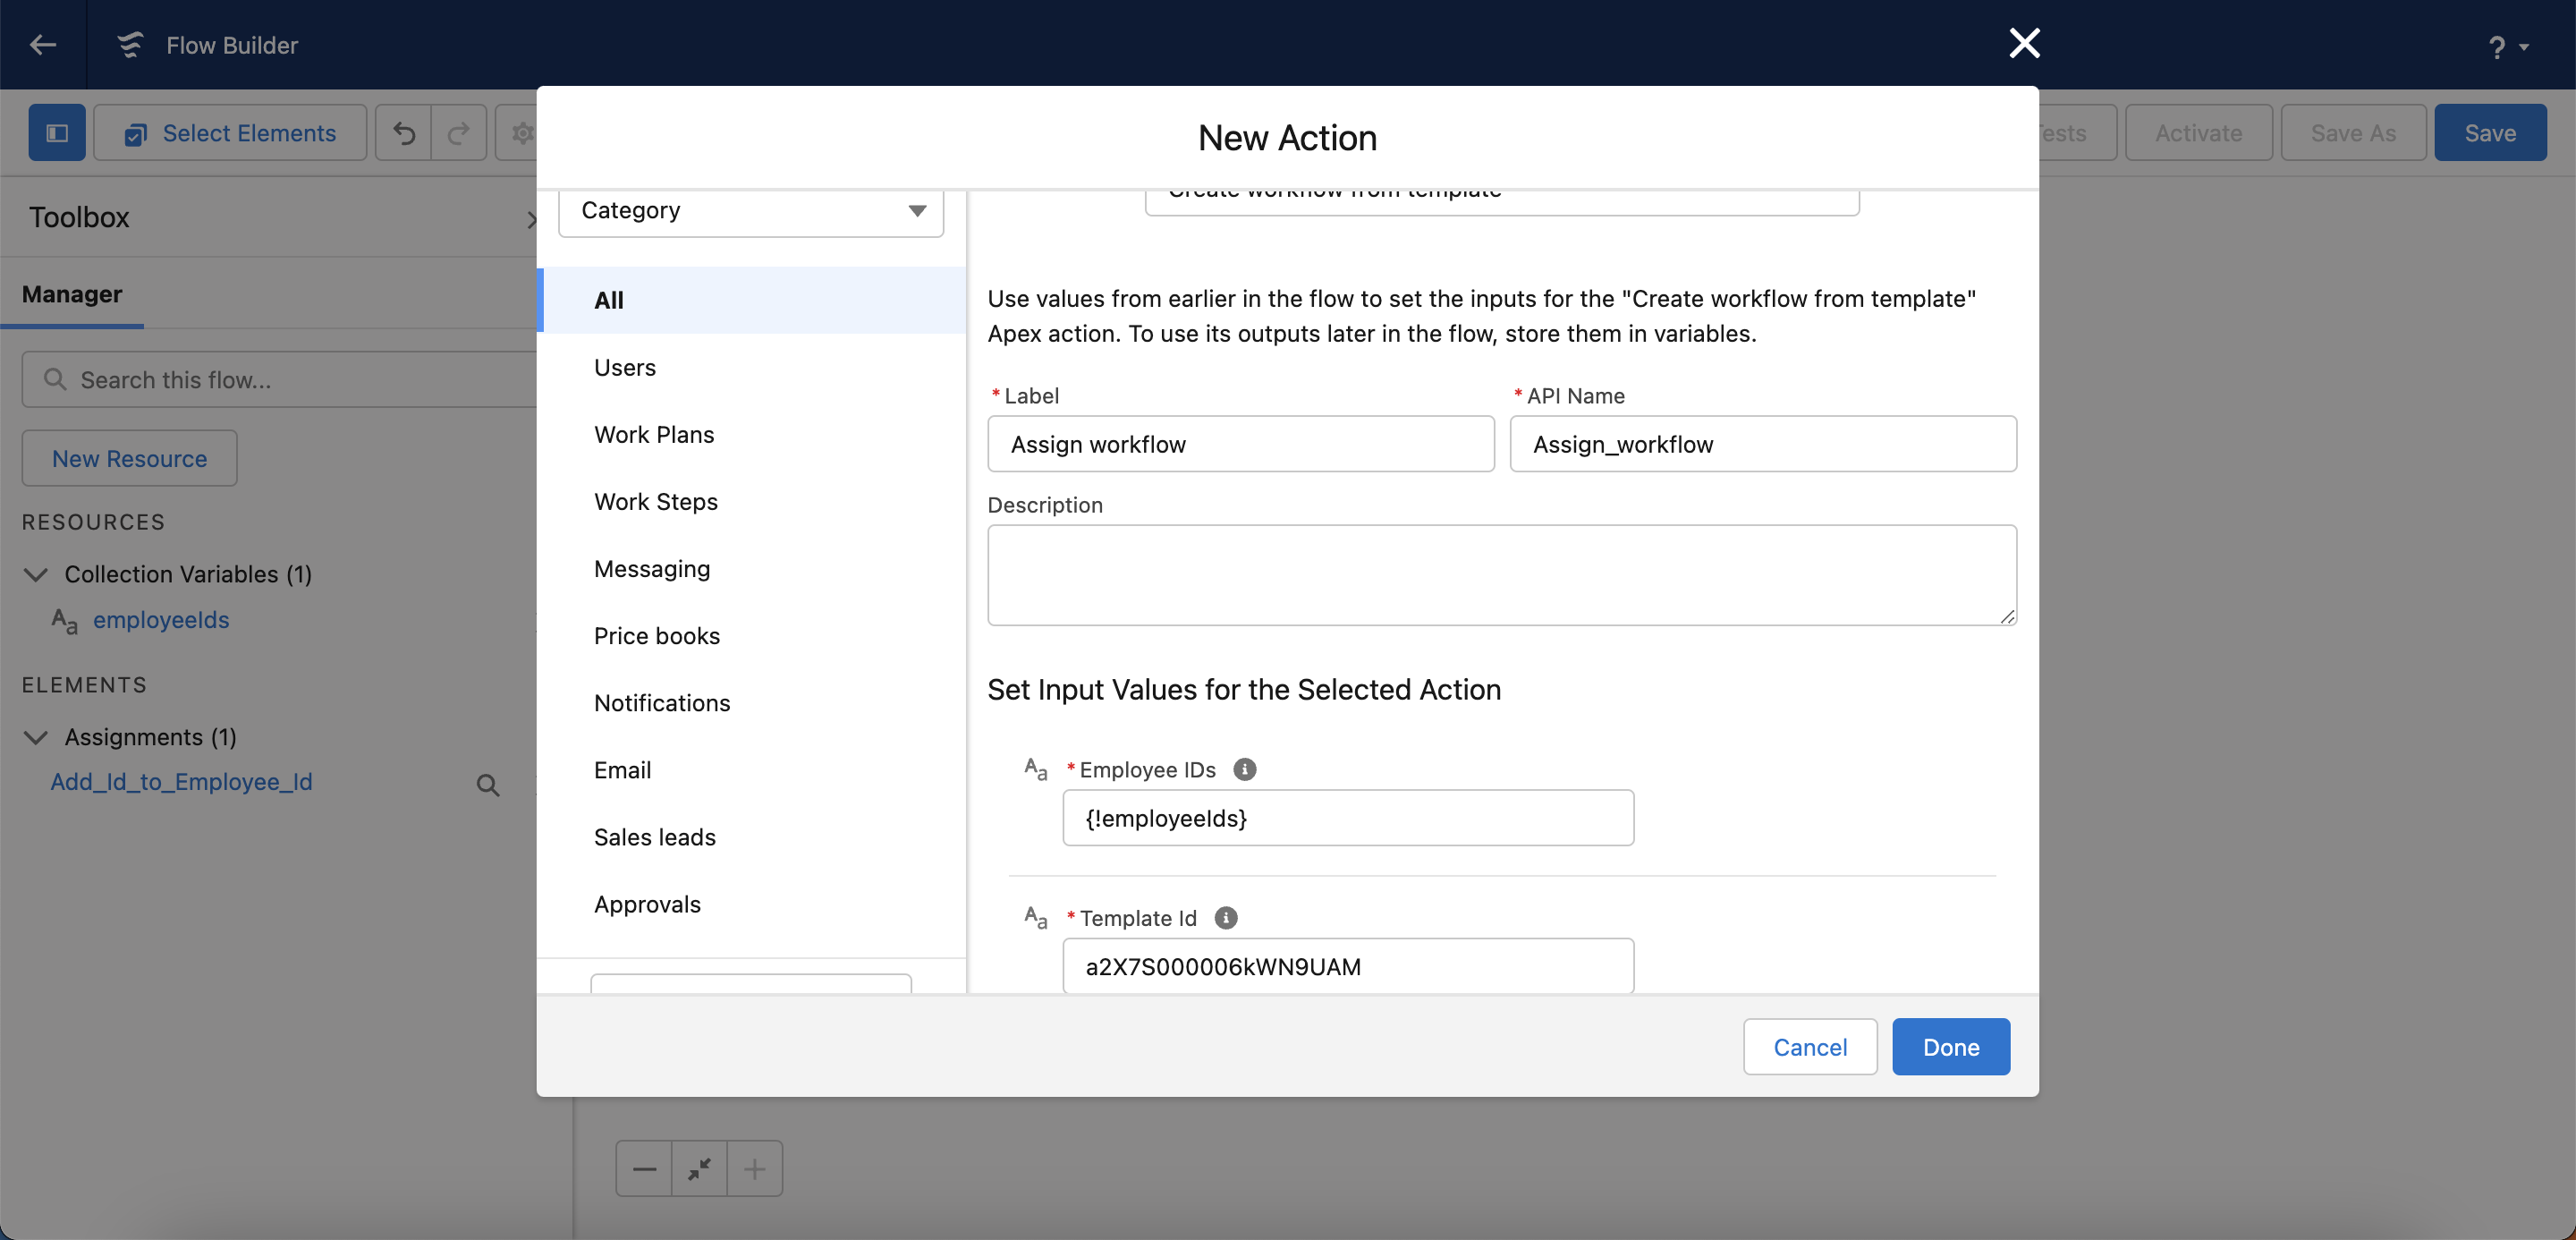
Now click the circle between your Assignment and the End of the Flow to add an Action.
In the Action search bar, find and select Create Workflow From Template. Then fill out the remaining fields as follows:
Label: Assign workflow
API Name: Assign_workflow
Employee IDs: {!employeeIds}
In the Template Id field, enter the ID of the workflow you want to assign. You can find this by opening the Workflow in your flair HR app and copying the part of the URL between /c and /view and then click Done.
Lastly, click Save in the Flow Builder and give your Flow a Flow Label, such as "Auto-assign workflow for HR team members" and then Save. Click the Activate button to start this flow.
Now, whenever you add a new team member to your HR team, the HR onboarding workflow will automatically be assigned to them.
Mass Updating Workflow Item Status
If you need to update the status of many workflow items at once (for example, marking all of an employee's tasks as completed), you can do so using Salesforce data tools such as Salesforce Inspector or Data Export.
- Export the workflow items using the following SOQL query (adjusting the filter values as needed):
SELECT Id, Name, flair__Responsible_Name__c, flair__Status__c
FROM flair__Workflow_Item__c
WHERE flair__Responsible_Name__c = 'Employee Name'
AND flair__Status__c = 'NOT_STARTED'
- Copy and paste the exported data into a spreadsheet.
- Change the
flair__Status__cvalue toCOMPLETEDfor all items you want to update. - Use the Data Import option in your data tool, paste the updated data, map the fields, and run the import.
Completing Missing Data
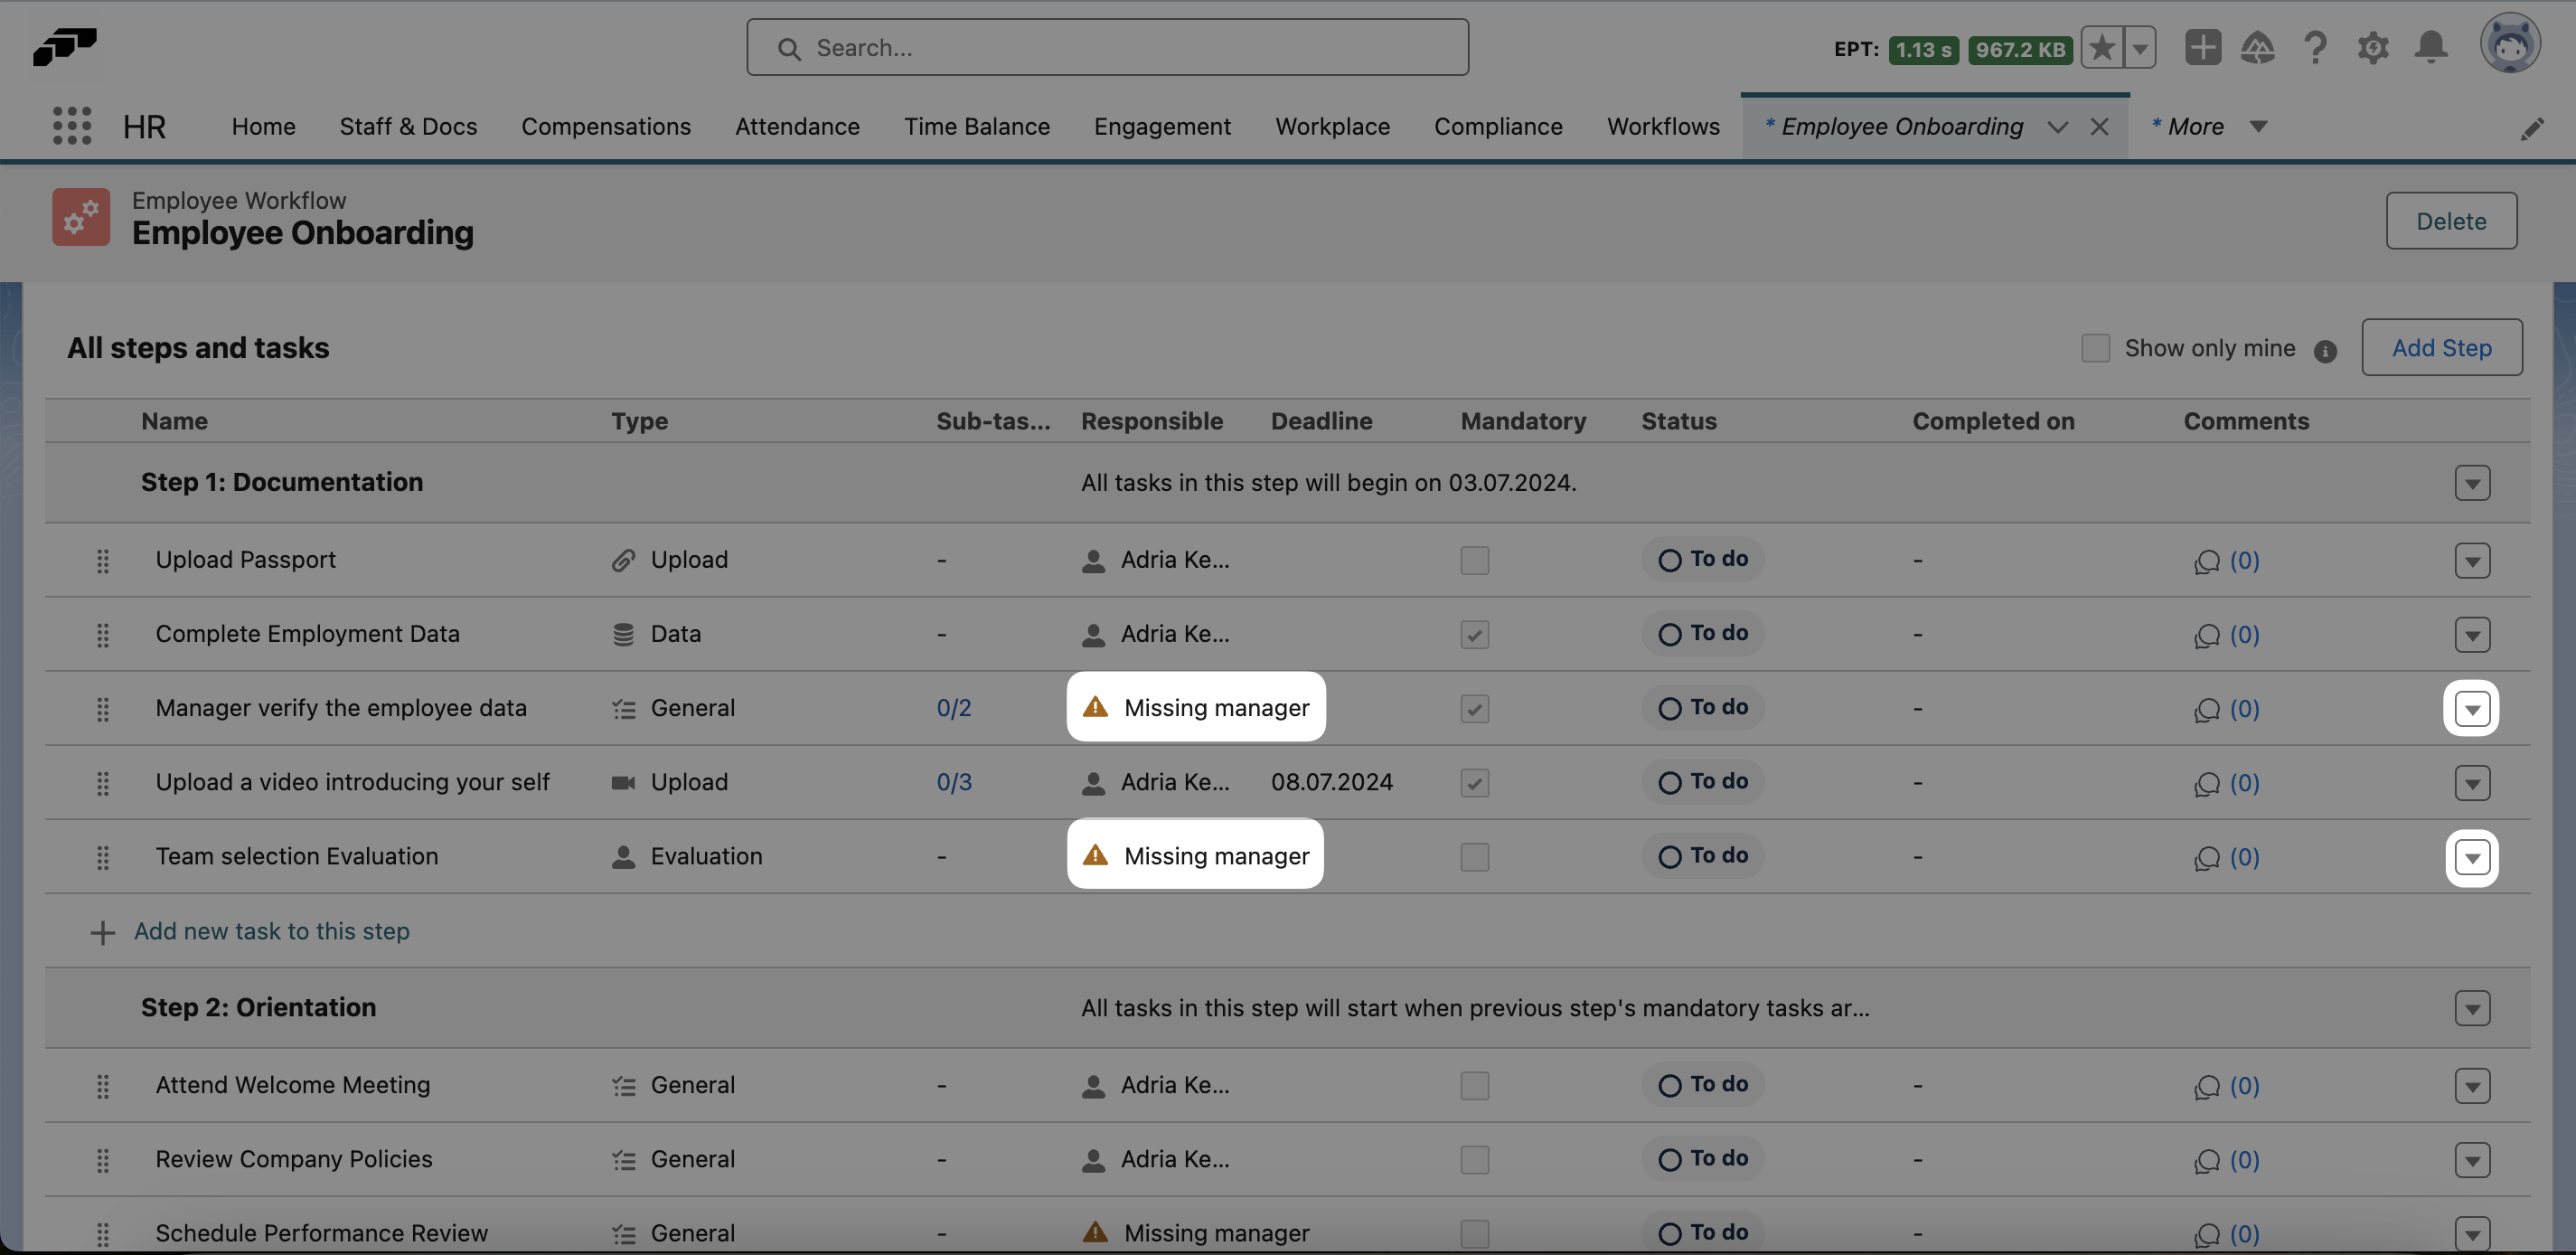
If you see an orange warning icon next to a workflow on the Overview tab, your workflow may be missing some essential information. This can happen when the workflow contains a task for which a manager is responsible, but the workflow assignee does not have a manager in flair.
To solve this error, click the down arrow ▼ next to the affected workflow and select Edit. You will then see all the steps and tasks in this workflow so you can identify which tasks are missing information.
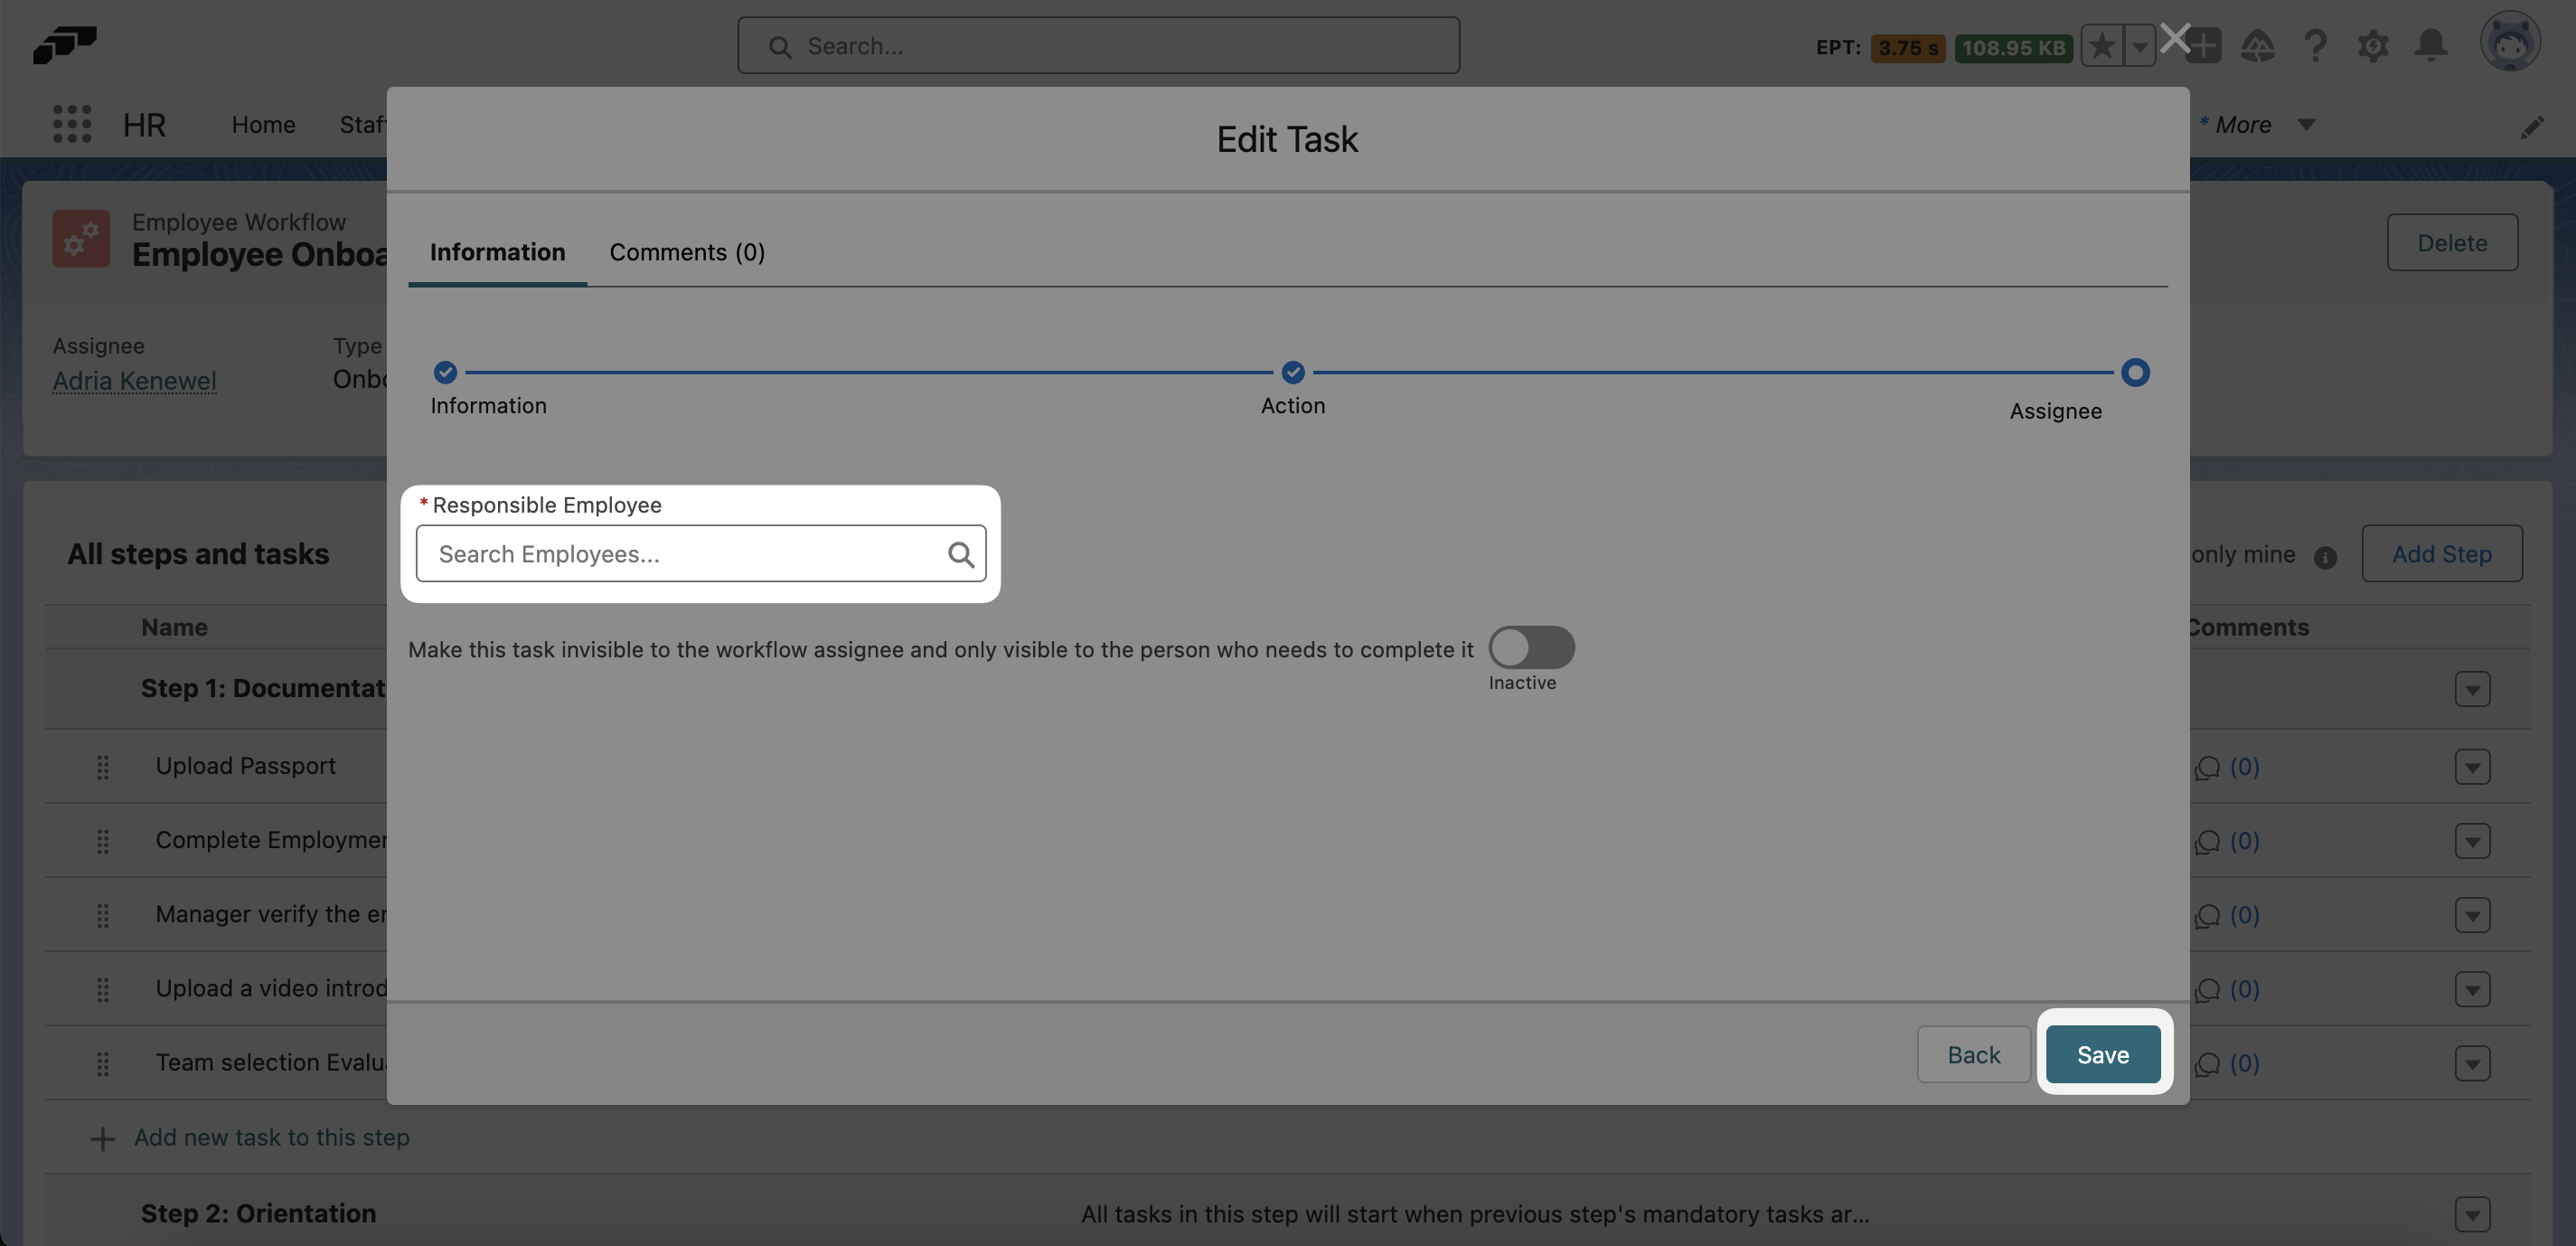
Select the down arrow ▼ next to an affected item and click Edit. Click Next until you reach the step named Assignee and then add a responsible employee from the dropdown.
Alternatively, you can prevent this error by making sure that every employee is assigned a Manager. You can do this from the Company Structure page in the flair HR app.
Completing Workflows in the Hub
When you assign a workflow to an employee, they will be able to see an overview of their tasks in the flair Employee Hub.
First make sure you have enabled the Employee Hub in the flair HR app. You can do this by visiting the Home page and checking the Setup Assistant. From there, you can also invite employees to the Hub.
The Company Email field must be filled in for your assignees to receive the workflow. You can add a company email address in the employee's record in the flair HR app.
After completing the setup, your assignees will receive an email notification whenever you assign a workflow to them. Clicking the link in this email will take them to Workflows in their Employee Hub and show them a list of tasks to complete.
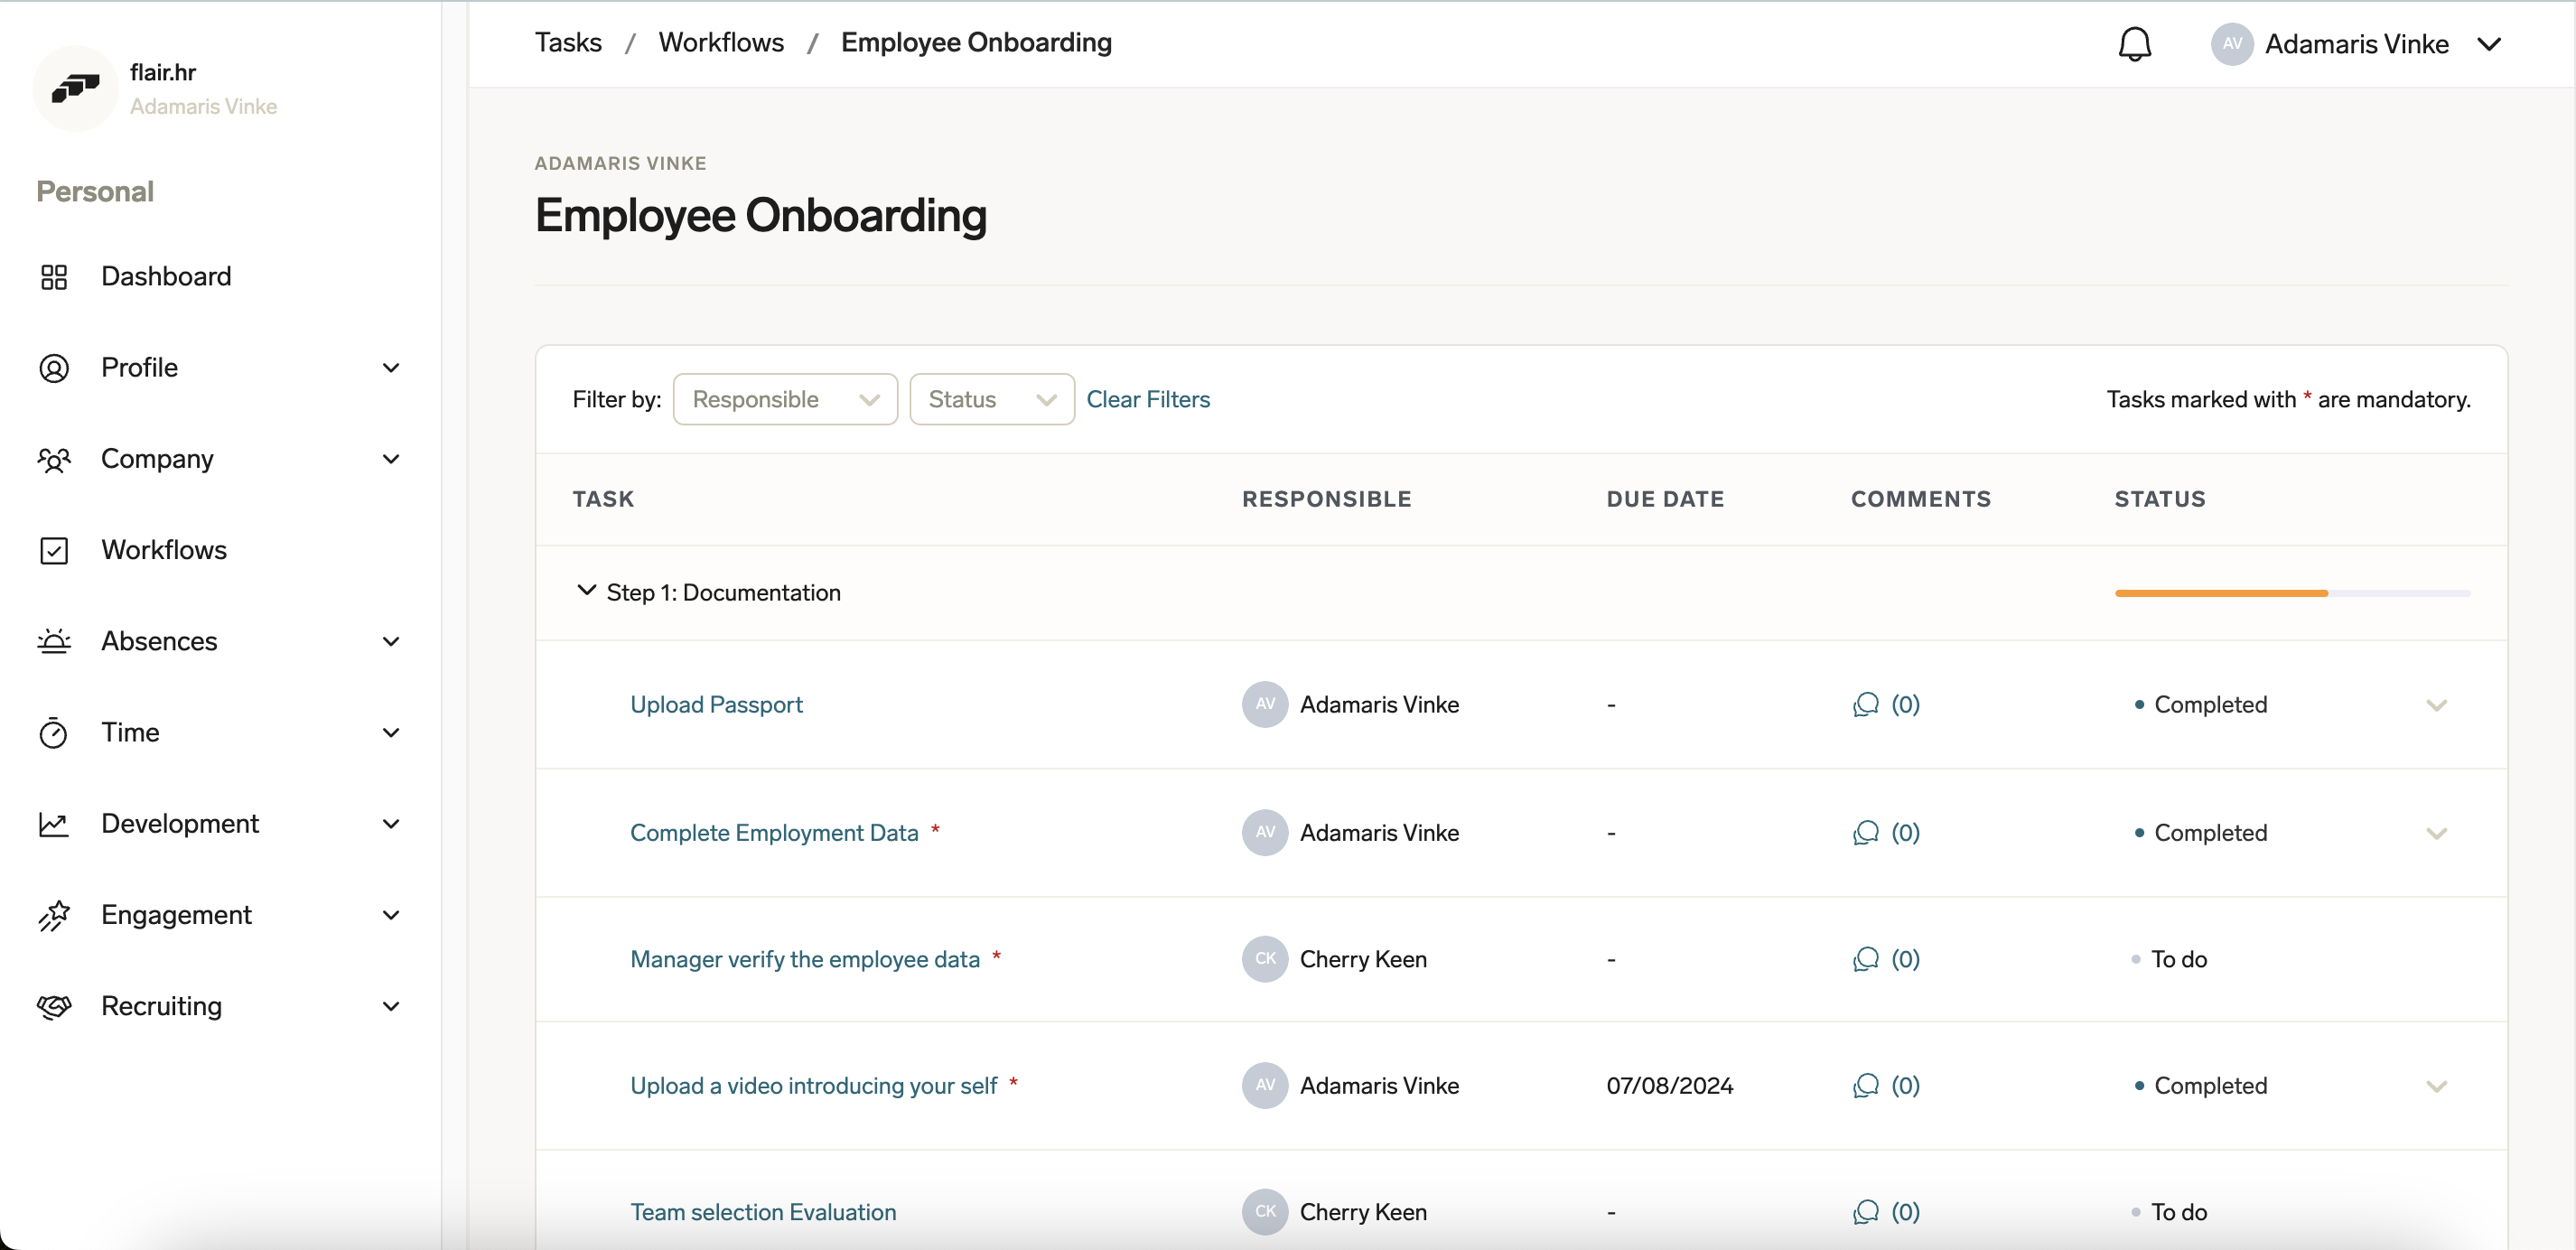
Alternatively, you can click Workflows in the left-side menu of the Employee Hub to see all of your assigned workflows. Here, you can filter by workflow name, employee, type of workflow, year, and status. Switching the toggle on the right from Workflows to Tasks will show all the tasks within your assigned workflows.
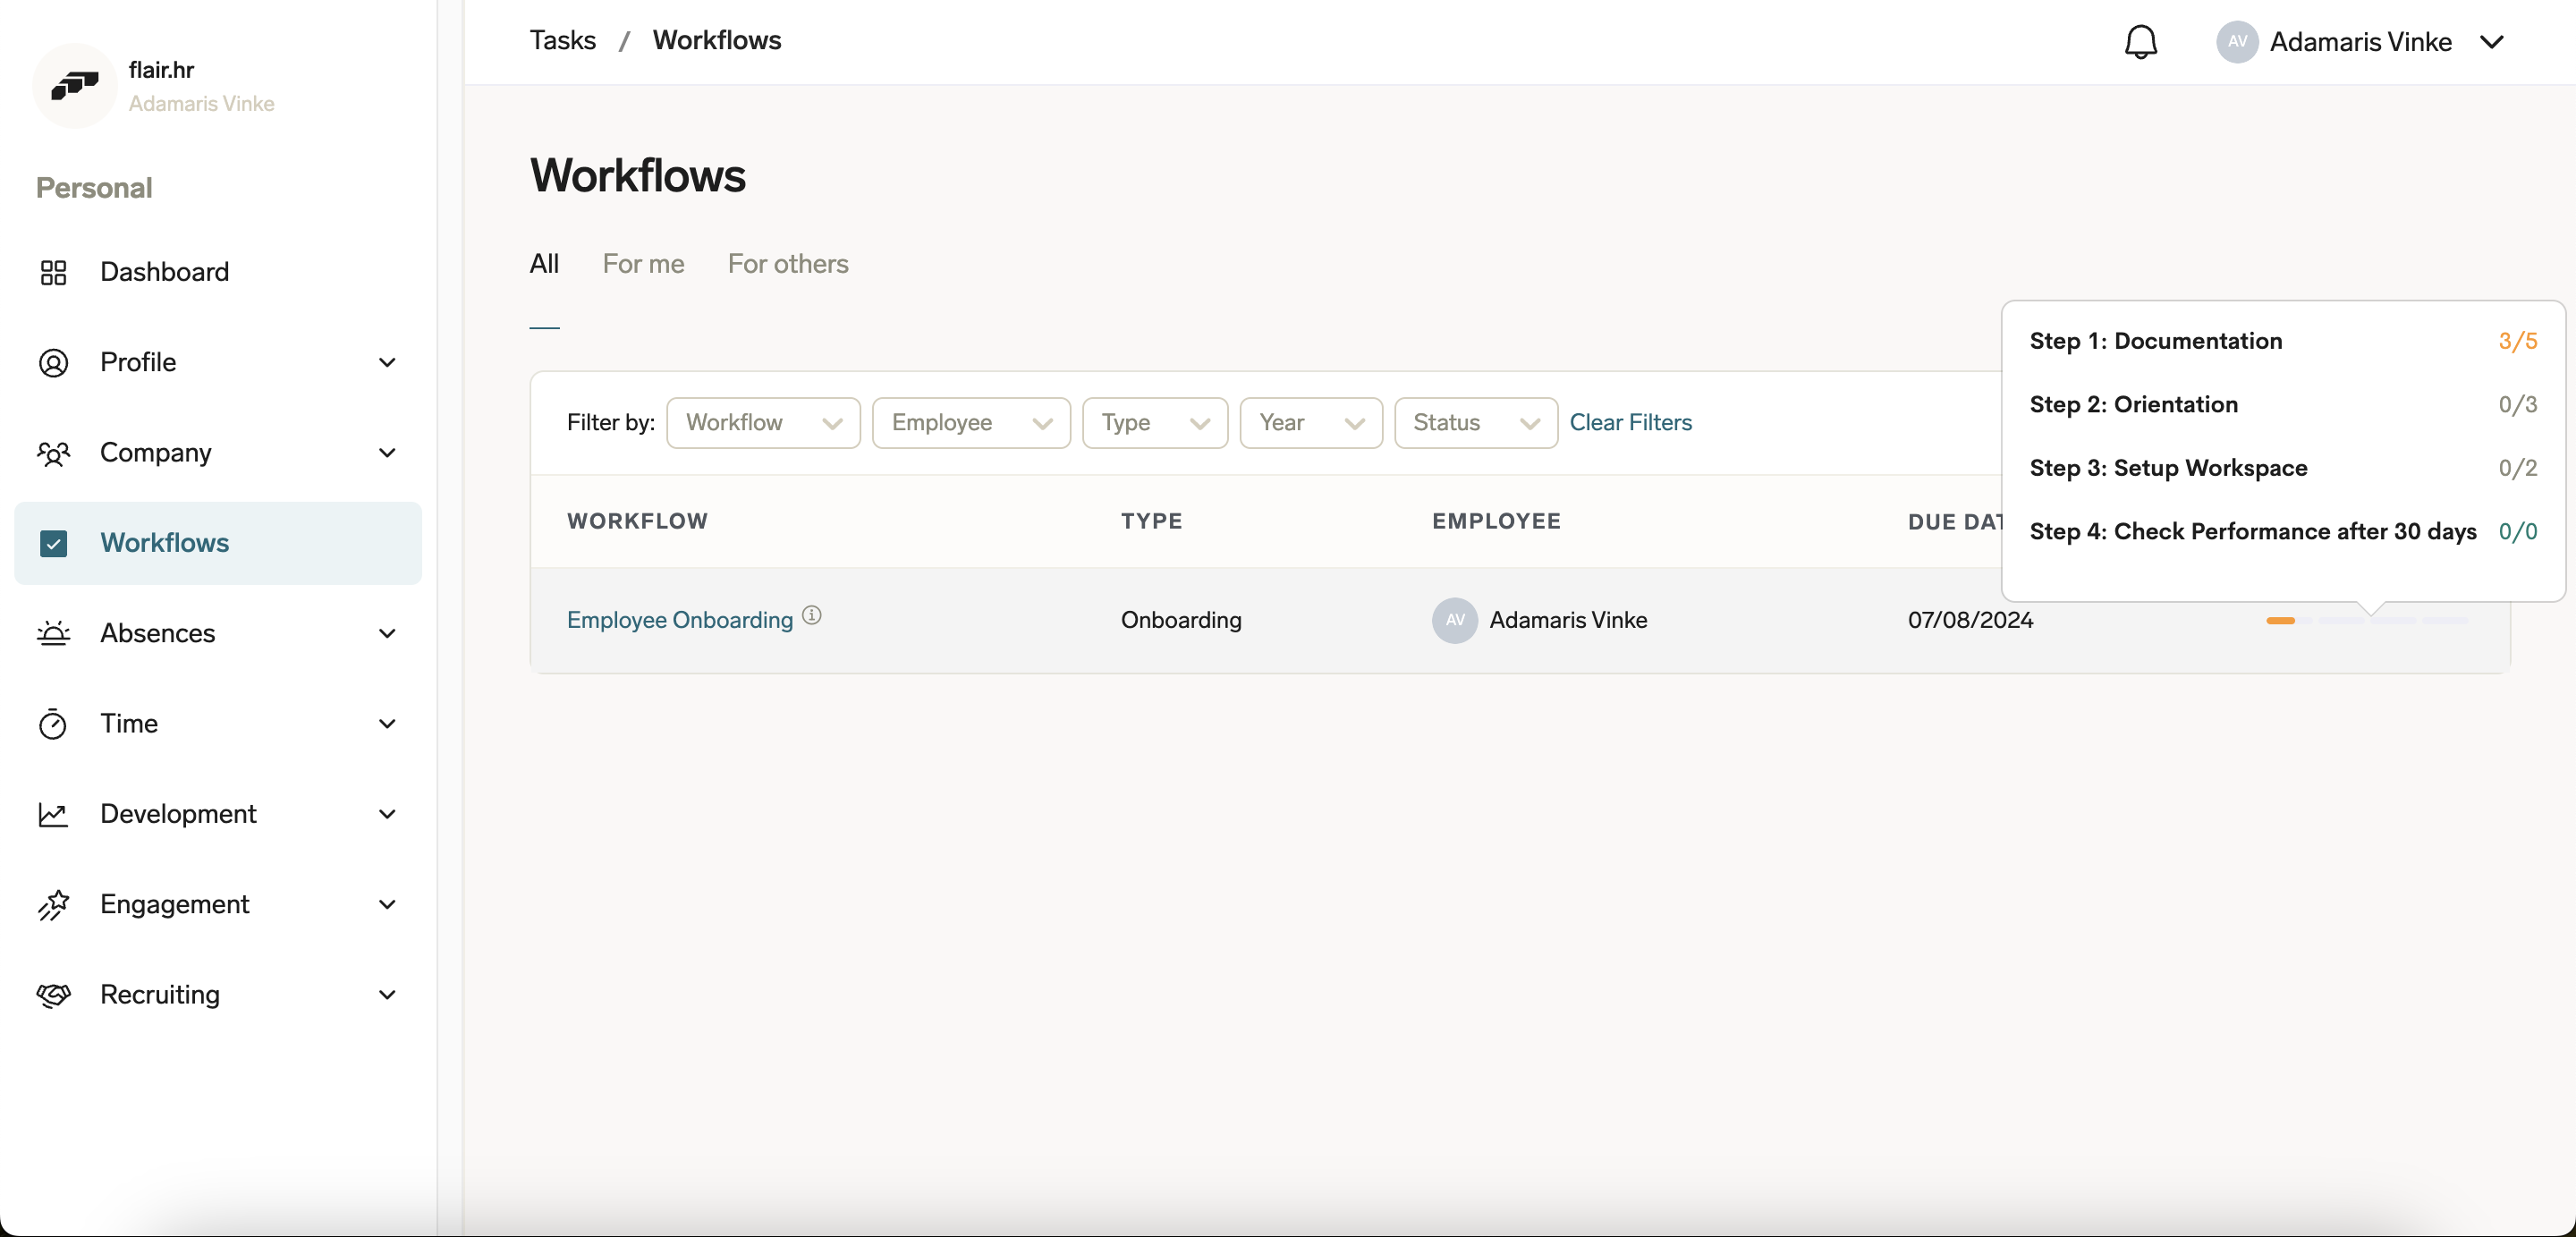
When you click into one of the workflows, you can see a list of tasks divided into steps, along with the person responsible, due date, and status. You can also add and view comments to any task. Mandatory tasks are marked with an asterisk * and steps and tasks that require previous tasks to be completed are indicated by a padlock icon.
Please note that workflow tasks assigned to other people may not be visible to you. If you have completed your mandatory tasks but the next step is still inactive, then another person may not yet have completed their mandatory tasks.
To complete a task, click on its status and change it to Completed. You can also mark tasks as In Progress.
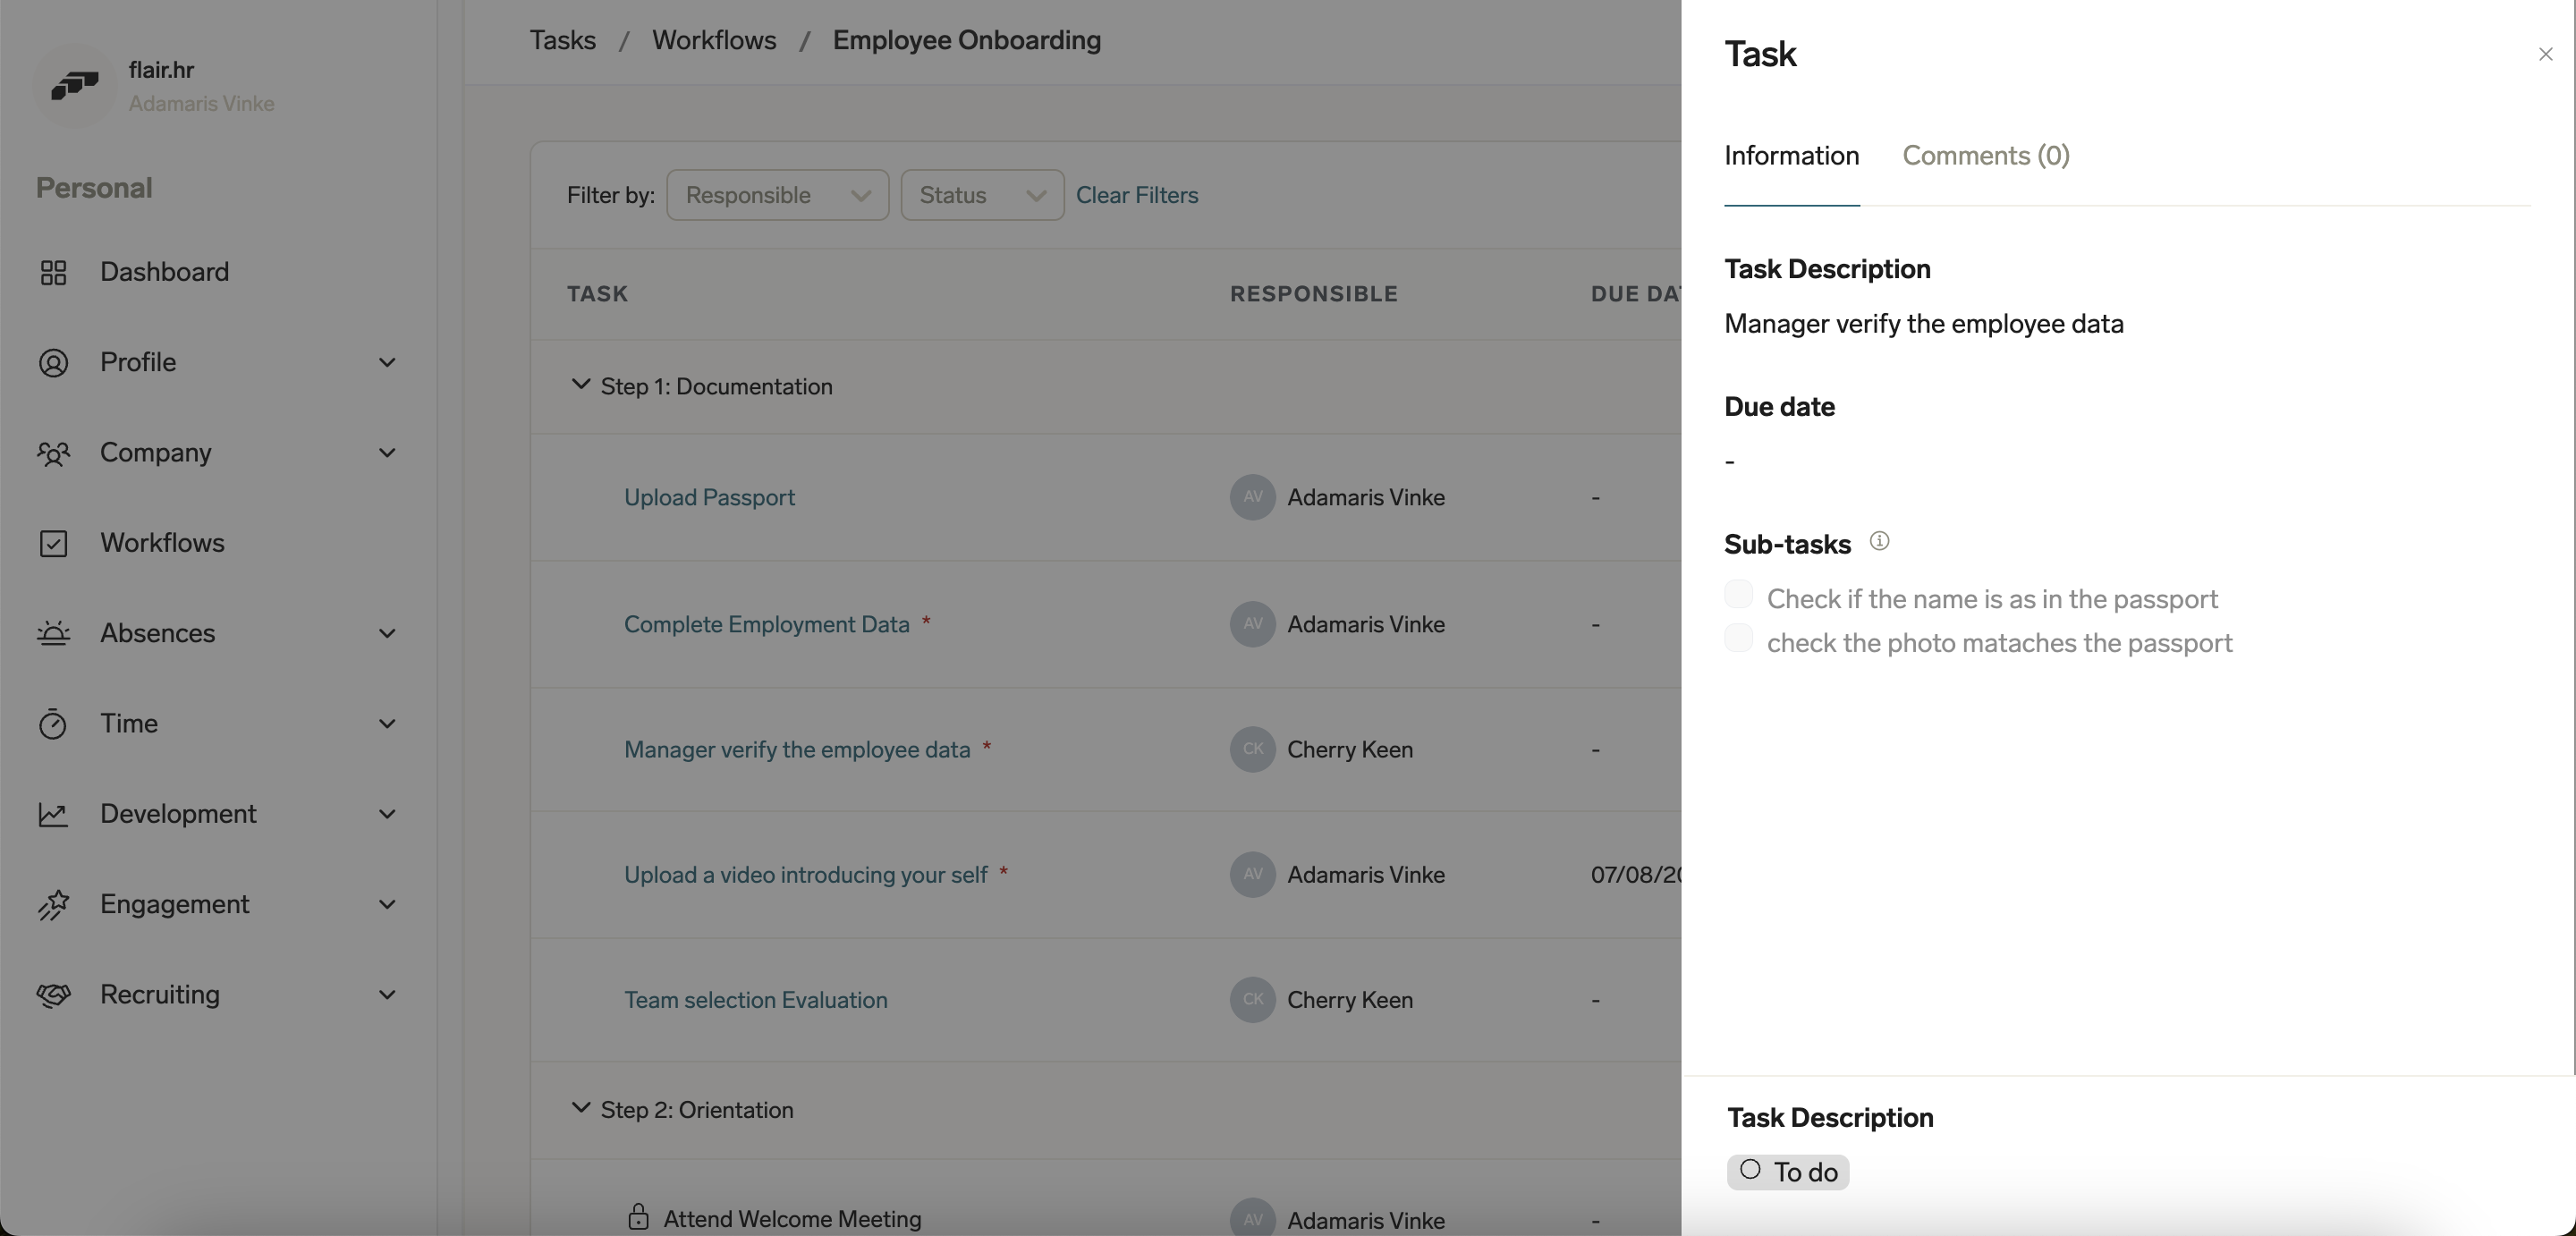
Clicking on a task will show you more details, including a task description. For Upload tasks and Data tasks, you can upload documents here or enter the requested data. You will also see any subtasks that may be included. When you complete a subtask, you can click on it to mark it as done; this will also automatically update the status of the parent task. It is not mandatory to mark every subtask as done, but it can help you to check whether you have done everything that is required.
HR Manager Workflow Access
HR managers can view and update the workflows and workflow items of their HR-managed employees directly in the Employee Hub. This gives HR teams full oversight of employee task progress without requiring direct managers to be involved.
Viewing Employee Workflows as HR Manager
When you are set as an employee's HR manager, their workflows appear in two tabs in the Employee Hub Workflows section:
- All — Shows all workflows across the employees you manage as HR manager, alongside your own assigned workflows.
- Others — Shows workflows where you are not the direct assignee — useful for tracking progress on tasks belonging to your HR-managed employees.
You can open any workflow item, view its details, and update its status — the same way a direct manager can for their reports.
HR manager access is determined by the HR Manager field on each employee's record in the flair HR app. Only employees where you are assigned as HR Manager will appear in your workflow views.
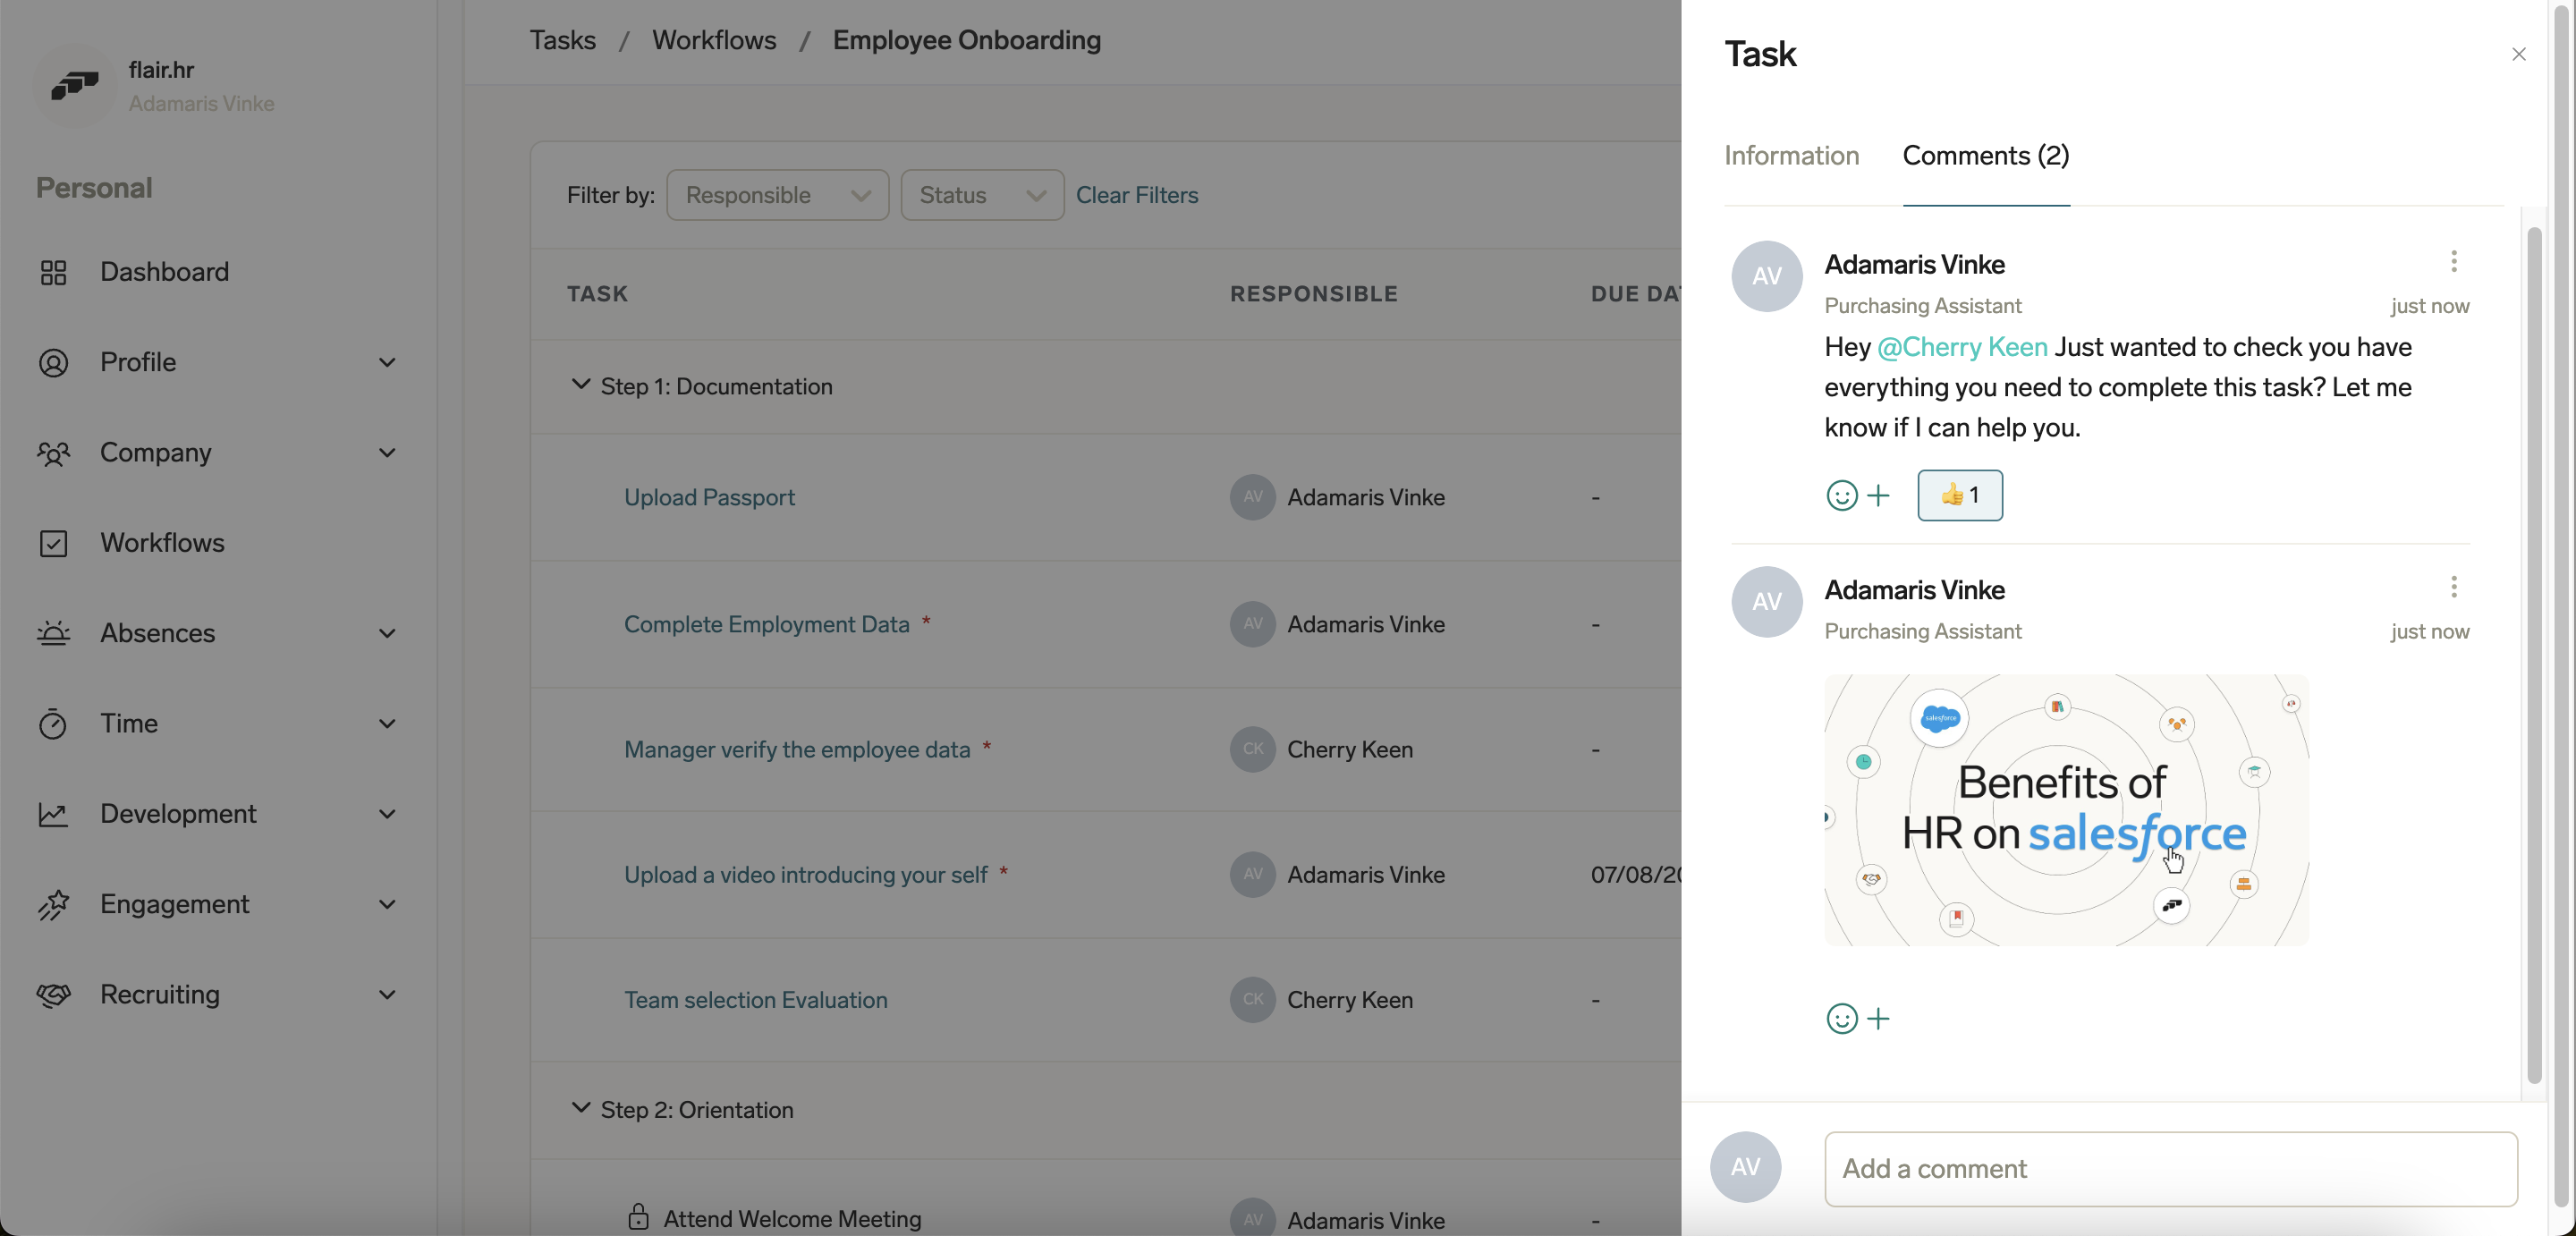
Commenting on Workflows
Our comments feature in the Employee Hub enables open and clear dialogue about workflows. Have a question for a colleague? Want to double-check a request? You can comment directly on the topic in the Workflows section.
Simply select the relevant Workflow. You can make and view comments either by clicking on the speech bubble icon in the Comments column or opening a workflow task and selecting the Comments tab.
You can also attach documents and images to your comments, tag colleagues, and use emojis to react to comments.
What Happens to Older Workflows?
Important Notice: Customers with pre-existing workflow templates need to review and reconfigure these workflows to align with this new flair update. Here's what you need to know.
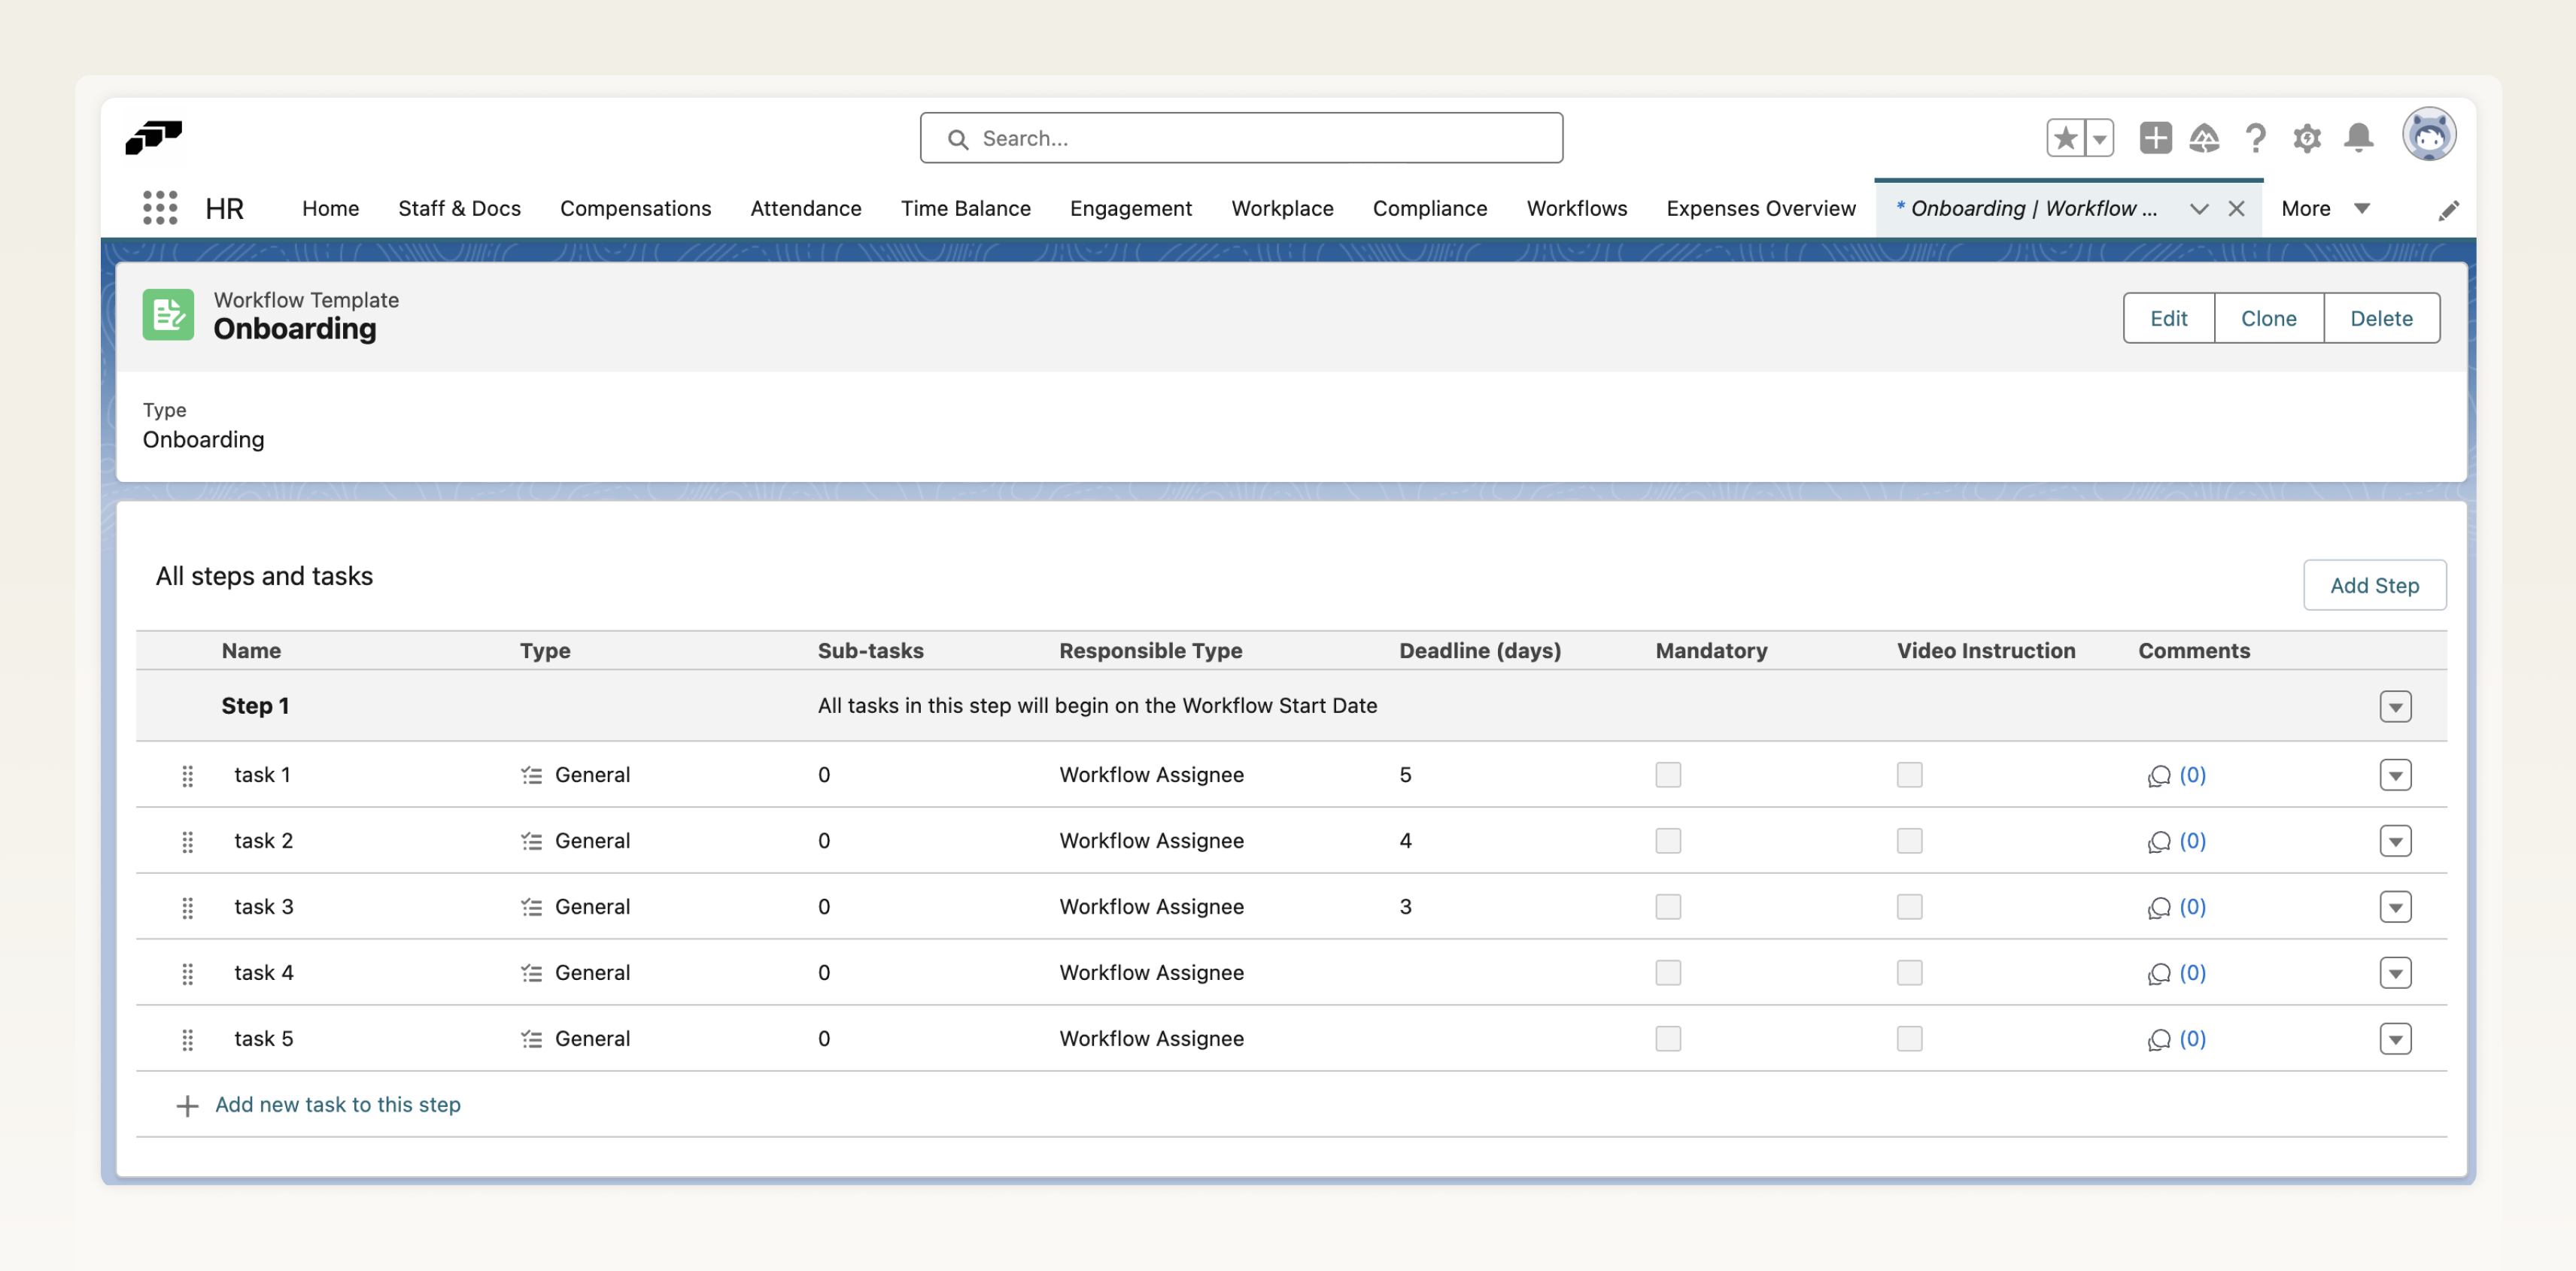
1. Previously, workflows only consisted of tasks like below.
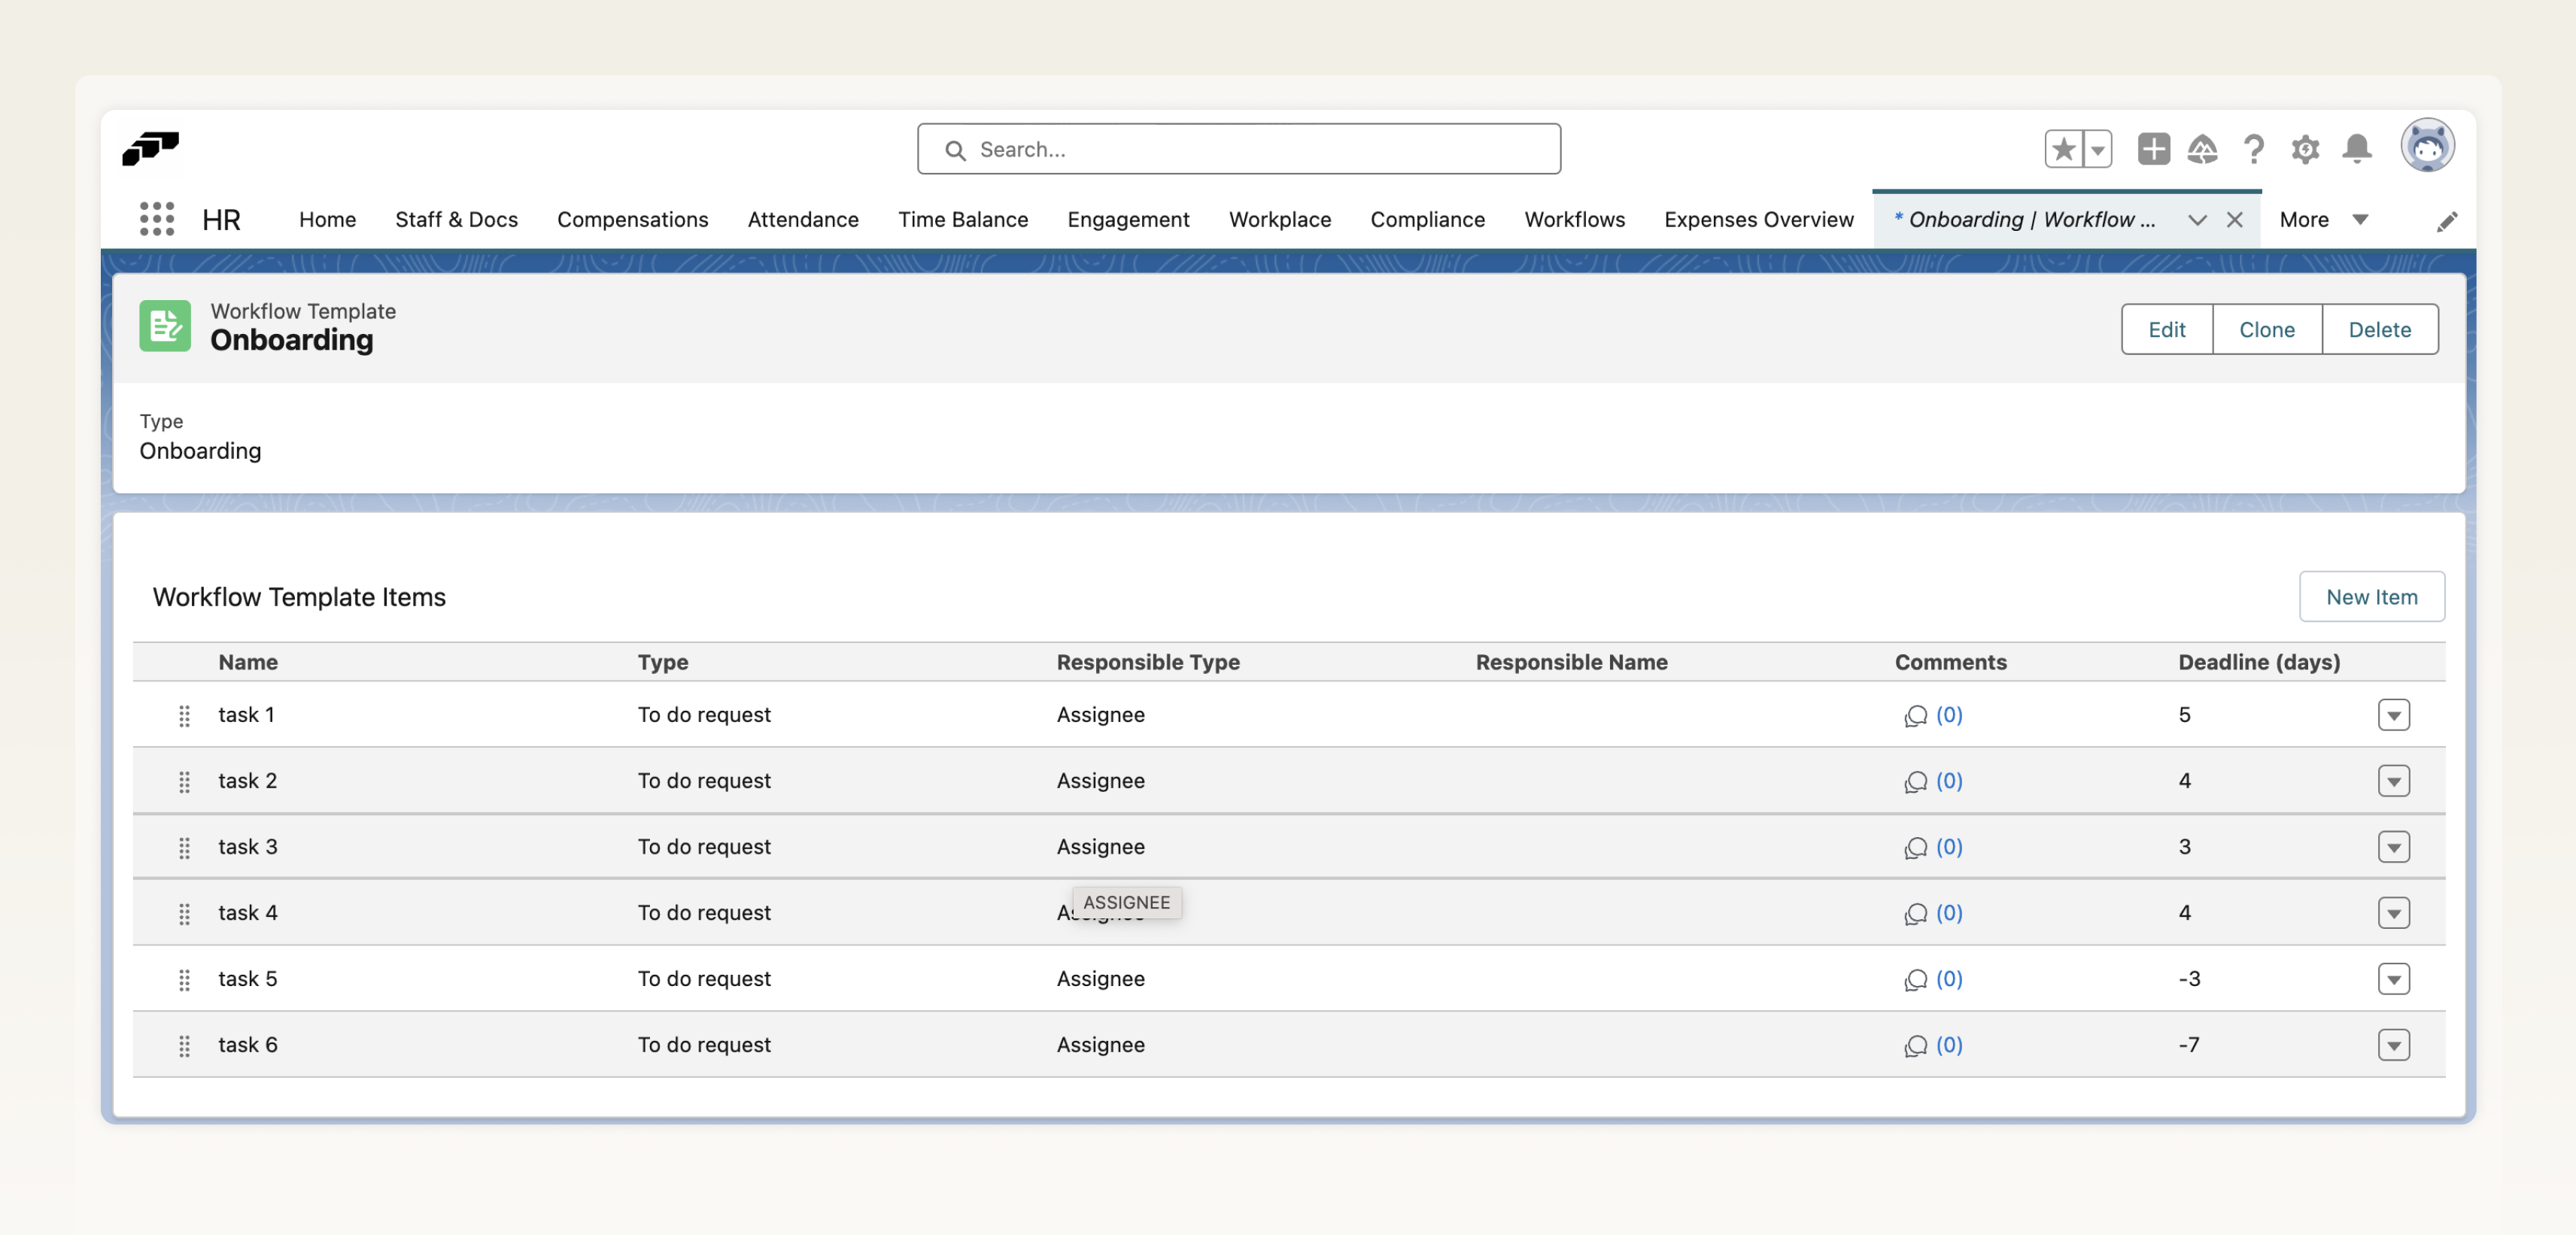
2. But now, with the addition of workflow steps, existing tasks will be grouped under a new heading and name called "Step 1" in your workflow templates. Please see the new layout below.
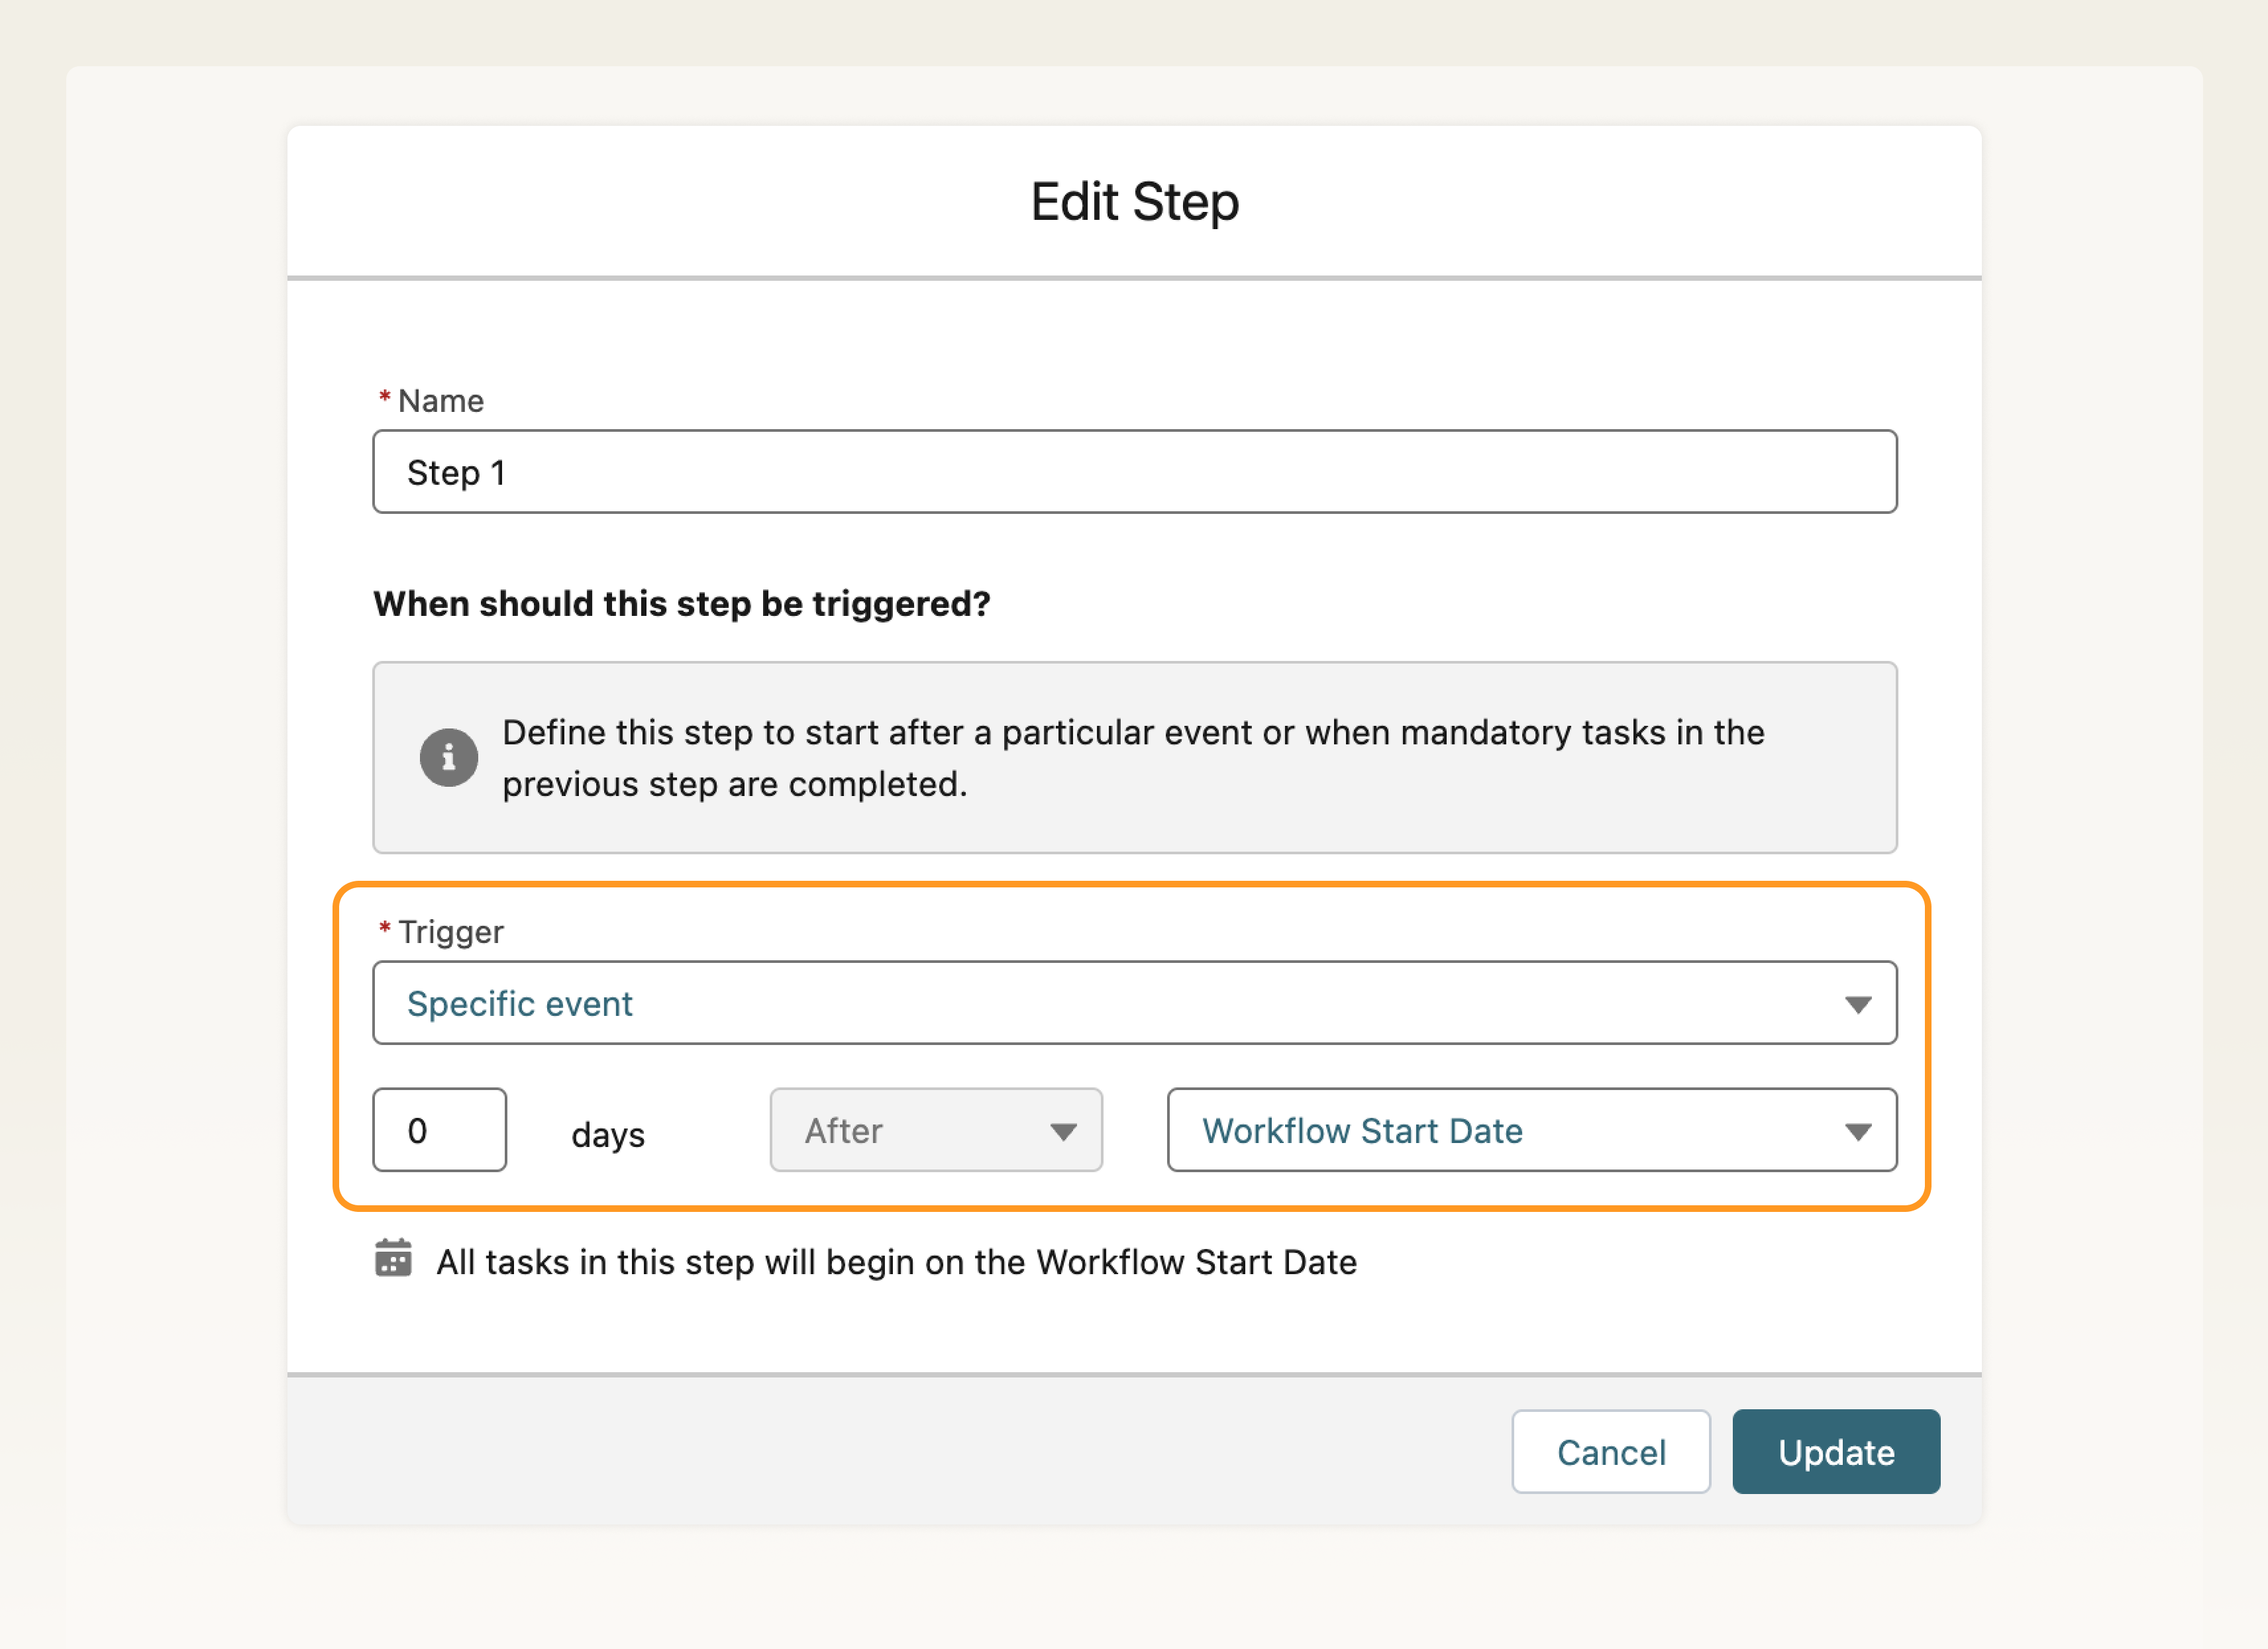
3. Task start dates used to be set individually like below. Start dates are now set at the step level. This means all tasks within a step will share the same start date.


4. With this new update, you will find that your tasks are grouped under "Step 1." By default, the start date for "Step 1" is related to a specific event known as the "Workflow Start Date."
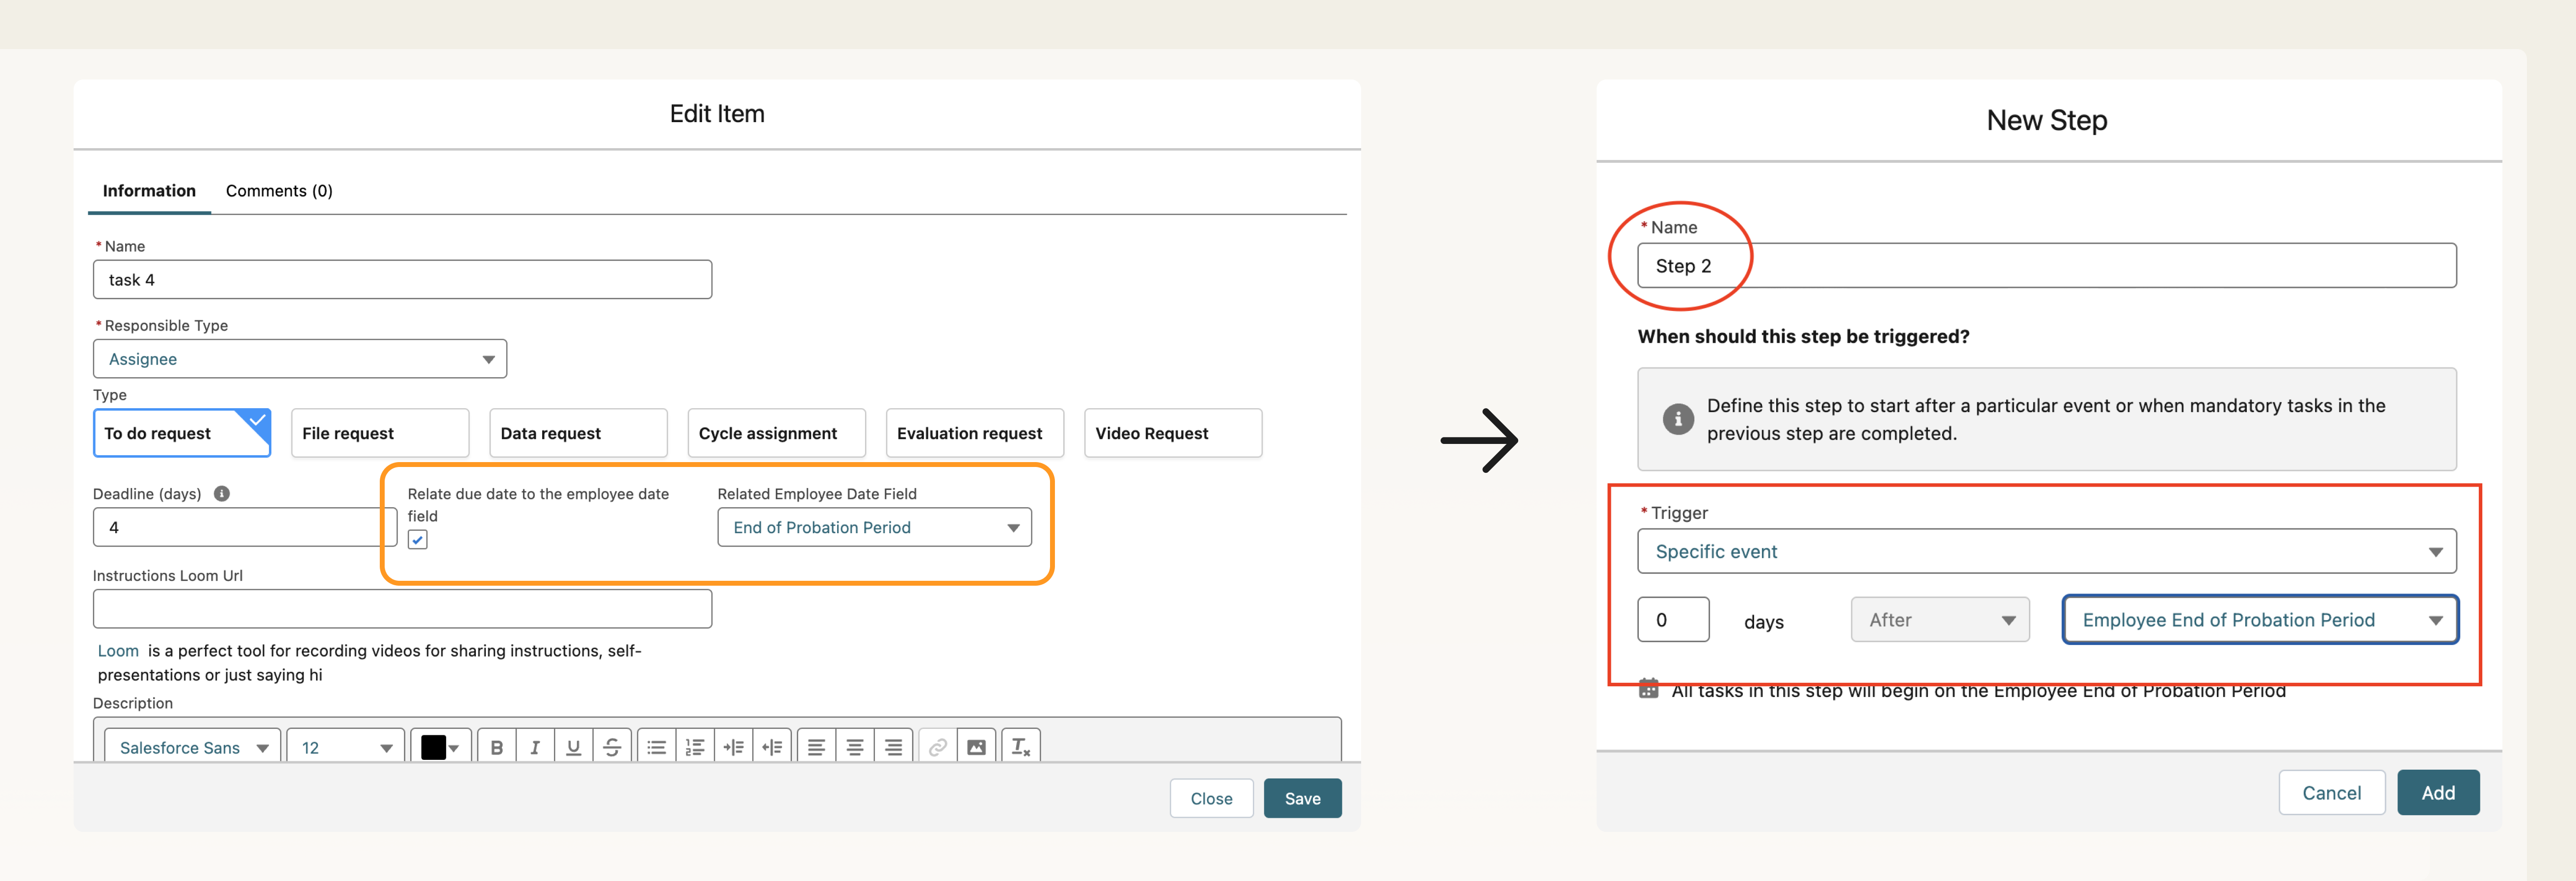
If your task's due dates were previously set based on a trigger event other than the "Workflow Start Date," you'll need to create a new step for the trigger event and move your task under that step.
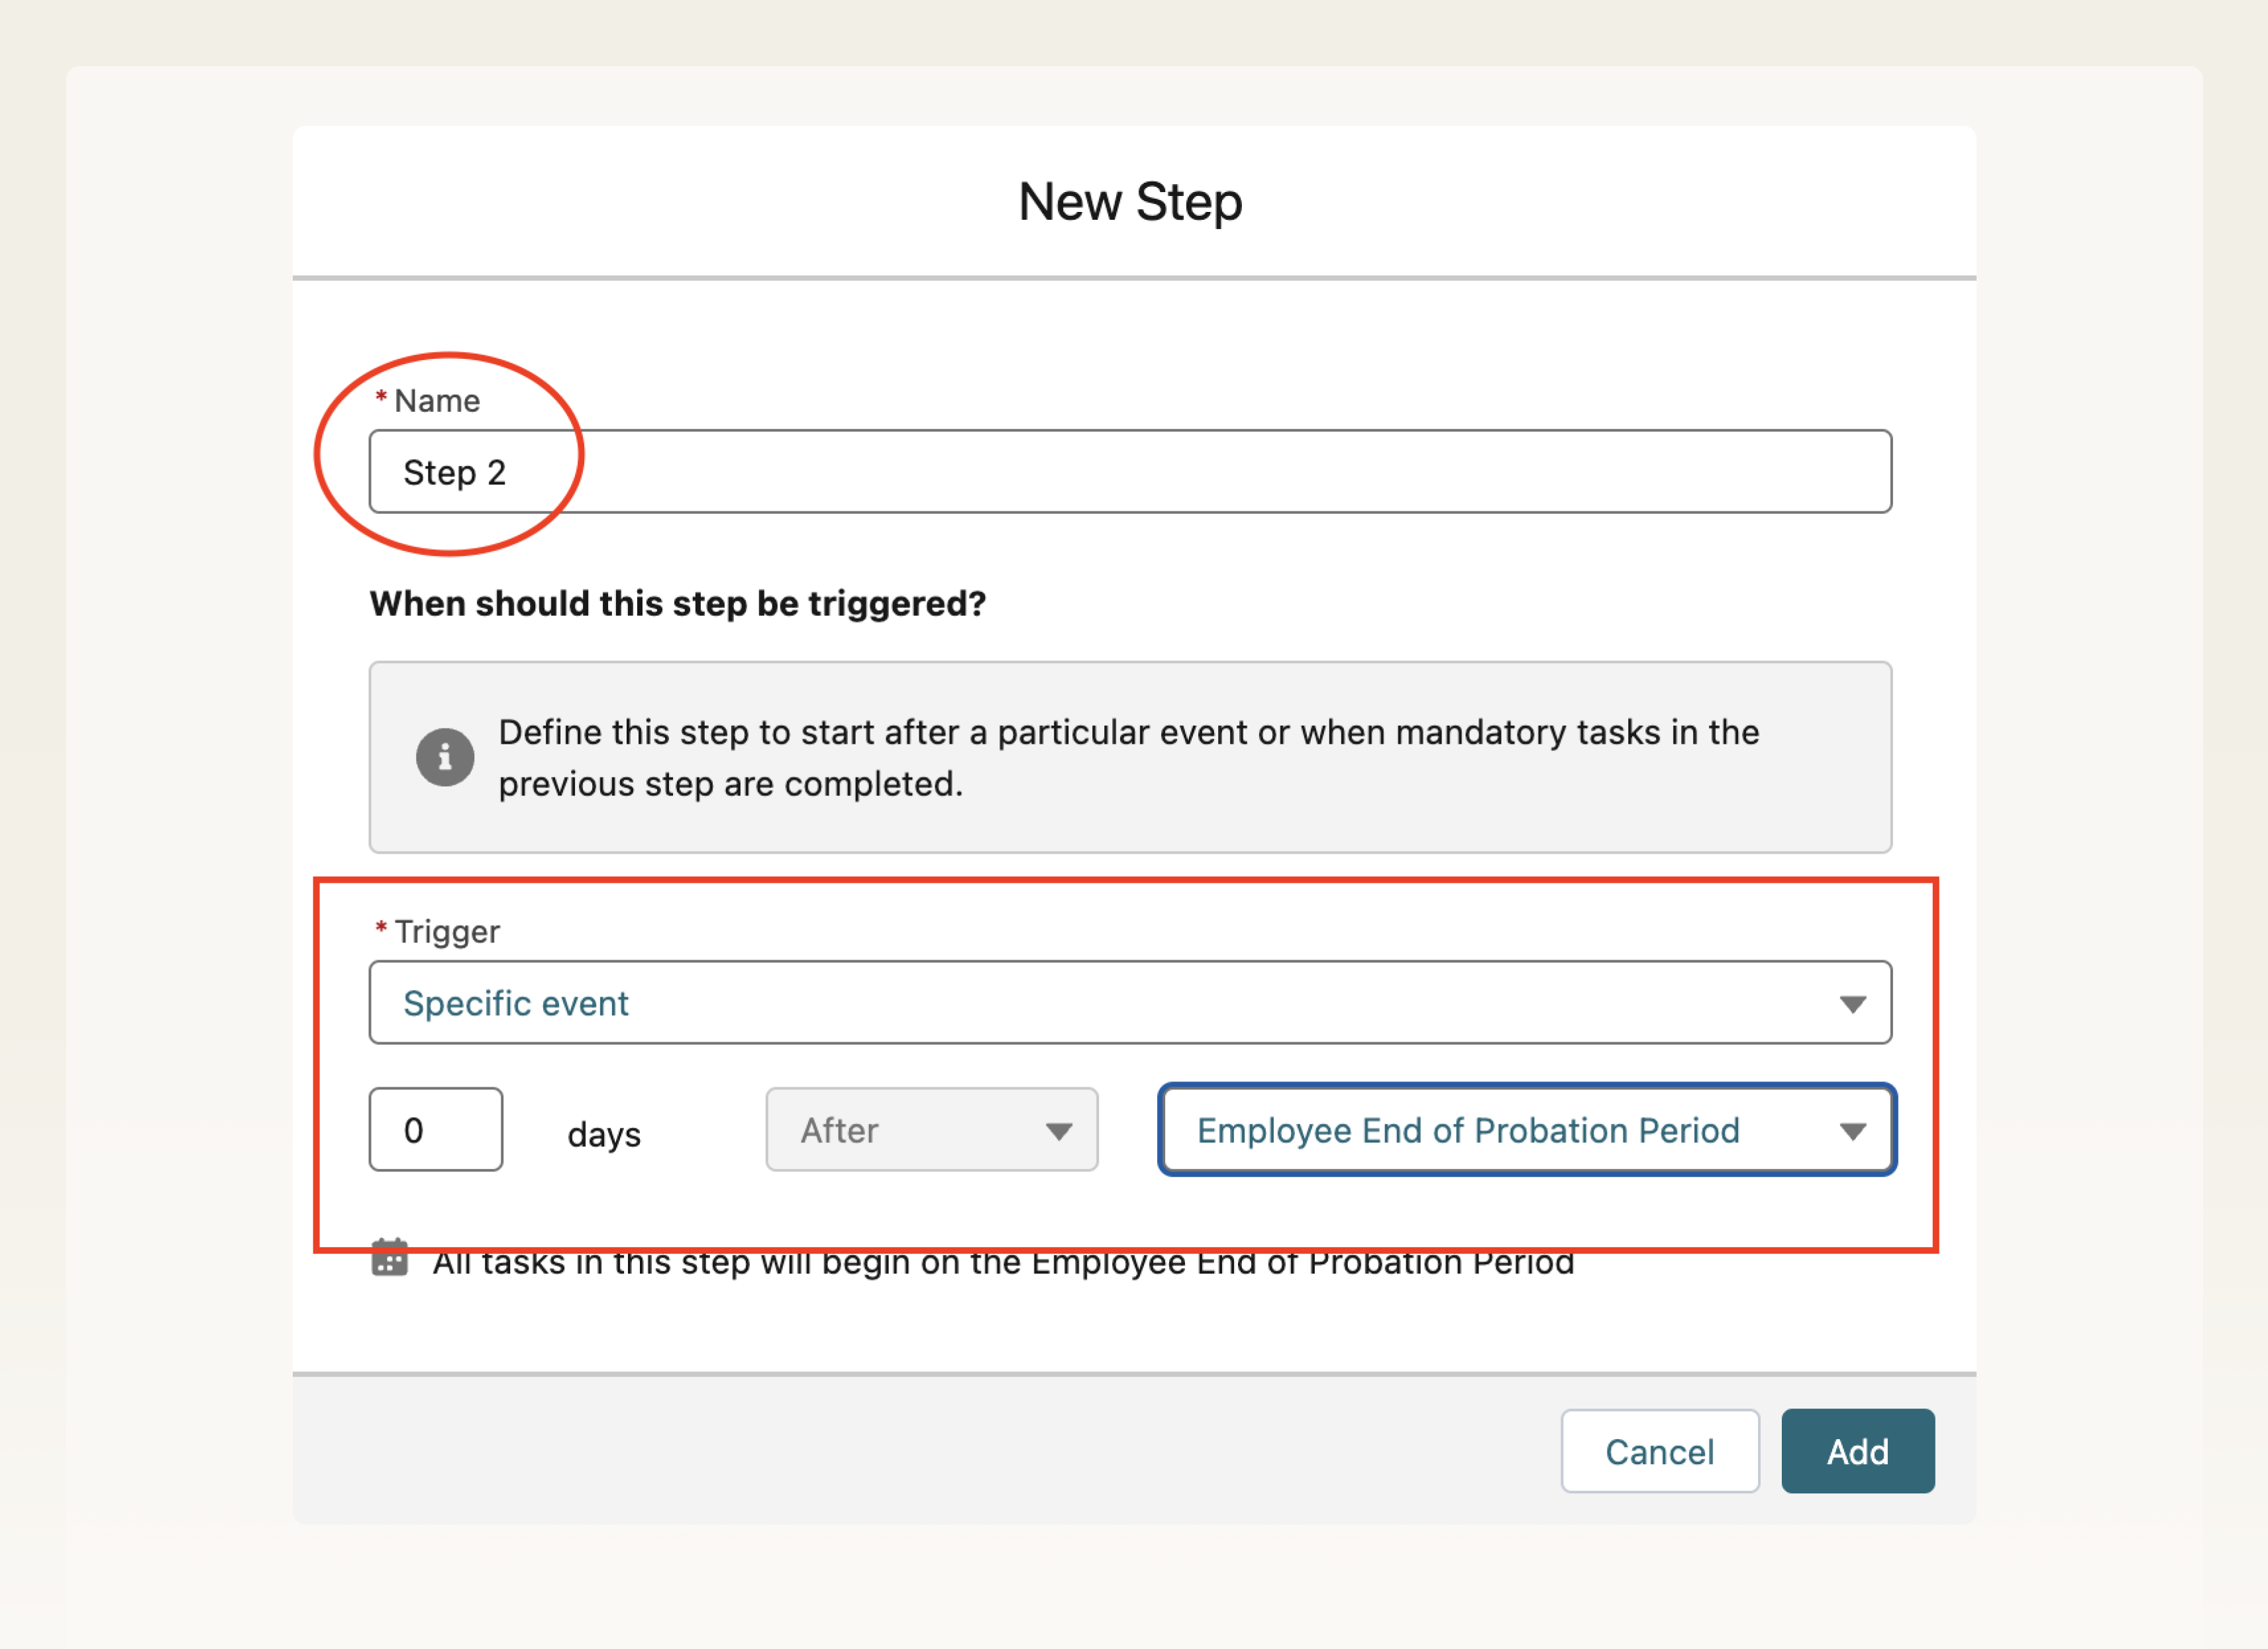
5. This is what setting up a new step for a trigger event looks like:
6. Existing tasks remain unchanged in terms of their content. However, their deadlines may need adjustment according to the new structure.