Create and publish flair Reports
When none of the packaged flair Reports answers your question, you can create your own. Start from a copy of a packaged report, let flair AI build a report from a description, or configure every setting yourself. A new report starts as a draft, which you can configure. Publishing it locks the configuration.
HR Admins and Recruiters in Salesforce. flair AI report generation requires flair AI for HR and a connected flair AI integration.
Before you begin
- Creating and editing flair Reports requires the Flair Manager, Flair Employee Management, Flair Recruiter, or Flair Recruitment Management permission set. If New or Add a report isn't available, ask your Salesforce Admin for one of them.
- Packaged reports can't be edited. To change one, clone it first.
Clone a packaged report
Cloning is the fastest way to adjust a packaged report, for example to add a quick filter or change the chart.
- Open the App Launcher (⋮⋮ grid icon), search for
flair Reports, and open flair Reports. - In the All list view, click the report you want to copy.
- In the record header, click Clone.
- In Report Name, enter a name for your copy, and click Save. The copy opens as an editable draft with the same configuration as the original.
- Change the configuration as described in Build a report manually, then publish the report.
A copy keeps the original report's Employee Hub settings, so a copy of a report that's available in the Employee Hub appears in Analytics right away, next to the original. To keep the copy out of the Hub, publish it, and clear Available in Employee Hub on its Employee Hub tab.
Create a report
- Open the App Launcher (⋮⋮ grid icon), search for
flair Reports, and open flair Reports. - Click New.
- Enter a Report Name, and click Save. The report opens as a draft, with the configuration panel on the right.
Alternatively, on the Metrics tab, click Add a report. flair creates a draft named New report and opens it.
A new report shows No data yet until you configure it, either with AI or manually.
Create a report with AI
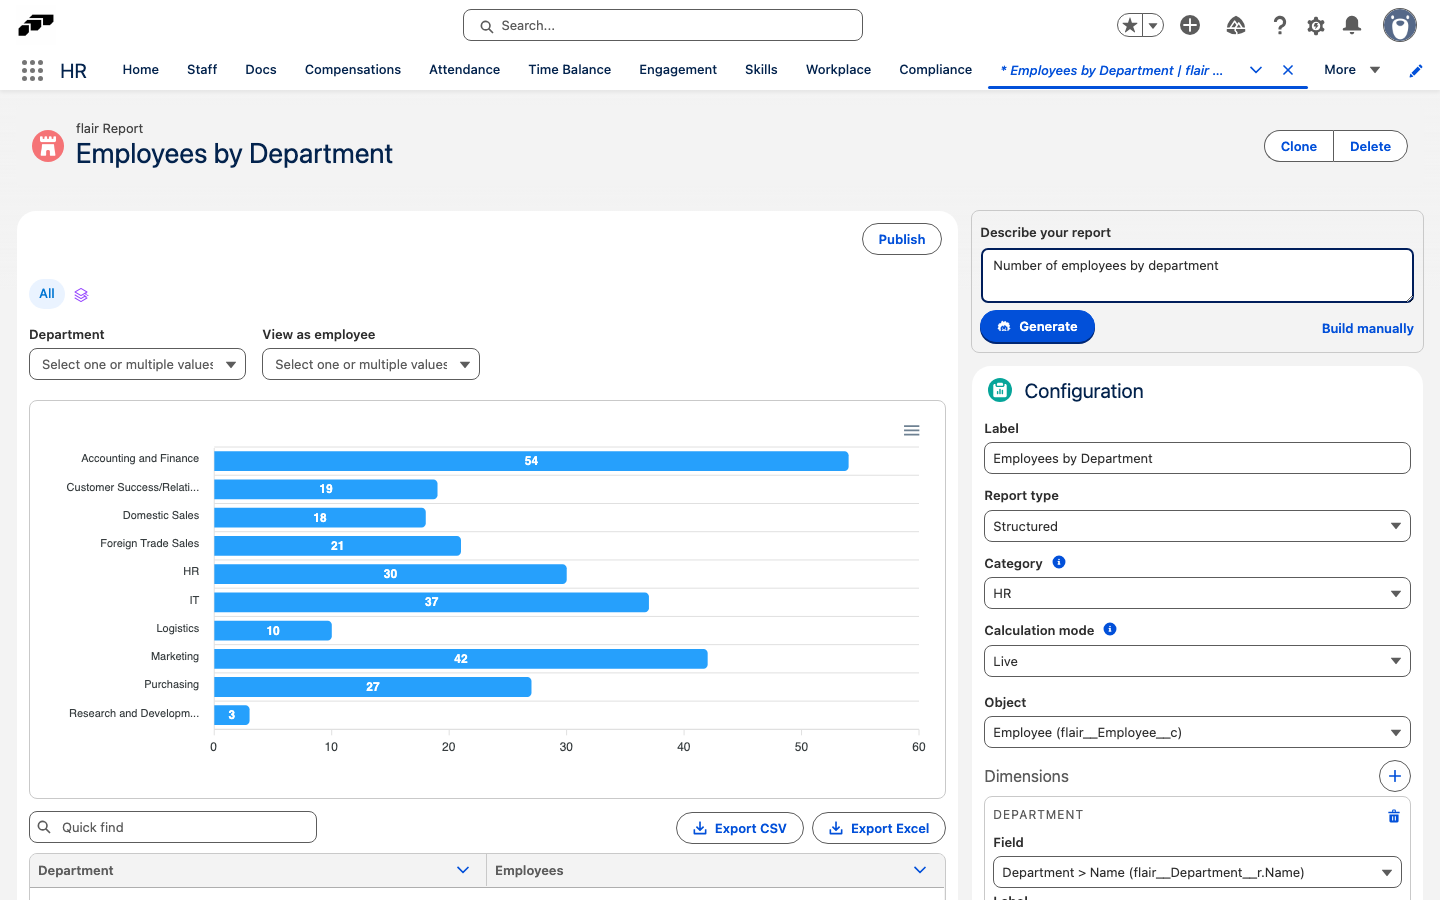
Describe the report in plain language, and flair AI fills in the configuration for you. If flair AI for HR or the flair AI integration is missing, a banner above the prompt explains what to enable, and Generate stays unavailable.
- On the draft report, find Describe your report above the configuration panel. If you see Create with AI instead, click it.
- In Describe your report, enter what the report should show, for example
Average age of employees by department. - Click Generate. flair AI fills in the configuration, including a new Label that replaces the report name, and saves the report. The results appear.
- Review the generated configuration, and adjust it as described in Build a report manually.
If flair AI can't generate the report, rephrase your description and try again. To hide the AI prompt and work only with the configuration panel, click Build manually.
Build a report manually
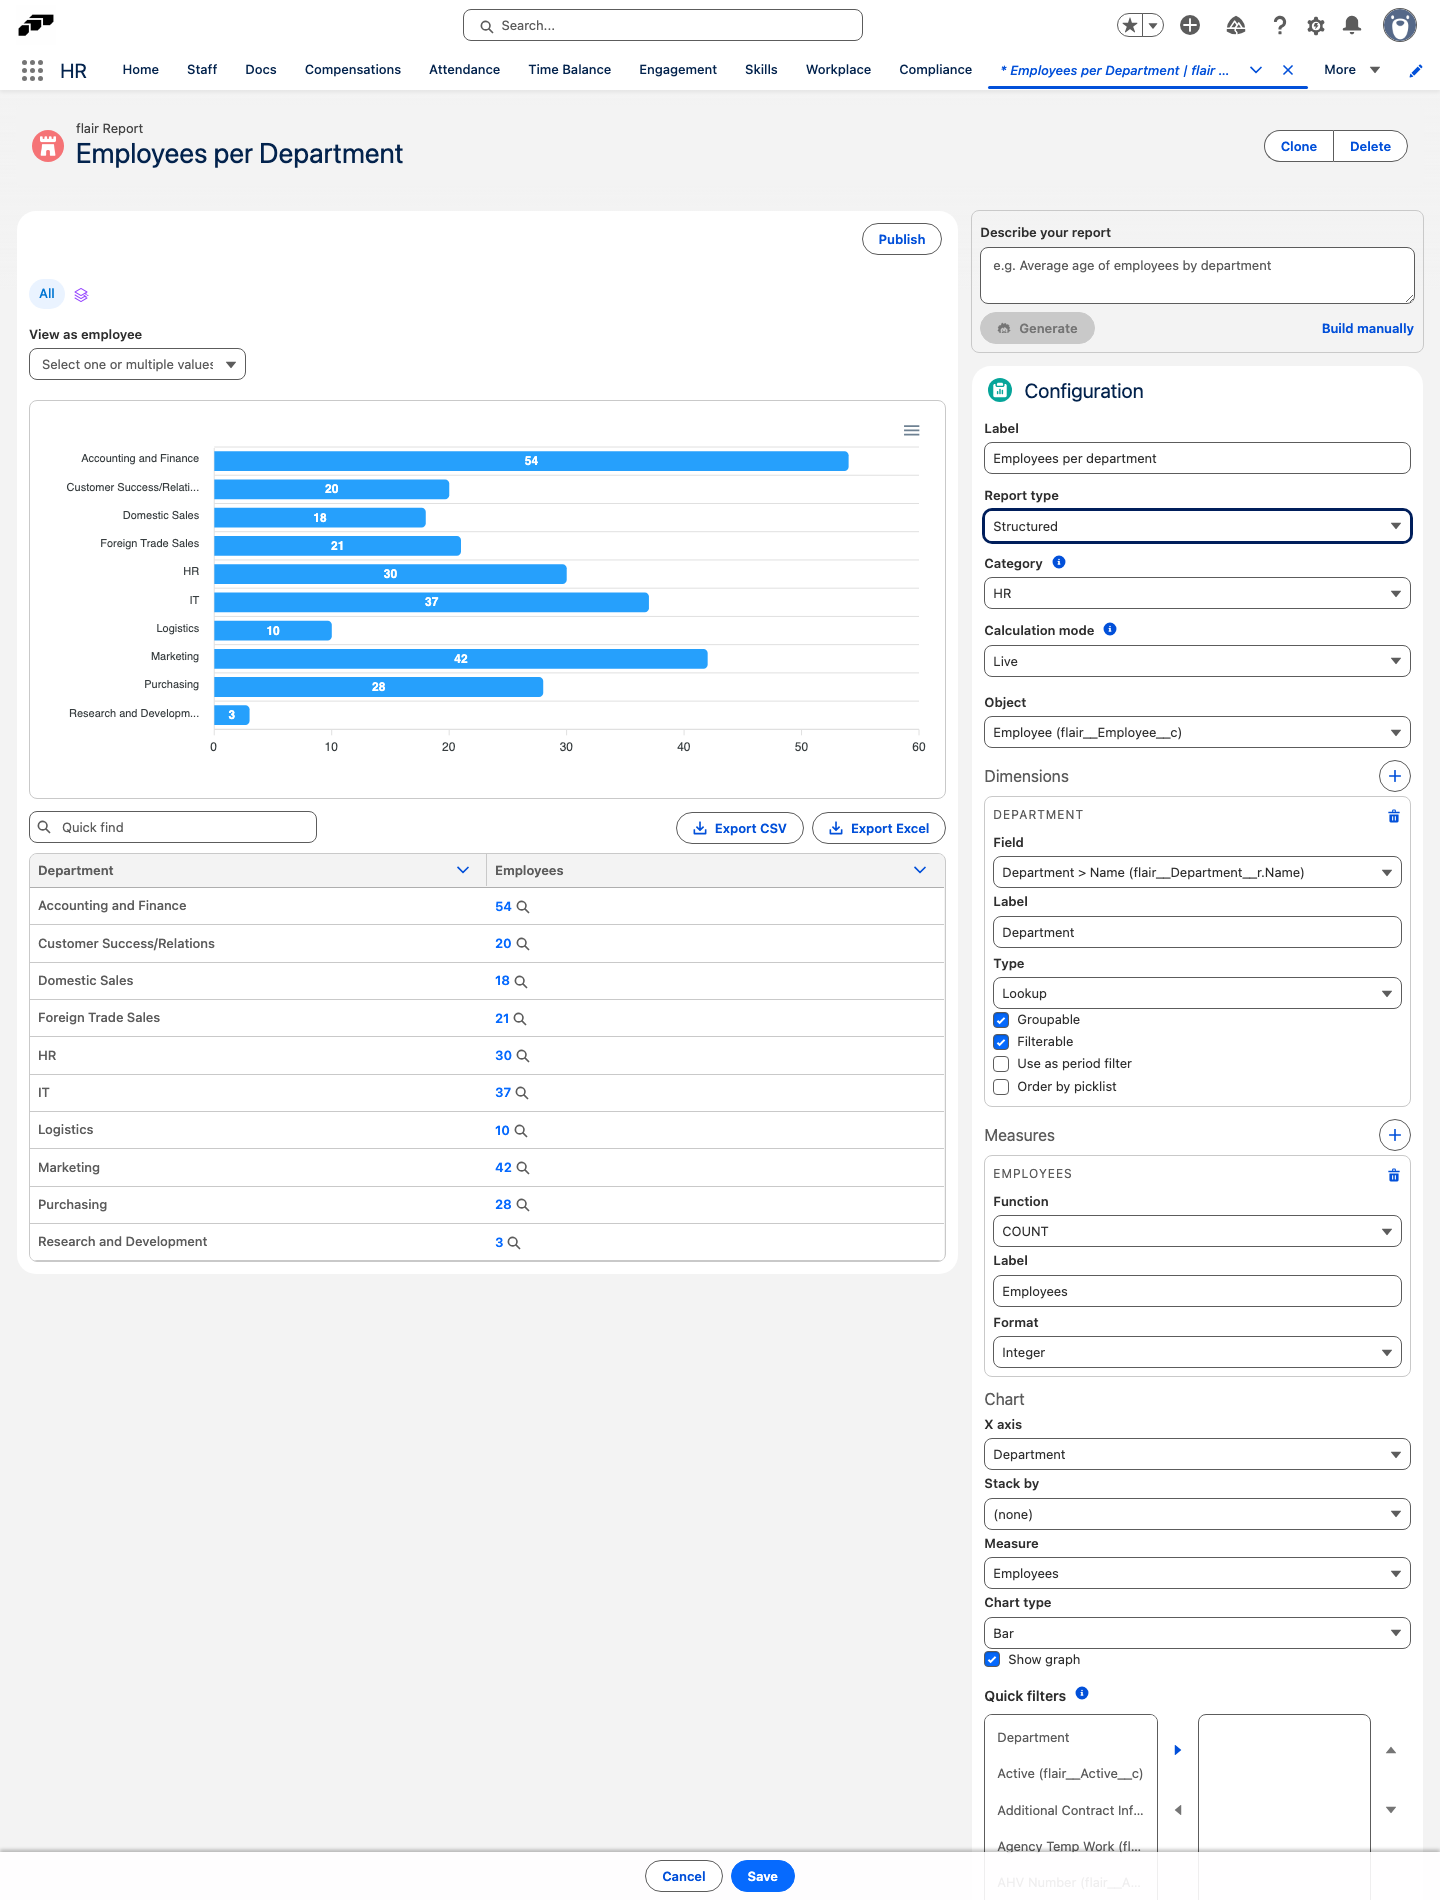
The Configuration panel defines what the report shows. The steps describe a Structured report, which covers most needs.
- In Label, check the report name.
- In Report type, select Structured.
- In Category, select HR, Recruiting, or Other.
- In Calculation mode, select Live to run the report every time it opens, or Background for reports too large to run live. Background reports show a snapshot that you calculate on demand.
- In Object, select the flair object to report on, such as Employee or Absence.
- Next to Dimensions, click the add icon (Add dimension), and select a Field to group or display data by. Repeat for each field you need.
- Optional: Next to Measures, click the add icon (Add measure), and select a Function (COUNT, SUM, AVG, MIN, or MAX). For any function except COUNT, also select a numeric Field. Without measures, the report shows a flat table of the dimensions.
- Optional: Under Chart, select the X axis, Stack by, Measure, and Chart type, and select Show graph.
- Optional: In Quick filters, move fields to the selected list to show them as filters above the report.
- Click Save. The results next to the configuration panel update.
Each dimension and measure has more settings:
| Setting | What it does |
|---|---|
| Label | The column and axis name readers see. |
| Type (dimension) | How the field is treated: Text, Picklist, Date, Number, Lookup, or Reference. |
| Groupable | Offers the field in Group by and Stack in the viewer. |
| Filterable | Lets readers filter by the field. |
| Use as period filter | Turns on Start period, End period, and Interval for a date field. |
| Order by picklist | Sorts groups in picklist order instead of alphabetically. |
| Format (measure) | Shows values as Integer, Decimal, Percent (0-1), Percent (0-100), or Number. |
| Base filter (SOQL WHERE) | Limits the records the report reads, for example to active employees. |
Use an advanced report type
For questions a structured report can't answer, select another Report type:
- Advanced SOQL: enter a SOQL query, and click Validate. Query is valid. confirms the query.
- Invocable (Apex): enter the Apex class that calculates the report in Invocable class. Use this for calculations such as attrition rates, which many packaged reports use.
Publish the report
- Above the results, click Publish. The configuration panel closes, and the report record shows its tabs.
- Optional: To change the configuration later, click Move to draft.
To show the report in the Employee Hub, see Publish a report to the Employee Hub.
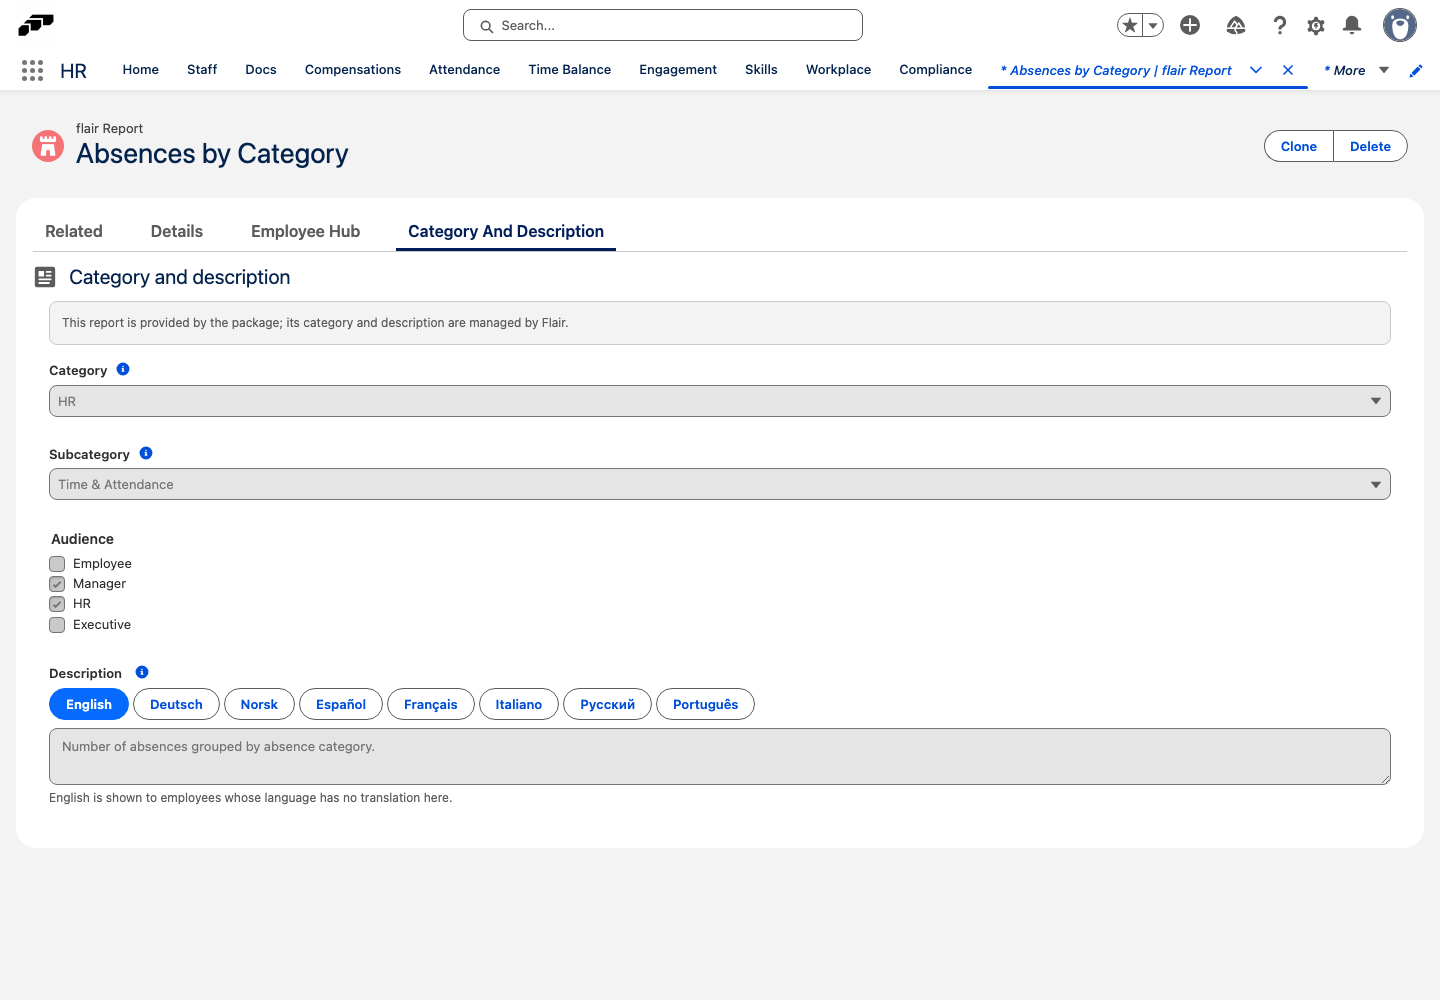
Set the category and description
The category, subcategory, and description decide where a report appears in the Metrics tab and in Employee Hub Analytics, and what readers see under its title.
- On a published report, open the Category And Description tab.
- Select a Category and a Subcategory, such as Headcount and turnover or Time & Attendance.
- In Audience, select Employee, Manager, HR, and/or Executive. The audience filters the report library and doesn't grant access. In the Employee Hub, only reports for Employee or Manager appear, apart from hiring reports.
- In Description, enter what the report shows. To add translations, switch the language, for example to Deutsch, and enter the translated description.
- Click Save.
Packaged reports show their category and description read-only, because flair manages them.