Time Tracking
The Time Tracking feature in the flair Employee Hub is an easy way to keep a record of the hours that employees have spent at work.
Introduction to Time Tracking
Time tracking allows employees to log their working hours, breaks, and overtime. This feature helps organizations maintain accurate records of employee attendance and working hours, which is essential for payroll processing, compliance, and workforce management.
What Is Time Tracking Used For?
Time tracking in flair serves multiple purposes:
- Payroll Accuracy: Ensure employees are compensated correctly for their working hours
- Compliance: Meet legal requirements for tracking employee working time
- Project Management: Monitor time spent on specific projects and tasks
- Productivity Analysis: Understand how time is being utilized across the organization
- Overtime Management: Track and manage employee overtime hours
- Resource Planning: Make informed decisions about staffing and workload distribution
Types of Time Tracking
flair supports three common types of time tracking:
Digital Clock In / Clock Out
Employees can clock in, record breaks, and clock out using the flair Employee Hub or mobile app. This offers a more modern and efficient alternative to paper or spreadsheet-based tracking.
Project-Based Tracking
With time tracking in flair, you can track time spent on specific projects alongside ordinary working hours. This helps you keep track of billable hours for a particular project, so that you don't run over time or budget.
Tracking With Physical Devices
flair also supports time tracking with physical devices. For example, employees can clock in with a card, badge, or chip when they arrive at work. Their time is then synched with the flair time tracking app.
Time Tracking With flair
flair offers a comprehensive time tracking solution that integrates seamlessly with Salesforce. Employees can track their time through multiple channels:
- Employee Hub (web-based)
- Mobile app
- Slack integration
- Physical kiosk devices
- RFID tags and fingerprint scanners
How To Set Up Time Tracking
Before employees can start tracking time, administrators need to configure the time tracking system in Salesforce.
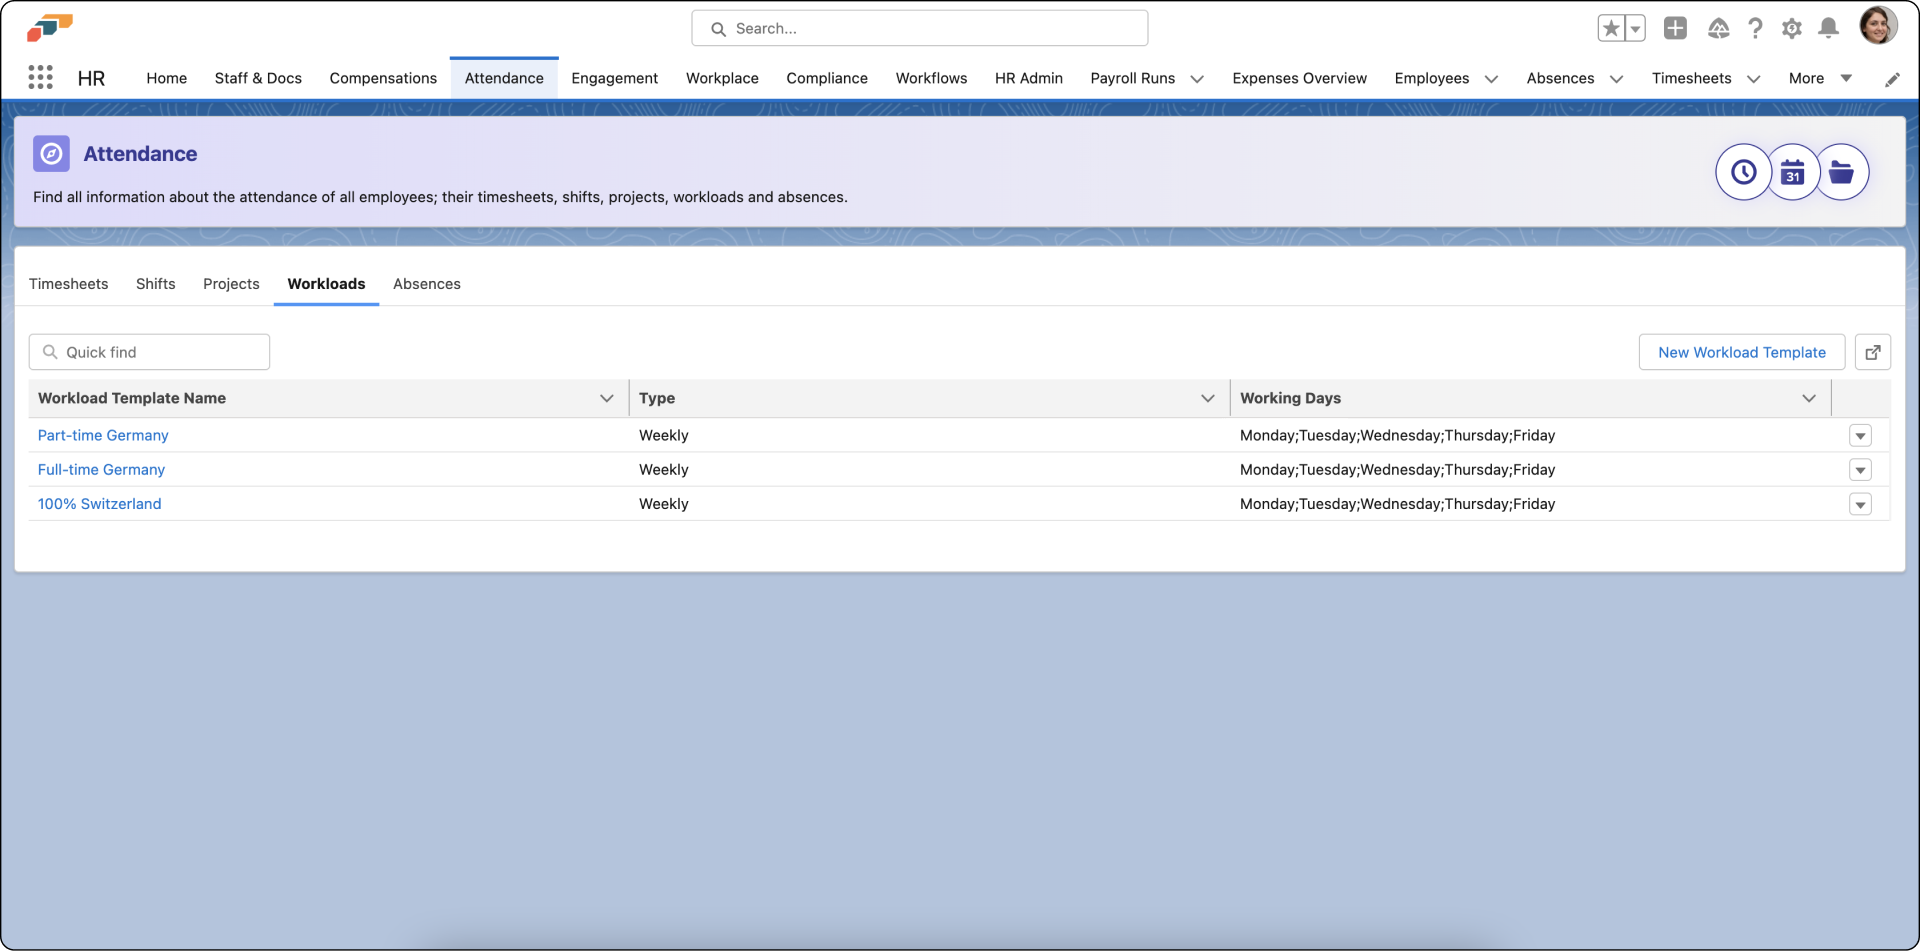
Click on New Workload Template to add a new set of working hours for specific employees. Here you can define how many hours employees are required to work on a weekly or monthly basis. You also have the option to schedule break times.
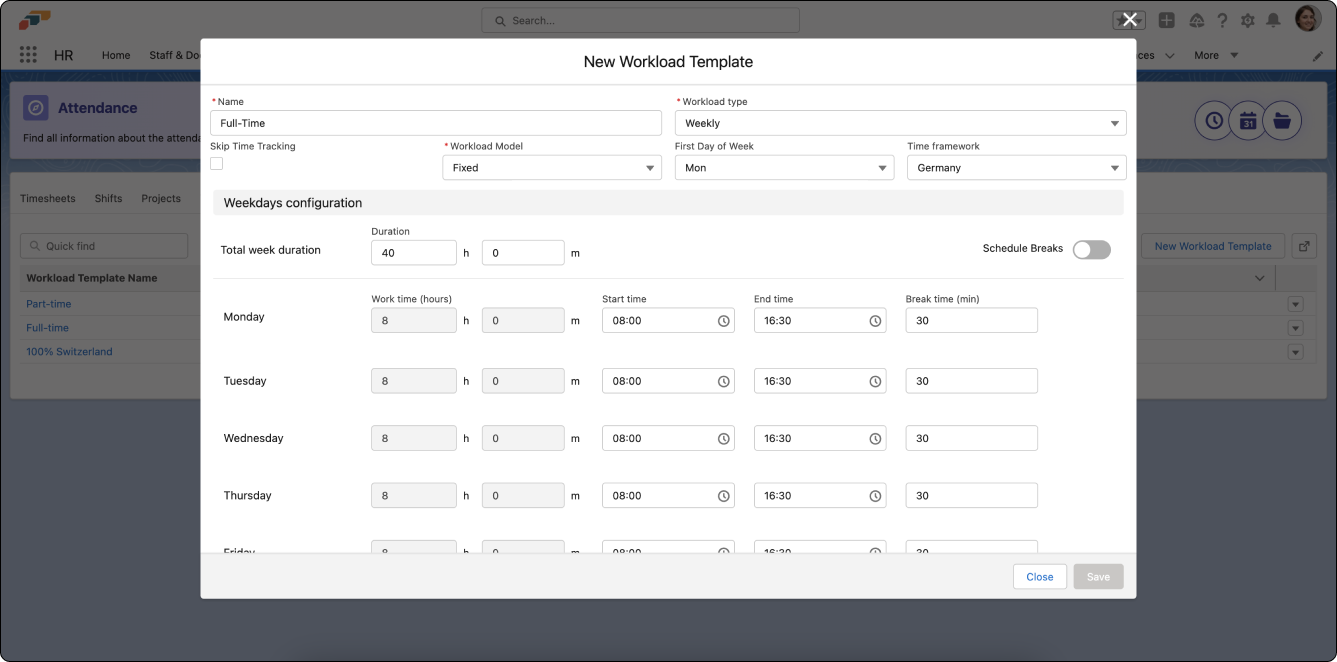
When configuring a workload template:
- Name: Give the template a descriptive name.
- Counting Period: Choose weekly or monthly counting.
- First Day of Week: Select which day starts the work week.
- Time Framework: Assign the applicable time framework.
- Skip Time Tracking: Check this box if the workload should not require time tracking (e.g., for employees who only need absence management).
- Workload Model: Choose between Fixed (set hours per day with start/end times and break length) or Flexible (define total hours per working day without fixed schedules).
Setting Up a Time Framework
Time frameworks define the rules and parameters for time tracking in your organization.
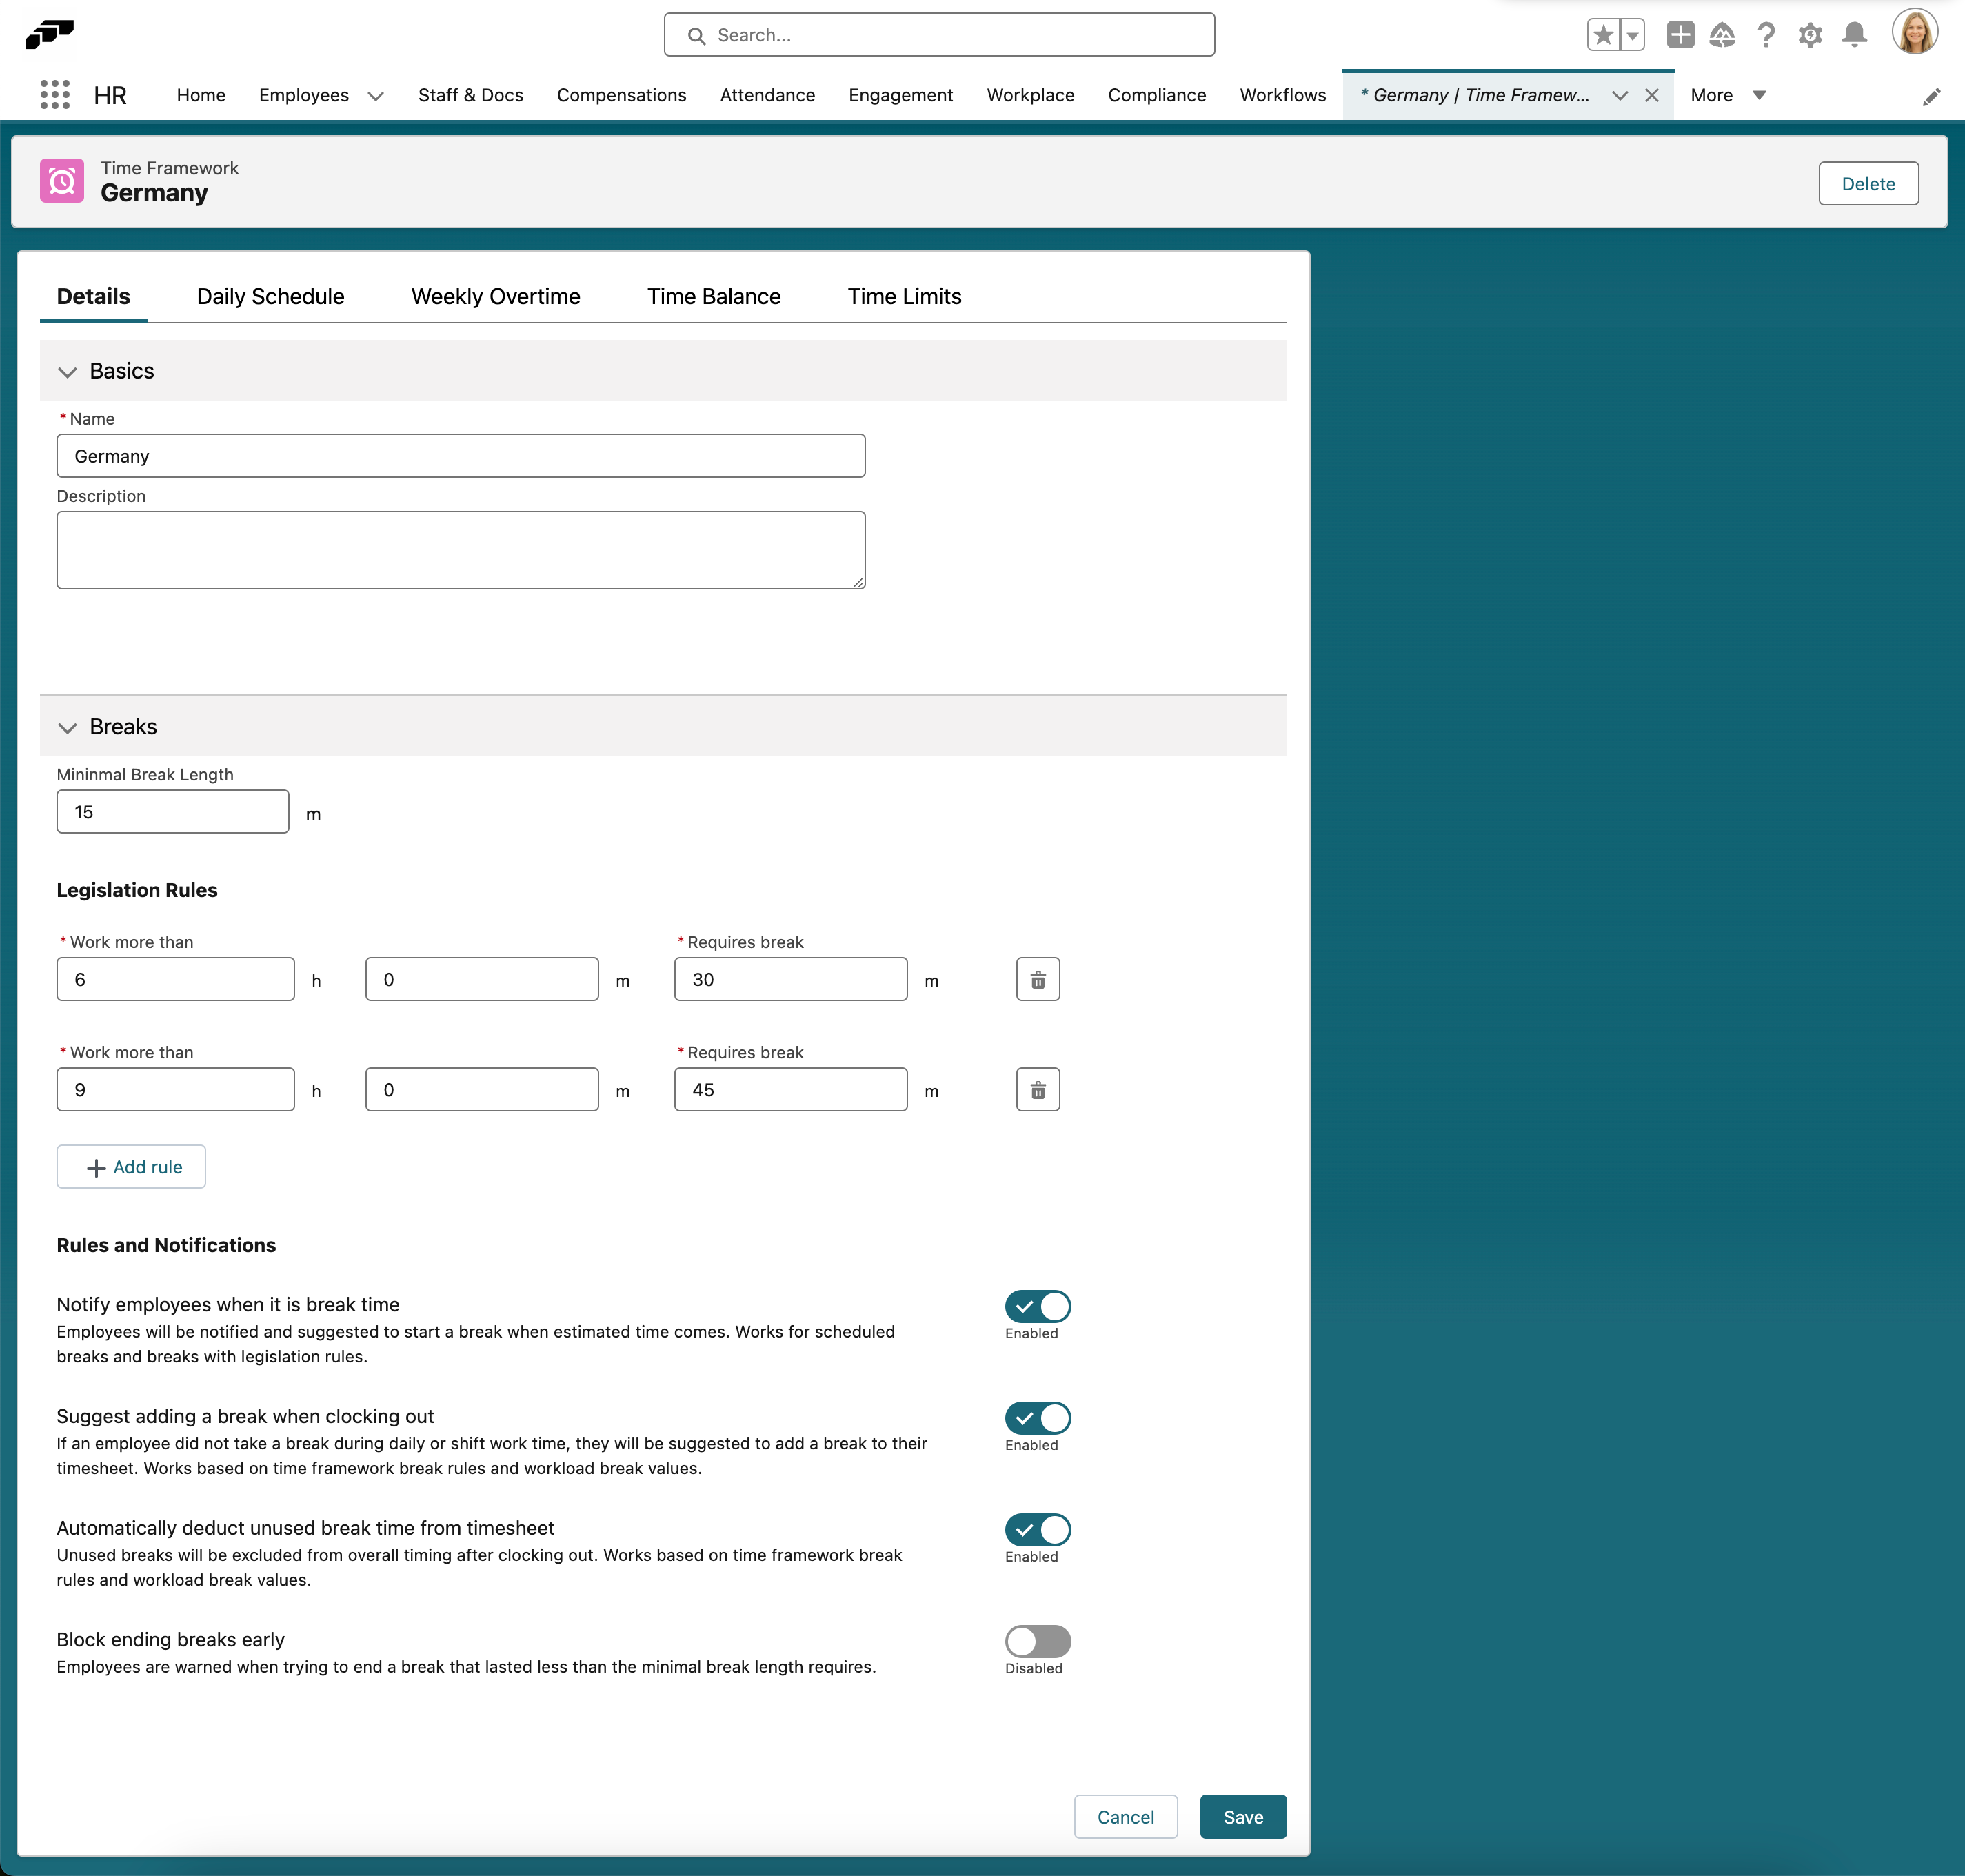
To create a time framework:
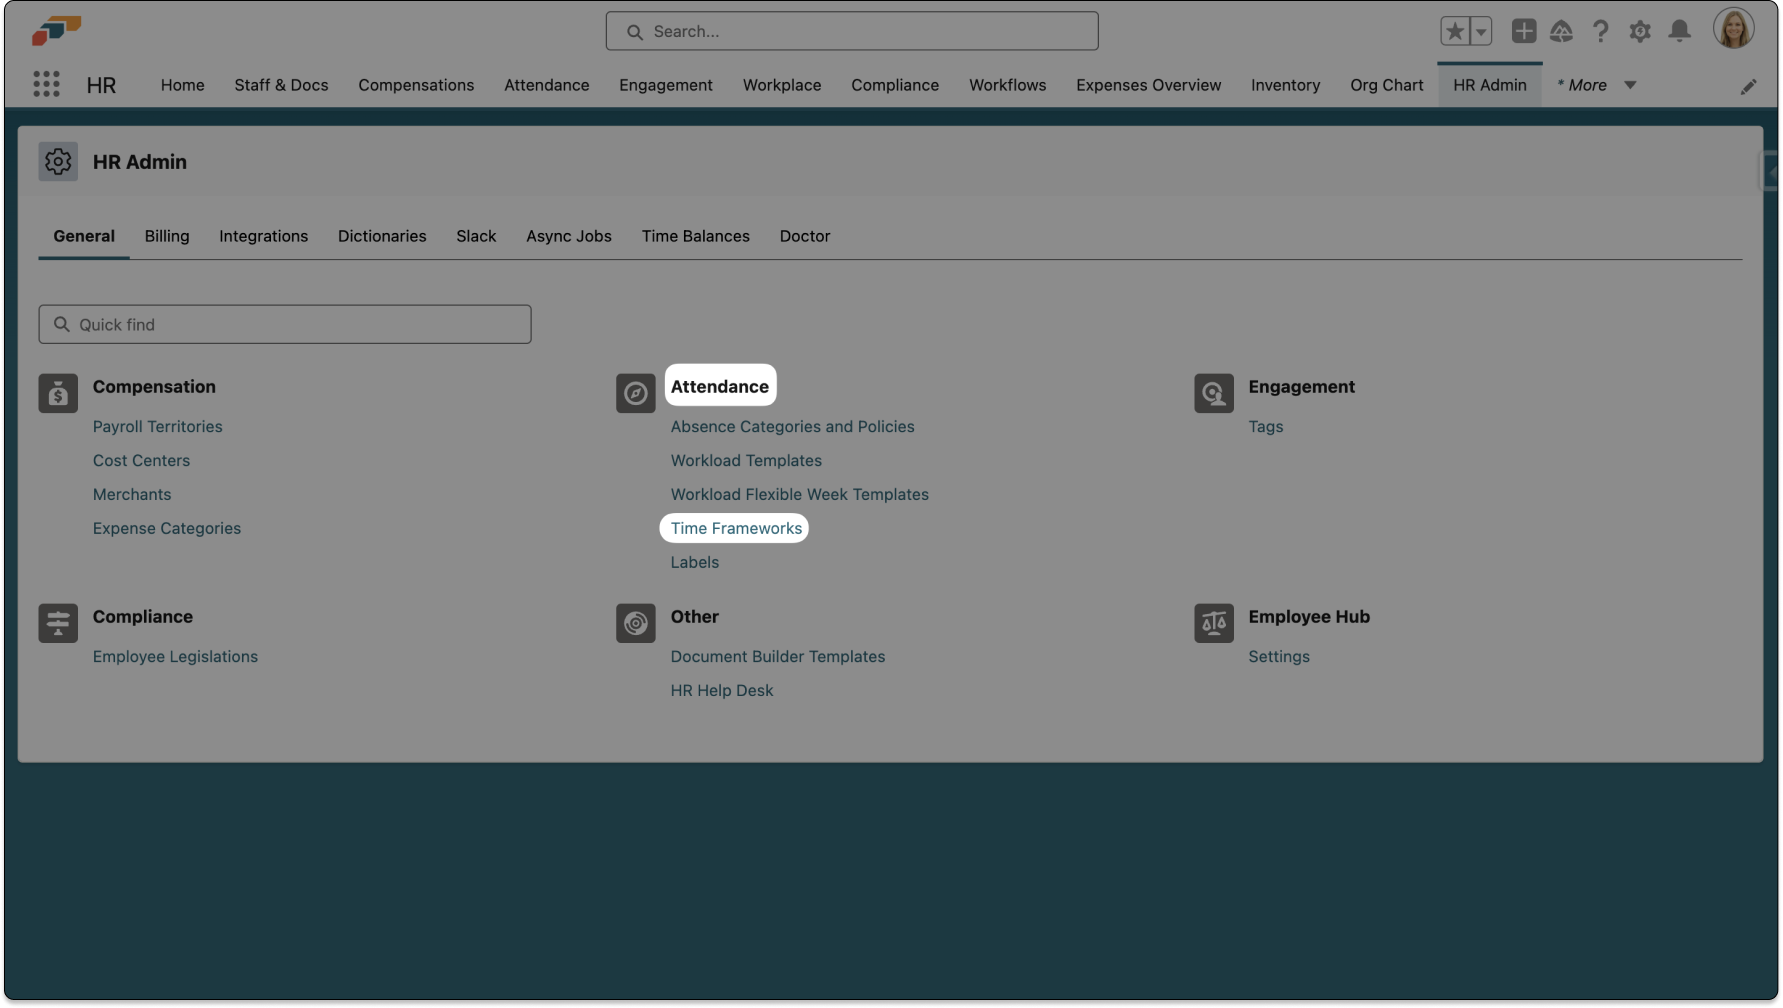
- Navigate to the Time Frameworks tab in Salesforce
- Click New to create a new framework
- Configure the following settings:
- Name: Give your framework a descriptive name
- Working Hours: Define standard working hours per day/week
- Break Rules: Set rules for mandatory and optional breaks
- Overtime Calculation: Define how overtime is calculated
- Rounding Rules: Set time rounding preferences (see below)
Configuring Time Rounding
Time entries and breaks can be automatically rounded when employees clock in or out. Admins set rounding at the Time Framework level so different employee groups can have different rules.
Rounding Interval — choose how finely to round:
| Interval | Effect |
|---|---|
| 1 minute (default) | Strips seconds only — effectively no rounding |
| 5 minutes | Rounds to the nearest 5-minute mark |
| 10 minutes | Rounds to the nearest 10-minute mark |
| 15 minutes | Rounds to the nearest 15-minute mark |
| 30 minutes | Rounds to the nearest 30-minute mark |
Rounding Method — choose which direction to round (not available when interval is 1 minute):
| Method | Effect |
|---|---|
| Nearest (default) | Rounds to whichever interval boundary is closest |
| Up | Always rounds to the next interval boundary |
| Down | Always rounds to the previous interval boundary |
Use Up rounding for break start times and Down for break end times to ensure employees always receive their full entitled break duration.
Assigning Approval Responsibilities
At the end of a week, timesheets are automatically sent to an employee's manager for approval. The manager of an employee is defined by who holds the Parent Position in the company hierarchy. You can find and edit this hierarchy on the Company Structure page of the flair HR app.
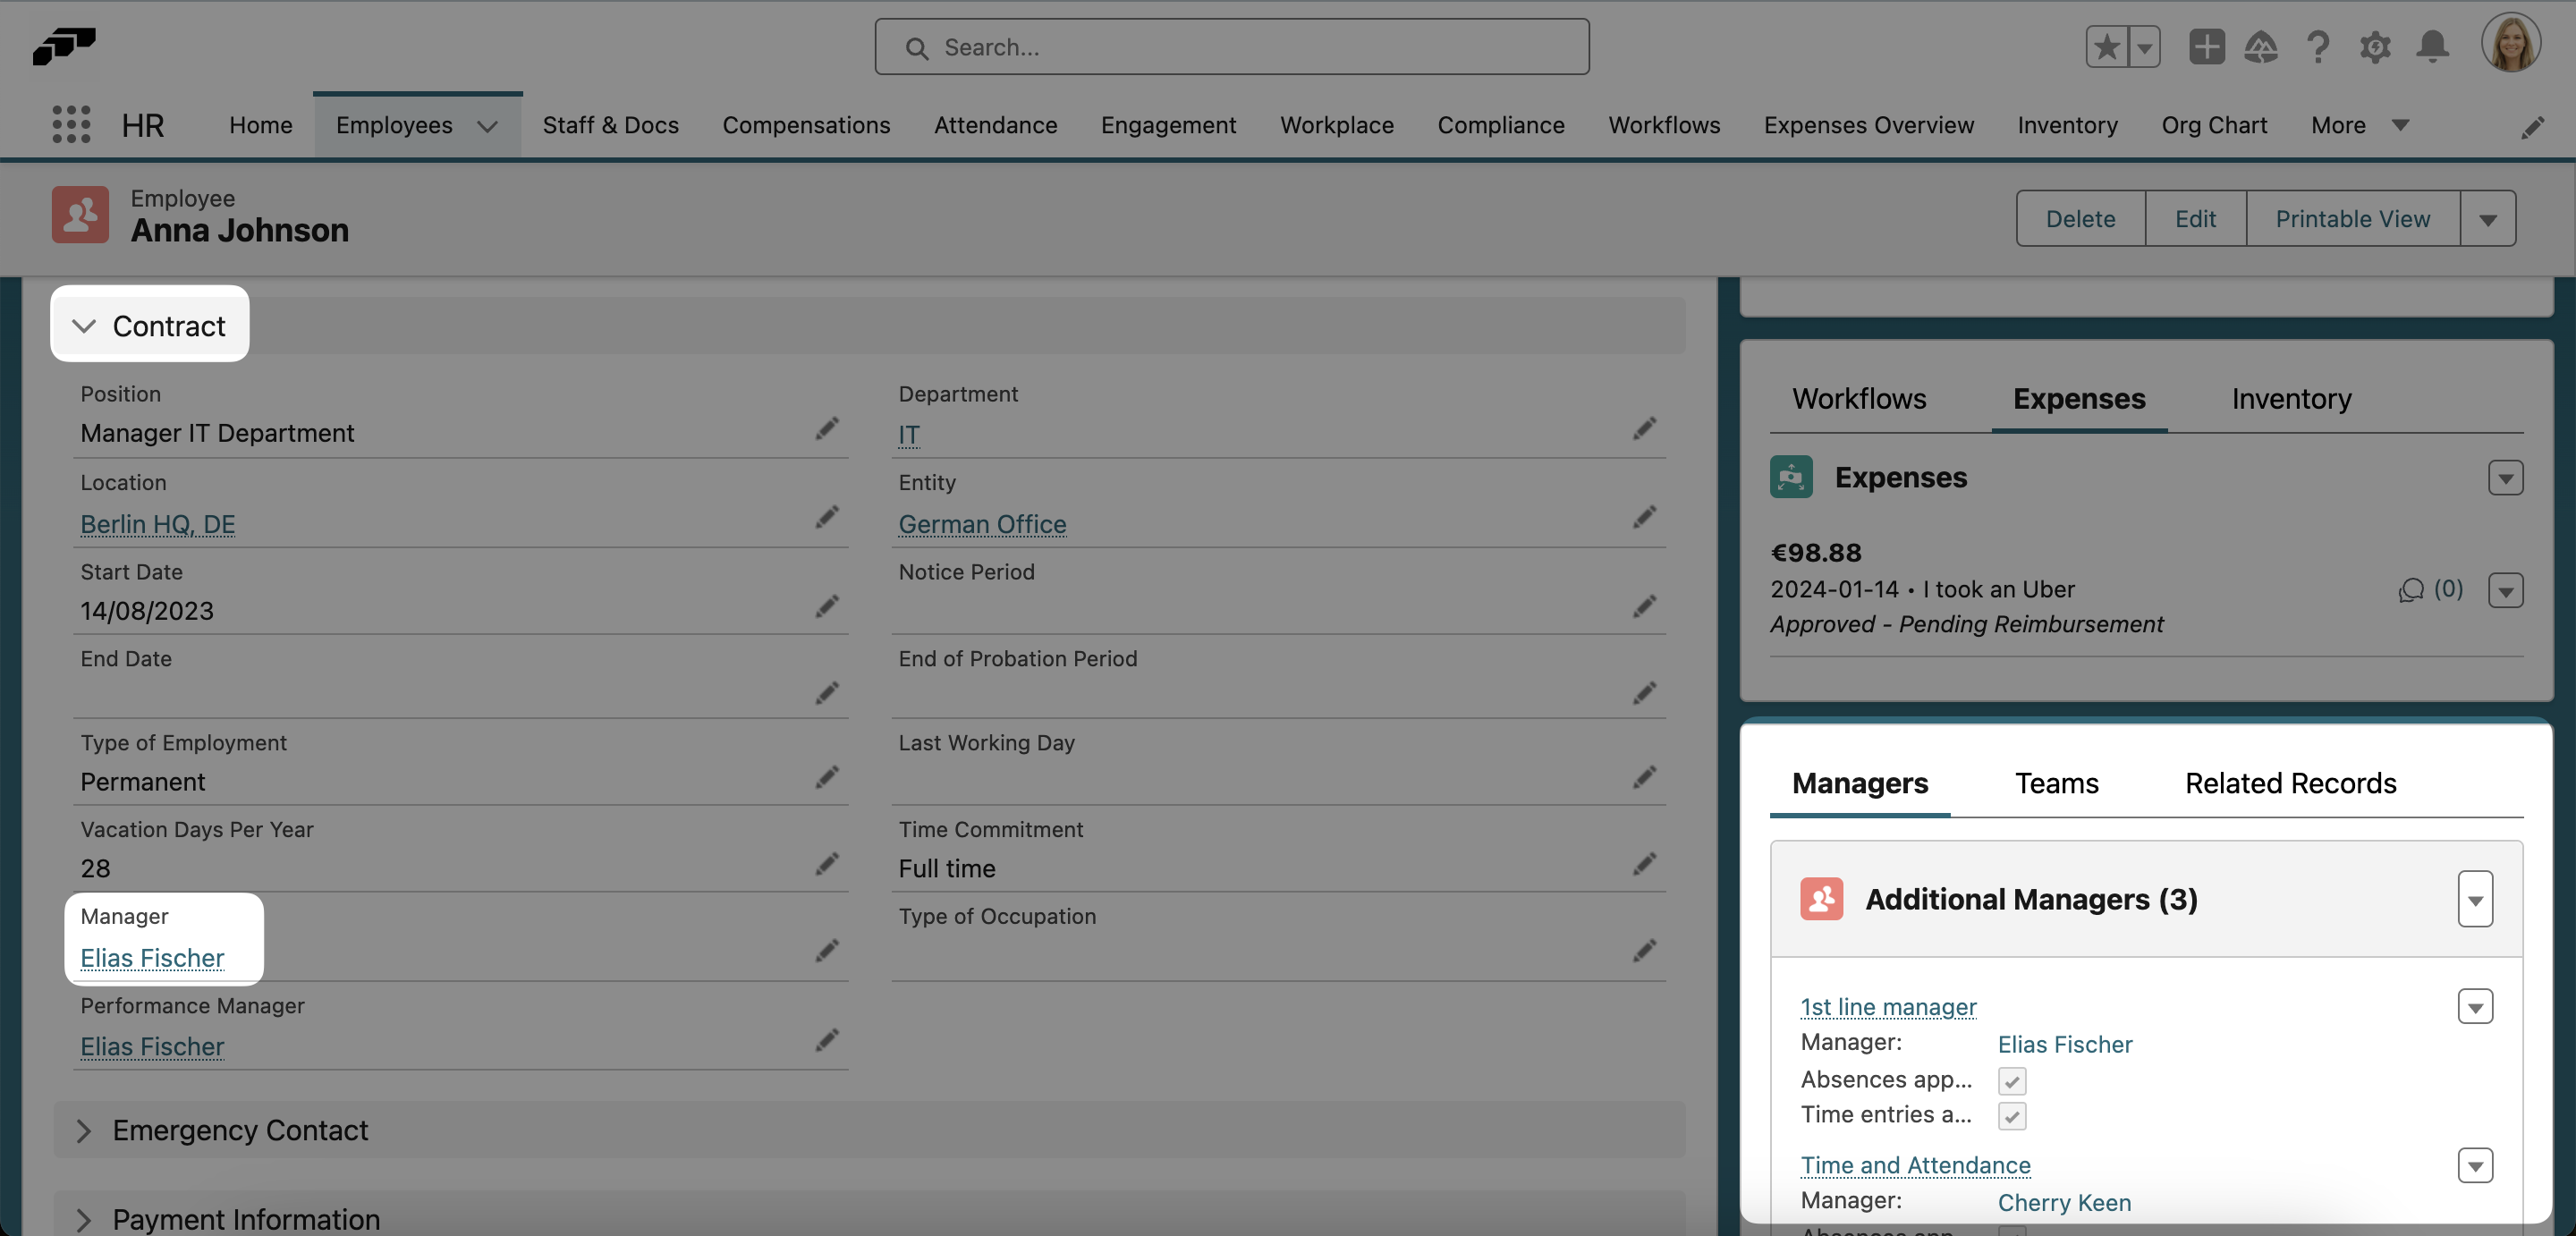
You can also view an employee's main manager and any additional managers in the Contract section of an employee's record in the flair HR app.
Assigning Additional Managers for Timesheet Approval
You can easily assign additional managers to an employee on the Staff & Docs page:
- Open Staff & Docs from the App Launcher or navigation bar
- Select the Additional Managers tab
- You'll see a list of managers and the employees they are managing
- Along the top row, you'll see different kinds of manager responsibilities, such as:
- Absence Approval
- Time Entries Approval
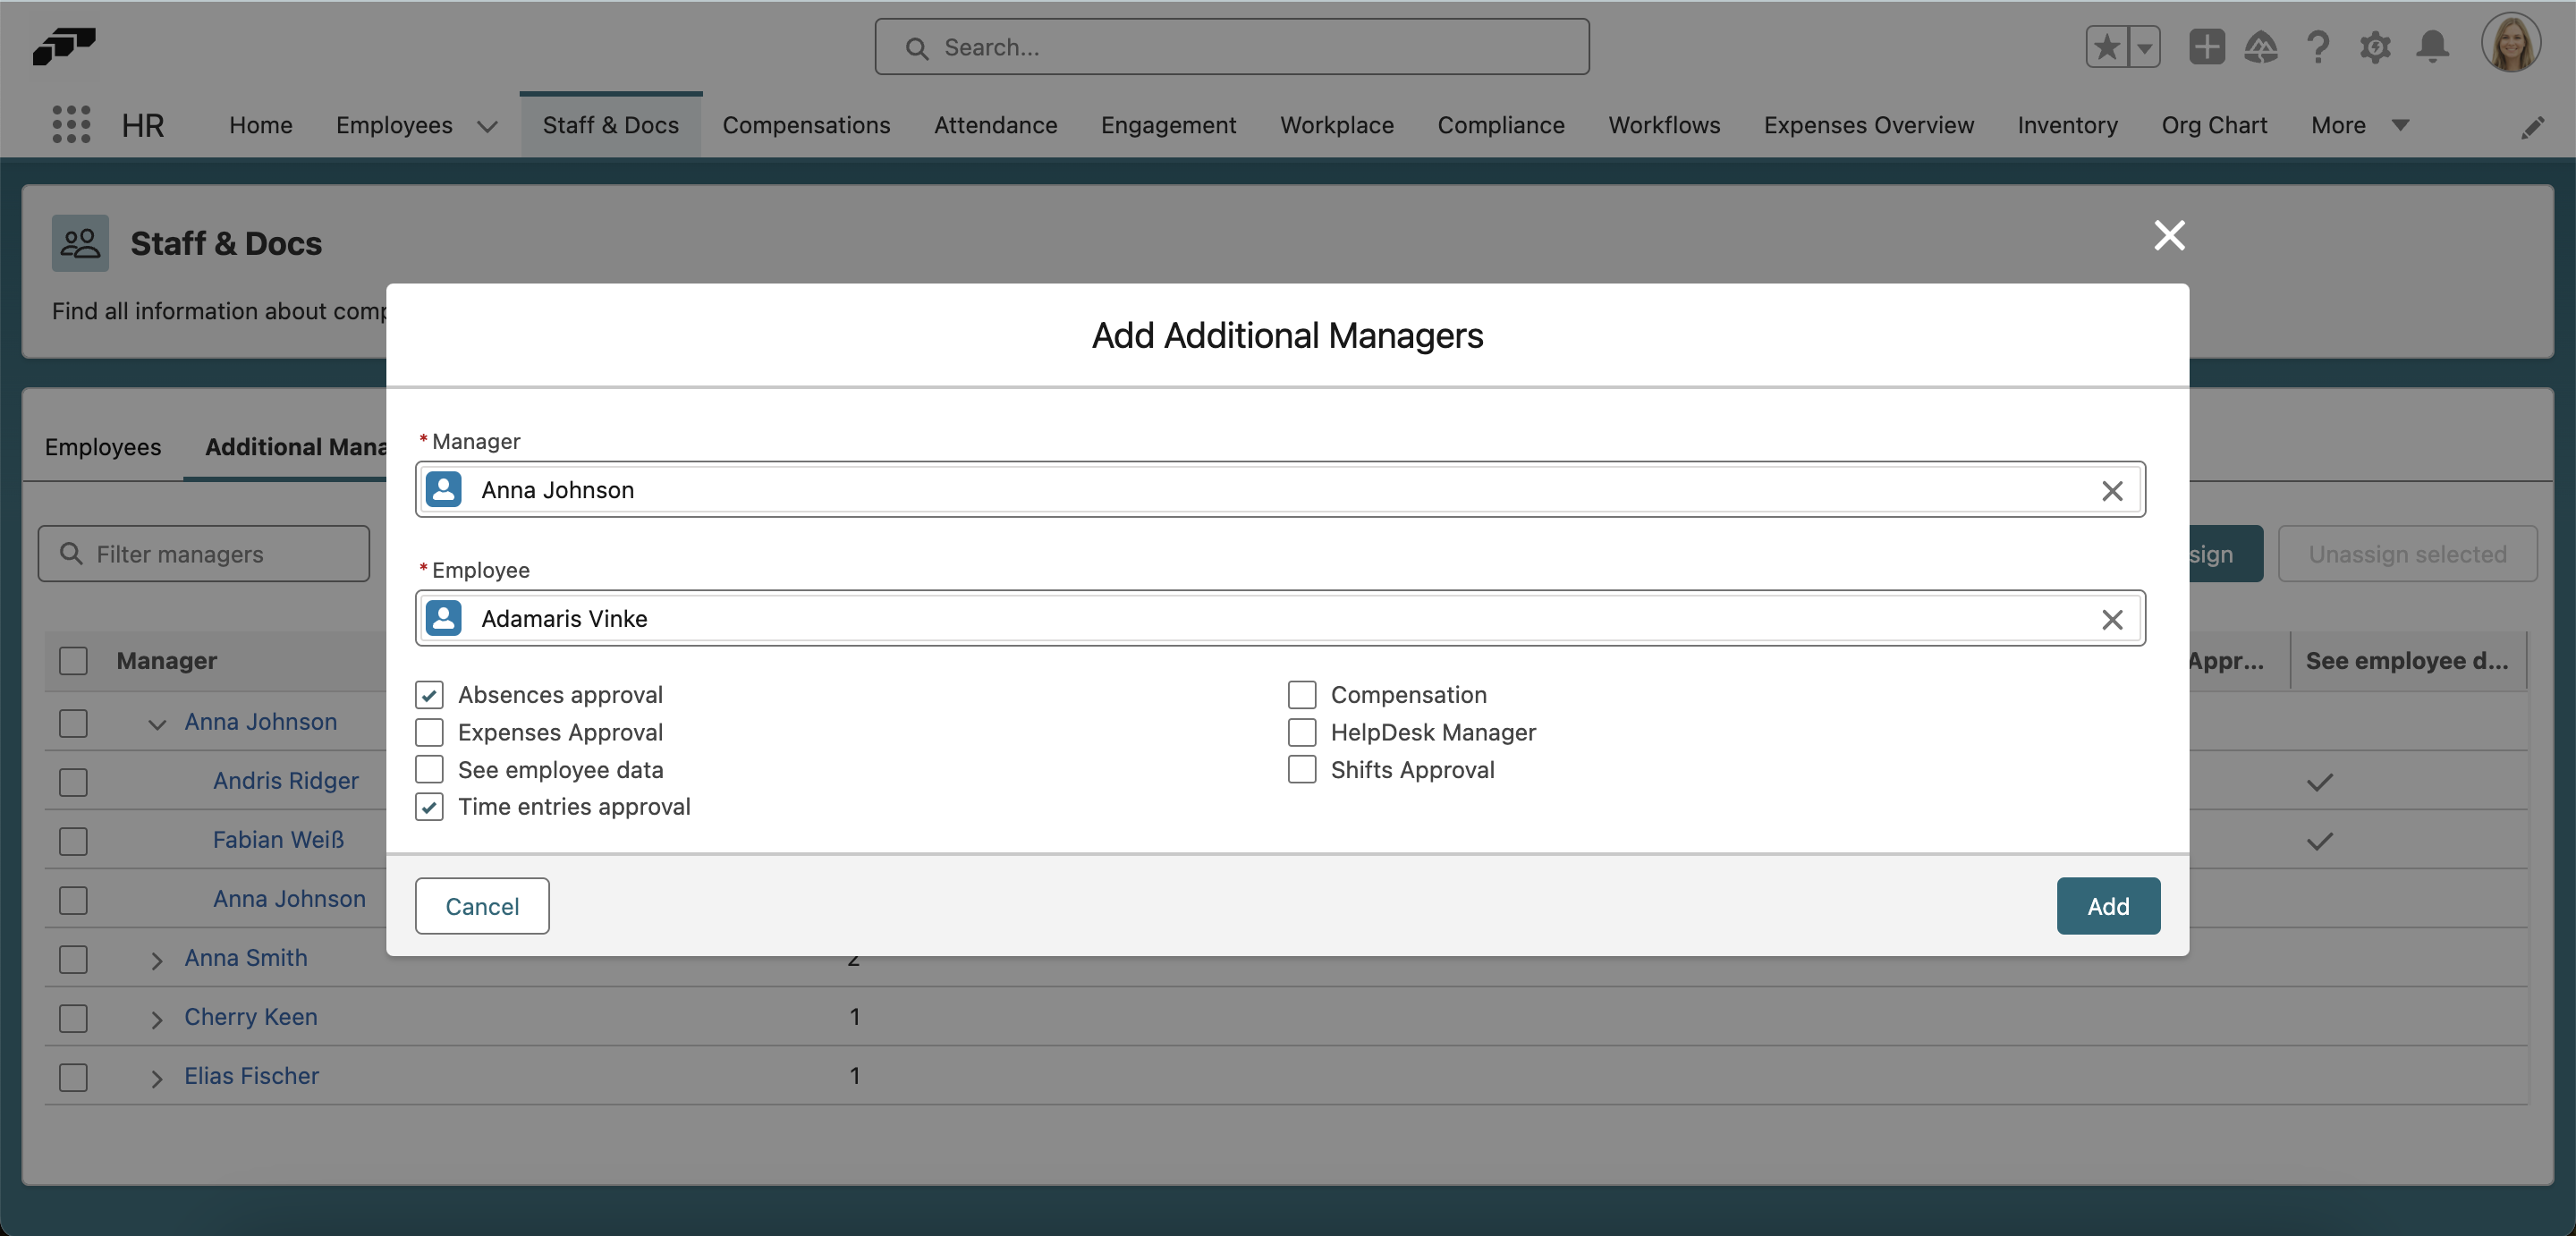
- To assign additional managers, click the Assign button
- Select a manager and an employee
- Choose which permissions the manager should receive
Managers with Time Entries Approval will also receive the employee's timesheet for approval at the end of each week.
Time Limits for Time Tracking
You can configure limits to prevent errors and ensure compliance. To set time limits, go to any Time Framework and click on the Time Limits tab.
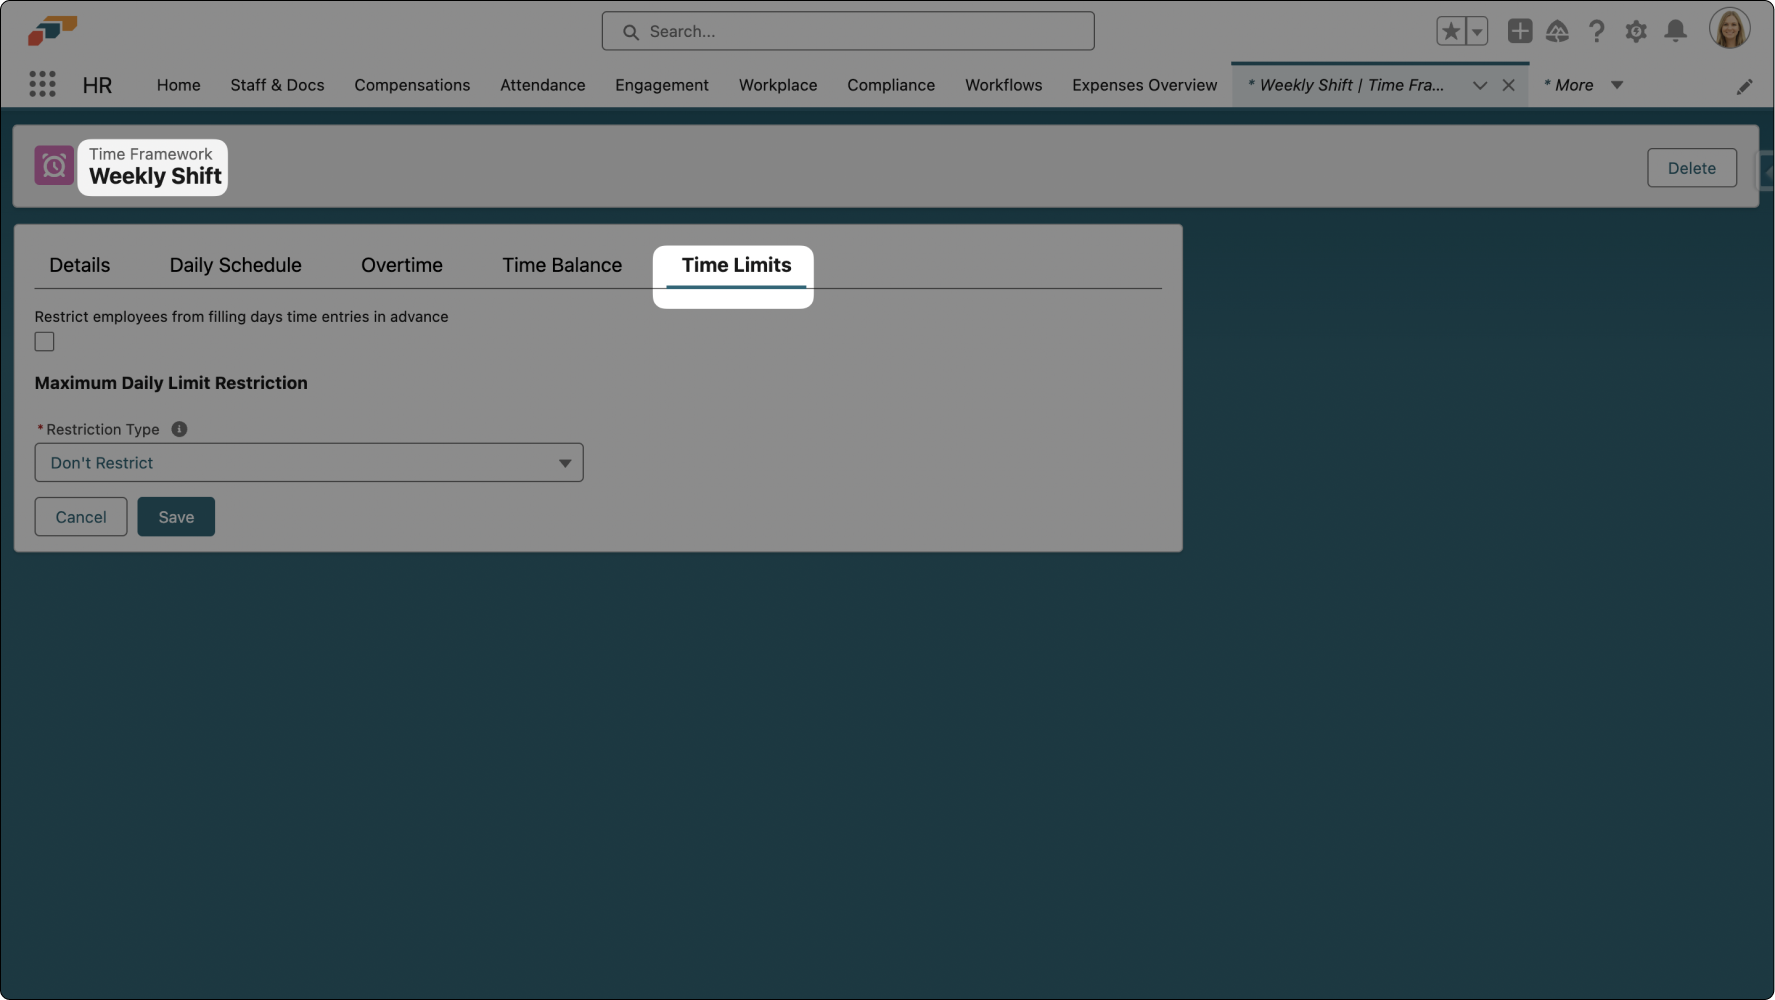
You can configure:
- Don't restrict: Allows employees to track time without limitations
- Restrict daily hours based on workload: Employees can only track during agreed working hours
- Restrict daily hours with custom duration: Set a custom maximum (e.g., 480 minutes for 8 hours)
- Maximum Daily Hours: Set a cap on hours that can be logged per day
- Minimum Break Duration: Ensure employees take required breaks
- Retroactive Time Entry: Control how far back employees can log time
Time Limit Notifications
When an employee reaches a configured time limit, there are two notification options:
- Auto clock-out: The system automatically clocks out the employee when the limit is reached, and both the employee and their manager are notified.
- Continue tracking with notification: The employee can continue tracking beyond the limit, but both the employee and their manager receive a notification.
Restricting Future Time Entries
You can prevent employees from filling out time entries in advance by enabling the Restrict Future Time Entries checkbox in the time framework settings. When enabled, employees can only create time entries for the current day or past dates.
How It Works
Time Tracking Overview
The time tracking process follows these steps:
- Clock In: Employee starts their working day
- Track Work: Time is automatically recorded
- Breaks: Employee can start and end breaks
- Clock Out: Employee ends their working day
- Review: Employee reviews their tracked time
- Approval: Manager or HR approves the timesheet
Change Requests
If employees need to modify their time entries after submission, they can submit a change request:
![]()
- Navigate to the time entry that needs correction
- Click Request Change
- Enter the corrected information
- Add a reason for the change (note field)
- Submit for approval
Change requests go through an approval workflow before the time entry is updated.
Start Time Tracking in the Employee Hub
Employees can easily track their time through the Employee Hub:
![]()
- Log in to the Employee Hub
- Navigate to the Time Tracking section
- Click Start Tracking to begin tracking time
- The system automatically records your working time
- Use Start Break when taking a break
- Use End Break when returning from a break
- Click Clock Out when finished for the day
The interface displays:
- Current status (clocked in/out, on break)
- Total working time for the current session
- Total break time
- Expected end time based on scheduled hours
Break Types
When employees pause a time entry, they can select a break type — such as Lunch, Coffee, or Smoke — instead of registering a single generic break. This lets organizations distinguish between different break categories for reporting or compliance purposes.
Setting Up Break Types
Break types are configured in Salesforce:
- Open the flair HR app and navigate to the Time Frameworks tab.
- Open the relevant Time Framework.
- Navigate to the Break Types tab.
- Click New to add a break type.
- Give the break type a name (e.g., "Lunch", "Coffee") and configure any duration rules.
- Save.
Selecting a Break Type in the Employee Hub
When the employee clicks Start Break during an active time entry, a picker appears showing the available break types. The employee selects the appropriate type before the break starts.
The break duration is tracked separately per type.
Selecting a Break Type in the Mobile App
Tap the pause button during an active time entry. A bottom sheet appears with the configured break types. Select a type to start the break.
What if I Forget To Track My Time?
If you forget to clock in or out, you can manually add time entries:
- Go to the Time Tracking section in the Employee Hub
- Click Add Time Entry
- Enter the date and time details
- Add a note explaining why you're adding it manually
- Submit for approval
Manual time entries follow the same approval process as regular time tracking.
Mobile Time Tracking
The flair mobile app allows employees to track time on the go. This is ideal for remote workers, traveling workers, and people in jobs that spend little or no time at a computer.
You can start tracking time from the home screen of the mobile app by clicking the play button ▶️. Press pause ⏸️ to take a break or stop ⏹️ to clock out for the day.
By opening the Time Tracking tab at the bottom of the screen, you can view your tracked hours for the current week, as well as previous time entries. Tapping the question mark icon at the top right of the screen will show you the break-time rules set by your organization.
Tap on a specific day to see what time you clocked in, took your break, and clocked out on that day. If you forgot to log your working hours, you can tap on Edit in the top-right corner to submit a change request to your manager. You can also leave a comment to explain the reasons for the change.
If you are using iOS 16 or later, our time tracker is also compatible with Apple's Live Activities feature. This means that you can view and control your time tracker from your phone's lock screen.
The mobile app syncs automatically with the web-based Employee Hub.
Download our free mobile app for iOS and Android.
Slack Time Tracking
For organizations using Slack, flair offers time tracking directly within Slack:
- Install the flair Slack integration
- Use slash commands to track time:
/flair clock-in- Start your working day/flair break- Start or end a break/flair clock-out- End your working day/flair status- Check your current time tracking status
Slack-tracked time syncs automatically with your flair account.
Time Entry Cost Center Assignment
Organizations can track time against specific cost centers or departments:
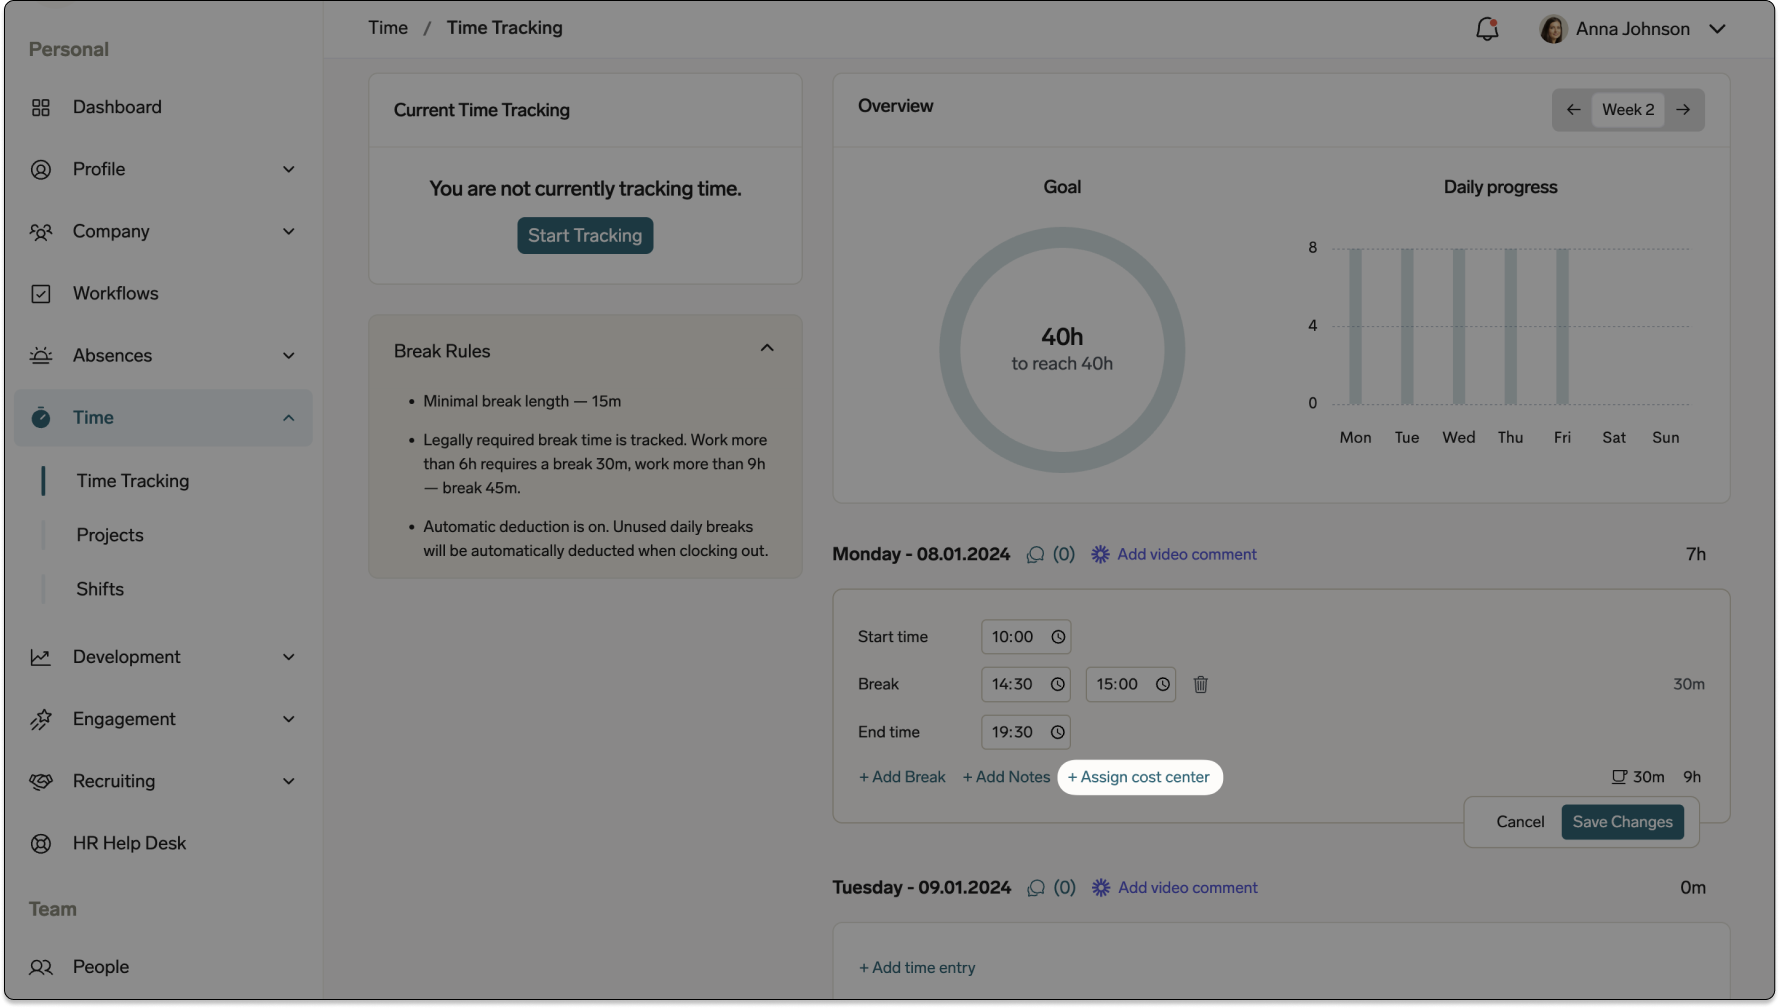
- When adding a time entry in the Employee Hub, use the Assign Cost Center button
- Select the appropriate cost center
- Click Save to finalize your entry
This feature helps with:
- Budget tracking
- Project costing
- Department-level time analysis
- Internal reporting
Block Time Tracking During Absence
To prevent conflicts, time tracking can be blocked when an employee has an approved absence. When creating a new absence category or editing an existing one in Absence Settings, check the box labeled "Time Tracking Restricted".
![]()
This will disable time tracking during:
- Vacation days
- Sick leave
- Other specified absence types
If an employee tries to clock in during a restricted absence period, they'll receive a notification explaining why time tracking is unavailable.
Auto-Tracking Flow and Absences
If you have an auto-tracking flow enabled, time entries are automatically skipped for any day when an absence is added (including part-time absences). When this happens, the time entry needs to be added manually if the employee actually worked that day.
Restrict Time Entry Creation Outside Workload Date Range
To ensure time entries are only created during active workload periods, flair restricts time entry creation to dates within the employee's workload date range.
How It Works
When an employee attempts to create a time entry for a date that falls outside their active workload period, they will see a warning notification explaining that time entry creation is not available for that date.
For example, if an employee's workload starts on September 19th:
- On September 19th and later dates (within the workload period), employees can add time entries, add breaks, and save changes normally
- On dates before September 19th (outside the workload period), employees cannot create new time entries and will see a warning message
This restriction helps maintain data accuracy by ensuring time entries align with the employee's assigned workload period.
Creating Flexible Workloads
Flexible workloads are ideal for employees whose working hours vary, such as part-time workers or those with rotating schedules.
To create a flexible workload:
- Open the employee's record in the flair HR app.
- Navigate to the Time And Workload tab.
- Click Add New Workload.
- Set the workload model to Flexible.
- Configure the FTE percentage to reflect the employee's working hours relative to a full-time position.
For completely flexible schedules, you can leave the daily hours undefined and let the employee track their actual working time. For rotating schedules, use the calendar view to adjust hours for specific days.
When setting up accrual policies for employees with flexible workloads, use the Prorate based on FTE percentage option to ensure leave entitlements are calculated proportionally.
Setting a Workload End Date
To set an end date for an employee's workload (e.g., when their contract ends or their schedule changes):
- Open the employee's record and navigate to the Time and Workload tab.
- Click the down arrow next to the active workload and select Edit.
- Fill in the End Date field.
- Click Save.
After the end date, the employee will no longer be able to track time against this workload. If their schedule is changing, create a new workload starting after the end date.
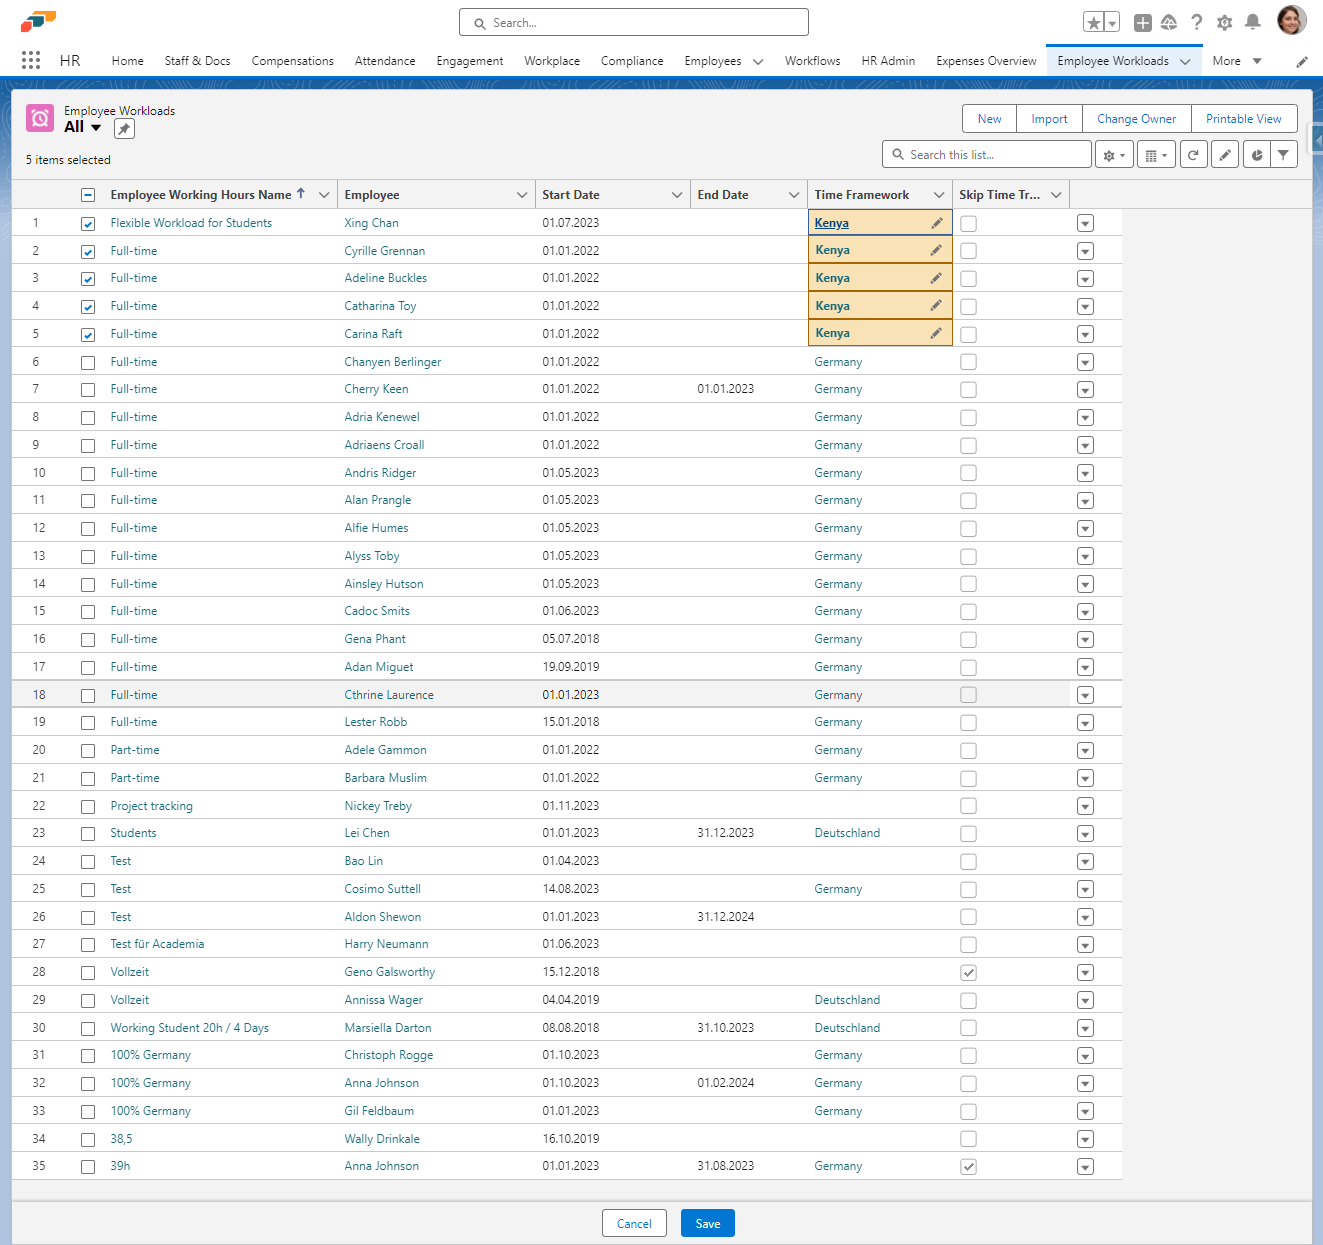
Mass-Assigning Time Frameworks
You can assign time frameworks to multiple employees at once to save time when setting up or updating time tracking configurations.
Steps to Mass-Assign Time Frameworks
- Click on App Launcher 𓃑
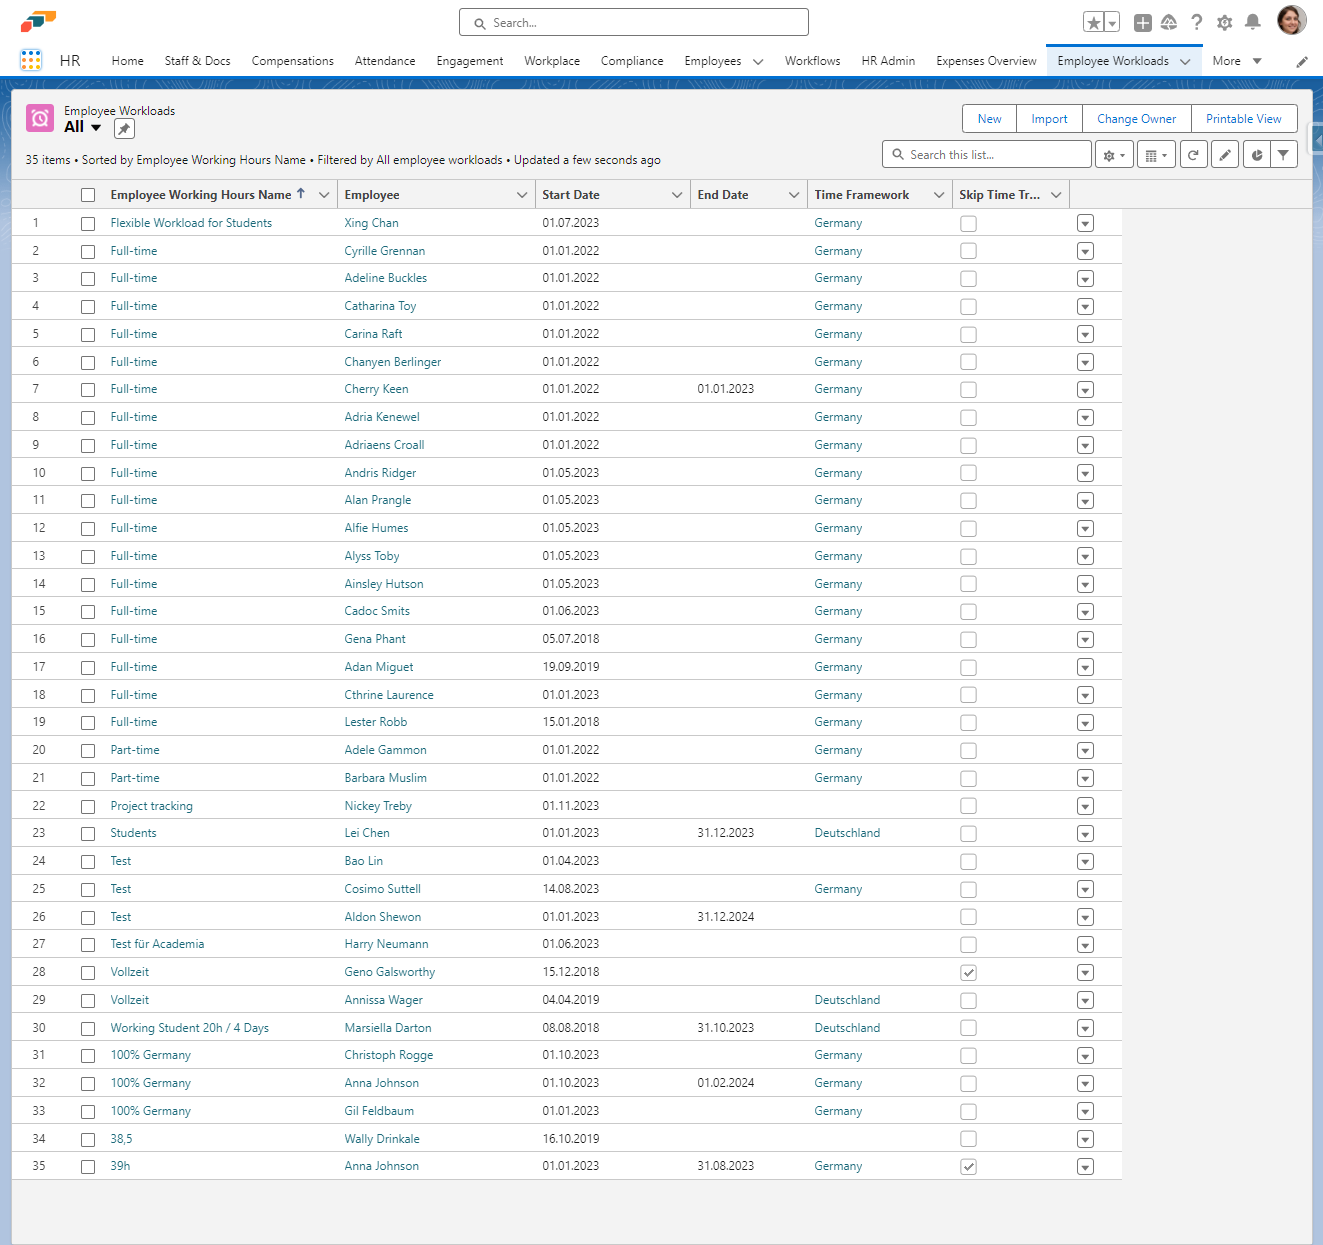
- Type "employee workloads"
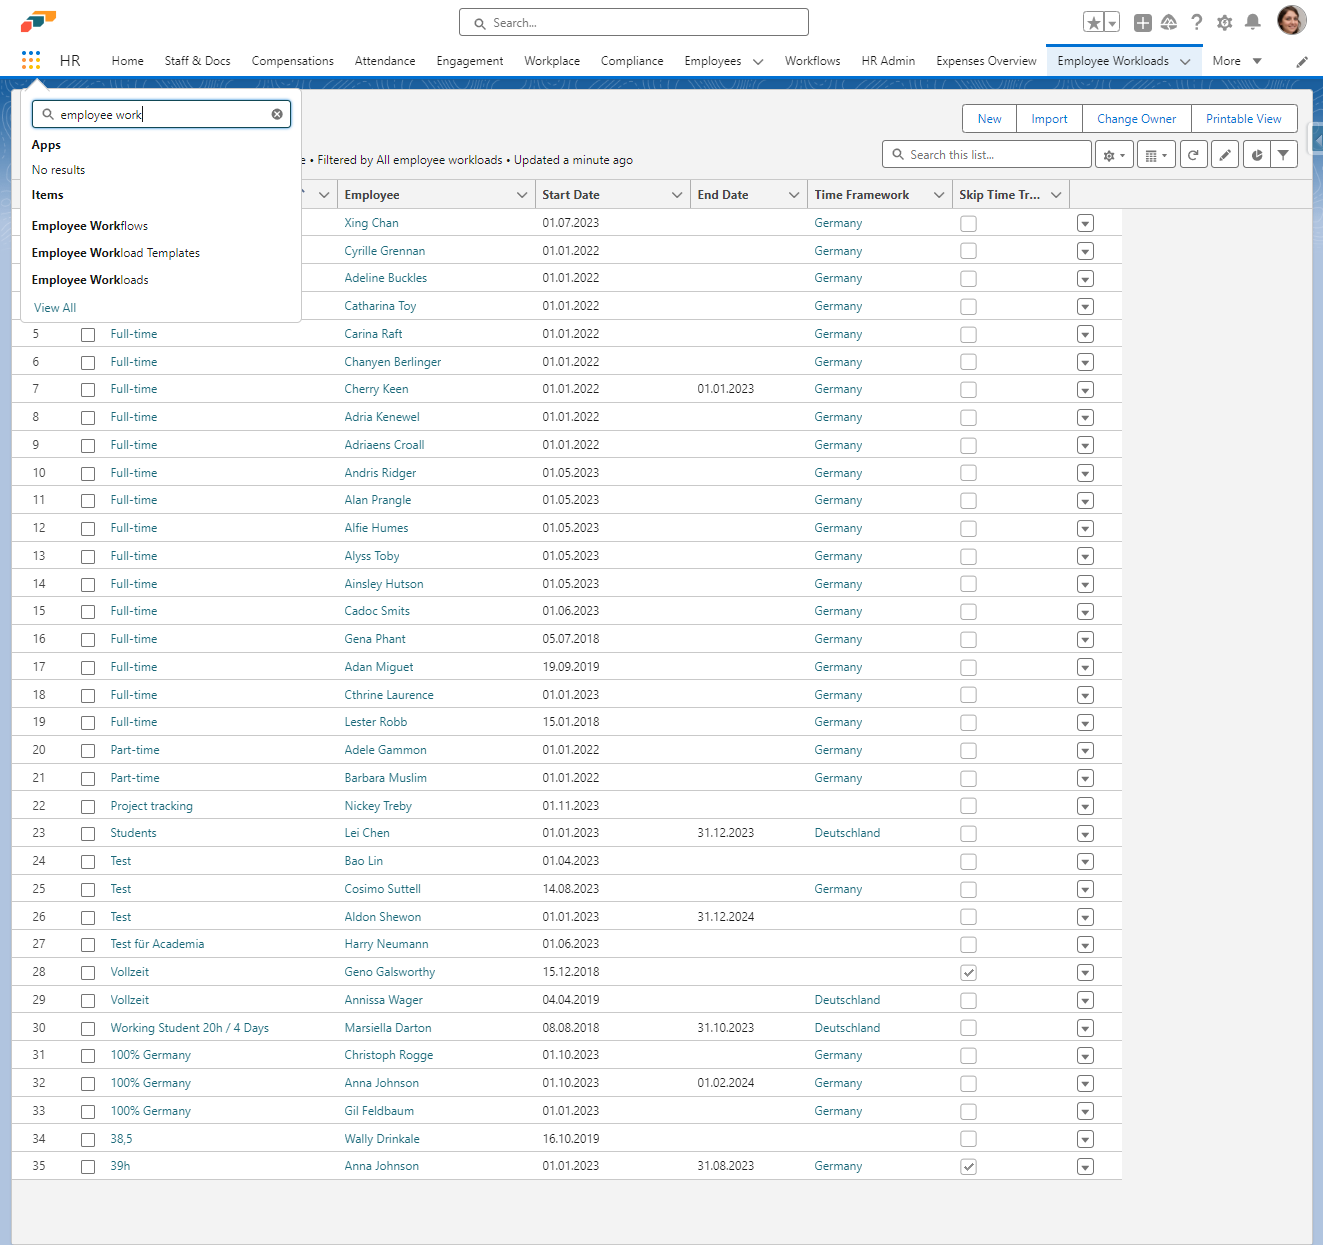
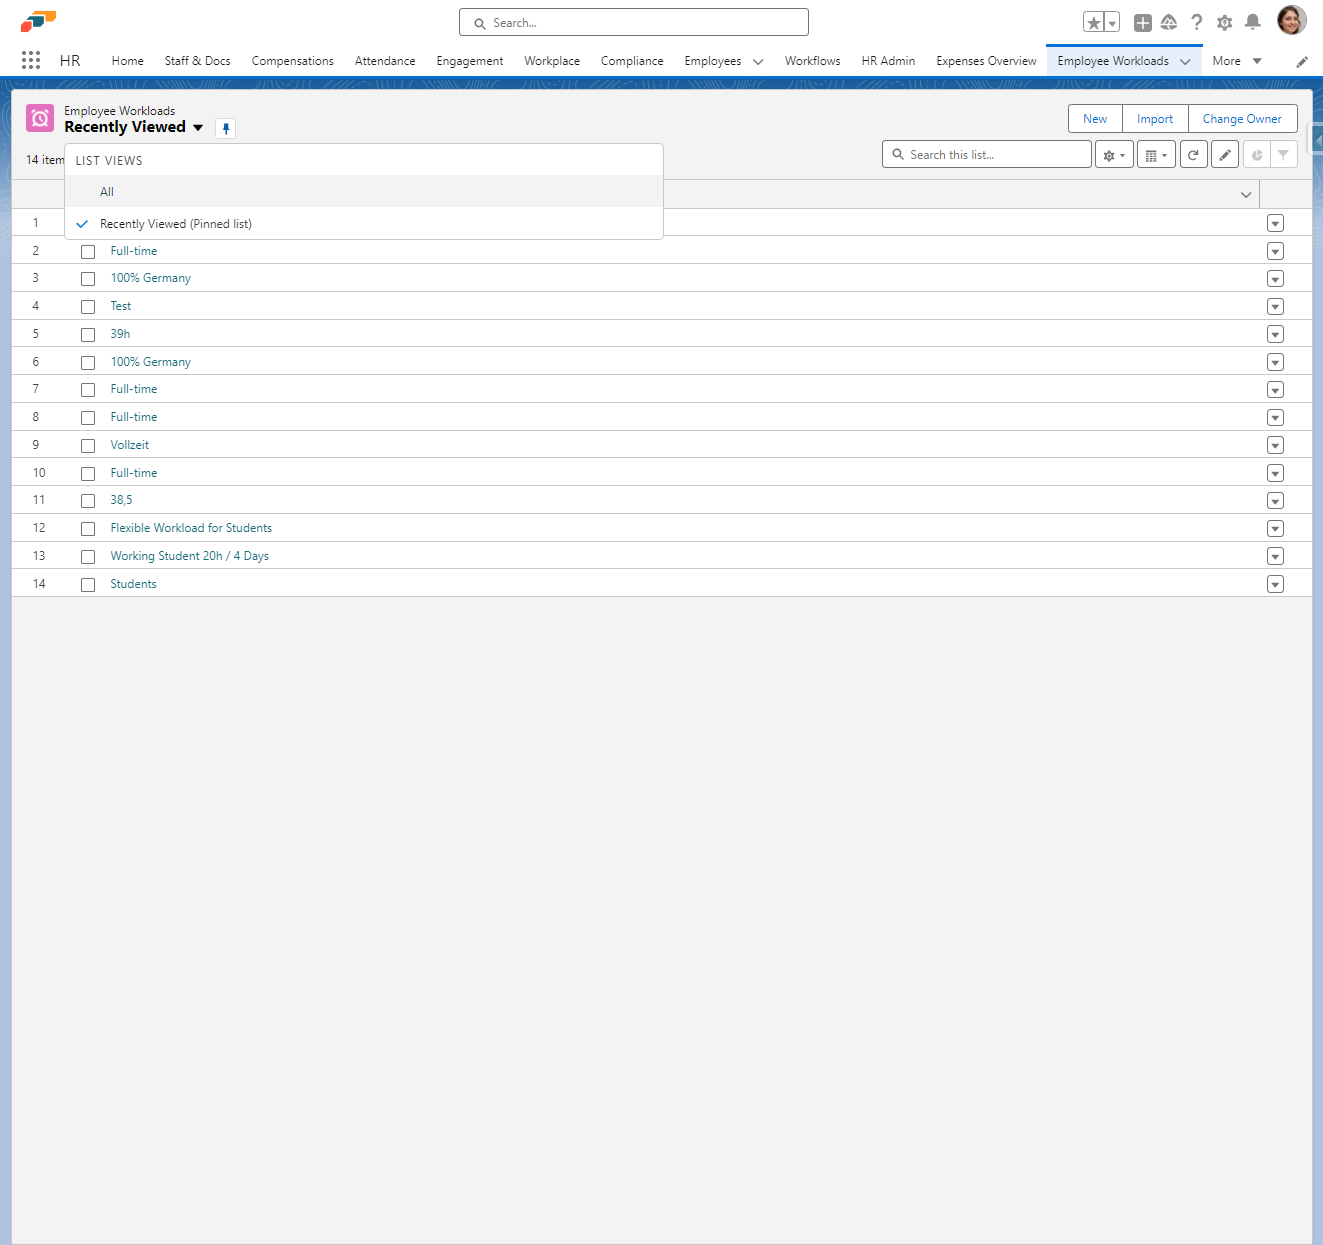
- Click on Employee Workloads

- Click on Select a List View: Employee Workloads
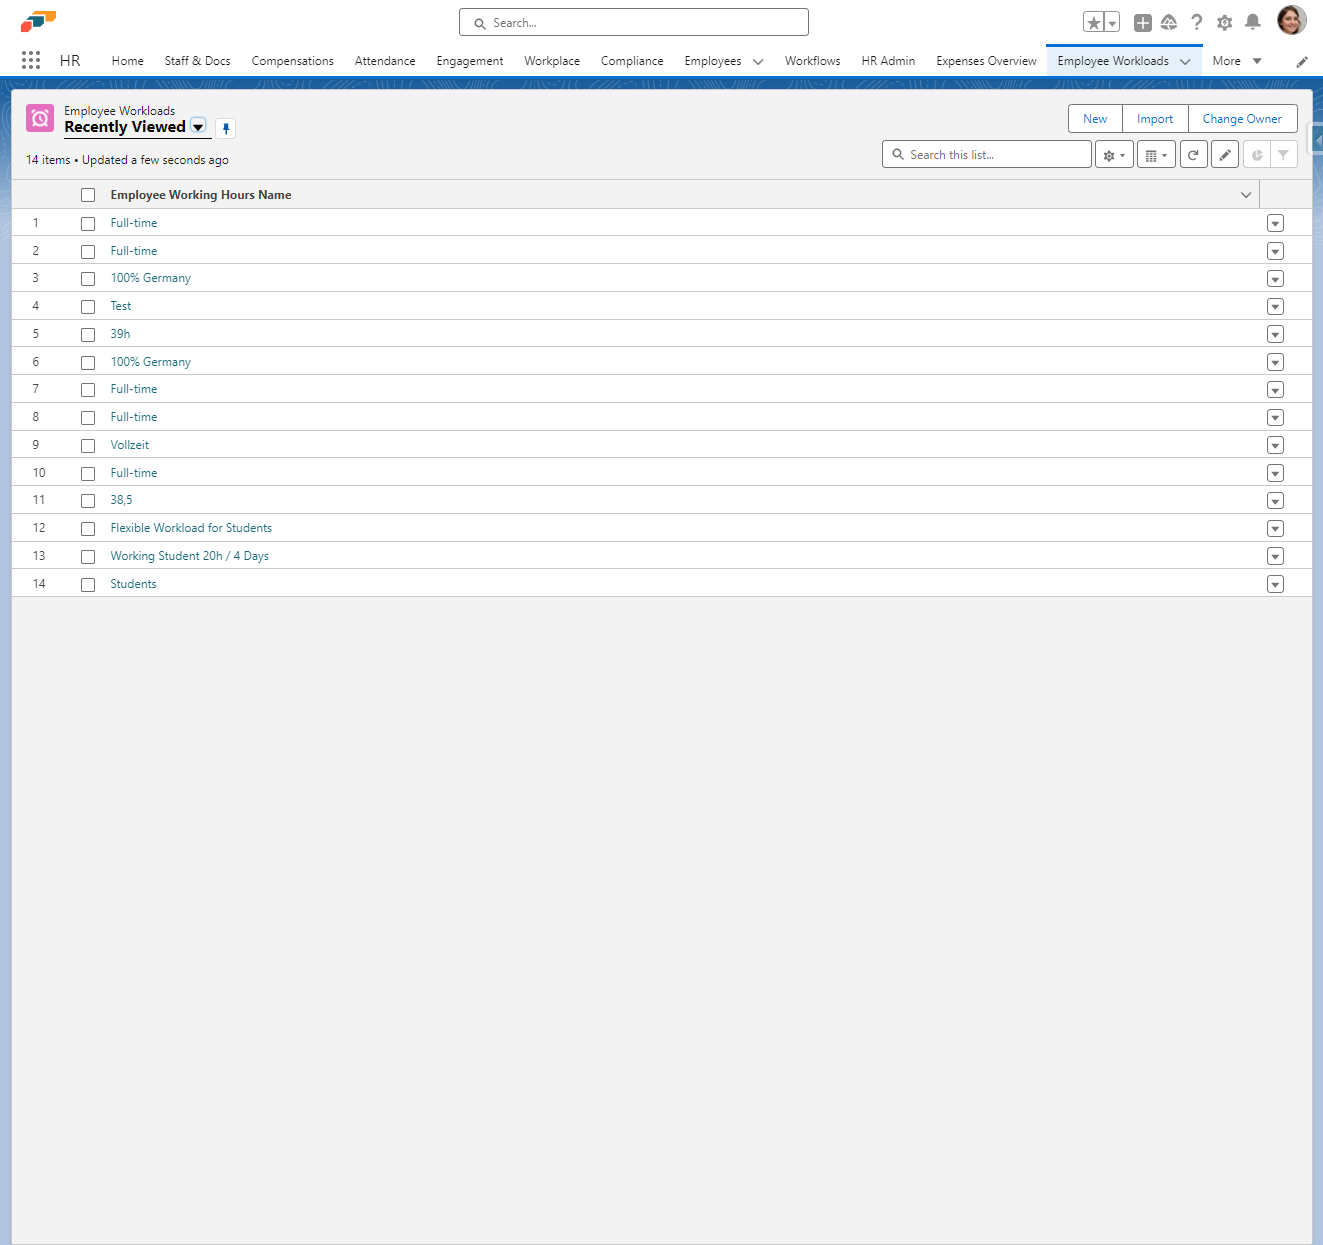
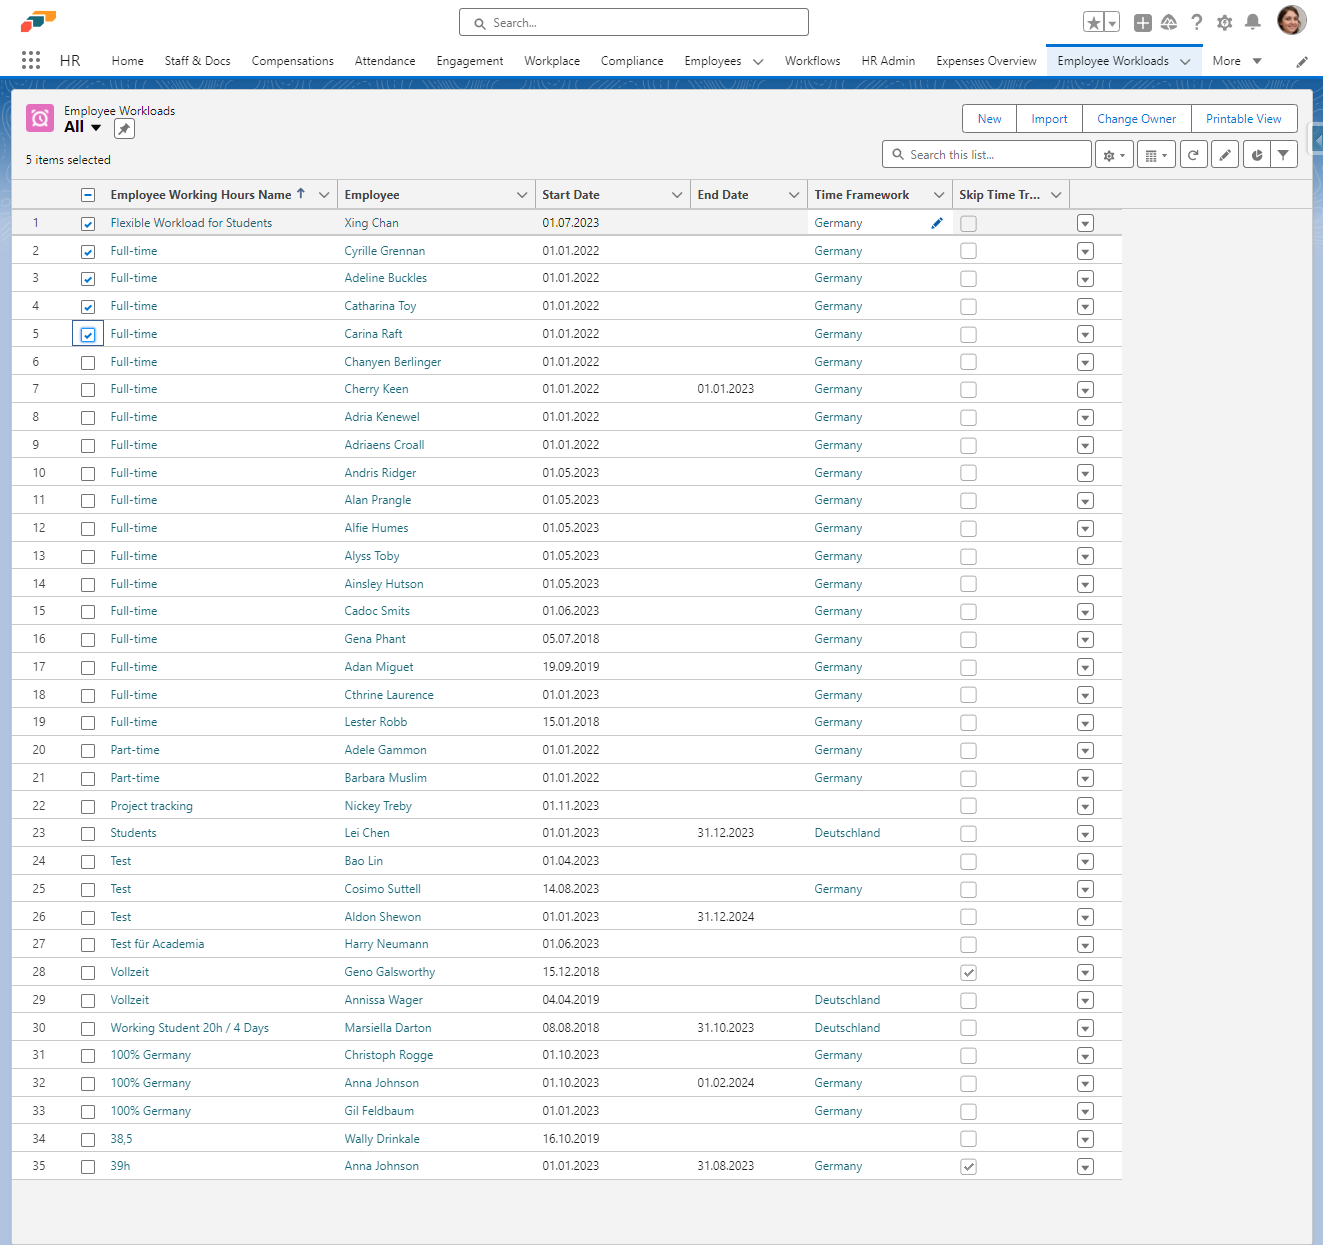
- Click on All
- Select employees

- Click on Edit Time Framework: Item
- Click into the field
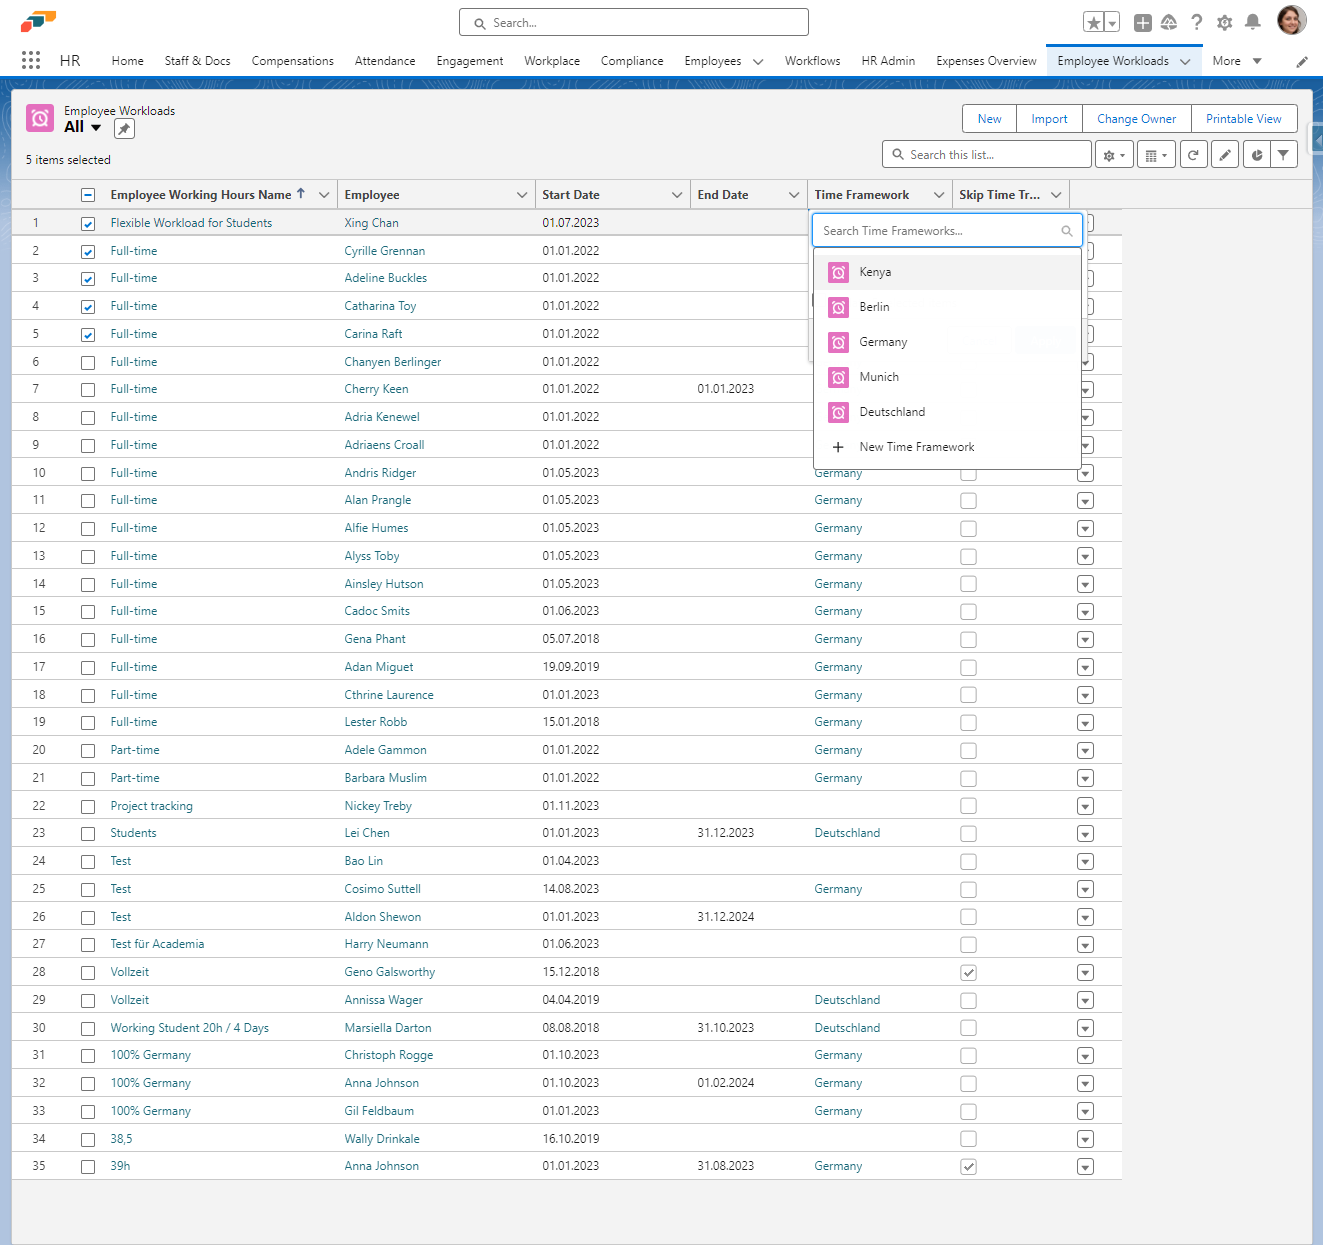
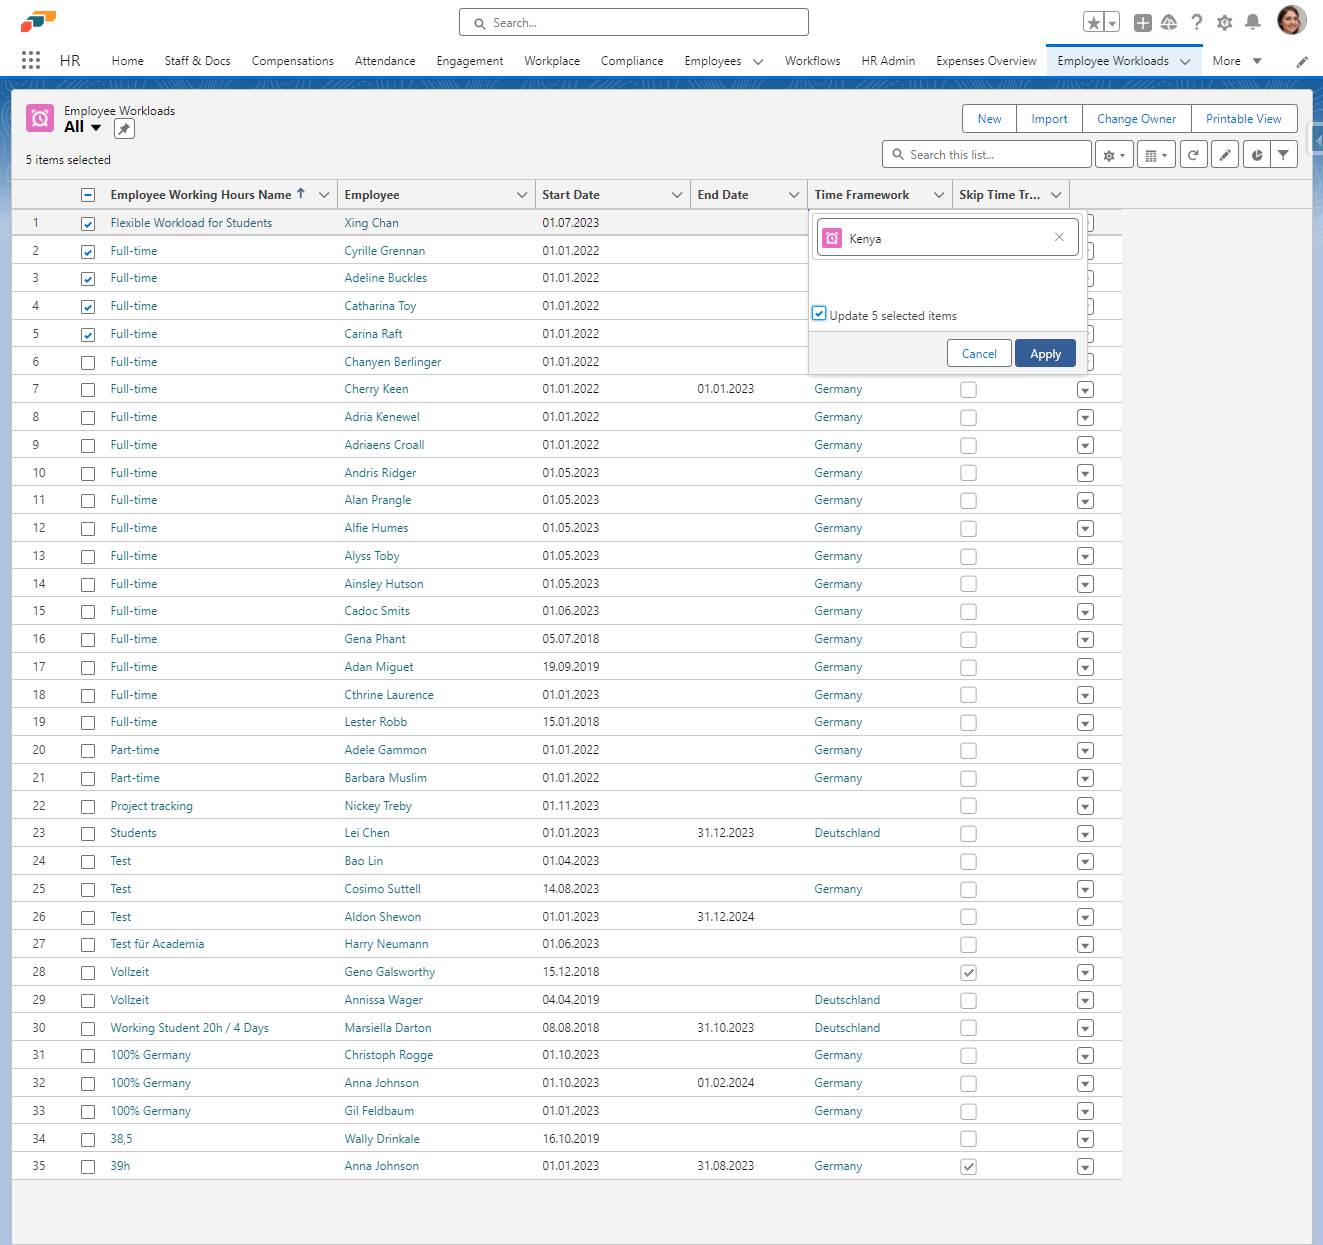
- Click on any Location

- Check Update selected items

- Click on Apply
- Click on Save