Timesheets
Timesheets provide a comprehensive view of employee working hours, allowing for review, approval, and management of time entries. Managers and HR personnel can approve timesheets in both Salesforce and the Employee Hub.
View and Approve Timesheets in Salesforce
Managers and HR administrators can review and approve employee timesheets directly in Salesforce.
Accessing Timesheets
- Open Salesforce and use the App Launcher 𓃑
- Navigate to Timesheets
 3. You'll see a list view of all timesheets that require your attention
4. Use filters to narrow down the list:
3. You'll see a list view of all timesheets that require your attention
4. Use filters to narrow down the list:
- Status: Pending, Approved, Rejected
- Employee: Filter by specific employee
- Date Range: Select a specific time period
- Department/Team: View timesheets by organizational unit
Reviewing a Timesheet
- Click on a timesheet to open it
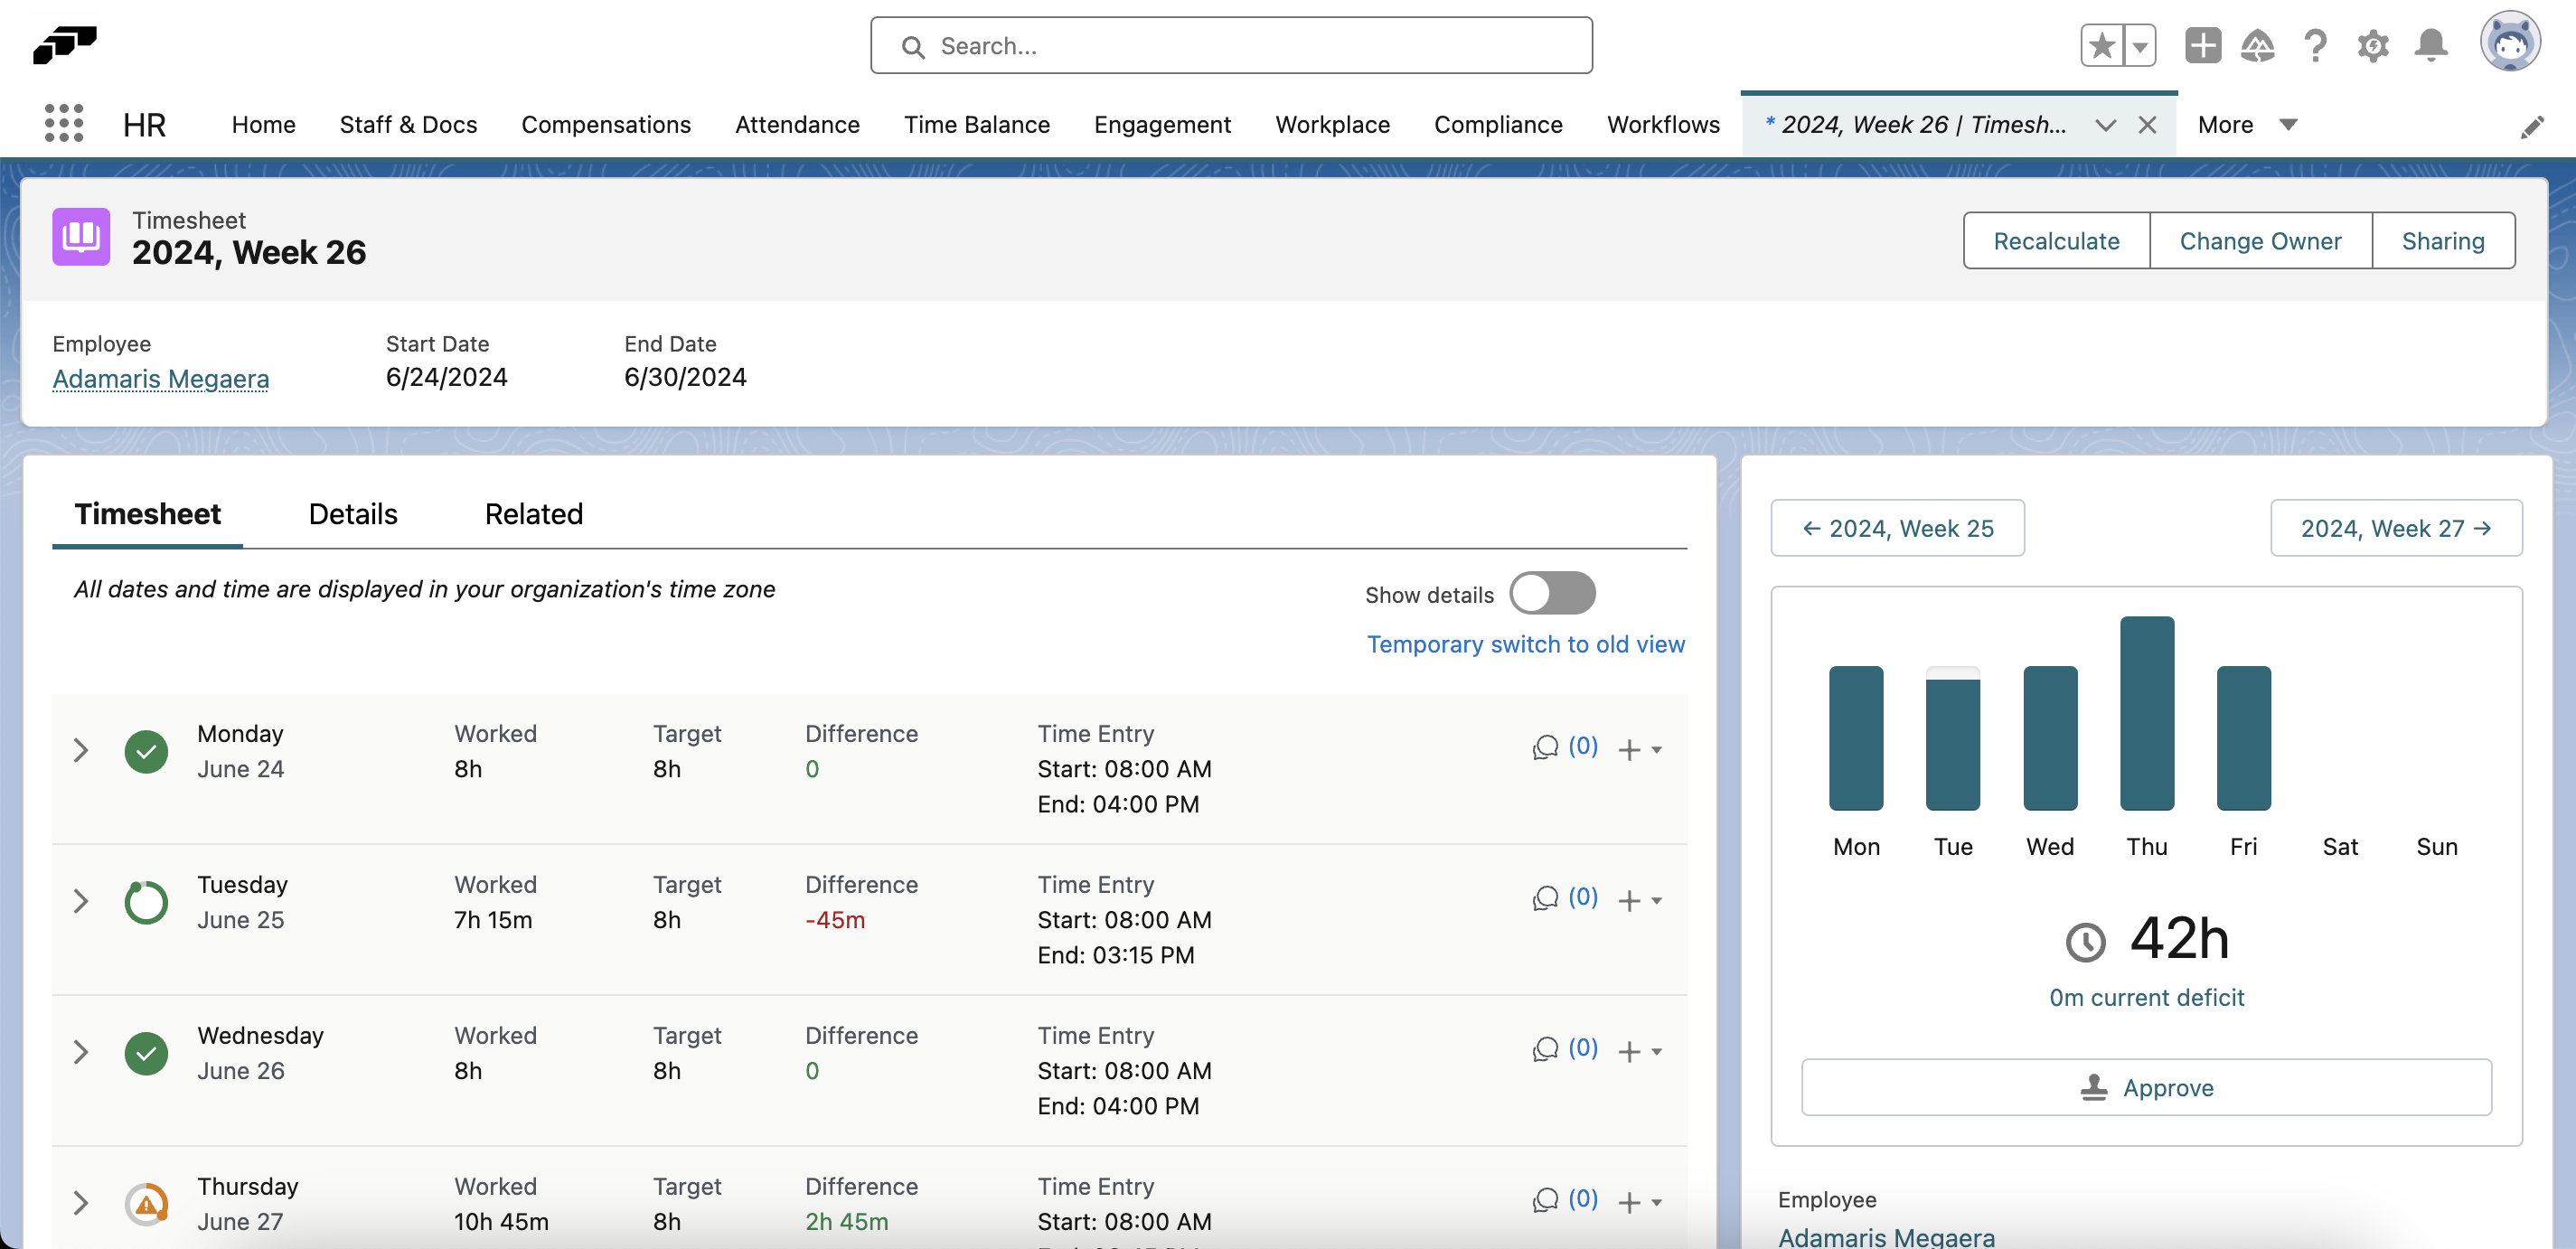
- Review the following details:
- Employee information: Name, employee ID, department
- Time period: The week or month covered by the timesheet
- Total hours: Overall hours worked
- Daily breakdown: Hours worked each day
- Break times: Duration and timing of breaks
- Overtime hours: Any overtime worked
- Cost center assignments: If applicable
- Notes: Any comments from the employee
Approving or Rejecting
To approve a timesheet:
- Review all time entries for accuracy
- Check for any anomalies (excessive hours, missing breaks, etc.)
- Verify against schedules and expected working hours
- Click Approve to approve the timesheet
- The employee will be notified of the approval
To reject a timesheet:
- Click Reject
- Important: Add a clear reason for rejection explaining what needs to be corrected
- The employee will receive a notification with your feedback
- They can then make corrections and resubmit
Bulk Approval
For approving multiple timesheets at once:
- From the timesheets list view, select the checkboxes next to the timesheets you want to approve
- Click the Bulk Approve button (if available)
- Confirm the bulk approval
- All selected employees will receive approval notifications
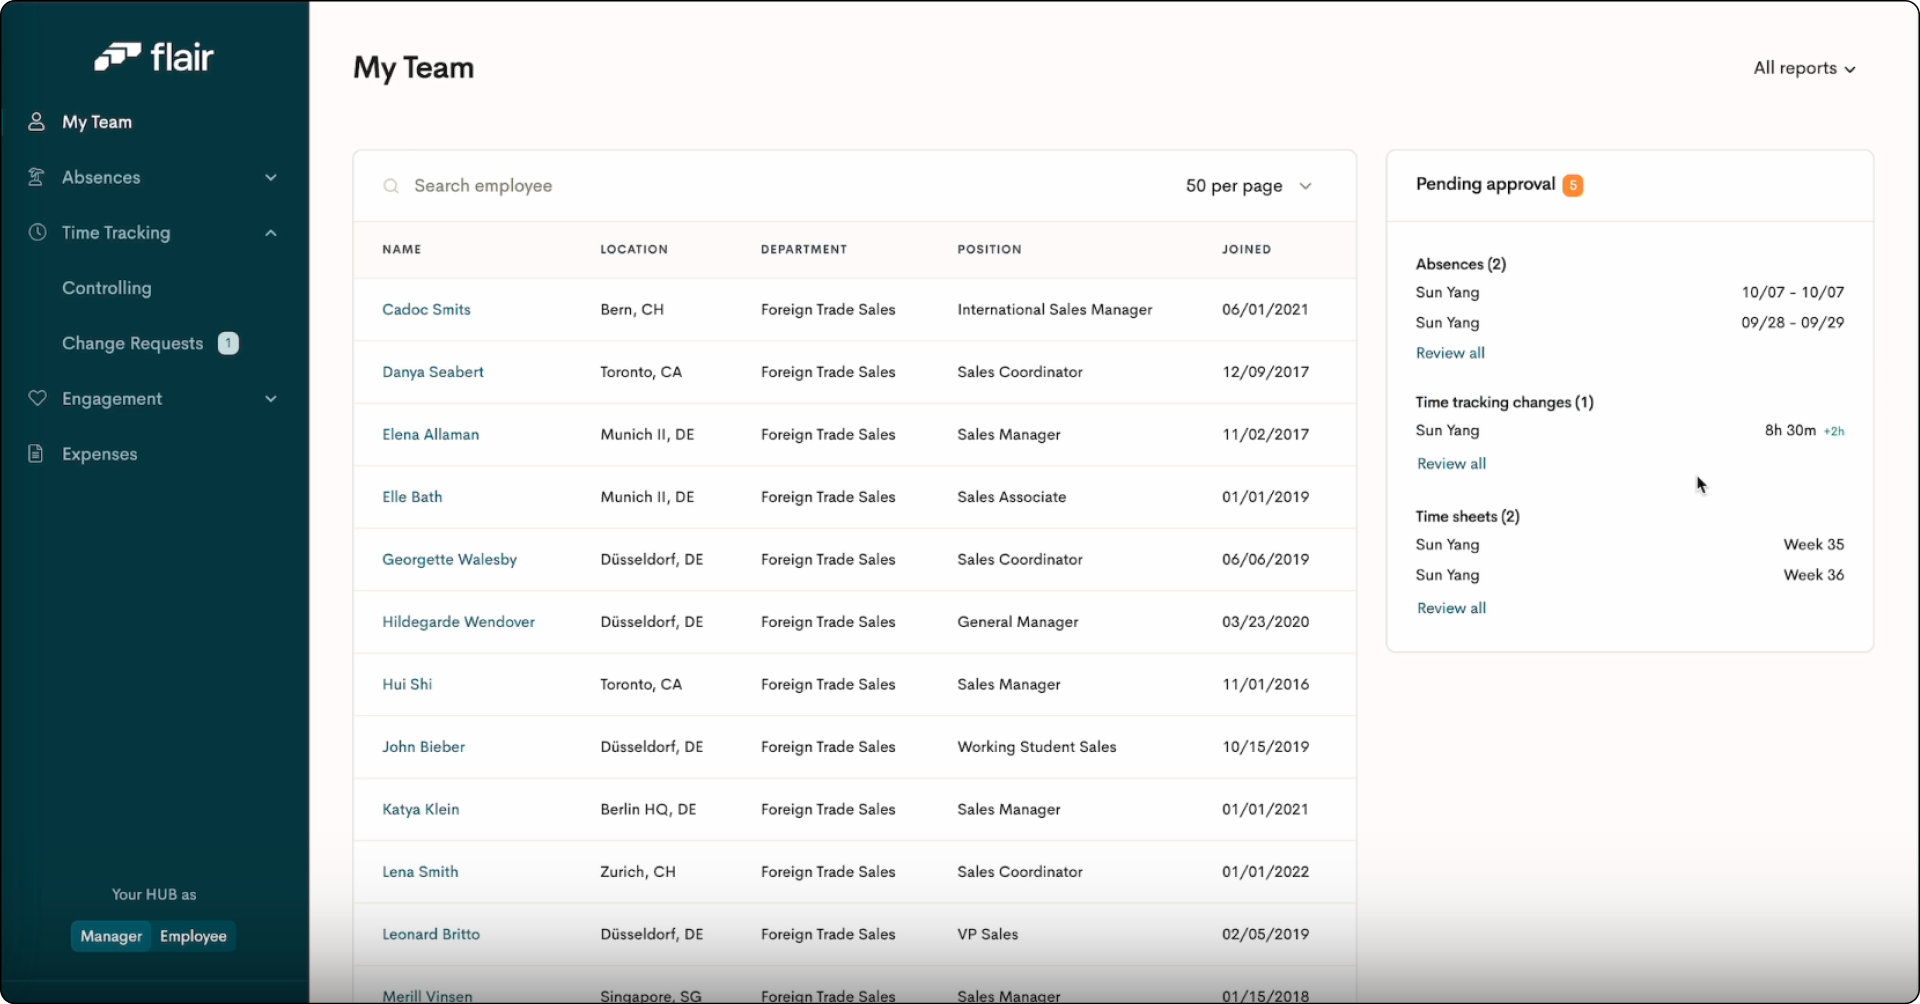
View and Approve Timesheets in the Hub
The Employee Hub provides a user-friendly interface for managers to review and approve timesheets.
Accessing Timesheets in the Hub
- Log in to the Employee Hub with manager credentials
- Navigate to Time Management or Timesheets in the main menu
- You'll see all pending timesheets that require your approval
Hub Approval Process
- Click on an employee's timesheet to view details
- Review the time entries for the period
- Use the Approve or Reject buttons
- If rejecting, add a comment explaining the issue
- The system updates automatically and notifies the employee
Mobile Approval
Managers can also approve timesheets via the flair mobile app:
- Open the flair app
- Go to Approvals or Timesheets
- Review and approve/reject timesheets on the go
Change Requests
When employees need to modify already-submitted time entries, they can submit a change request. This ensures an audit trail and requires manager approval.
How Employees Submit Change Requests
- Navigate to the time entry that needs correction in the Employee Hub
- Click Request Change
- Modify the information:
- Start time
- End time
- Break duration
- Cost center assignment
- Add a reason for the change (required)
- Submit the request
Types of Changes
Employees can request changes for:
- Clock in/out times: Adjust start or end times
- Forgotten entries: Add missing time entries
- Break corrections: Modify break start/end times
- Cost center changes: Update cost center assignments
- Date corrections: Fix entries logged on wrong dates
Approving Change Requests
In Salesforce
- Navigate to Change Requests in the App Launcher
- You'll see all pending change requests
- Click on a request to review:
- Original entry: What was initially logged
- Requested changes: What the employee wants to change
- Reason: Employee's explanation
- Impact: How this affects total hours
- Approve or reject the request
- If rejecting, provide a clear reason
In the Employee Hub
- Go to Approvals or Change Requests
- Review pending requests
- Compare the original and requested changes side-by-side
- Approve or reject with comments
Audit Trail
All change requests maintain a complete audit trail:
- Who made the original entry
- When it was submitted
- Who requested the change
- What was changed
- Who approved/rejected the change
- When the approval/rejection occurred
This ensures compliance and accountability.
Reapproving Timesheets
In some cases, a timesheet that was previously approved may need to be modified and reapproved.
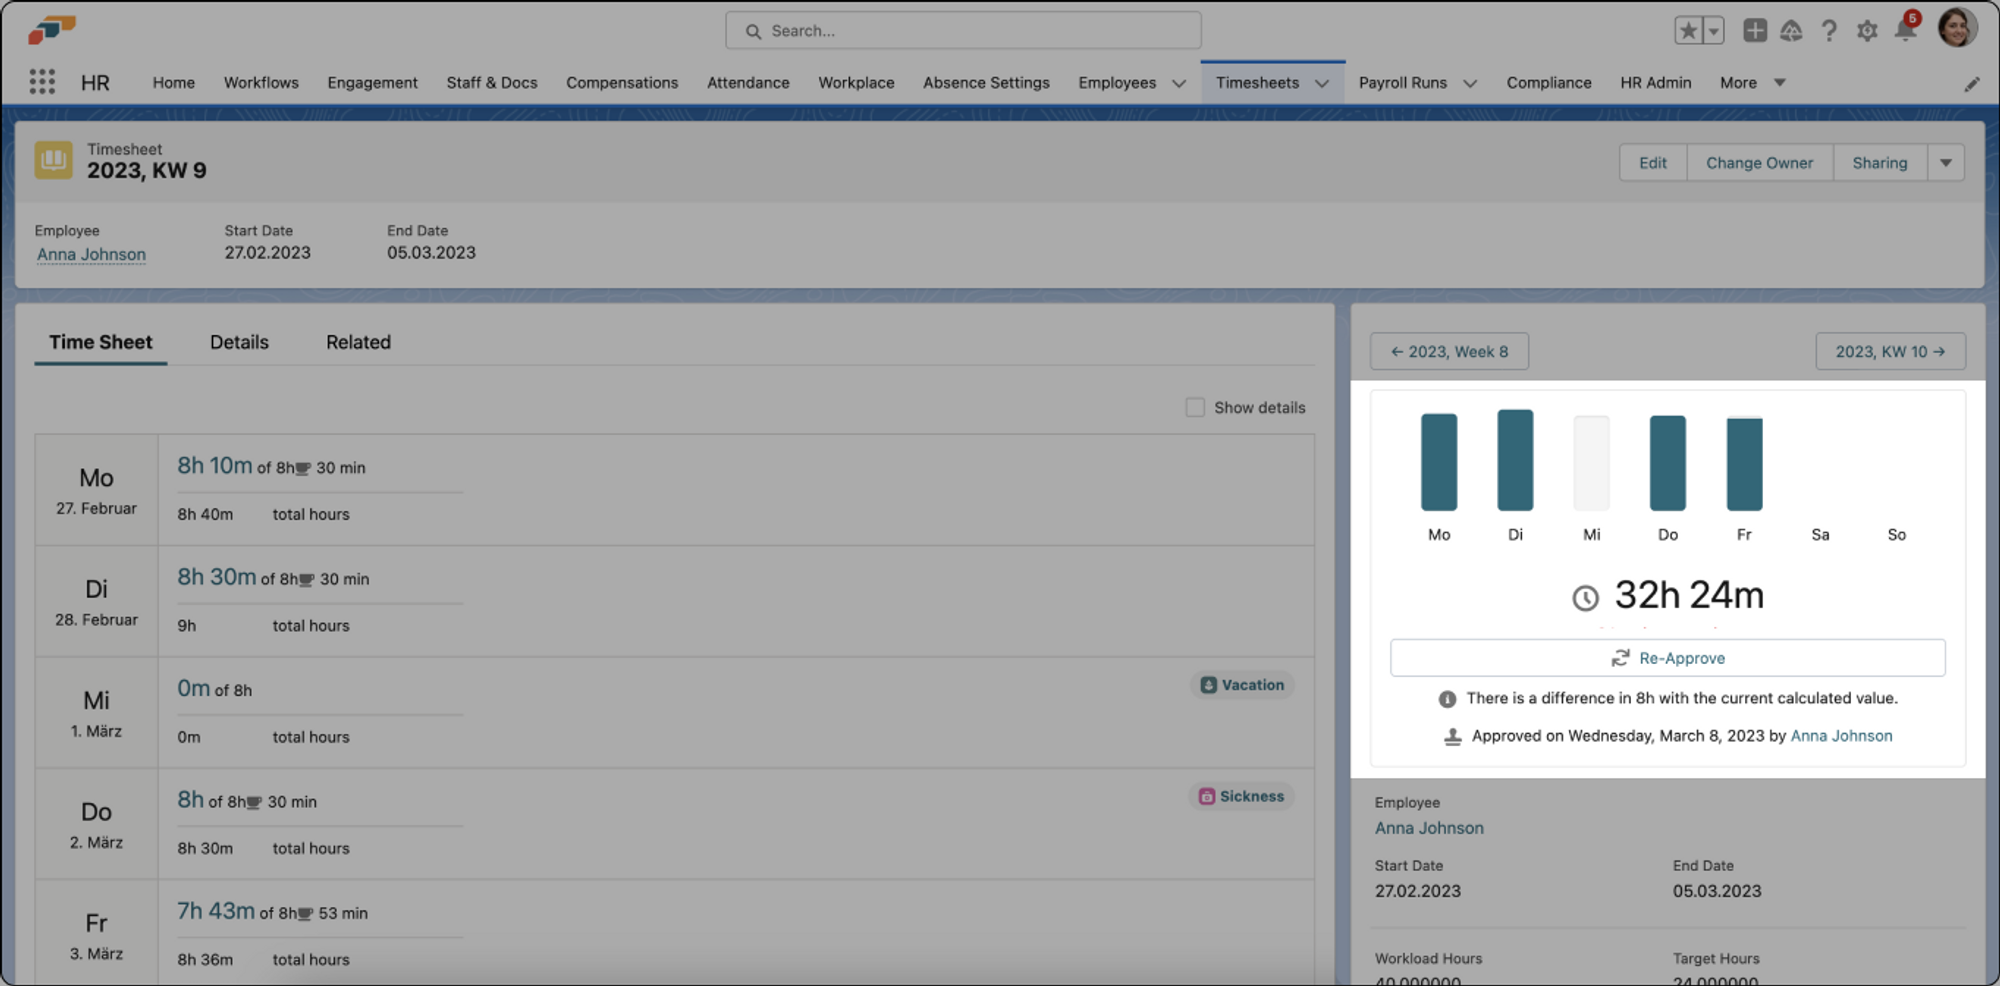
This can happen when:
- Errors are discovered after approval
- Payroll corrections are needed
- Compliance audits require adjustments
When Reapproval Is Needed
The system will flag a timesheet for reapproval when:
- An approved time entry is edited by an administrator
- A change request is approved that modifies an already-approved timesheet
- Manual adjustments are made to hours or calculations
Reapproval Process
- The timesheet status automatically changes to Pending Reapproval
- The assigned approver receives a notification
- The approver reviews the changes (highlighted in the interface)
- The approver can see:
- What was originally approved
- What has changed
- Who made the changes
- Why the changes were made
- The approver then approves or rejects the modified timesheet
Best Practices for Reapproval
- Review change history: Always check what was modified
- Verify impact: Ensure changes don't create compliance issues
- Document reasons: Add notes about why reapproval was granted
- Notify payroll: If changes affect payroll, alert the payroll team
- Set deadlines: Establish reapproval deadlines to avoid payroll delays
Timesheet Settings
Administrators can configure various timesheet settings:
Approval Workflows
- Single approver: One manager approves all time entries
- Multi-level approval: Time entries go through multiple approval stages
- Automatic approval: Time entries auto-approve after a certain period (use with caution)
Assigning Additional Managers for Timesheet Approval
By default, timesheets are sent to the employee's direct manager, as defined by the Parent Position in the company hierarchy on the Company Structure page. You can view the assigned manager in the Contract section of an employee's record.
To assign additional managers for timesheet approval:
- Navigate to the employee's record in the flair HR app.
- Go to Staff & Docs and open the Additional Managers tab.
- Add the additional manager and grant them the Time Entries Approval responsibility.
Managers with the Time Entries Approval permission will also receive timesheets for weekly approval alongside the employee's direct manager.
Submission Deadlines
- Set deadlines for timesheet submission (e.g., Friday by 5 PM)
- Configure reminder notifications
- Set up escalation for missed deadlines
Locking Periods
- Lock approved timesheets to prevent modifications
- Set lock dates for payroll periods
- Configure who can unlock timesheets (usually limited to admins)
Notifications
Configure notifications for:
- Pending timesheets requiring approval
- Approved/rejected timesheets
- Change requests
- Approaching submission deadlines
- Reapproval requirements
Timesheet Reports
Generate reports to analyze time tracking data:
Available Reports
- Hours worked by employee: Total hours per employee over a period
- Overtime report: Overtime hours by employee or department
- Approval status: Timesheets pending approval
- Cost center breakdown: Hours by cost center
- Attendance trends: Patterns in clock in/out times
- Compliance report: Adherence to working time regulations
Exporting Timesheets
Export timesheet data for:
- Payroll processing
- Accounting systems
- External reporting
- Compliance documentation
Export formats typically include:
- CSV
- Excel
- Direct integration with payroll systems
Printing a Working Time Report
To print a working time report for an employee:
- Open the App Launcher and search for Employees.
- Click on Employees to open the list.
- Click on the employee's name to open their record.
- Click Working Time Report.
- Select the desired time period.
- Print the report.
Common Timesheet Issues
Missing Time Entries
Problem: Employee forgot to clock in or out, or time entries are missing from the system
Solution:
- Employee submits a manual time entry
- Manager reviews and approves
- System maintains audit trail
Redistribute Missing Time Entries:
If time entries or timesheets are missing for an employee, you can redistribute them:
- Navigate to the Attendance tab
- Under Workloads, select the affected employee
- Click the lightning symbol ⚡
- Choose "Redistribute Time Entries"
This action creates an Apex Job that retrieves and displays all missing Time Entries in the system.
Overlapping Time Entries
Problem: Time entries overlap (e.g., clocked in twice)
Solution:
- System flags the overlap
- Manager reviews and corrects
- Remove duplicate entries
Excessive Hours
Problem: Time entry exceeds maximum allowed hours
Solution:
- System alerts during submission
- Manager reviews for accuracy
- Verify if overtime was authorized
- Adjust if error, approve if legitimate
Break Compliance
Problem: Employee didn't take required breaks
Solution:
- System flags missing breaks
- Manager discusses with employee
- Ensure future compliance
- Document if legitimate exception
Creating and Assigning Workloads
Workloads define employee working hours and schedules, which are essential for accurate time tracking and absence management. Before employees can track time or have their absence allowances calculated correctly, they need to have a workload assigned.
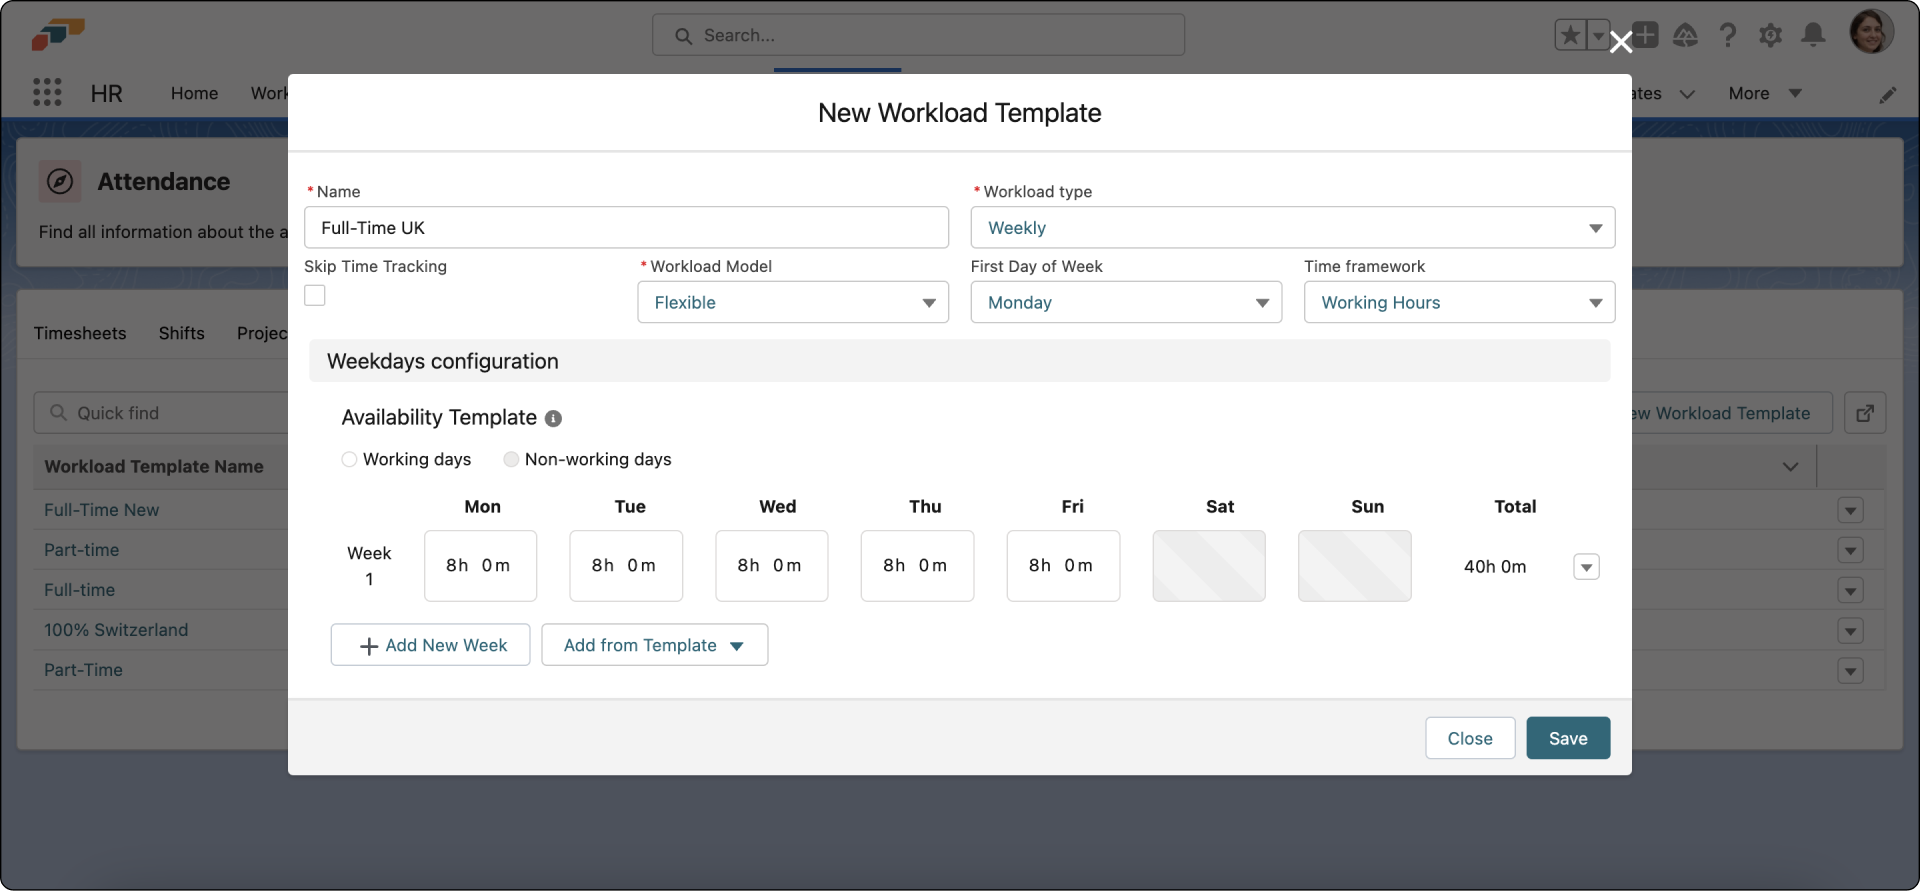
Create a Workload Template
To create a workload template, go to the Attendance section of the flair HR app and select Workload Templates. Click New Workload Template and give your workload a name, e.g. "Full-Time Office Worker". Select whether to count hours by week or by month, choose the first day of the week, and select the relevant time framework. Lastly, use the Skip Time Tracking checkbox to select whether time tracking is enabled or not.
If you chose a fixed, weekly workload, you will now be able to set the working hours per day in a normal working week, as well as start and end times and break length.
For flexible workload models, simply select the hours per working day.
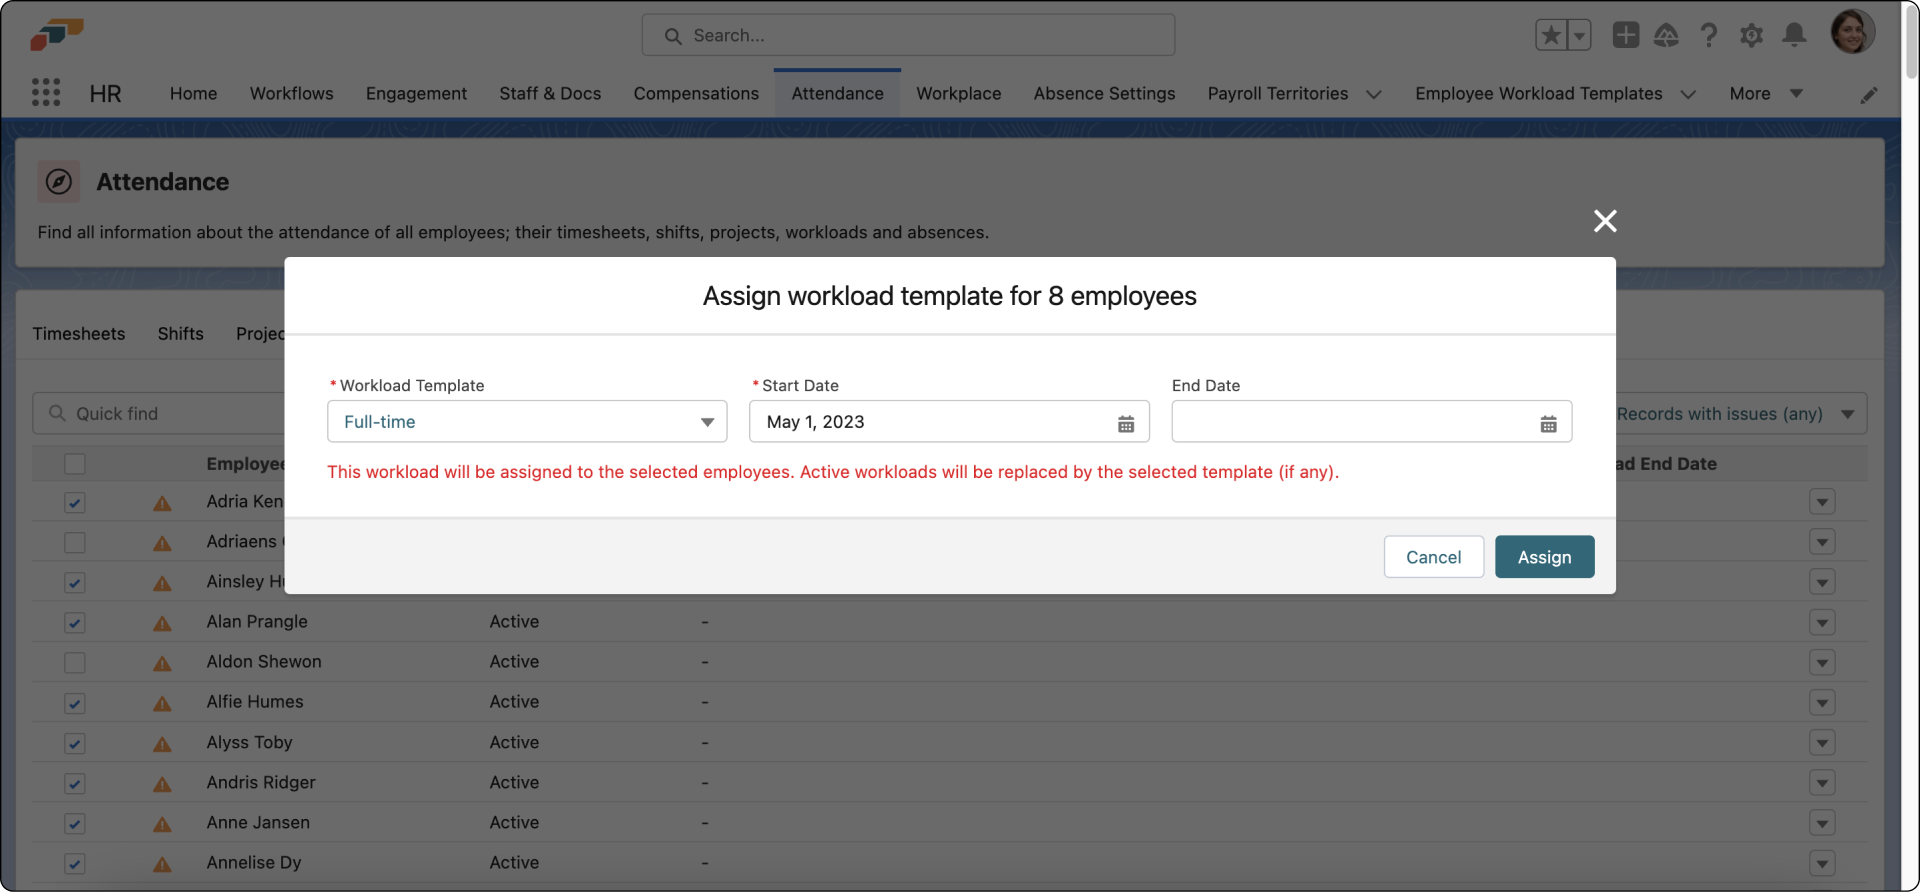
Assign a Workload
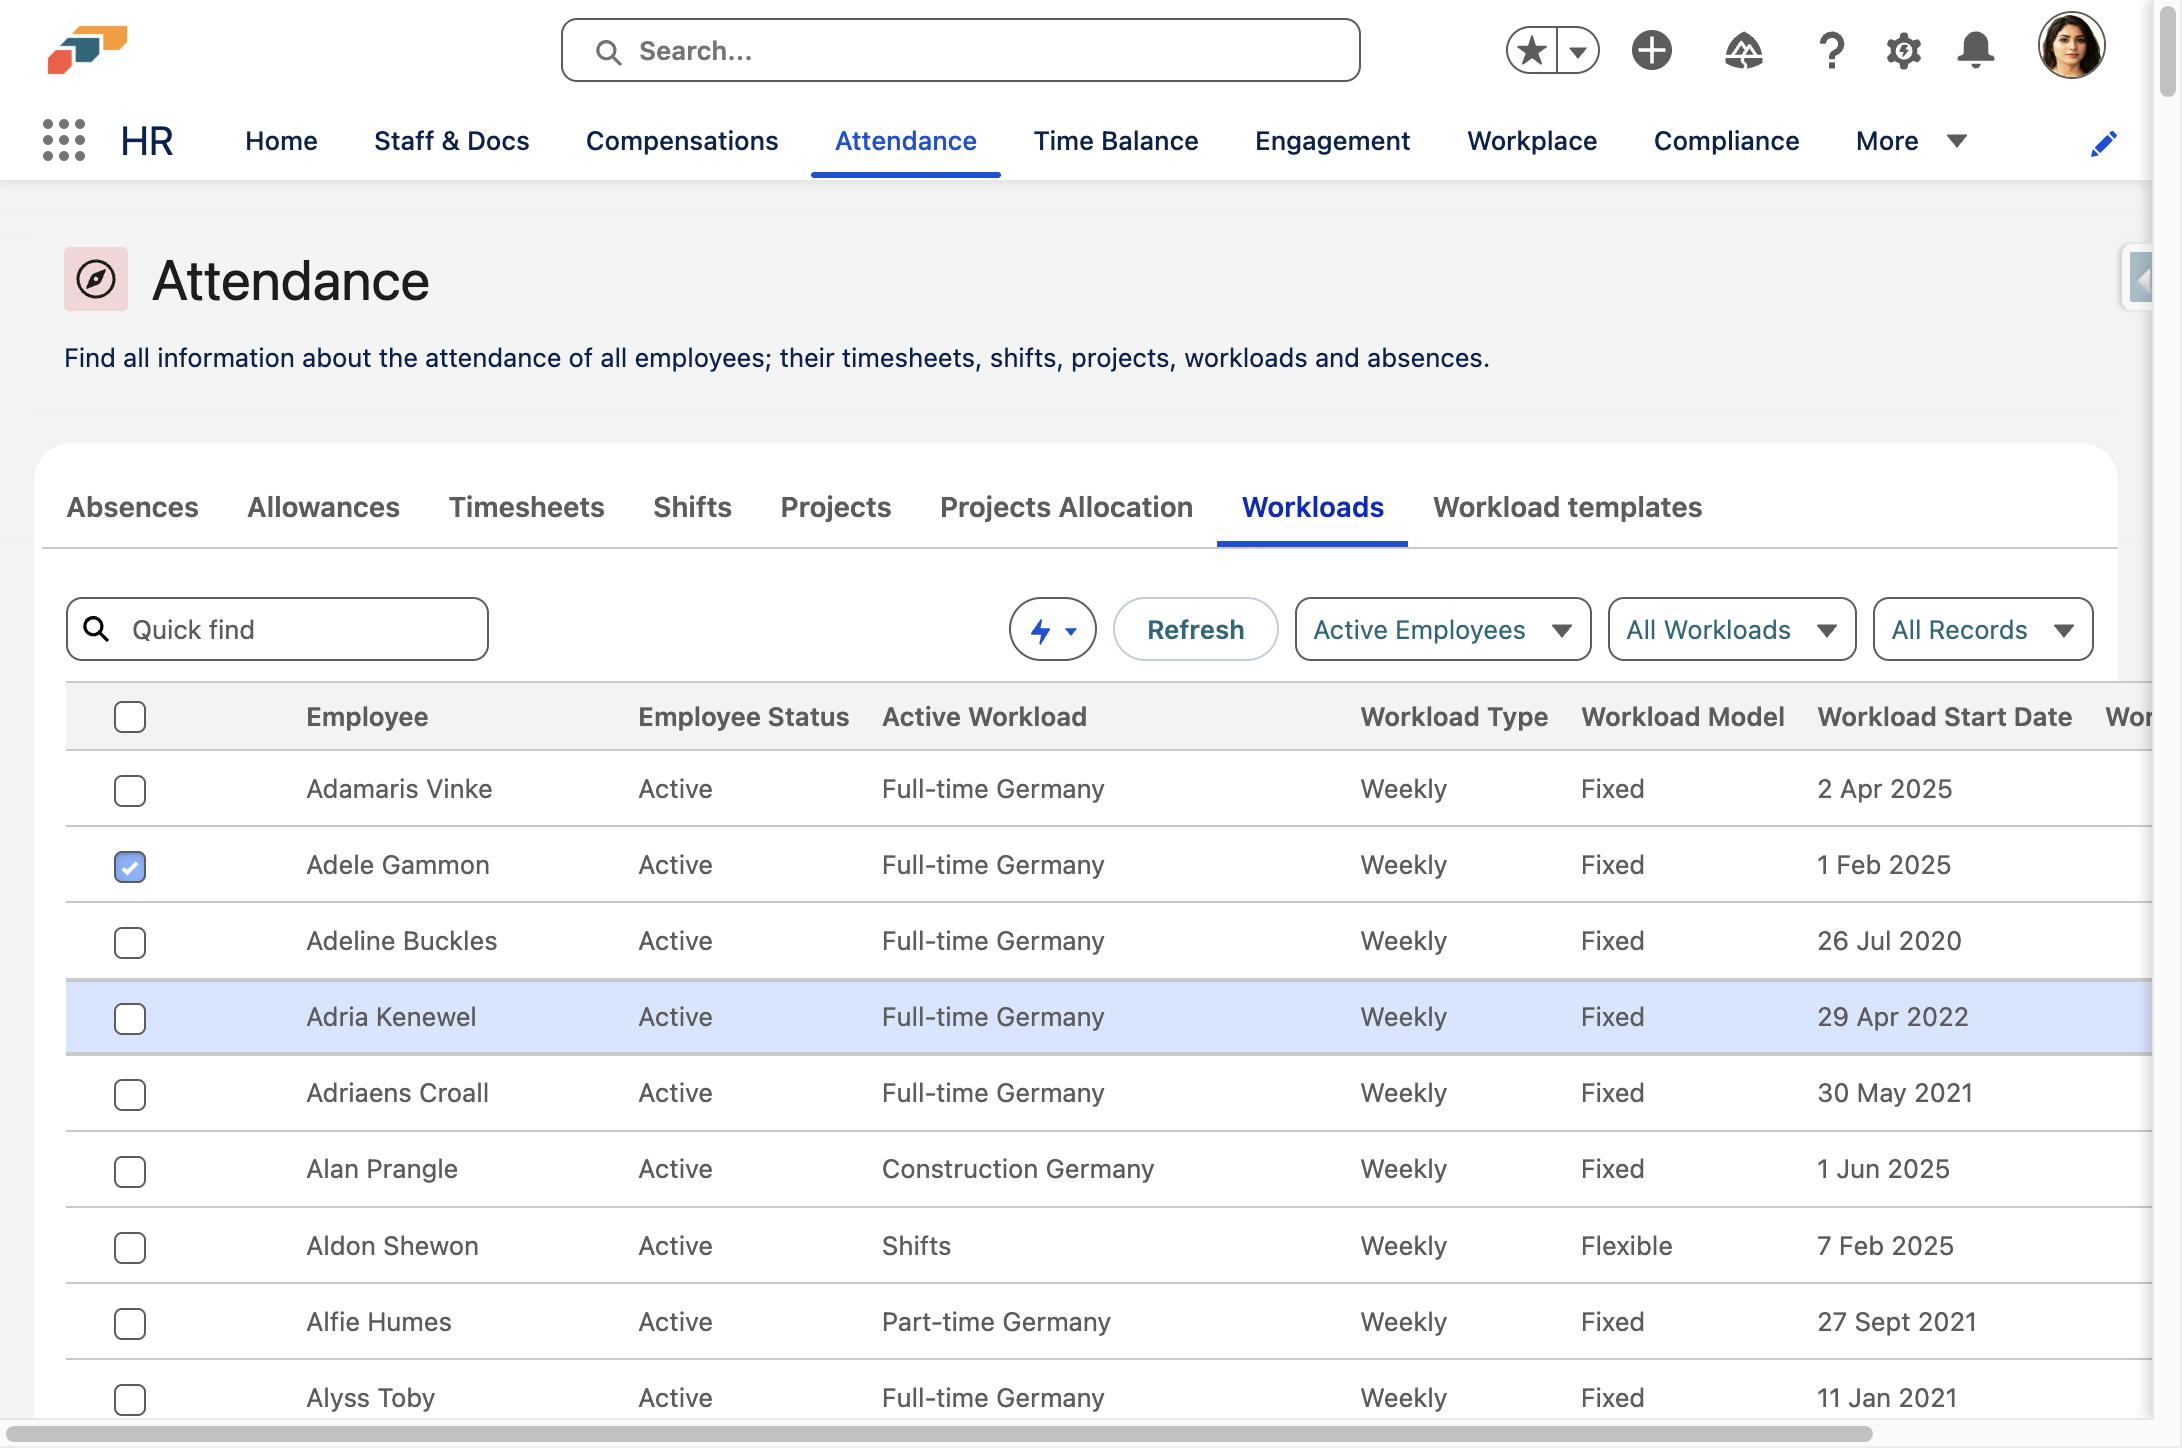
Once you've created your workload template, it's time to assign it to employees. In the Attendance section of flair HR, click the Workloads tab. Here you will see a list of your employees, which you can filter. Employees with a warning icon ⚠️ next to their name have not yet been assigned a workload.
Use the checkboxes to select employees, then click Assign Workload Template. Choose which workload template to assign and set the Start Date. If you are already using flair, the Workload Start Date should be the same as the employee's contract start date. If you are switching to flair and would like to start the vacation allowance from the start of the year, you will need to choose January 1 as the Workload Start Date to ensure that vacation days are properly allocated.
If needed, you may also set an End Date, after which the workload expires. When you're finished, click Assign.
Flexible Workloads
Flexible work has become a major employee benefit and, in recent years, more companies have adopted it. flair supports this change in working culture, and by using our HR app you can create easily adjustable and flexible workloads at any time.
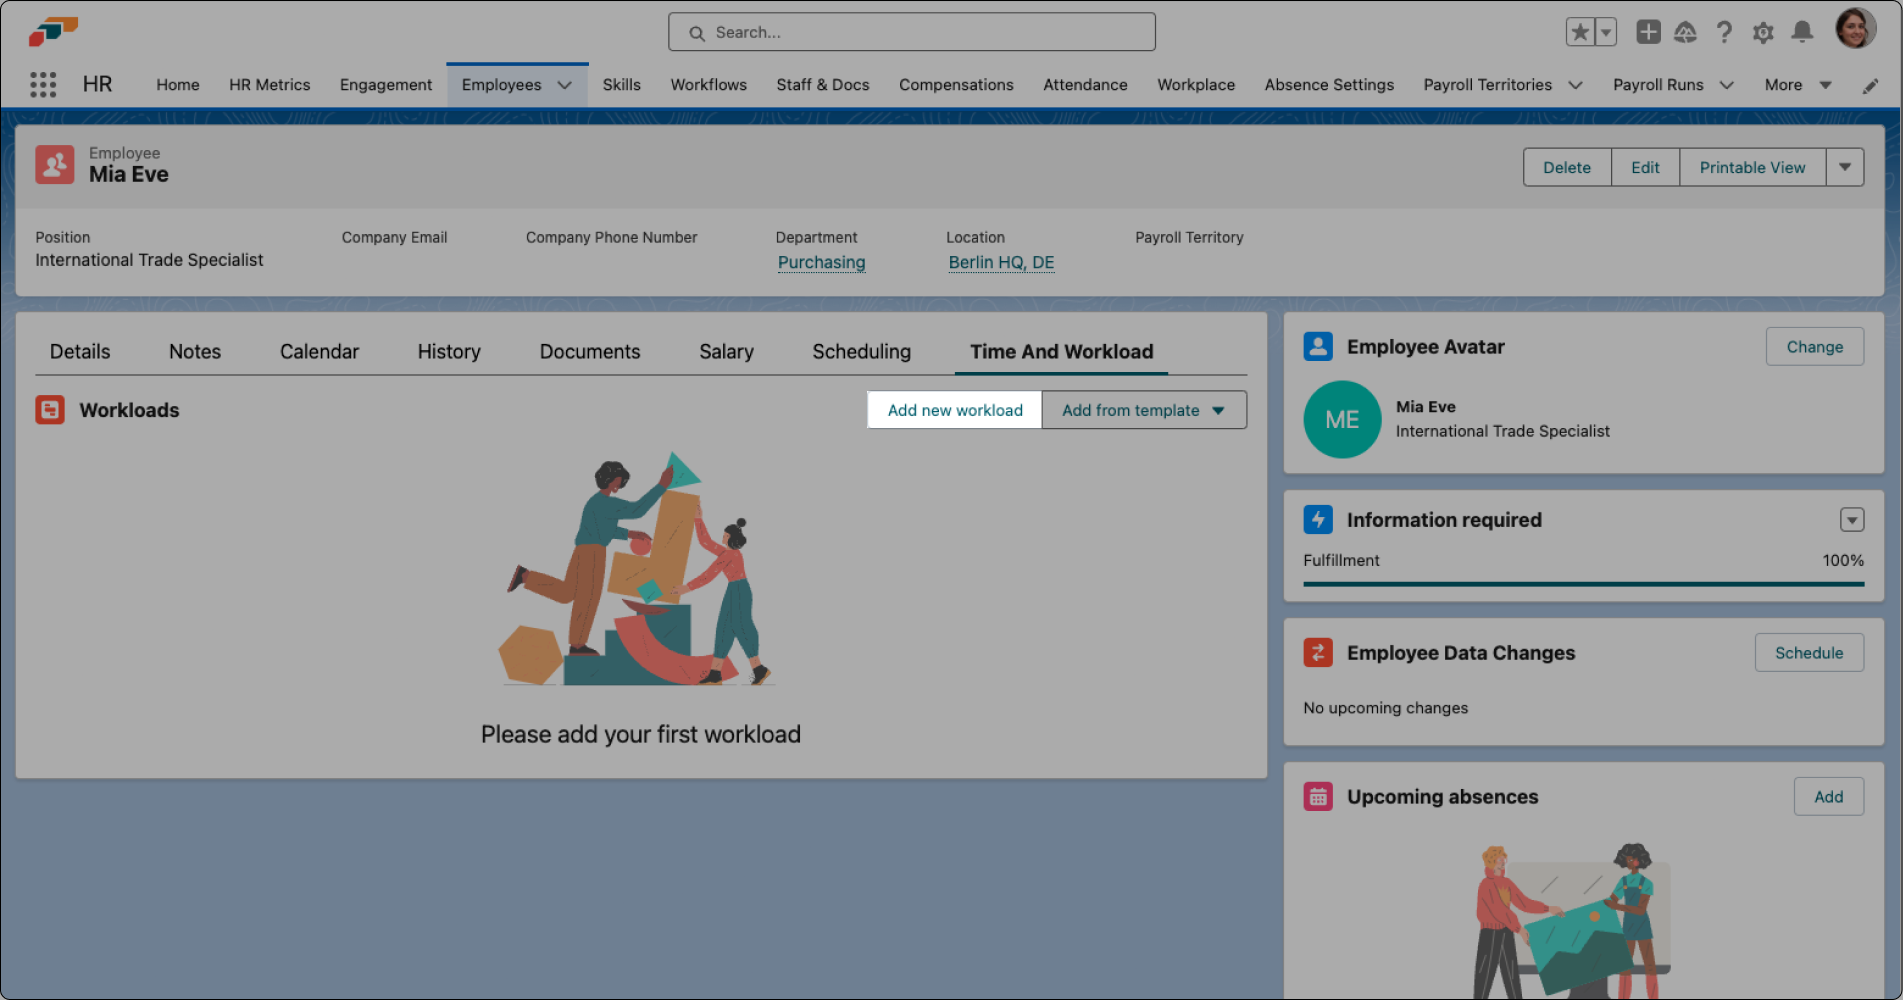
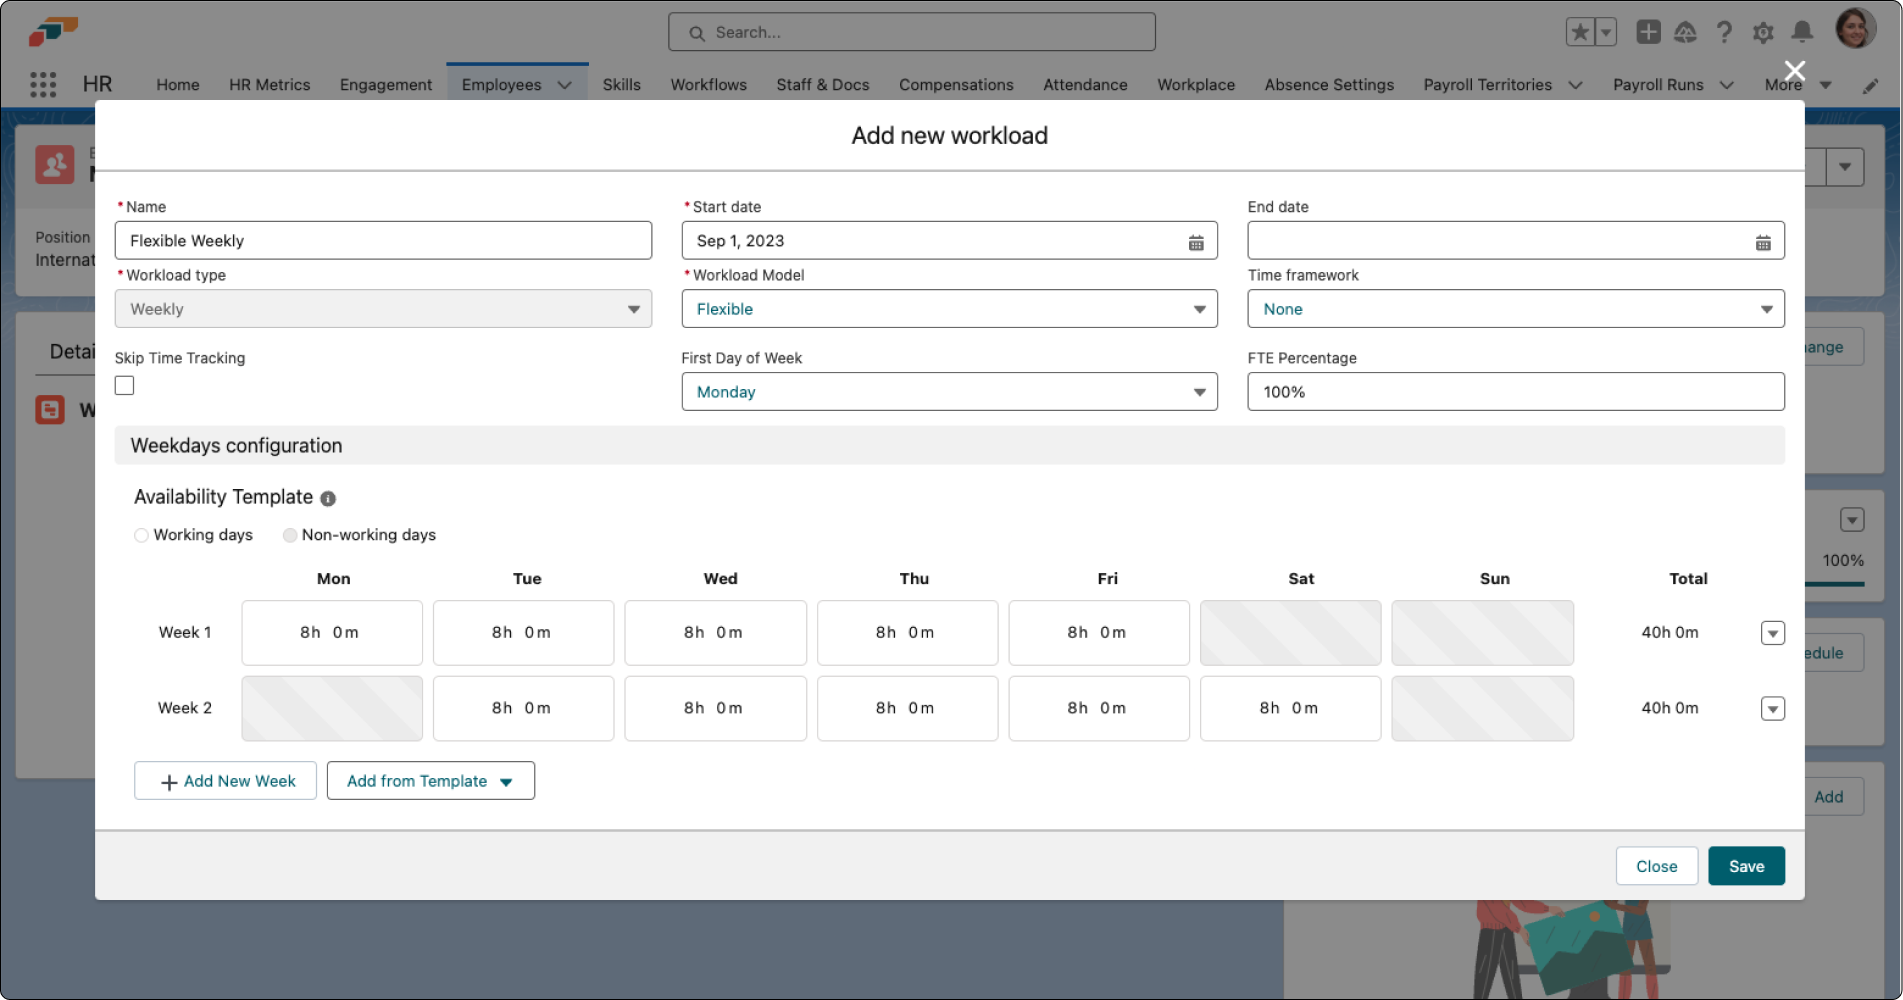
To set up a flexible workload, go to an employee's record in the flair HR app and select the Time And Workload tab. Click Add New Workload to create a workload from scratch or select Add From Template if you want to use one of your existing templates.
Give your workload a name and a start date, and choose a workload type (either weekly or monthly). Now change the Workload Model from Fixed to Flexible. Make sure that the FTE (full-time equivalent) percentage is correct. Full-time employees should have an FTE percentage of 100%, whereas a part-time employee who does half the hours would have 50%.
If the employee works completely flexibly and their working days vary from week to week, you can keep the standard Availability Template (Monday to Friday). Simply change the daily working hours to reach the desired total weekly hours, e.g. 40 hours.
If the employee has a rotating work schedule, click on Add New Week and adjust the weeks as needed. When you're finished, click Save.
Now that you have assigned this new workload to an employee, you will see a calendar view showing their working schedule. Because this is a flexible workload, you can simply adjust the workload by typing the actual working hours into the calendar.
For example, if Mia covers for a colleague on a Sunday so she can take Tuesday off, then you would remove the hours from Tuesday and add them to Sunday. Please remember to adjust the workload when there is a change so that vacation and sick days can be calculated accurately.

For Absence Management: If you're setting up flexible workloads for absence management purposes, make sure to configure your accrual policies to use "Prorate based on FTE percentage" in the Workload Proration Type. Learn more in the Accrual Policies article.
Recalculating Workloads
If you're experiencing issues with workload calculations or timesheet accuracy, recalculating workloads might resolve the problem. This process recalculates all workloads and related timesheets, which can help fix discrepancies in time tracking.
When to Recalculate Workloads
You may need to recalculate workloads if you experience:
- Accidentally deleted timesheets - Missing time entries affecting balance calculations
- Changed workloads - Modified employee schedules or working hours
- Incorrect absence balances - Holidays, sickness days, or overtime balance showing wrong amounts
- Data inconsistencies - Discrepancies between scheduled and actual hours
How to Recalculate Workloads
- Click on Attendance
- Click on Workloads
- Select the Workloads you want to recalculate
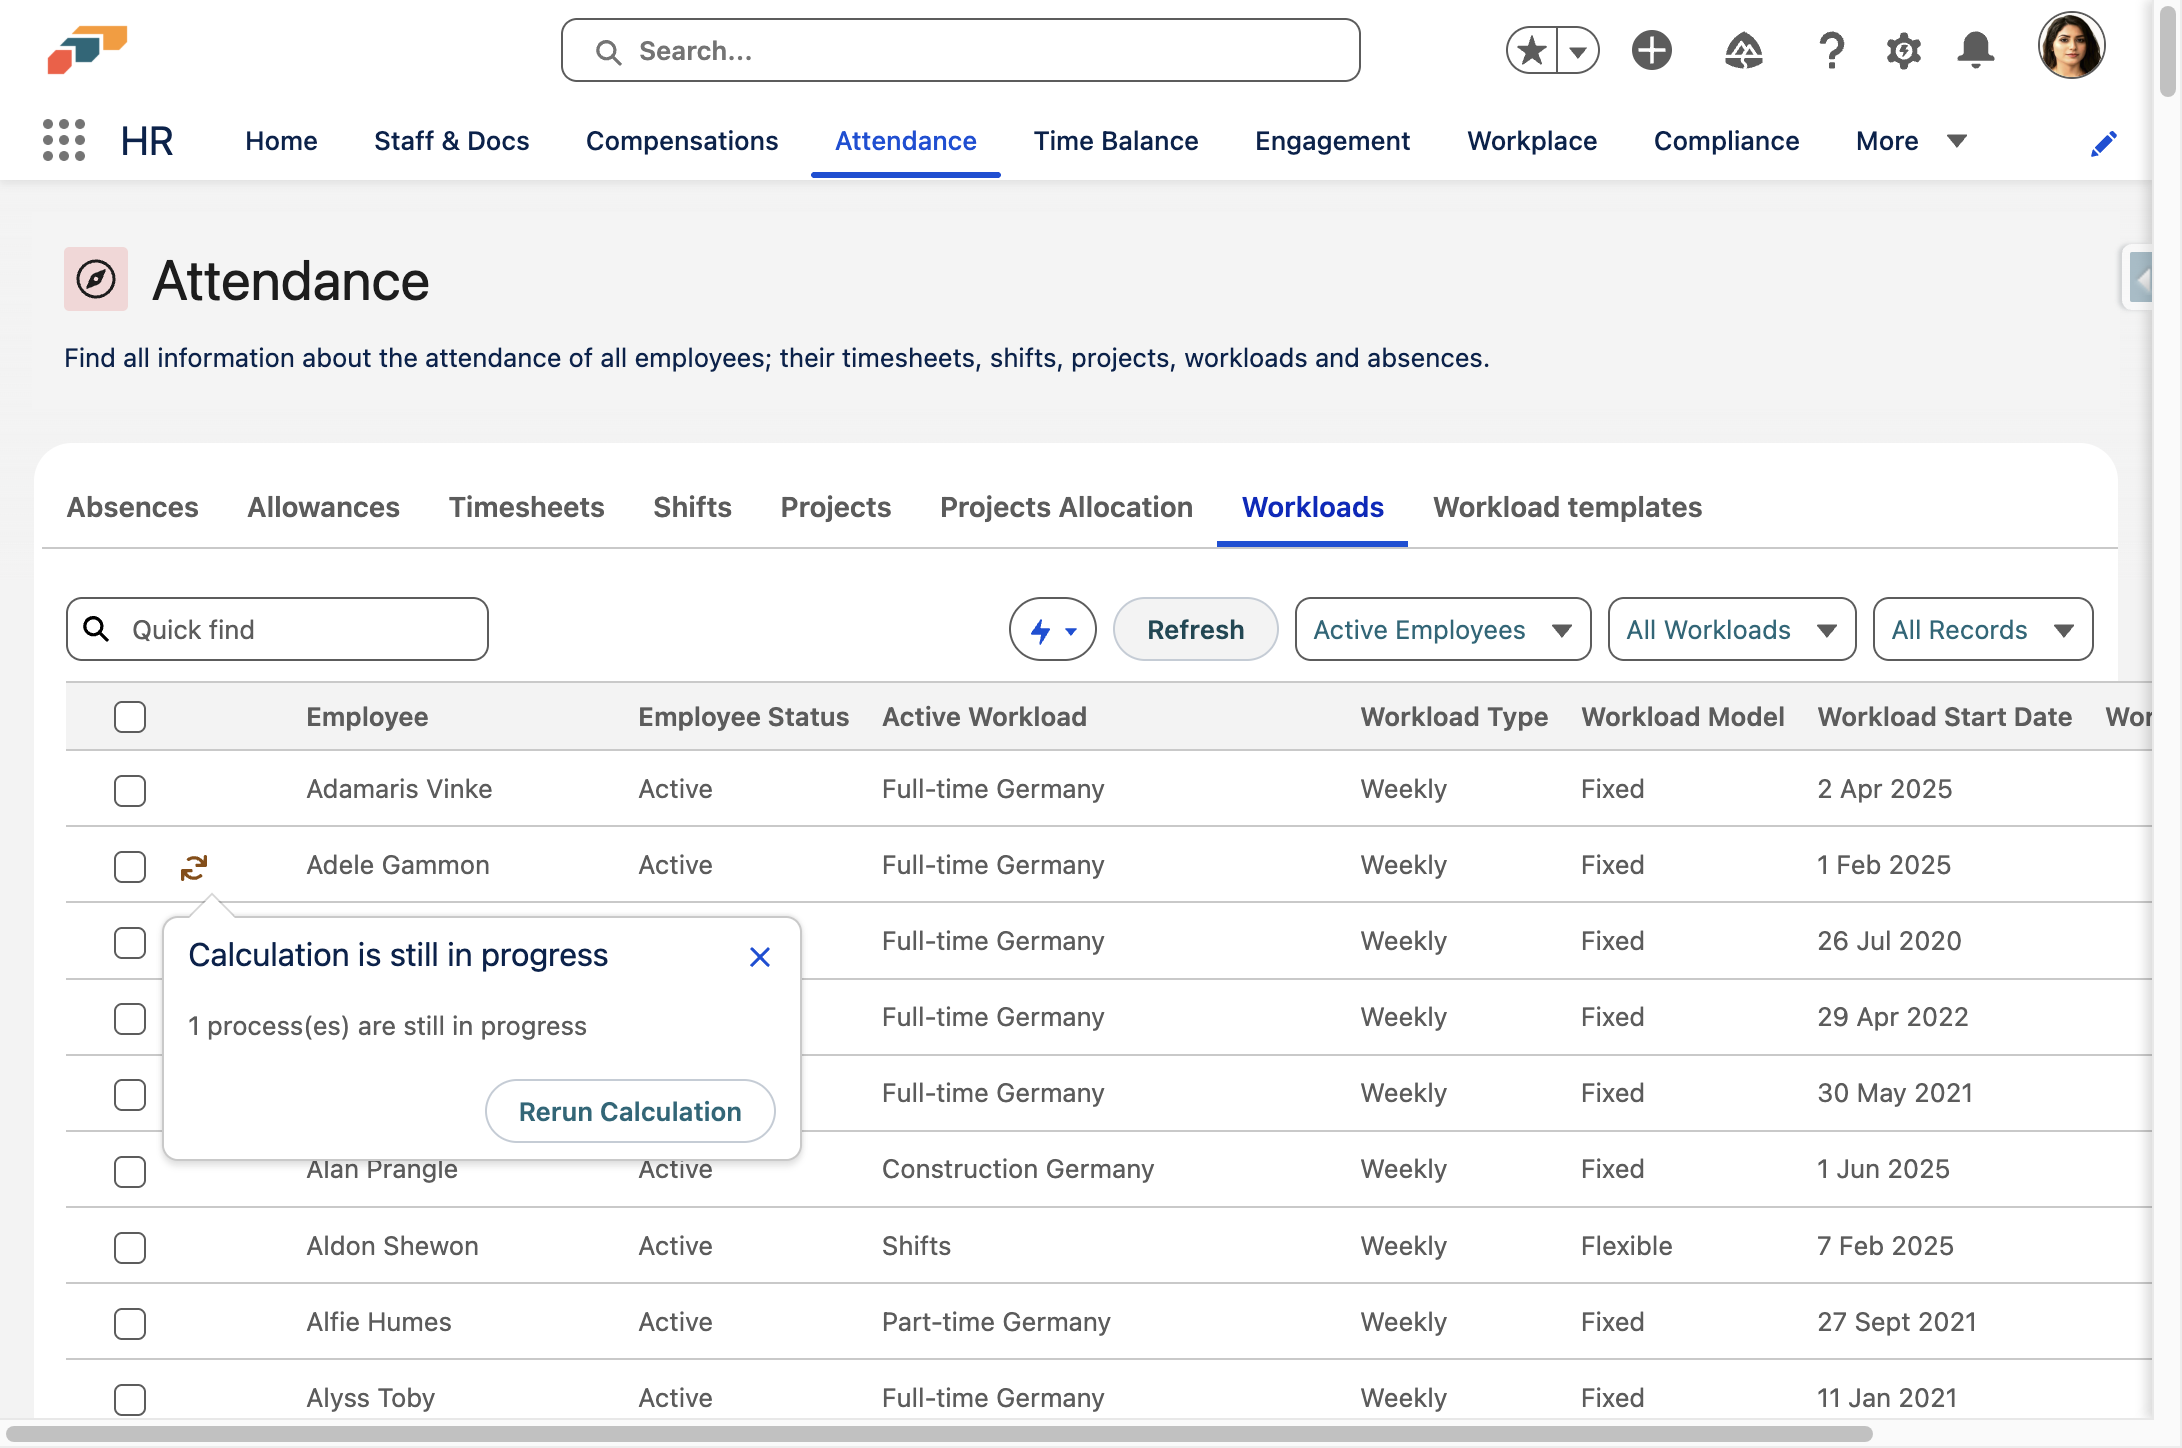
- Click on the flash icon
- Click on Recalculate

- The calculation runs in the background and might take some time
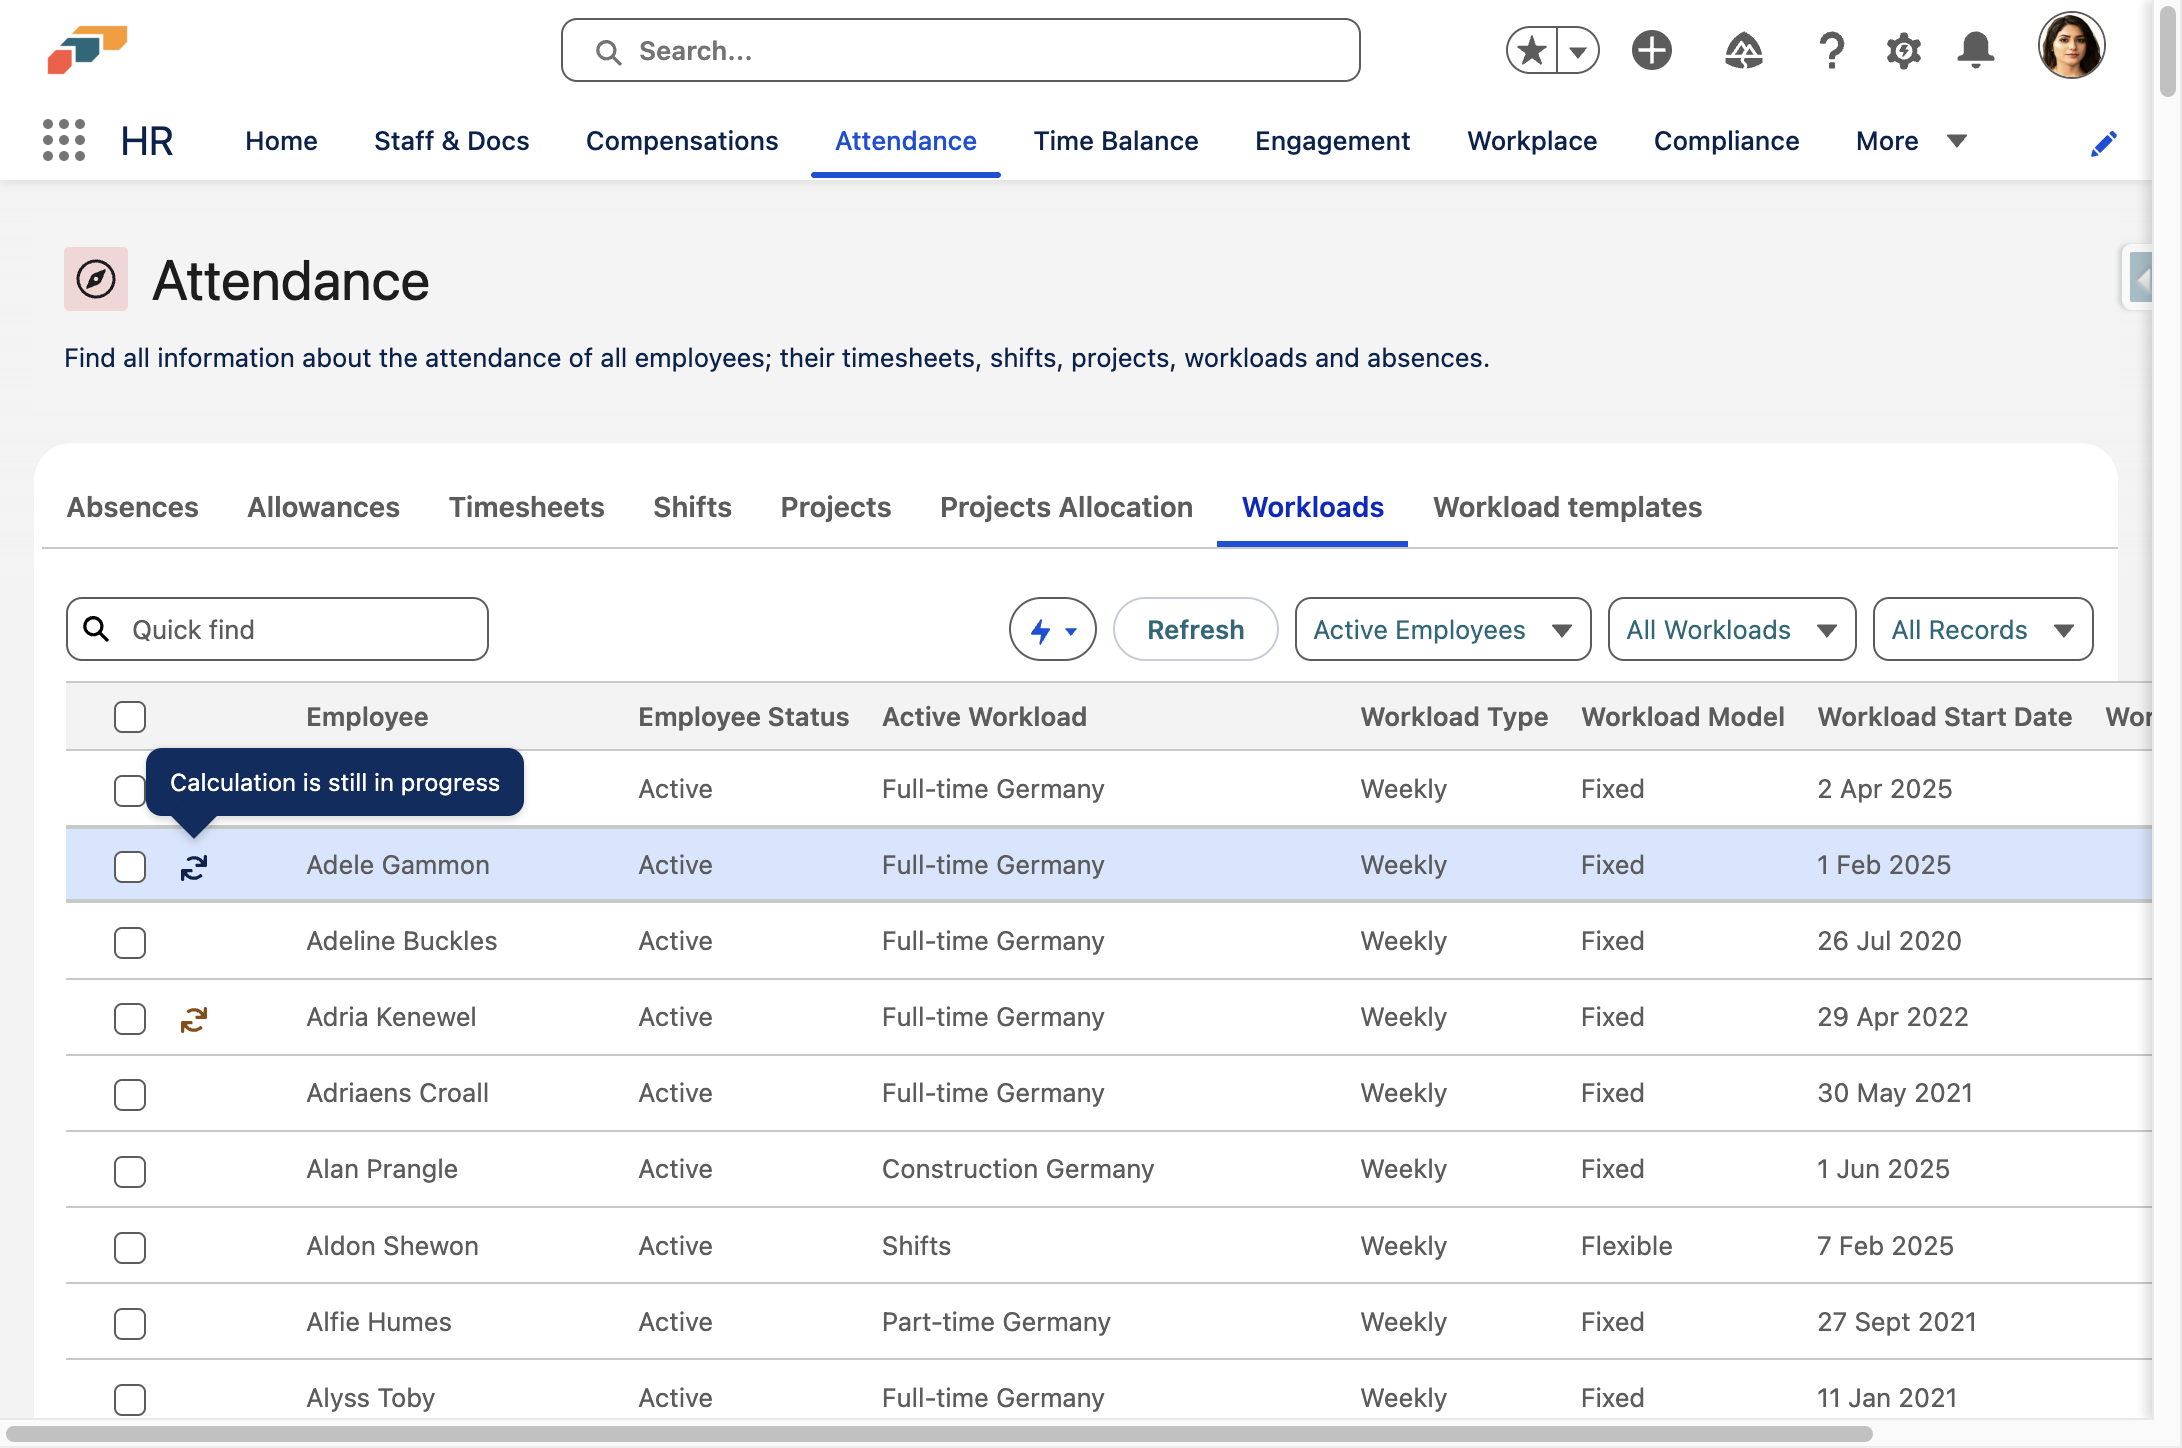
- Click on Refresh to see the recalculated workloads
All workloads and related timesheets will be recalculated. Depending on the data size, this process might take a while to finish.
Well done! You recalculated your workloads!