Introduction to flair
flair helps HR teams modernize, shape, and perfect every aspect of the employee experience. Using precise insights and rich data, flair gives users the tools to easily design, adapt, and scale a world-class culture that drives your company forward.
To create the best possible employee experience, flair users can build a smart HR framework. There are three flair apps to help users achieve this goal. They are the web-based Employee Hub, and two Salesforce applications: flair HR and flair Recruiting.
Together they make a smart and comprehensive HR platform.
flair's Salesforce Connection
Let's explore how flair works within Salesforce to streamline and improve the HR and employee experience.
Salesforce is a customer relationship management (CRM) platform. flair is a complete HR management solution integrated into the Salesforce CRM.
To understand how flair operates within the Salesforce ecosystem, perhaps it's easier to think about the construction of a building. Instead of building from scratch, Salesforce provides companies like flair with the foundations and ultimately the freedom to customize their own structure – in this case, a smart, intuitive HR management platform
All three apps that make up flair are linked to Salesforce. Even if you are not already using Salesforce, we can provide you with a Salesforce instance. This allows you to benefit from the scalability and security that approximately 150,000 companies around the world enjoy.
Two of our apps, flair HR and flair Recruiting, are accessible via Salesforce directly. These apps are designed for HR managers, recruiters, hiring and people managers, and Salesforce admins.
The third app, the Employee Hub, is a web-based application outside of Salesforce. This is designed to give employees and people managers a user-friendly interface with no need for Salesforce experience. Nevertheless, the Employee Hub is synched with Salesforce, giving you a single source of truth for all your people-related data.
Now let's take a look at some of the features each of the flair apps has to offer.
Salesforce Navigation Guide
In Salesforce, the main navigation and user interface elements are organized into different menu bars and sections. Here's a layout of the key components found in flair apps on Salesforce.
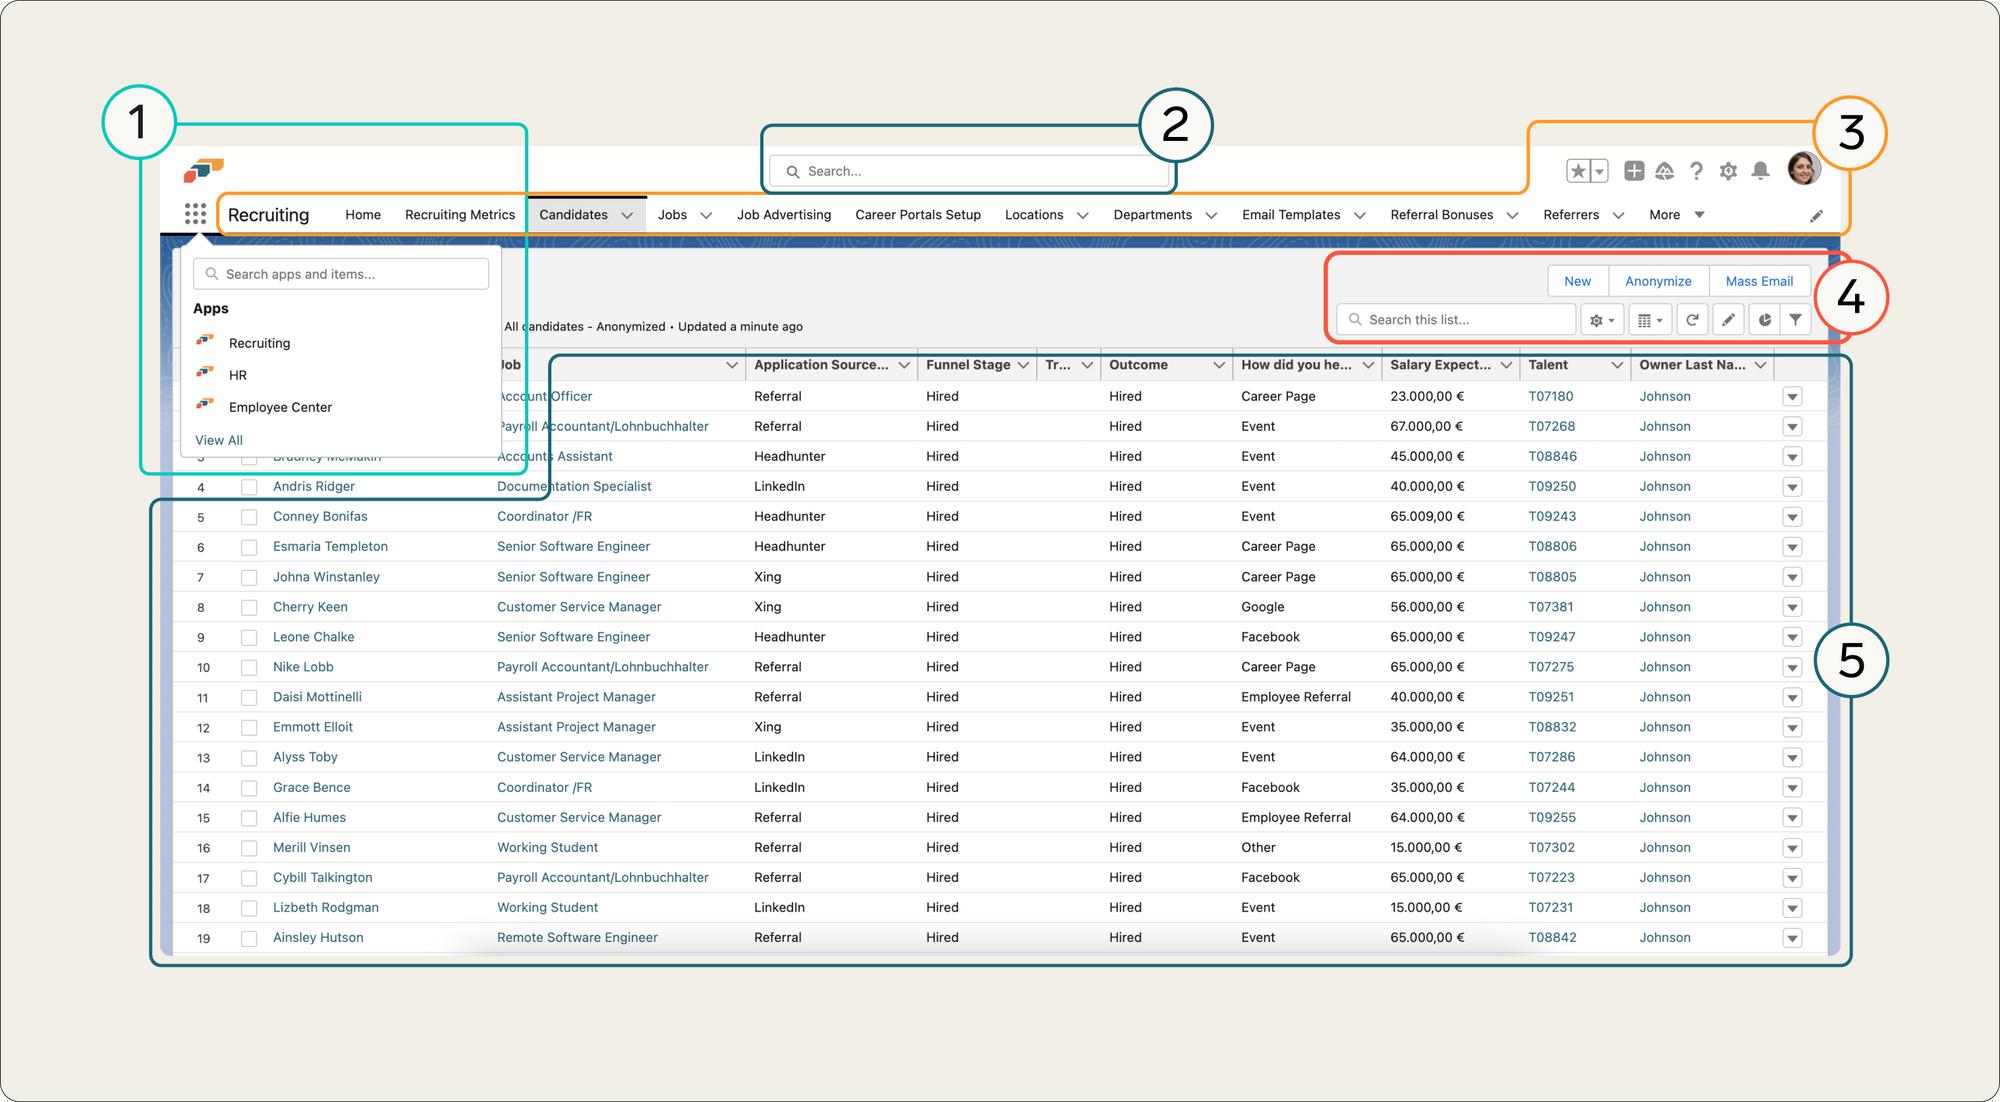
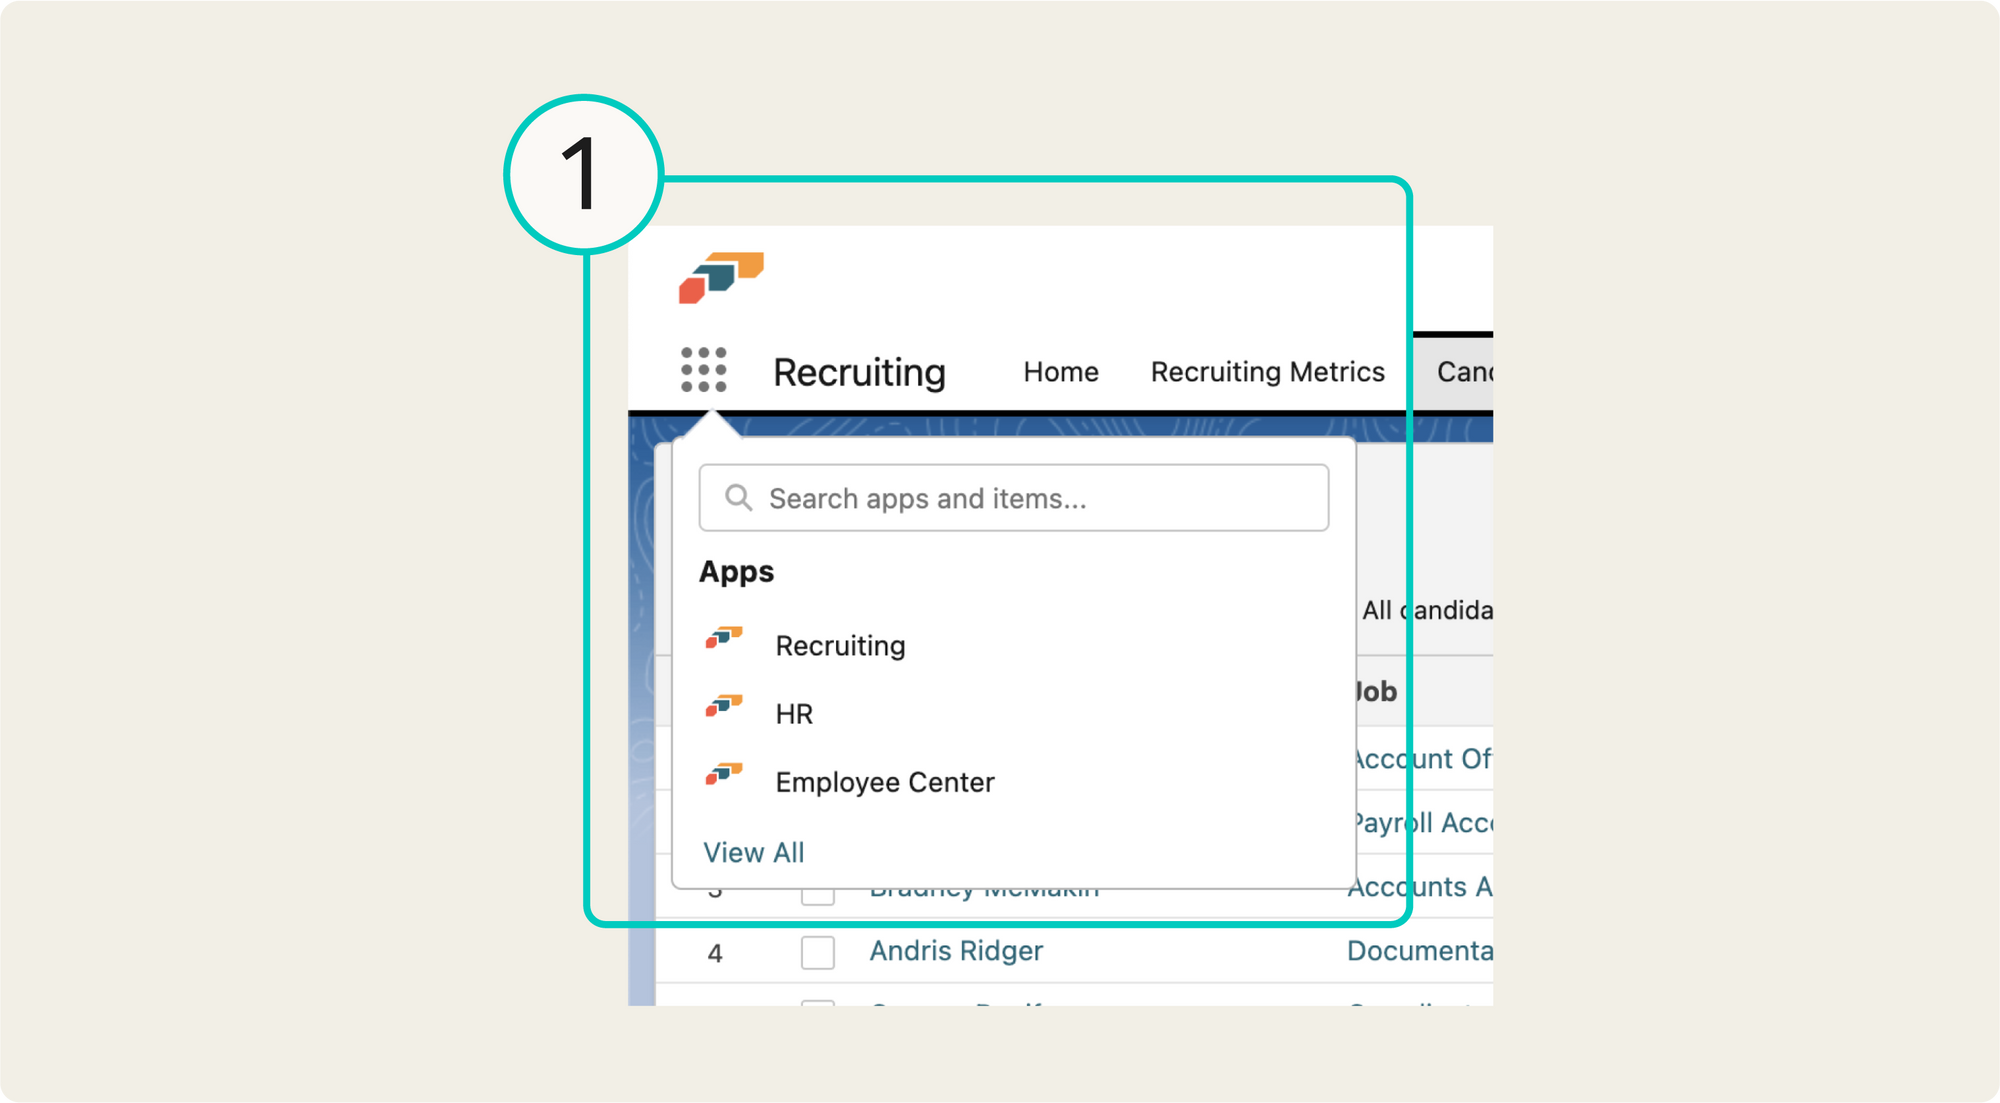
1. App Launcher
The App Launcher is the starting point for accessing different Salesforce apps, tools, and components. It appears as a nine-dot grid icon at the top-left corner of the screen. When using flair, clicking on it opens a menu that displays the flair Recruiting and HR apps.
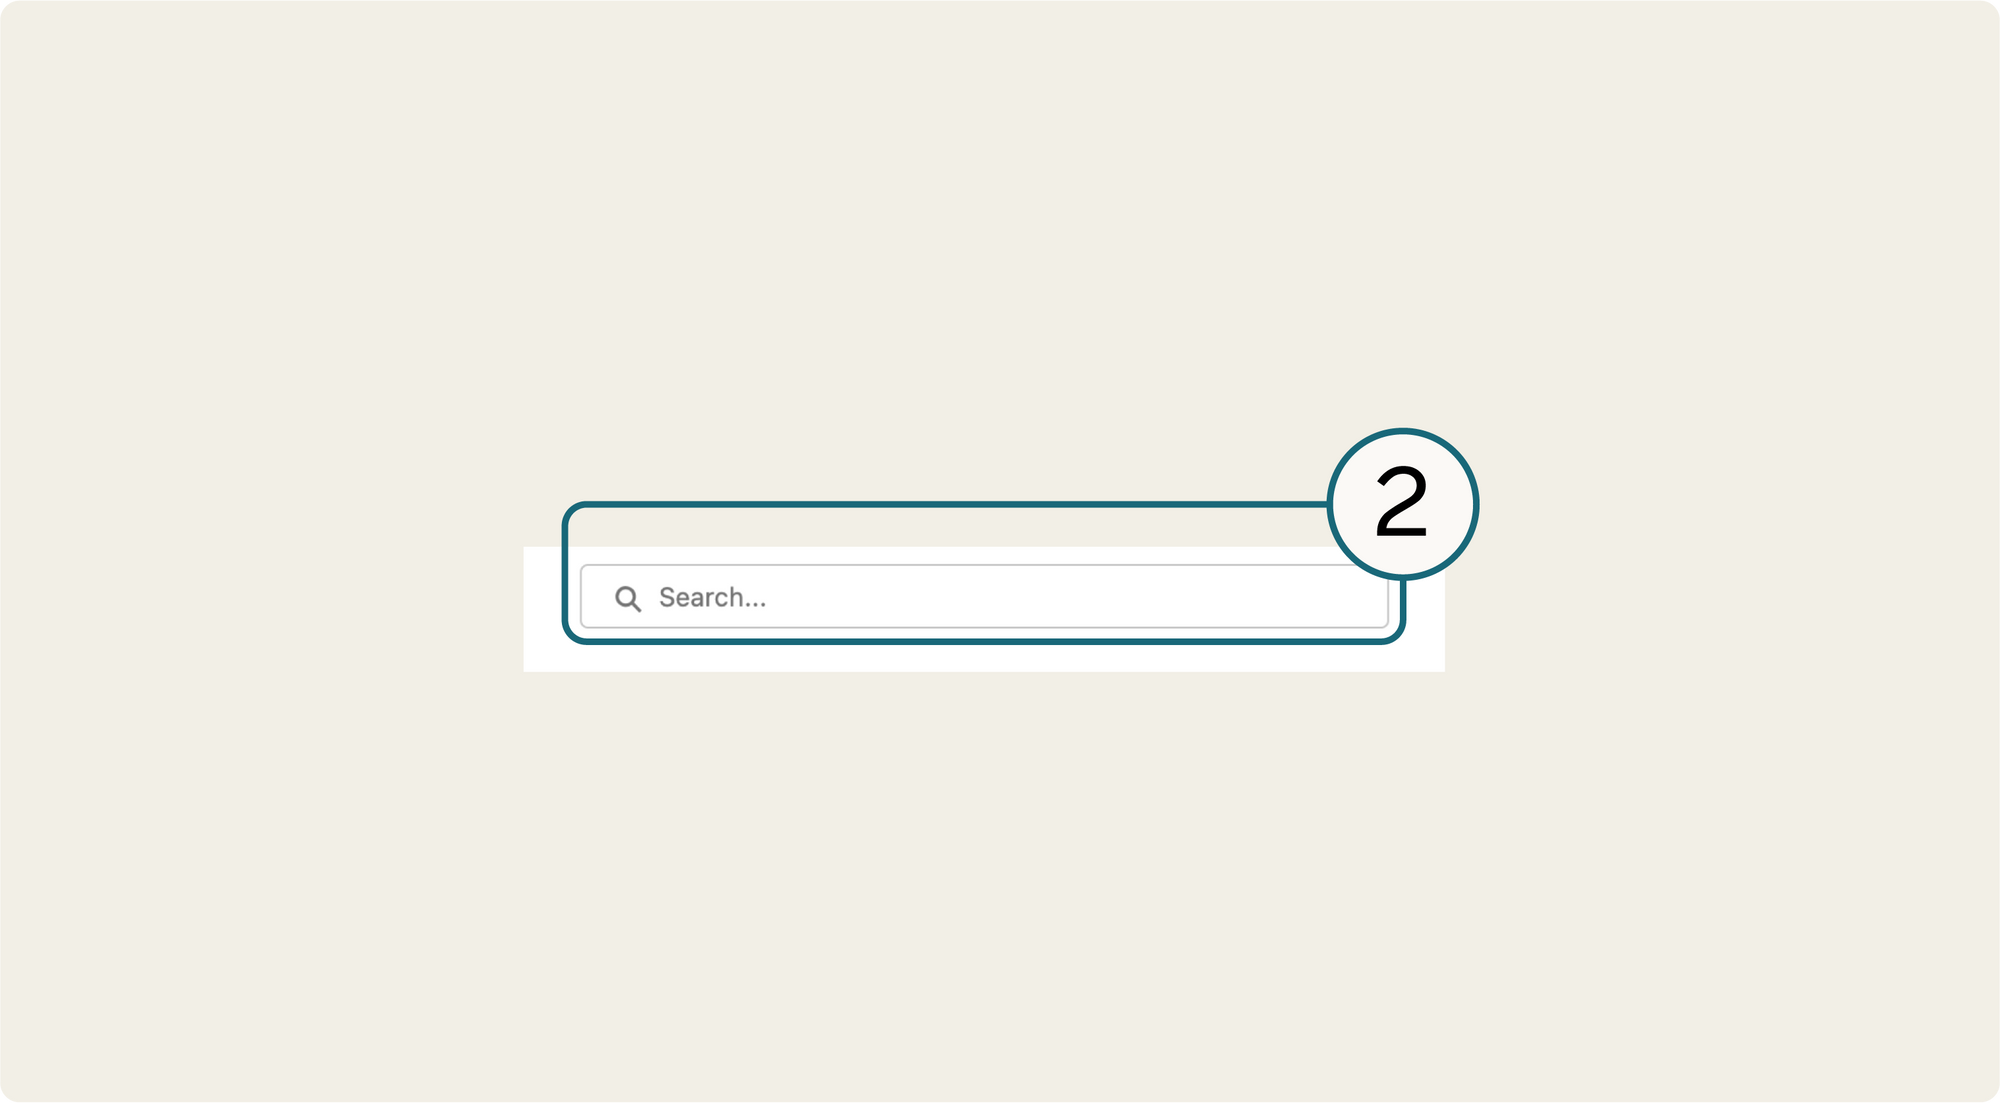
2. Global Search Bar
The functionality of Global Search enables you to locate any records marked as searchable within your Salesforce organization. You have the flexibility to conduct a comprehensive search across the entire database or apply filters based on specific objects.
For example, in the flair HR app, you may want to search for different company departments or office databases. You can also locate Employee Shift records or Absence Categories.
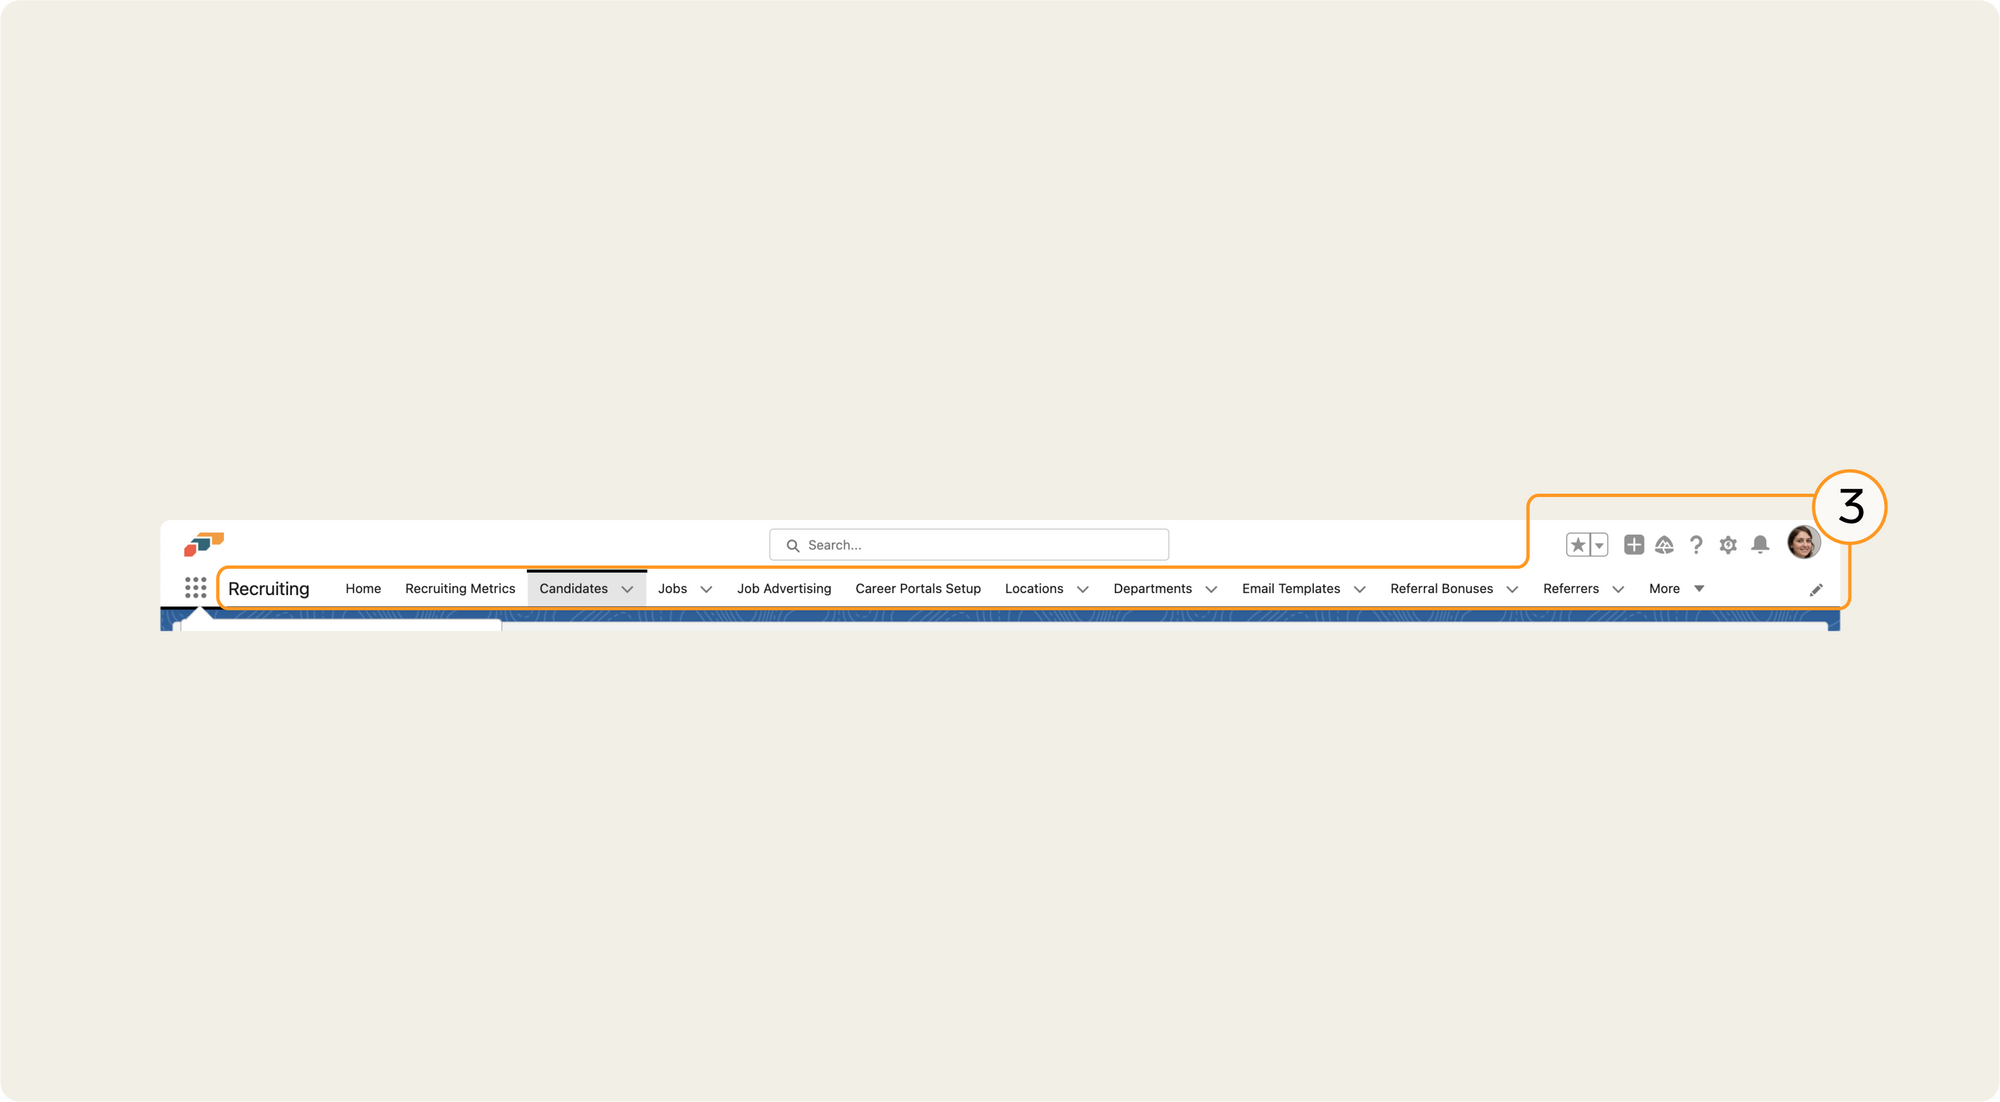
3. Navigation Bar
The Navigation Bar is located at the top of the screen. It typically contains the following elements including:
- flair Logo: The flair logo will appear on the top left corner of your screen when using the flair Recruiting and HR apps
- Favorites: Clicking on this tab allows users to manage their favorite items
- Global Actions: These are quick actions that allow users to create new records, such as a New Lead or Log a Call
- Guidance Center: This is Salesforce's in-platform learning library. It contains links to learning content suggested by Salesforce.
- Setup: The cog icon or gear-shaped icon is the Setup icon. The Setup menu provides access to the Salesforce administration settings and configuration options.
- Notifications: Here is where you will see alerts or messages that inform users about important events, updates, or actions related to their Salesforce org
- User Profile: This dropdown menu displays the user's name and profile picture, providing access to settings, personalization options, and a logout
- Pages: The Navigation Bar also includes pages or items of functionality. Depending on which flair app you are using you will see options such as: Attendance, Compensations, Engagement, Workflows, Staff & Docs, and much more.
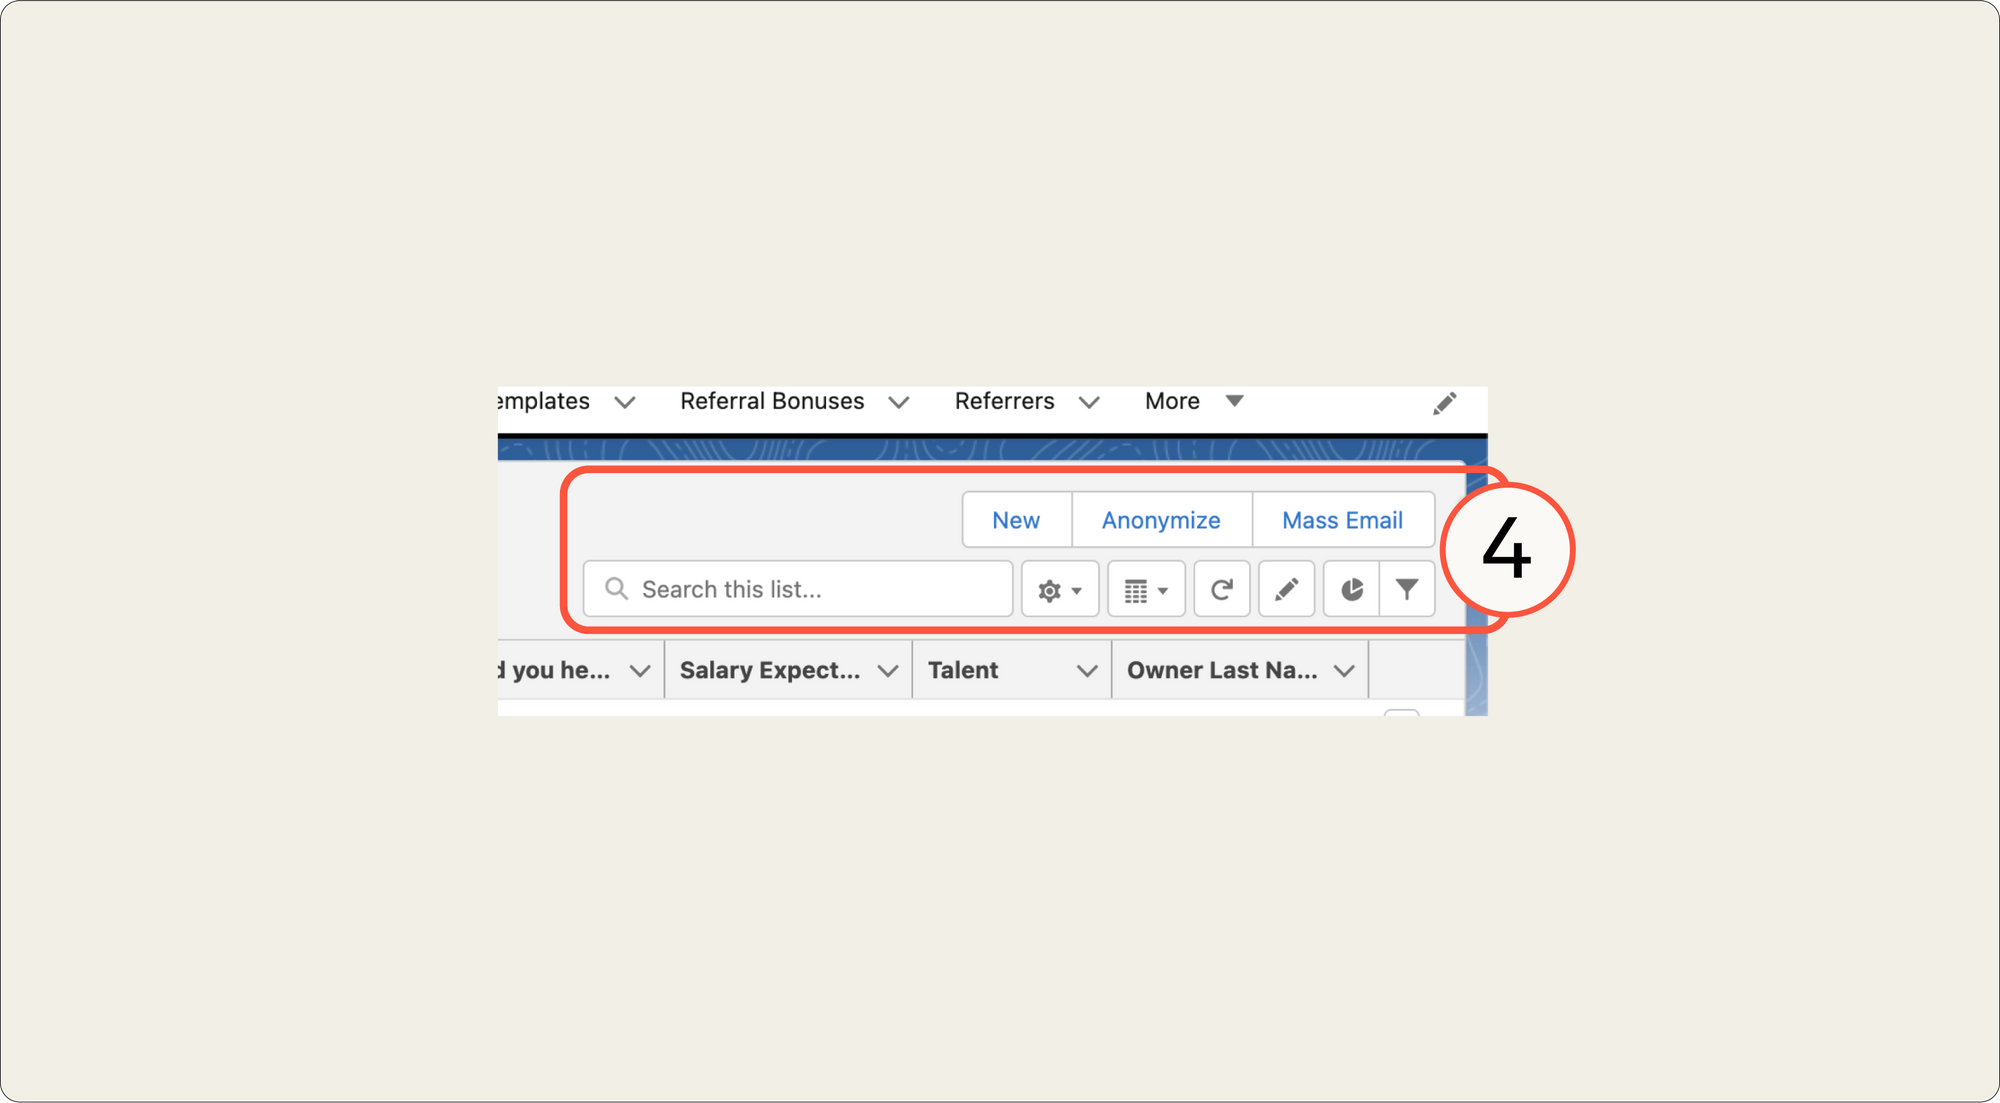
4. List View Controls Bar
This section includes controls for managing screen views and creating new components, including:
- Create New: A button that allows users to create a new record or component
- Search: A search bar to find specific records or names
- Edit: A button to amend a record or component
- Display As: This contains options for changing how records are displayed on a list. The available choices are:
- Table View: Displays the records in a tabular format, resembling a spreadsheet with rows and columns
- Kanban View: Displays the records as cards on a board, organized into columns
- Split View: Creates a split-screen, showing records side by side
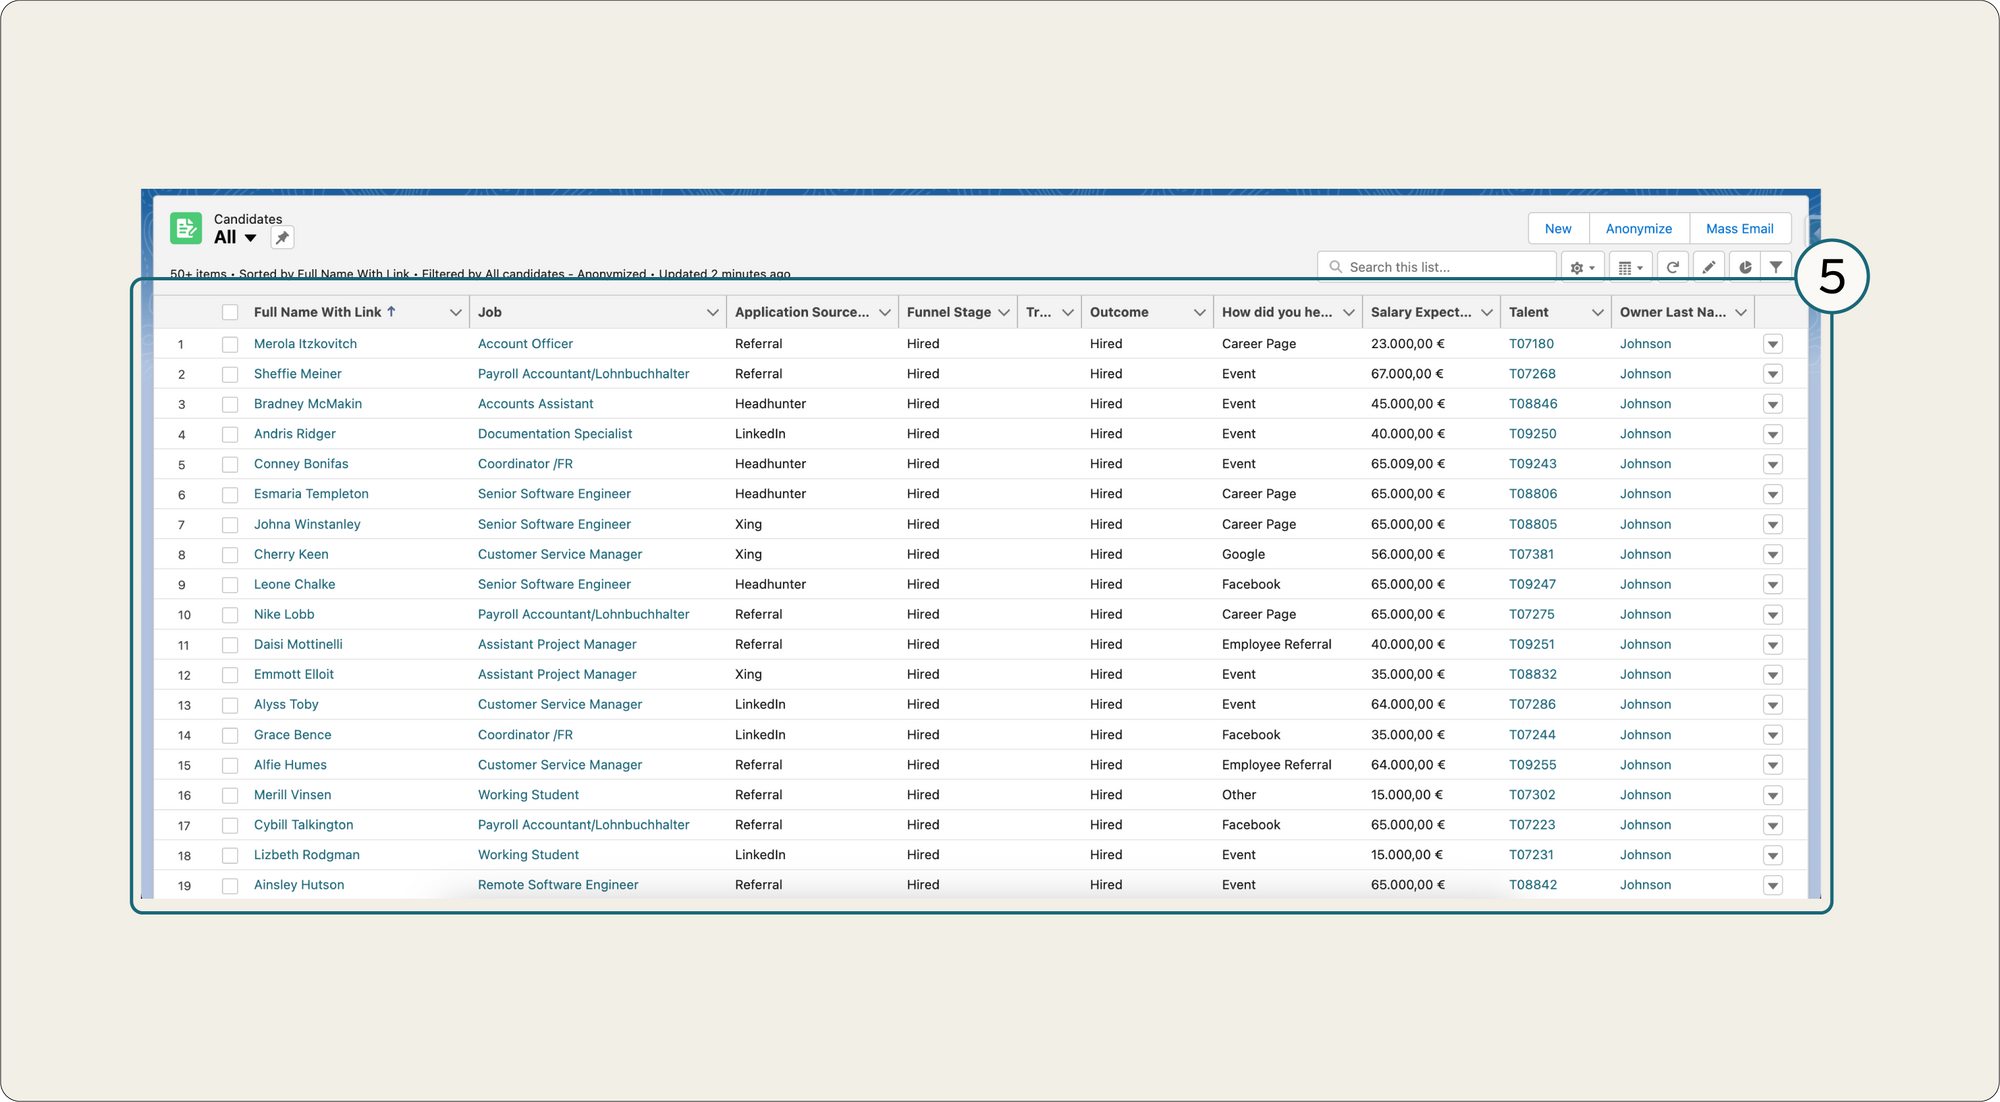
5. List View
The List View is the central section of the screen where your flair features and data are displayed. For example, when clicking on the Candidates tab in flair Recruiting, you will see a list of candidates that have applied for a job in the workspace area.
The List View area includes features such as:
- Tabs: Tabs represent different categories of information. For example, if you open a job in Recruiting app, the tabs include Candidates, Details, Publishing Details, Translations, Fields, and Advertising.
- Dashboards: Dashboards pull data from different objects, reports, or even external integrated sources, allowing users to create a comprehensive view of different data sets. For example, the flair Recruiting Metrics page can display information on the Number of Employees, Job Types, Contracts, Average Age, and more, in a dashboard.
NOTE: The layout and elements will vary depending on the Salesforce version you are using as well as customizations and user permissions.
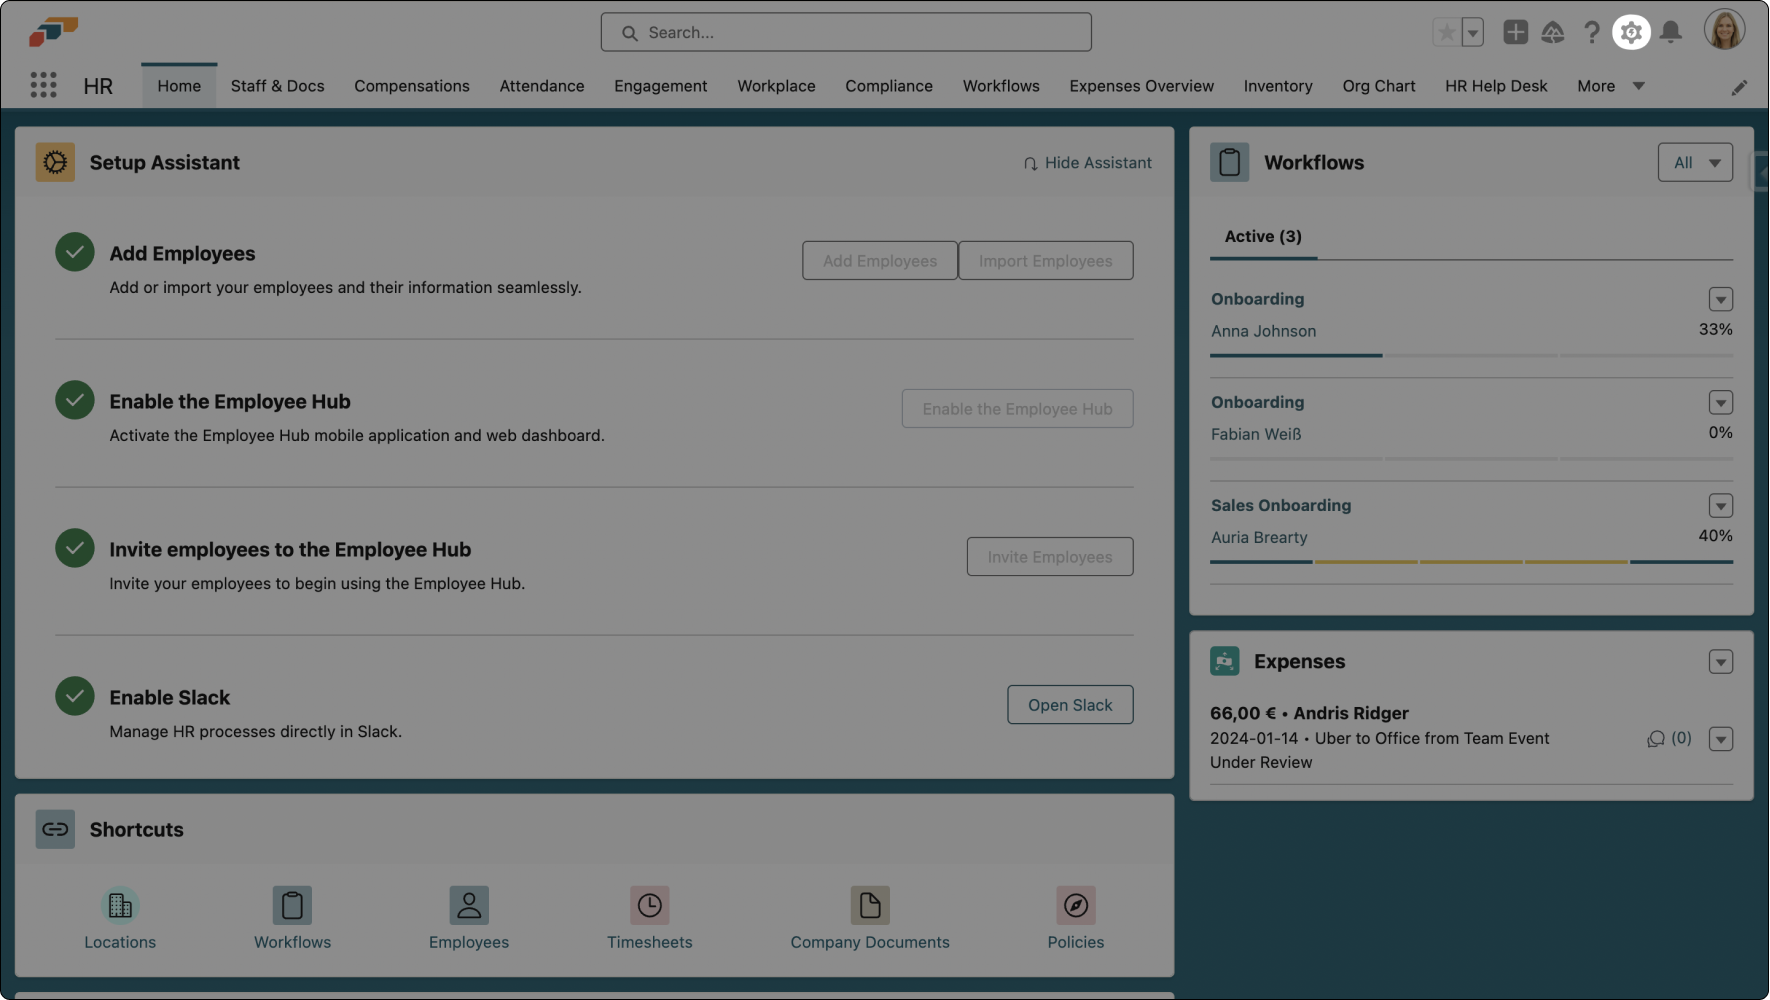
flair HR App Setup Assistant
Integration users can get staff started on the Employee Hub with the Setup Assistant.
Visit the HR app homepage in Salesforce and follow the prompts provided by the Setup Assistant.
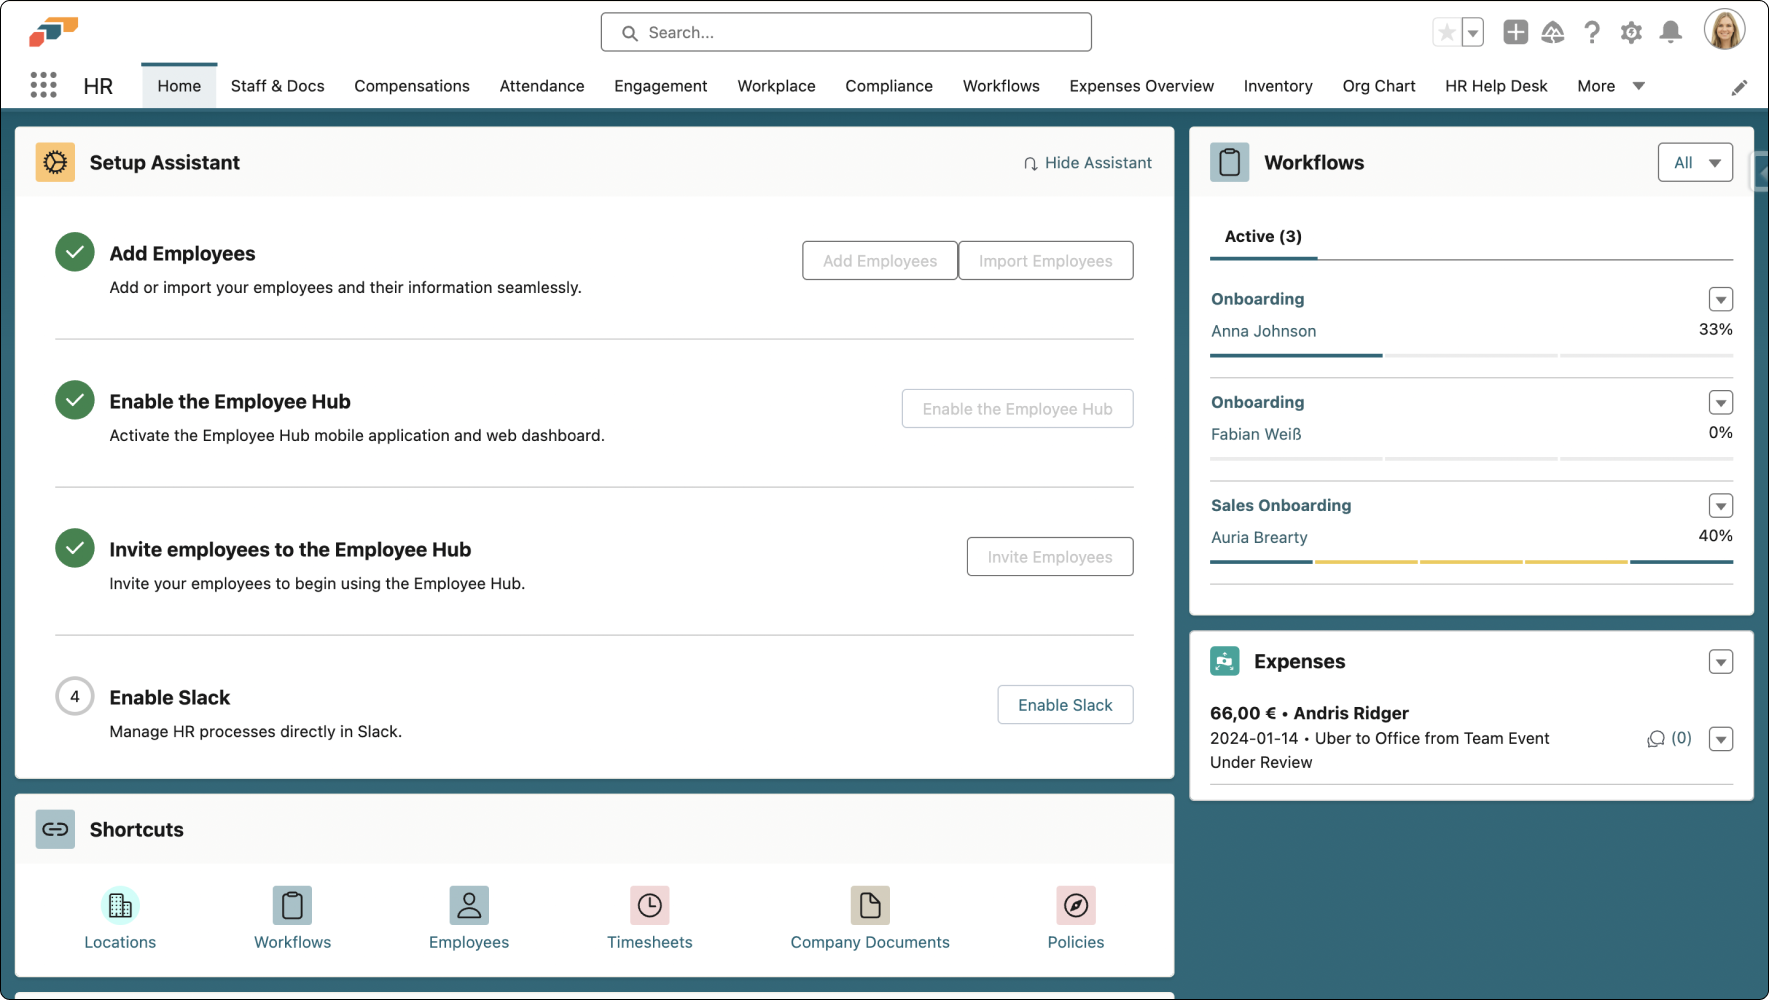
- Add Employees: Import employee details including email addresses on the Employee Hub platform.
- Enable the Employee Hub: Click Enable the Employee Hub to activate the Hub mobile app and web dashboard.
- Invite Employees: Click on the Invite Employees button to send email notifications to your staff. This informs them that they can now sign into the company's Employee Hub.
- Employees Sign In: Once employees receive the Employee Hub email invitation, they can follow the link provided to create a password and gain access to the company's Hub.
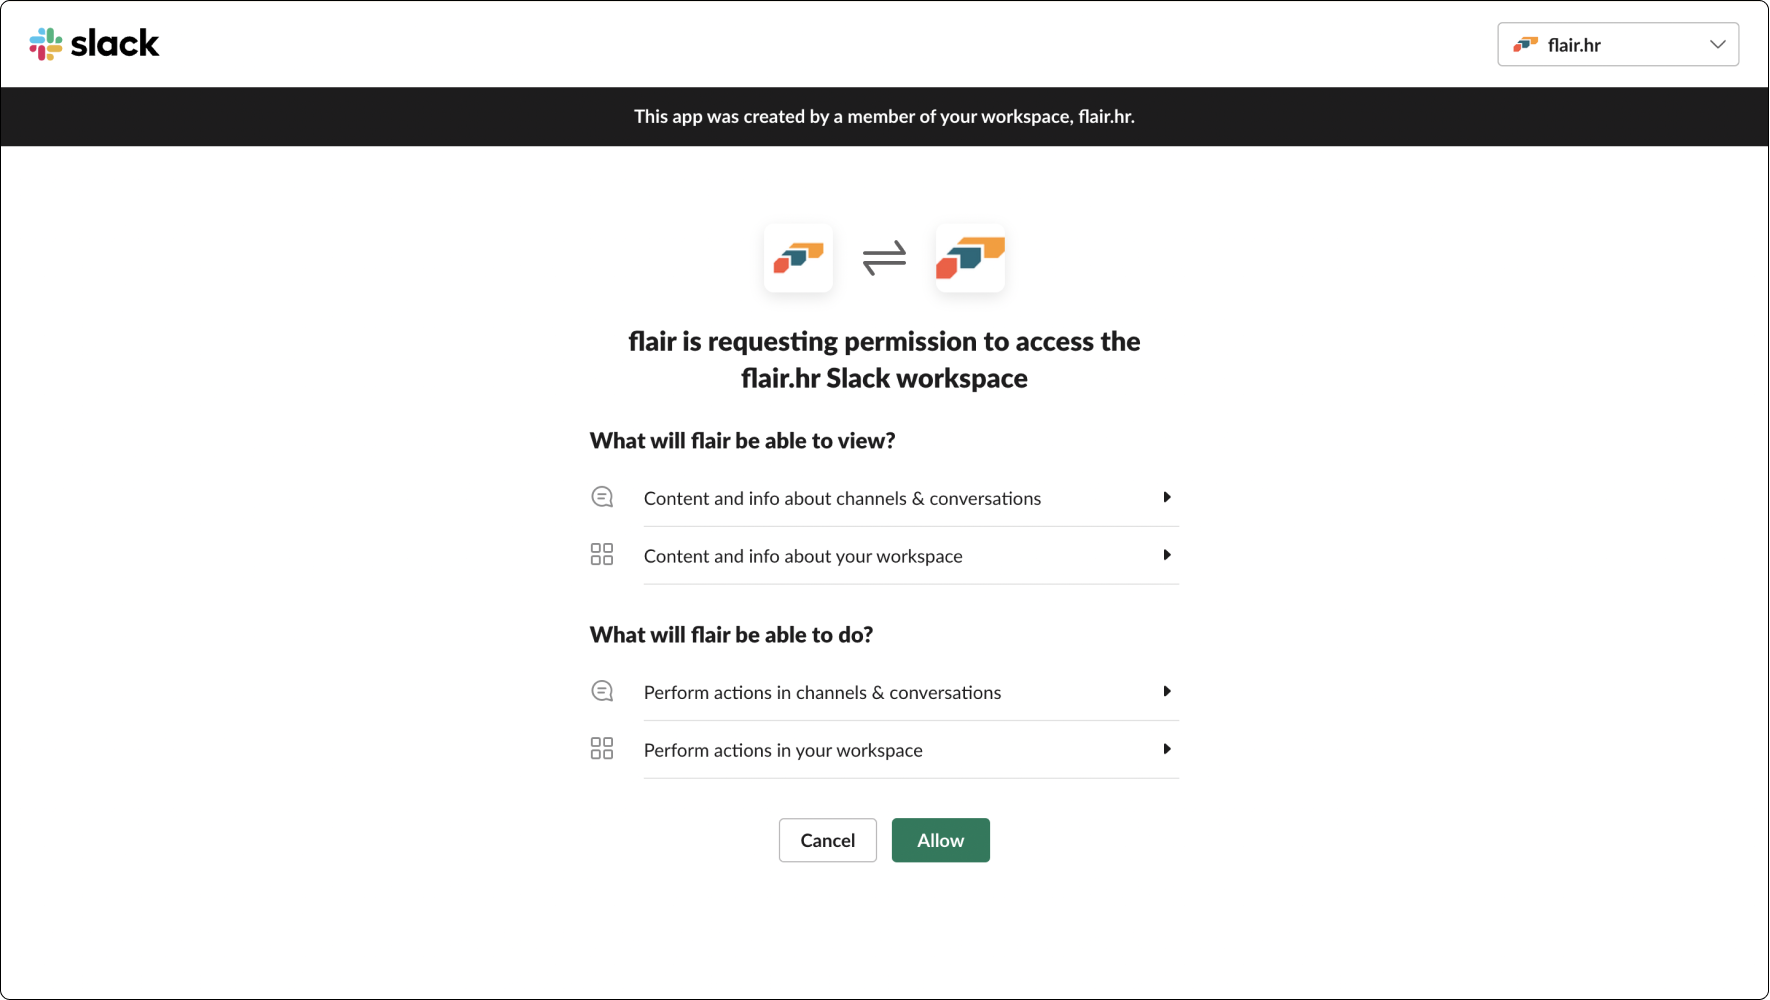
- Enable Slack: This Slack integration stage of the Setup Assistant is optional. It allows users to use the flair app on Slack, which includes features such as flair notifications, time tracking, and absence requests. Click Enable Slack and then select Allow to complete the integration.
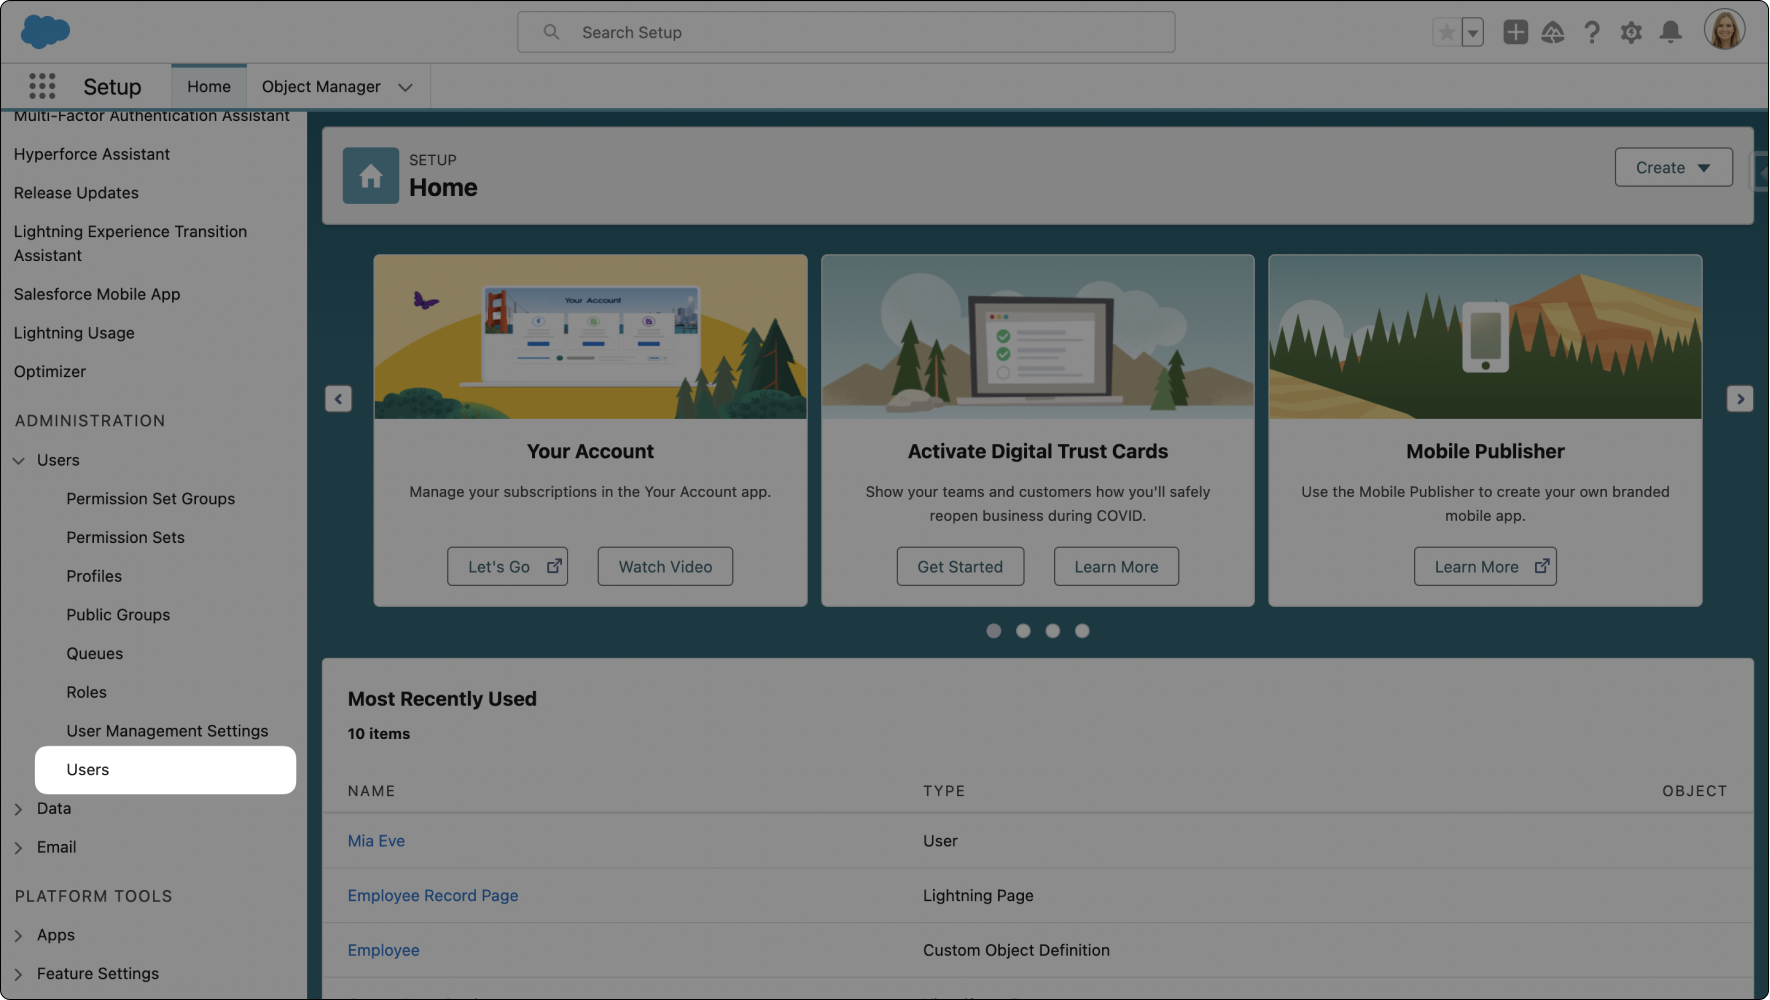
Assigning Integration User Role
- In Salesforce, click the cog icon at the top-right and select Setup.
- Navigate to Administration > Users > Users in the left-hand menu.
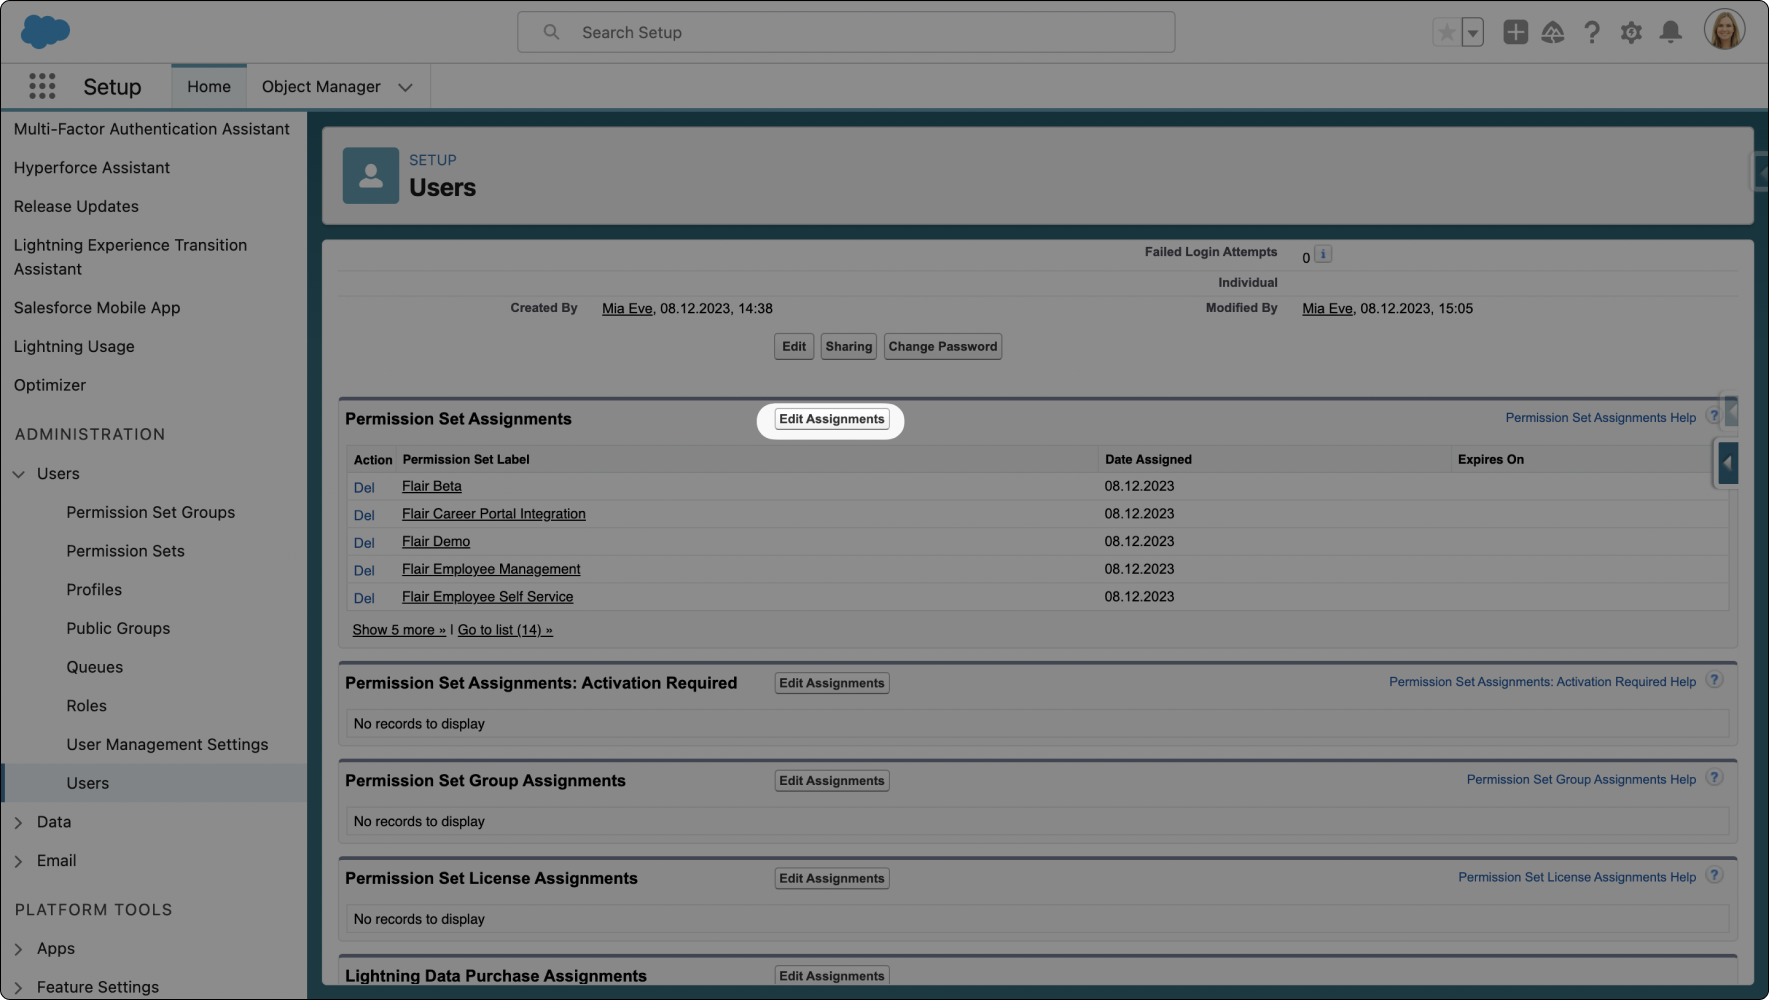
- Click on the desired user's name, scroll down to Permission Set Assignments, and click Edit Assignments.
- Add the Flair Hub to the Enabled Permission Sets and click Save.
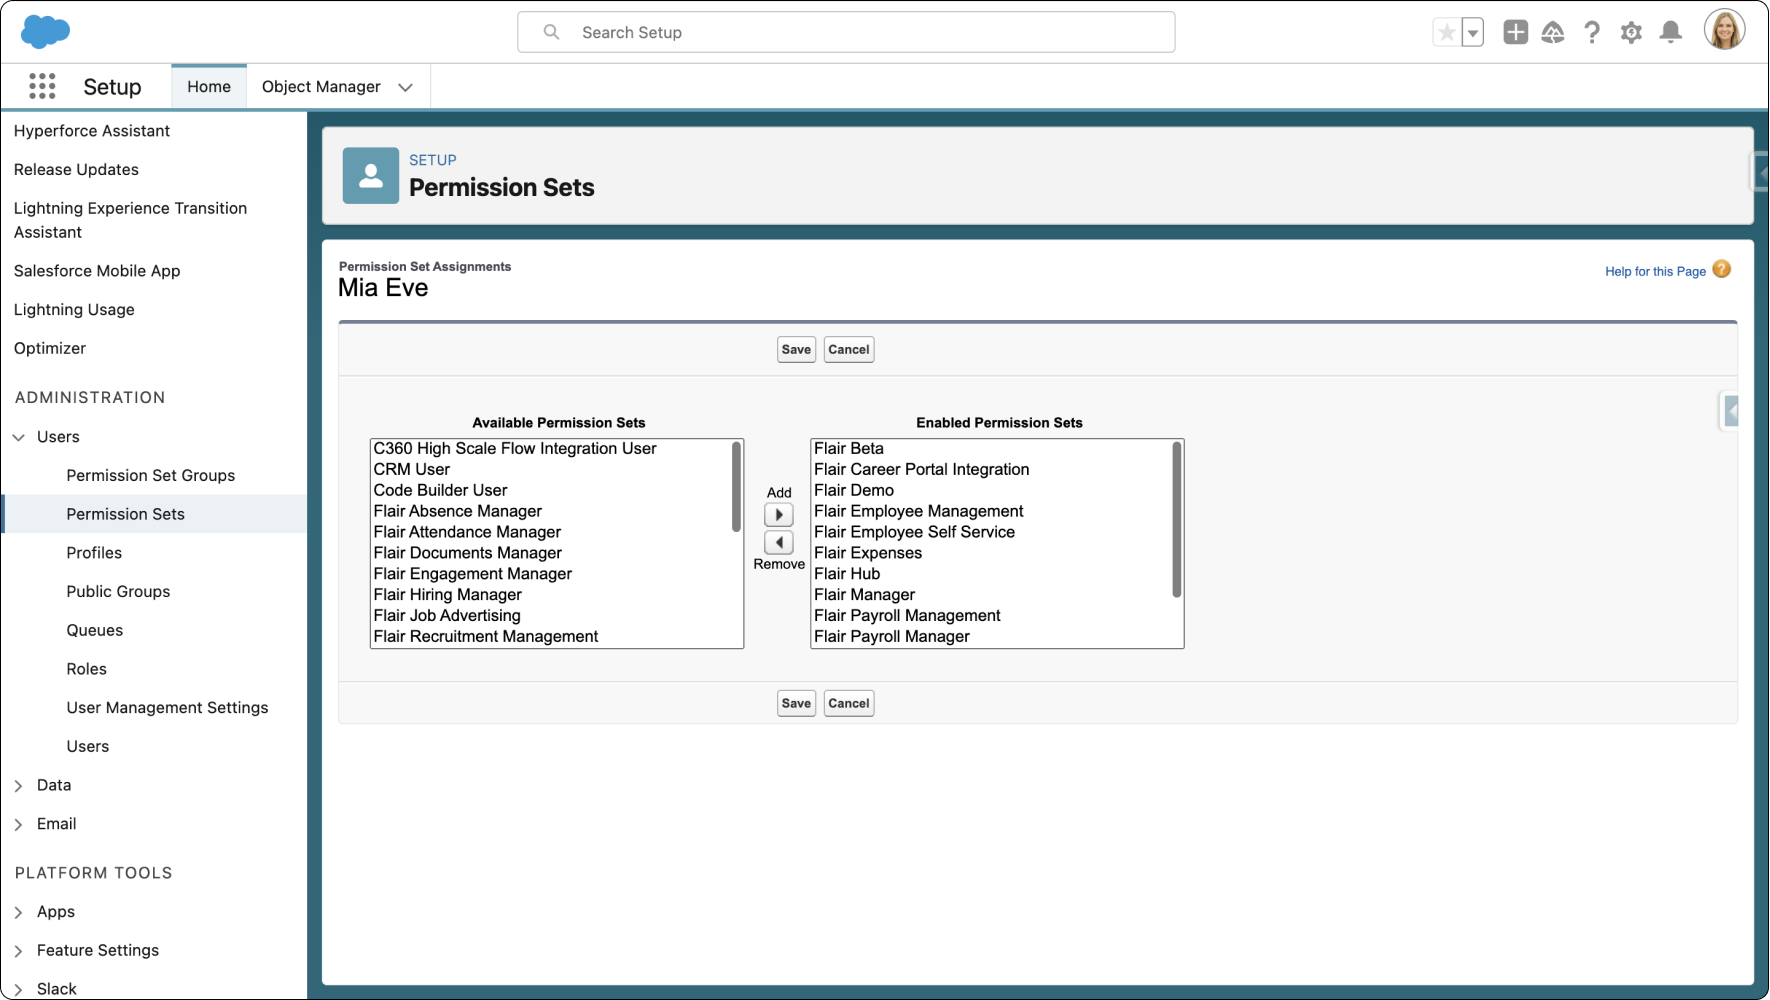
For more information on assigning a new integration user, visit our Developer Hub.