Configure accrual policies
Define how employees earn absence allowance, how flair prorates it, and when unused allowance carries over or expires.
HR Admins in Salesforce. Employees see their resulting allowances in the Employee Hub and mobile app.
Before you begin
- Create the relevant absence category.
- Assign active workloads to employees for every period covered by the policy.
Configure accrual and proration
- From the App Launcher (⋮⋮ grid icon), open Absence Settings.
- Select an absence category.
- In the Accrual Policies panel, click Create.
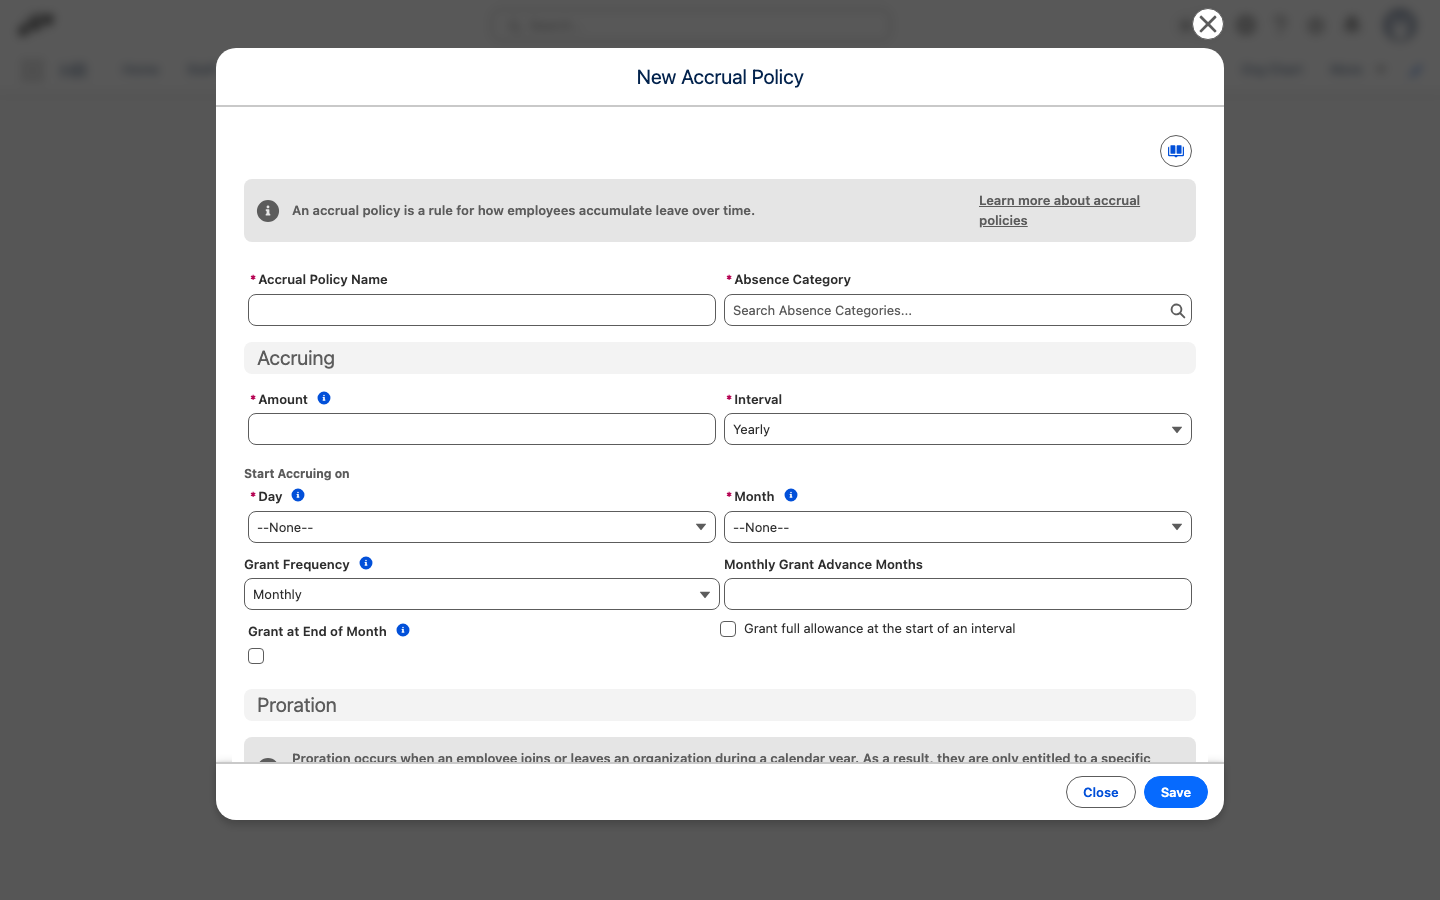
- Enter the policy settings.
- Configure the workload, period, and rounding options.
- Click Save.
- Assign the policy to employees.
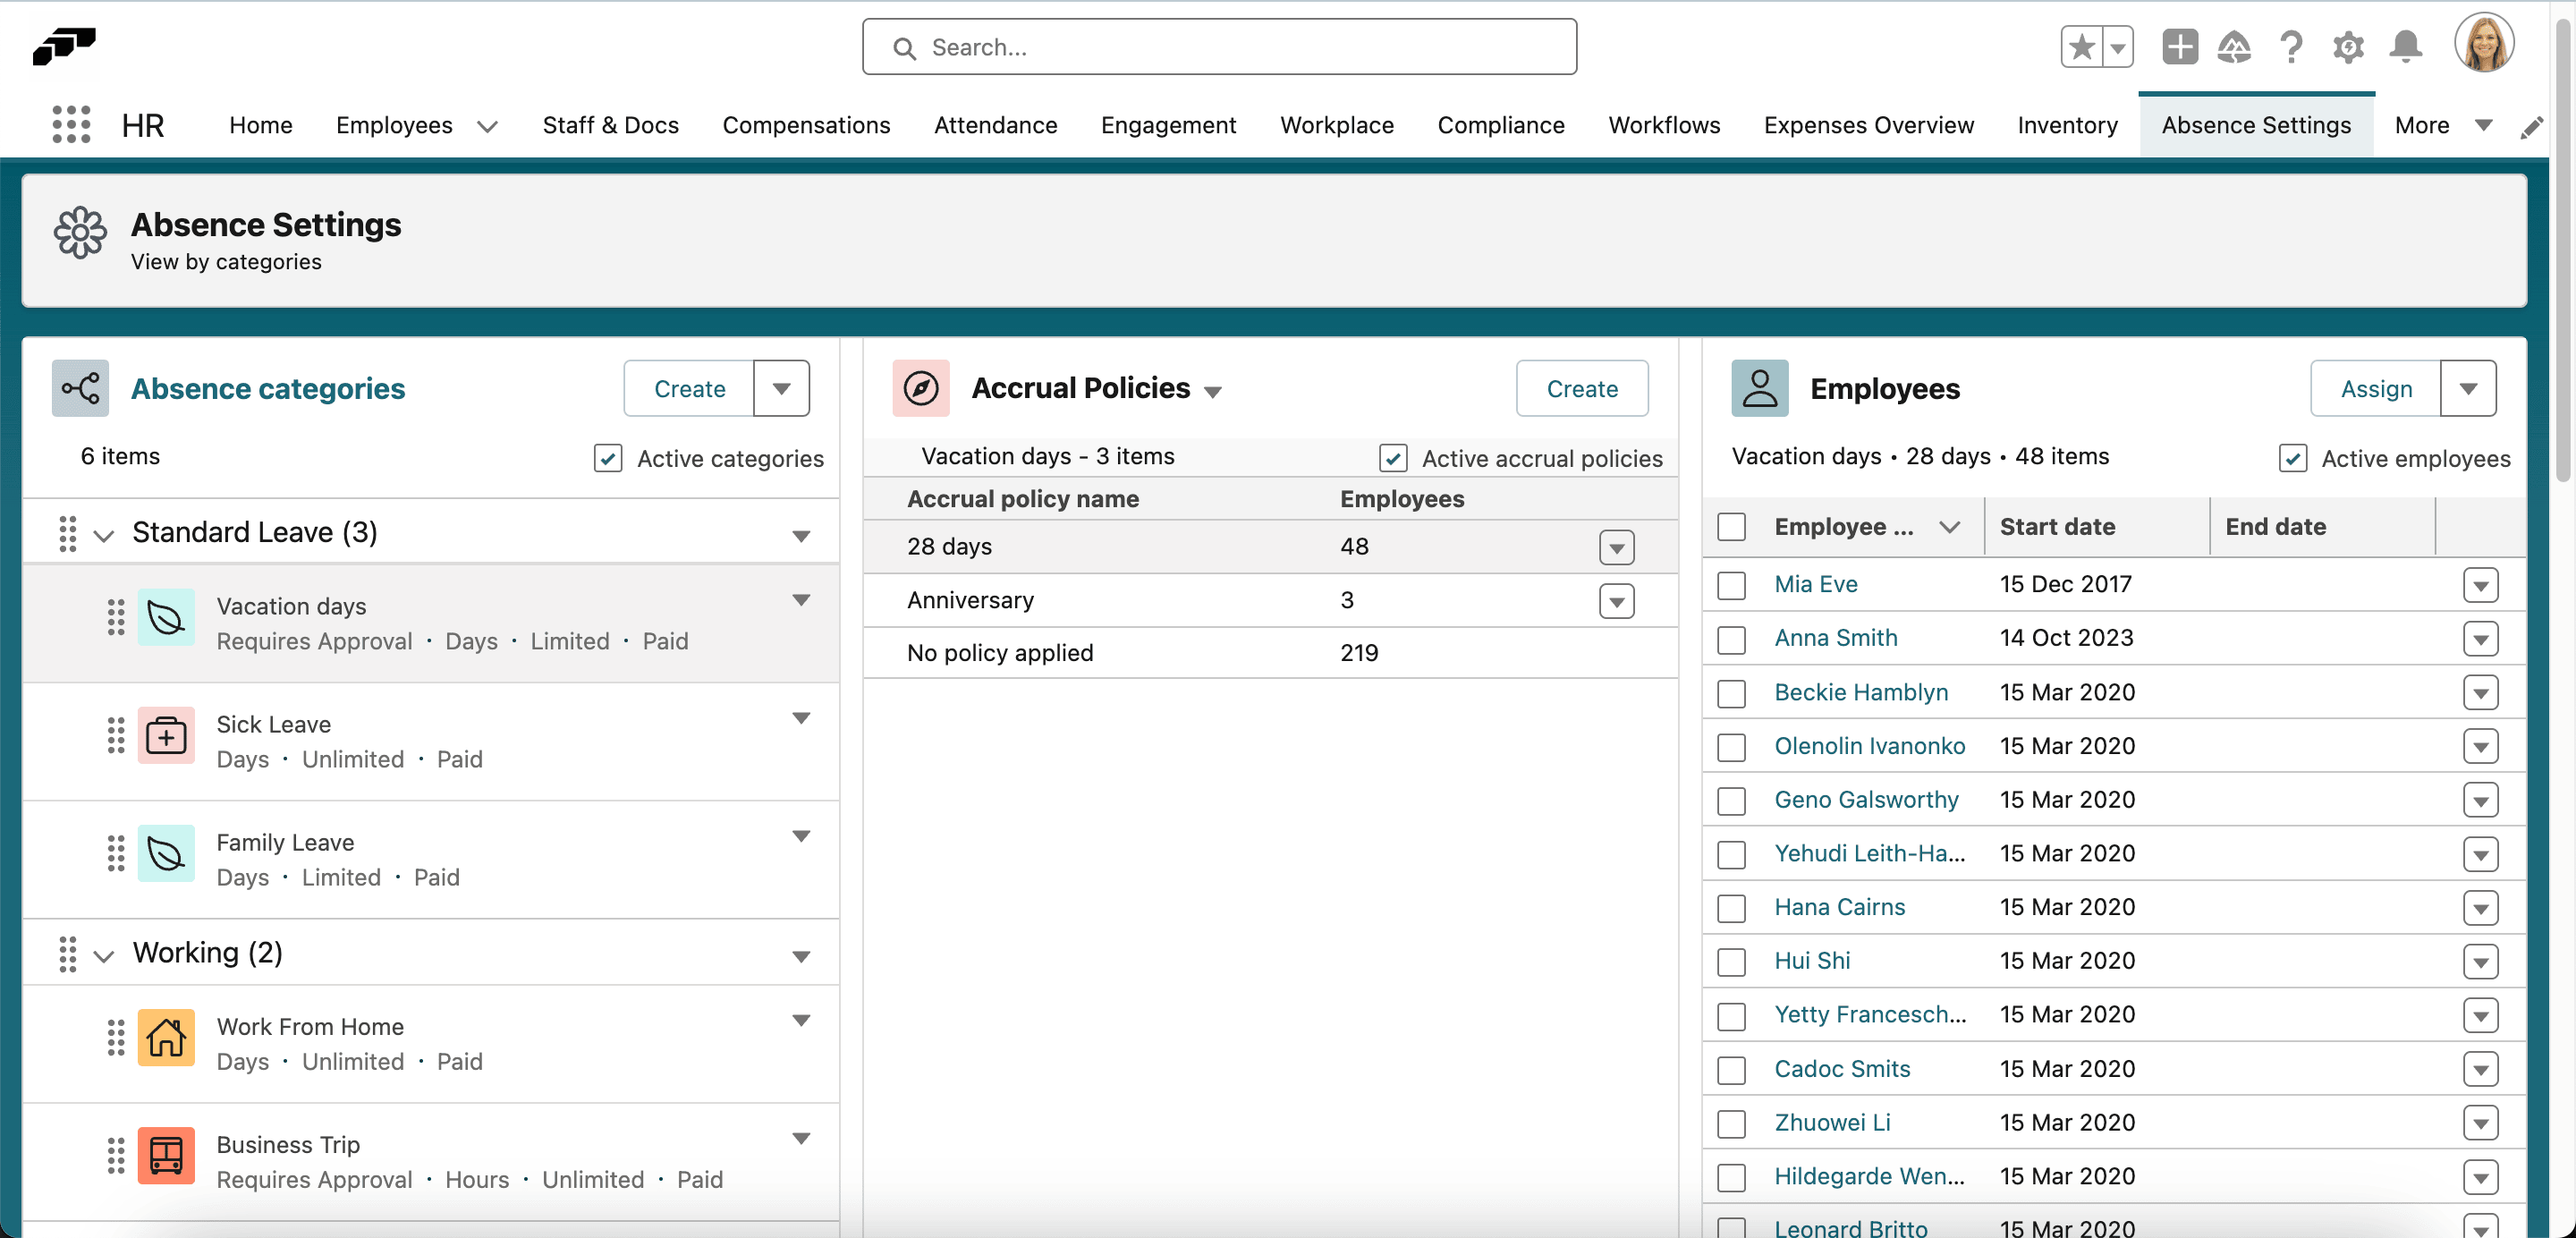
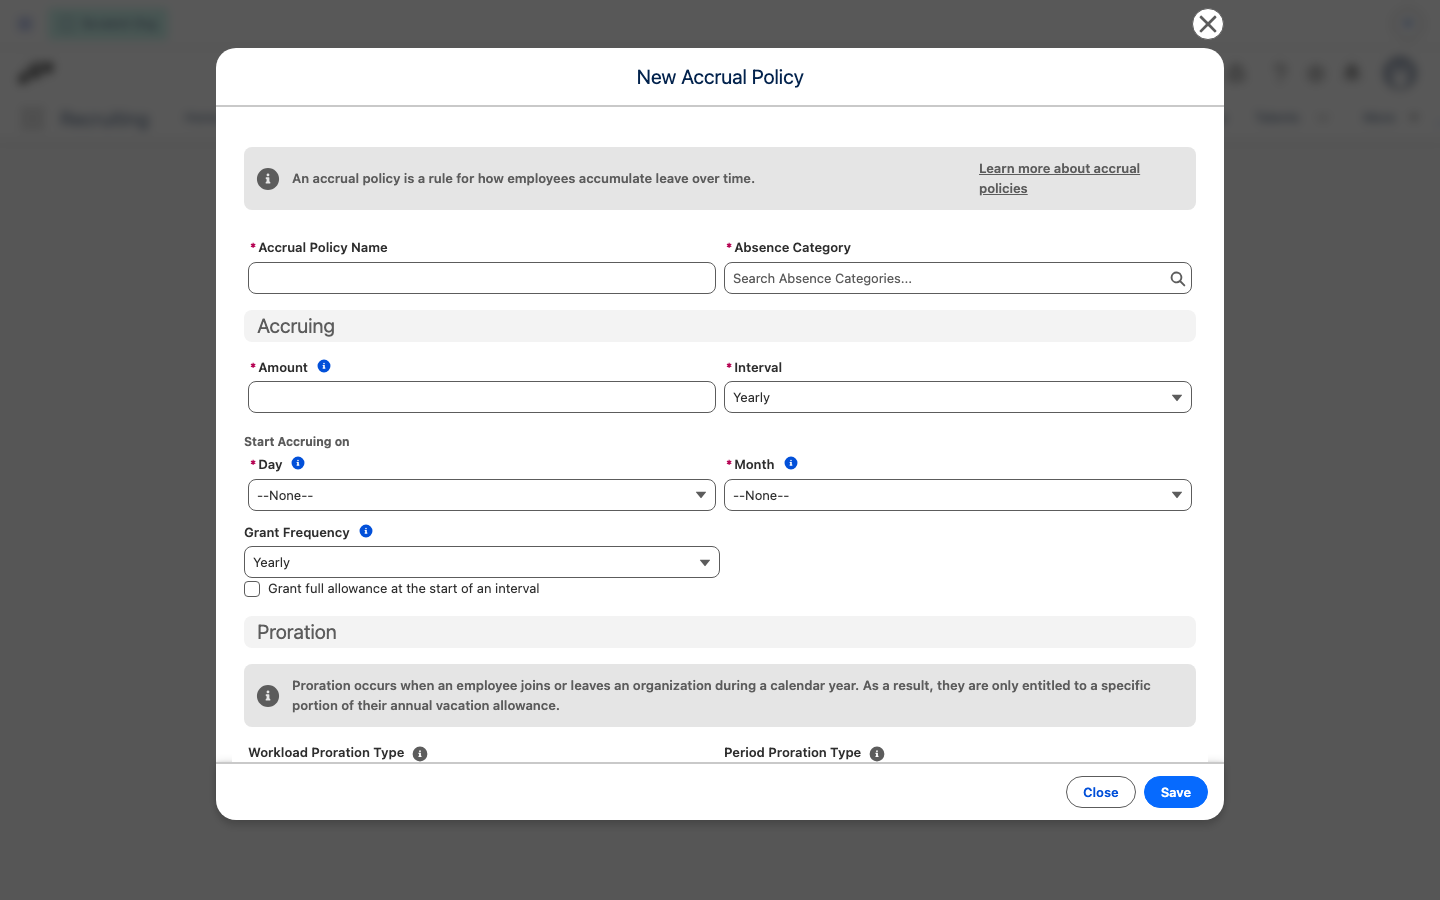
Use these settings to define the accrual:
| Setting | What it does |
|---|---|
| Accrual Policy Name | Identifies the policy. |
| Absence Category | Selects the absence type that receives the allowance. |
| Amount | Sets the number of days or hours earned in each interval. |
| Interval | Sets the earning period: Yearly, Monthly, Weekly, Employee’s work anniversary, or Per hours worked. Employee’s work anniversary counts from each employee's start date. Per hours worked earns allowance from tracked working time instead of from a calendar period — see Accrue allowance from hours worked. |
| Start Accruing On | Sets when accrual begins. Not shown for the Per hours worked interval. |
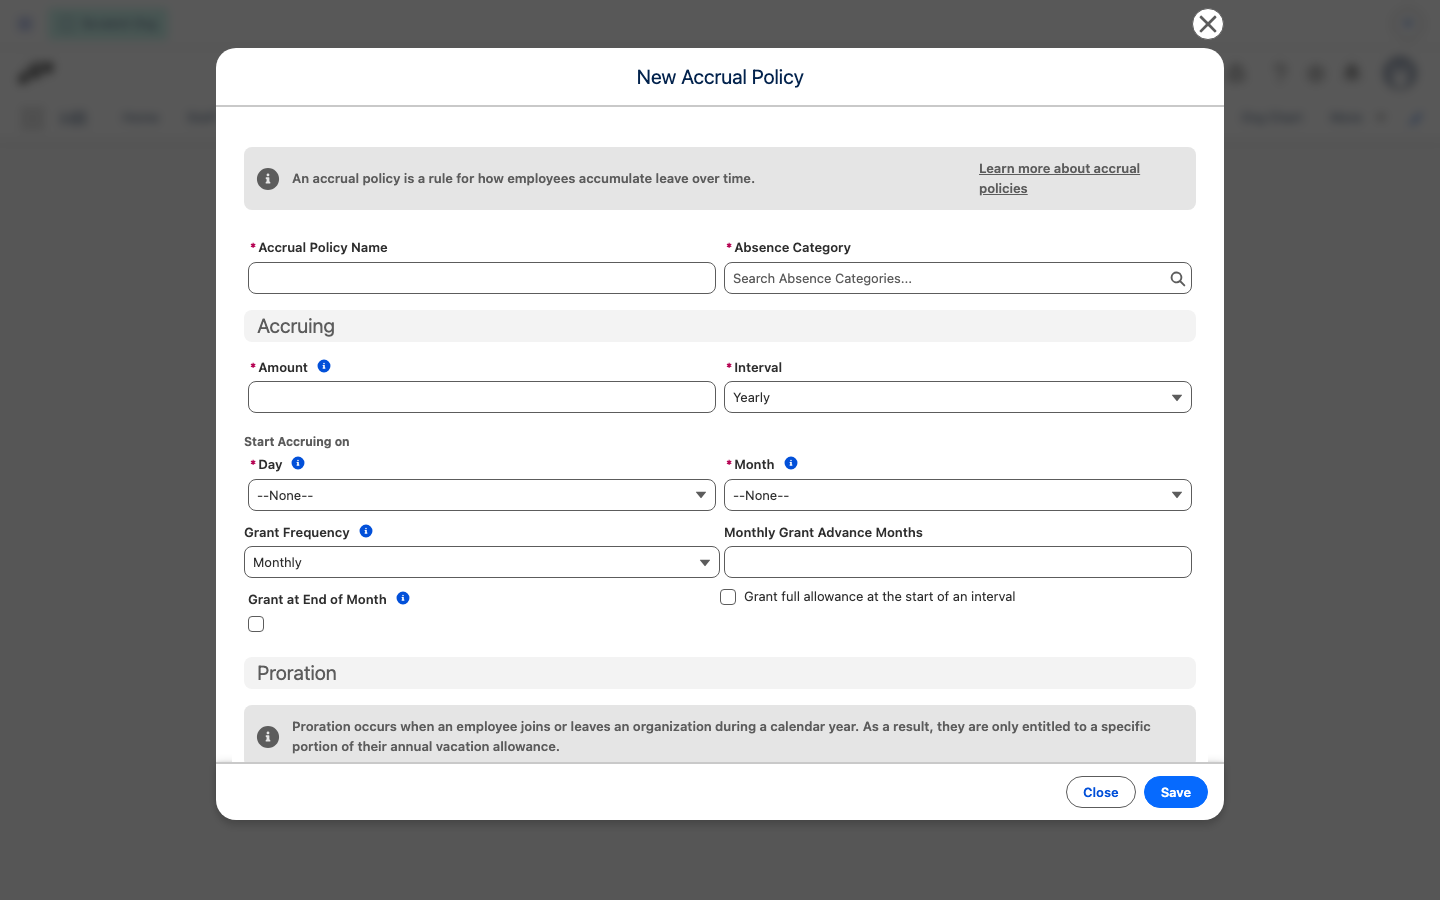
| Grant Frequency | For a Yearly or Employee’s work anniversary interval, choose Yearly to grant the allowance once per interval, or Monthly to grant one twelfth of the amount every month on the Start Accruing On day. For Employee’s work anniversary, the monthly grant falls on the day of the month of the employee's start date. To grant on the last day of each month instead, select Grant at End of Month. Not available together with Grant full allowance at the start of an interval. |
| Monthly Grant Advance Months | Appears when Grant Frequency is Monthly. Sets how far ahead flair grants monthly shares, counting the current month. Leave it empty or enter 1 to grant each share on its regular grant date. With 3, flair grants each share two months before its grant date. See Grant monthly shares in advance. |
| Grant at End of Month | Appears when Grant Frequency is Monthly. Grants each monthly share on the last day of the month instead of on the regular grant day. Cleared by default. See Grant monthly shares at the end of the month. |
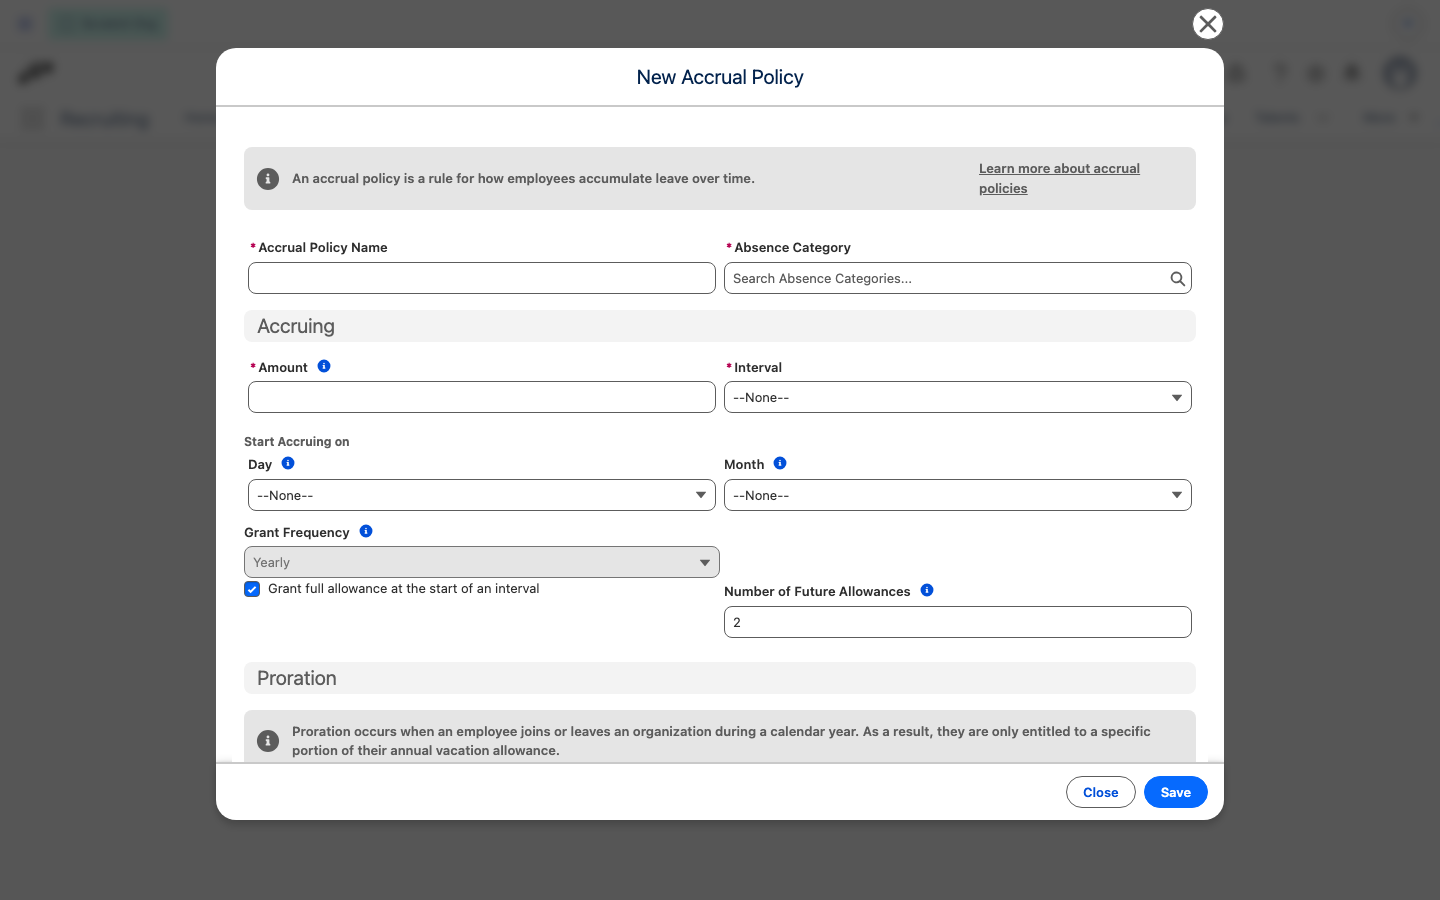
| Grant full allowance at the start of an interval | Grants the interval's allowance at once, at the start of the interval, and creates allowances for future intervals in advance. Not shown for the Per hours worked interval. |
| Number of Future Allowances | Appears when Grant full allowance at the start of an interval is selected. Sets how many future intervals flair creates allowances for in advance, in addition to the current interval. The default is 2. |
With Monthly grant frequency, flair grants one twelfth of the yearly amount each month, rounded to two decimal places, and does not apply the policy's Period Proration Type setting. The exception is Grant at End of Month with Prorate by days, see Grant monthly shares at the end of the month. Because each month rounds independently, the total granted across the year can differ slightly from the policy's yearly amount.
Grant monthly shares in advance
With Monthly grant frequency, Monthly Grant Advance Months lets employees book time off against shares they haven't earned yet. flair grants the shares ahead of their regular grant dates:
- Empty or
1: flair grants each share on its regular grant date. This is the default. 2or more: flair grants each share that many months minus one ahead of its grant date. With3, the shares for the next two months are granted as soon as the current month's share is. Values below1count as1.
The advance never crosses the end of the accrual period. flair stops at the period's full allowance and doesn't grant into a period that hasn't started. For example, on a calendar-year policy with a 24-day amount granted on the 1st of each month and a value of 3, an employee holds 6 days on January 1, and each month adds the next 2-day share until the period's 24 days are granted in October.
Setting the value on an existing policy changes the allowances of assigned employees on the next accrual run.
Grant monthly shares at the end of the month
With Monthly grant frequency, flair grants each share on the regular grant day: the Start Accruing On day, or for Employee’s work anniversary the day of the month of the employee's start date. Select Grant at End of Month to grant each share on the last day of the month instead. For example, an employee who starts on September 15 receives the first share on September 30, then on October 31, and so on.
How the first and last month of the accrual period are granted depends on Period Proration Type:
- Prorate by days: flair prorates the partial months at both ends of the period by days. For an anniversary year starting September 15, the share on September 30 covers 16 of 30 days, full shares follow from October 31 to August 31, and the rest of September is granted on September 14, the last day of the anniversary year. Over a full year, the shares add up to the policy's amount.
- Any other value: flair grants 12 full shares, from September 30 to August 31 in the same example.
Grant at End of Month works together with Monthly Grant Advance Months. With an advance, the month-end grant also covers the shares of the following months.
Choose a Workload Proration Type based on how workload affects the allowance:
| Value | Result |
|---|---|
| Do not prorate based on workload | Full-time and part-time employees receive the same allowance. |
| Prorate based on workload | flair uses the employee's working days per week. |
| Prorate based on FTE percentage | flair uses the employee's full-time equivalent percentage. |
Choose a Period Proration Type to control partial periods:
| Value | Result |
|---|---|
| Do not prorate by period | The employee receives the full interval allowance. |
| Prorate by days | flair prorates from the employee's start date by day. |
| Prorate by months | flair prorates from the employee's start date by month. |
| Prorate by full months | flair excludes an incomplete starting month. |
Use Rounding Type to round the final result or each workload segment. Use Rounding Mode to keep the value, round to a whole number, or round to a half value.
Common settings in Germany, Austria, and Switzerland use working-day proration with Prorate by days. A common United Kingdom configuration combines working-day proration with Prorate by months. Confirm the applicable rules for your organization.
Accrue allowance from hours worked
Select the Per hours worked interval when employees should earn allowance from the time they actually track — for example 2 hours of paid time off for every 30 hours worked, the model behind US and California sick-leave rules.
The interval requires an absence category whose Type is hourly, and a rate. flair rejects the policy on save otherwise.
- In the Accrual Policies panel, click Create.
- In Interval, select Per hours worked.
- Under Accrual year starts on, select the day and month that begin the yearly period in which worked hours are counted and the caps apply. Most companies use 1 January.
- In Amount, enter the allowance earned each time the employee reaches the rate.
- In Accrue Per Hours Worked, enter how many worked hours earn that amount.
- Optional: In Maximum Amount Per Period, enter the largest amount that can accrue in one accrual year. Leave it empty for no cap.
- Optional: In Maximum Balance, enter the unused balance, carryover included, at which accrual pauses. Accrual resumes as the employee takes time off. Leave it empty for no cap.
- Optional: Select Only Approved Timesheets to count hours from approved timesheets only.
- Click Save.
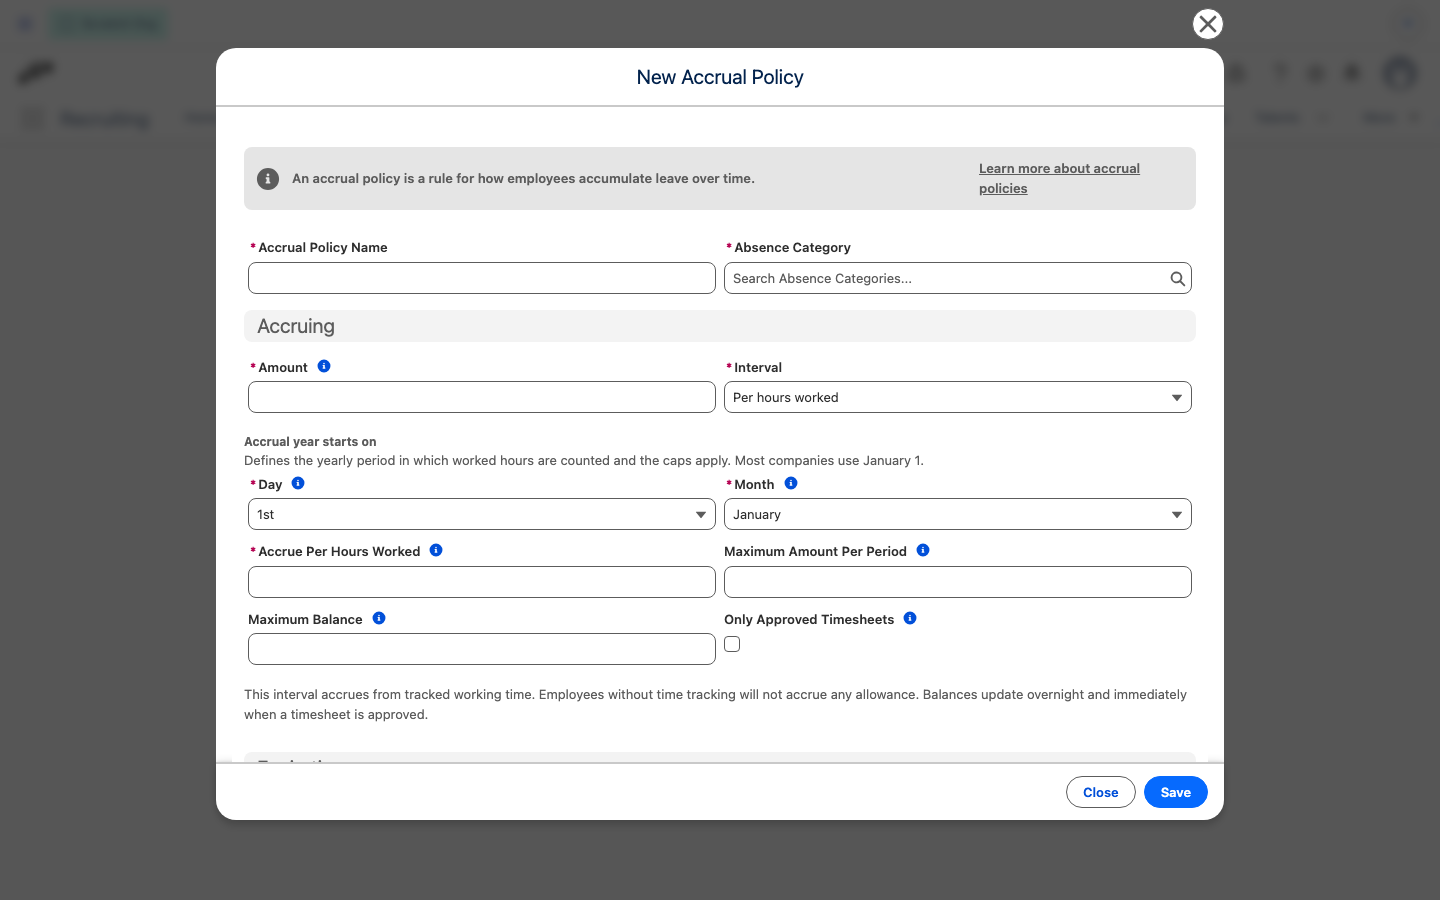
flair grants the amount once for each whole multiple of the rate: worked hours divided by Accrue Per Hours Worked, rounded down, multiplied by Amount. Worked hours come from the employee's tracked working time, so an employee without time tracking accrues nothing. Balances recalculate every night and again as soon as a timesheet's approval status changes.
Proration, rounding, Grant full allowance at the start of an interval, Grant Frequency, and Amount Change Rules do not apply to this interval, and the form hides them. Part-time employees prorate themselves through the hours they work.
Configure expiration and carryover
- In the accrual policy, open the expiration settings.
- In Accrued days expire, select an expiration method.
- For carryover, enter the amount when the method requires a limit.
- Select the expiration day and month.
- Select the Year Offset.
- Optional: For With unlimited carryover or With regulated carryover, select Use Carryover First. Absences booked in the next accrual period are then deducted first from the days this period carries over (up to the carryover limit), and only then from the next period's allowance.
- Click Save.
The available expiration methods are:
| Method | Result |
|---|---|
| Never | Allowance does not expire. |
| At the end of an accrual interval | Allowance expires at the interval boundary, with an optional offset. |
| With unlimited carryover | All remaining allowance moves to the next period. |
| With regulated carryover | Only the configured amount moves to the next period. |
Year Offset is relative to the year in which the accrual period ends. For carryover, Same year expires allowance in that year, Next year in the following year, and later values extend it further. For At the end of an accrual interval, the offset starts with Next year, which means the interval boundary.
Use Same year when the leave year crosses a calendar-year boundary but carryover must expire before that leave year ends. Later offsets can keep allowance for up to four additional years.
With an Employee’s work anniversary interval, each employee's accrual period ends on their anniversary date. The Year Offset is calculated from that employee-specific boundary.
Increase allowance over time
- In the accrual policy, open Amount Change Rules.
- Select Change leave allowance based on employee's age or years of service.
- Optional: Select Additional leave is used first.
- If the policy's Interval is Yearly, optionally select Grant in the Next Accrual Period. This grants the additional allowance from a years-of-service rule in the accrual period after the one containing the employee's anniversary, instead of the period the anniversary falls in. It works independently of Additional leave is used first.
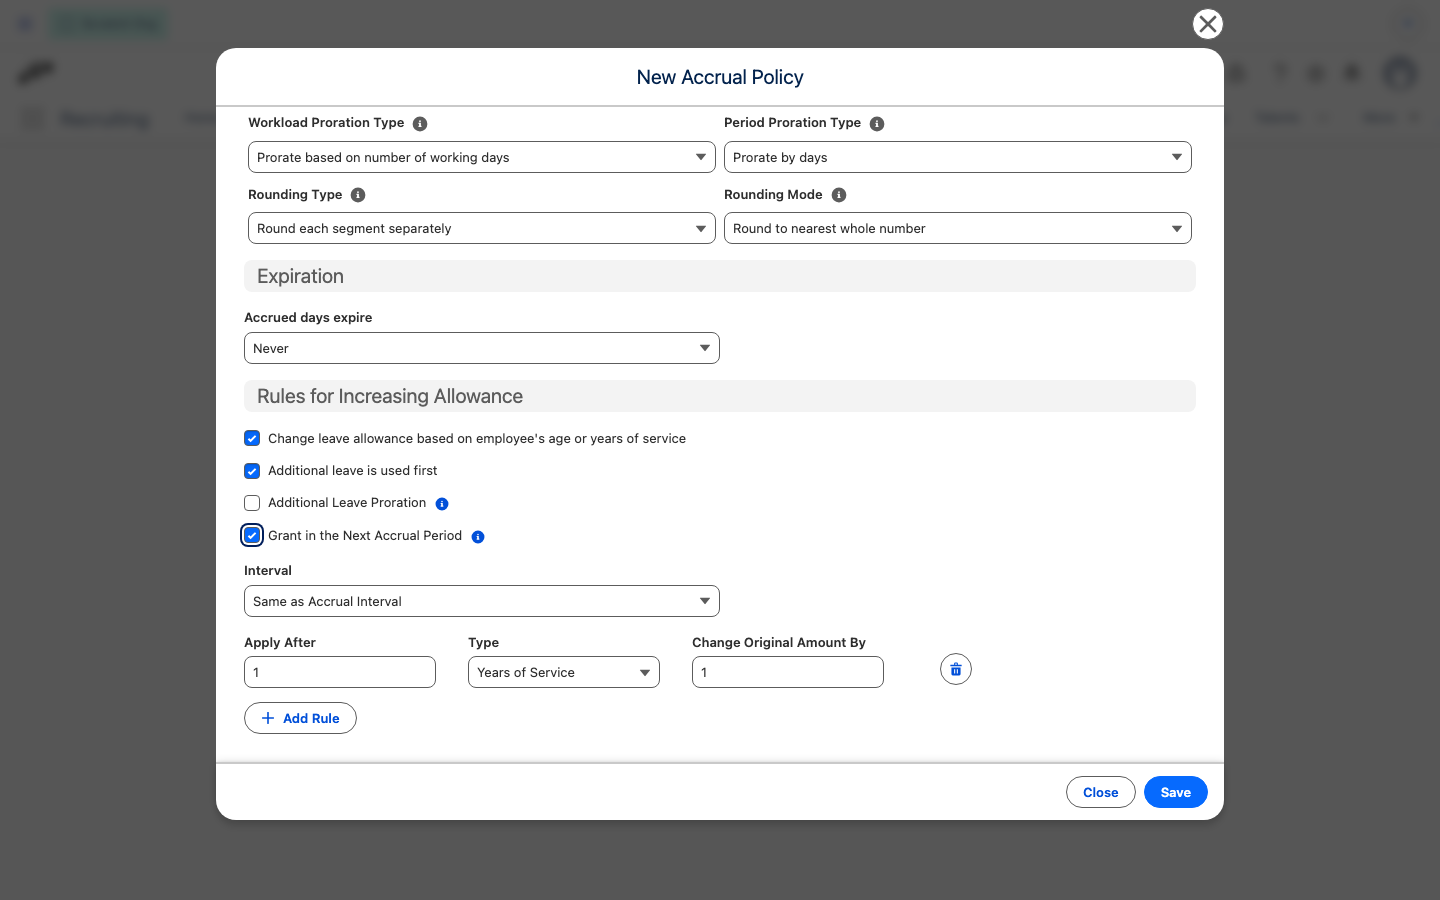
- Select the interval for additional allowance.
- In Apply After, enter the age, service, or custom-field threshold.
- In Type, select the basis for the rule.
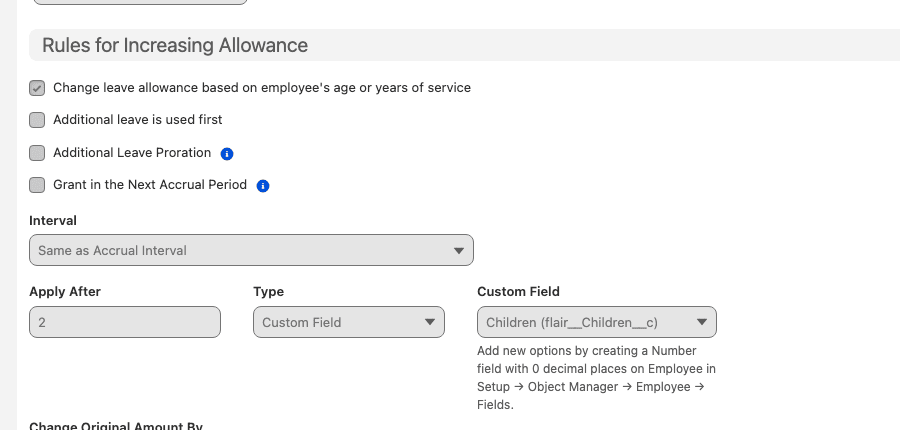
- If you select Custom Field, choose an Employee Number field with zero decimal places.
- In Change Original Amount By, enter the adjustment.
- To add another threshold, click Add Rule.
- Click Save.
Rules do not stack. Each Change Original Amount By value is measured against the policy's original amount.
To add an eligible field, create a Number field with zero decimal places under Setup → Object Manager → Employee → Fields.
Edit an active accrual policy
You can edit an accrual policy even after it has been assigned to employees. An accrual policy has the status Draft until it is assigned, Calculating while its allowances are recalculated, and Live afterwards. If you change allowance-relevant settings on an assigned policy, flair asks for confirmation and recalculates all affected allowances in the background, including past accrual periods.
- From the App Launcher (⋮⋮ grid icon), open Absence Settings.
- Select an absence category.
- In the Accrual Policies panel, open the row menu of the policy and select Edit.
- Update the settings and click Save.
- In the Recalculate allowances? dialog, confirm the recalculation.
While recalculation runs:
- The policy status changes to Calculating, and editing is temporarily locked.
- The policy record page displays a calculation status card with progress.
- In Absence Settings, a status indicator and a banner above the employees show the calculation progress.
Once processing finishes, the policy status returns to Live with updated allowances across all assignments.
You can't change the absence category of an assigned policy. Recalculating an assigned policy recalculates past periods as well as the current period and redistributes the employees' absences, so balances of previous years can change. Review employee balances after the calculation finishes.
Replace an outdated accrual policy
Follow this order so employee balances transfer to the replacement policy.
- On Absence Settings, select the absence category and old accrual policy.
- In the Employees panel, select all assigned employees.
- Open Show menu, click Delete, and confirm the assignment deletion.
- In the Accrual Policies panel, click Create.
- Configure the replacement policy, and then click Save.
- In the Employees panel, click Assign.
- Use the same start date as the previous policy.
- Click Select Employees.
- Select the affected employees, and then click Assign.
- After the balances transfer, archive the old accrual policy.
End an employee accrual policy
Setting an end date preserves policy history and is the recommended method.
- On Absence Settings, select the Employee Absence Category and accrual policy.
- Select one or more employees.
- From the assignment menu, click Edit.
- Select an End date.
- Click Save.
- After processing finishes, click Close.
To remove an assignment instead, select the employee, open the assignment menu, click Delete, and confirm the deletion. You can also disable the category on the employee's Absence Categories list.
Adjust a policy with Salesforce Inspector Reloaded
You can edit live policies in the interface, as described in Edit an active accrual policy. Use this method only when the standard interface cannot make the required change.
This procedure disables flair triggers temporarily. Record the existing setting and restore the triggers immediately after the edit.
- In Salesforce Setup, search for
Custom Settings. - Open Flair Migration Settings.
- Click Manage.
- Click New, and then enter the value that disables the required triggers.
- In Salesforce Inspector Reloaded, edit the accrual policy fields.
- Return to Flair Migration Settings.
- Delete the temporary value. The flair triggers are enabled again.
Troubleshooting
Allowances are not generated or have the wrong amount
Check these settings before triggering a recalculation:
- The accrual policy has no unintended end date.
- Carryover and expiry settings match the policy.
- The employee's Employment Term has no unintended end date.
- The employee has an active workload for the relevant year.
- The correct accrual policy is assigned to the employee.
- The absence category's workload and deduction settings match the policy.
- The location or Public Holiday Calendar contains the relevant holidays.
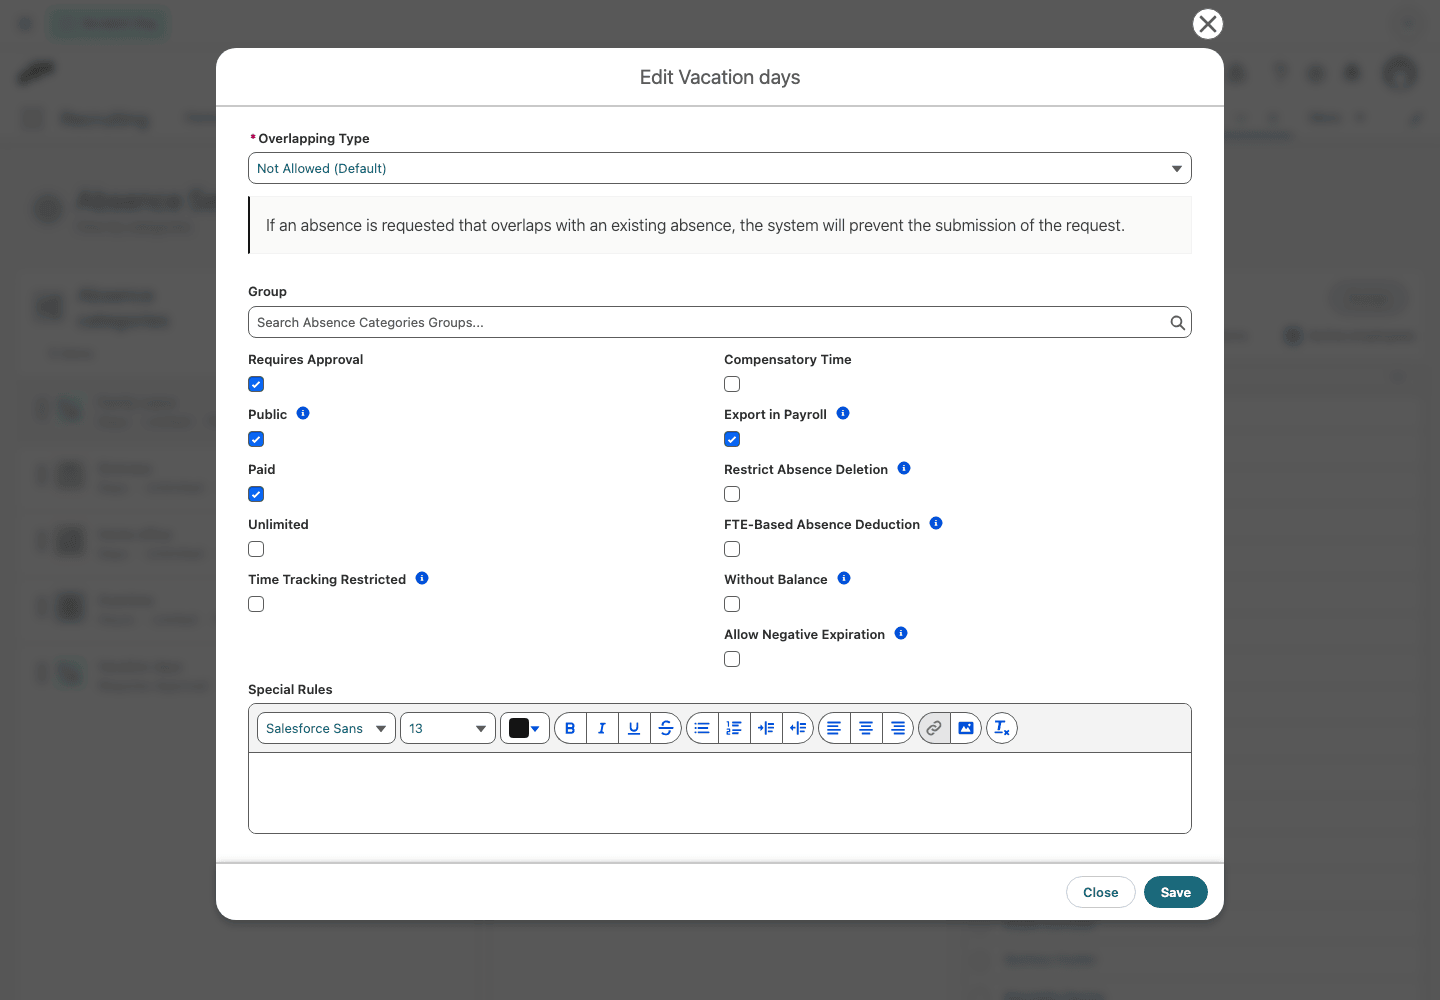
If negative allowances should expire, enable Allow Negative Expiration on the absence category. The setting is disabled by default.
Days available is lower than the allowances listed per policy
An allowance period in which the employee took more than they accrued keeps a negative balance, and flair subtracts it from the category total even after the period ends. Both Salesforce absence category screens name that deduction:
- The absence category overview shows it under Days available — for example
4 deducted from negative allowances— and lists every affected period under Negative allowances, with its assigned policy, accrued amount, taken amount, and negative balance. - The absence category tiles show the same deduction under the balance.
To leave that reporting out for the whole organization, in Salesforce Setup open Custom Settings → Flair Employee Settings → Manage, and select Hide Negative Allowances. The deduction still applies to the available amount; only the note and the table are hidden. The setting is cleared by default.
Monthly policy values look wrong in reports
Some reports use yearly values and do not represent monthly accrual policies accurately. Review the employee's Employee Absence Category for the current allowance, and contact flair Support if the policy itself is correct.