Requests & Approvals
This comprehensive guide covers the complete absence workflow, from requesting time off to approving requests, understanding your balance, and managing allowances.
Requesting an Absence
Our self-service Employee Hub is the place to go to request any kind of absence, including vacation, sick leave, or even out-of-office events such as business trips. You can also view your previous and upcoming absences, remaining leave balance, and coworker absences.
You can also manage your absences using the flair mobile app for iOS and Android.
There are two easy ways to request an absence in the Employee Hub:
Dashboard: The Employee Hub Dashboard includes a widget to show you your upcoming absences. Click the plus + icon to request a new absence.
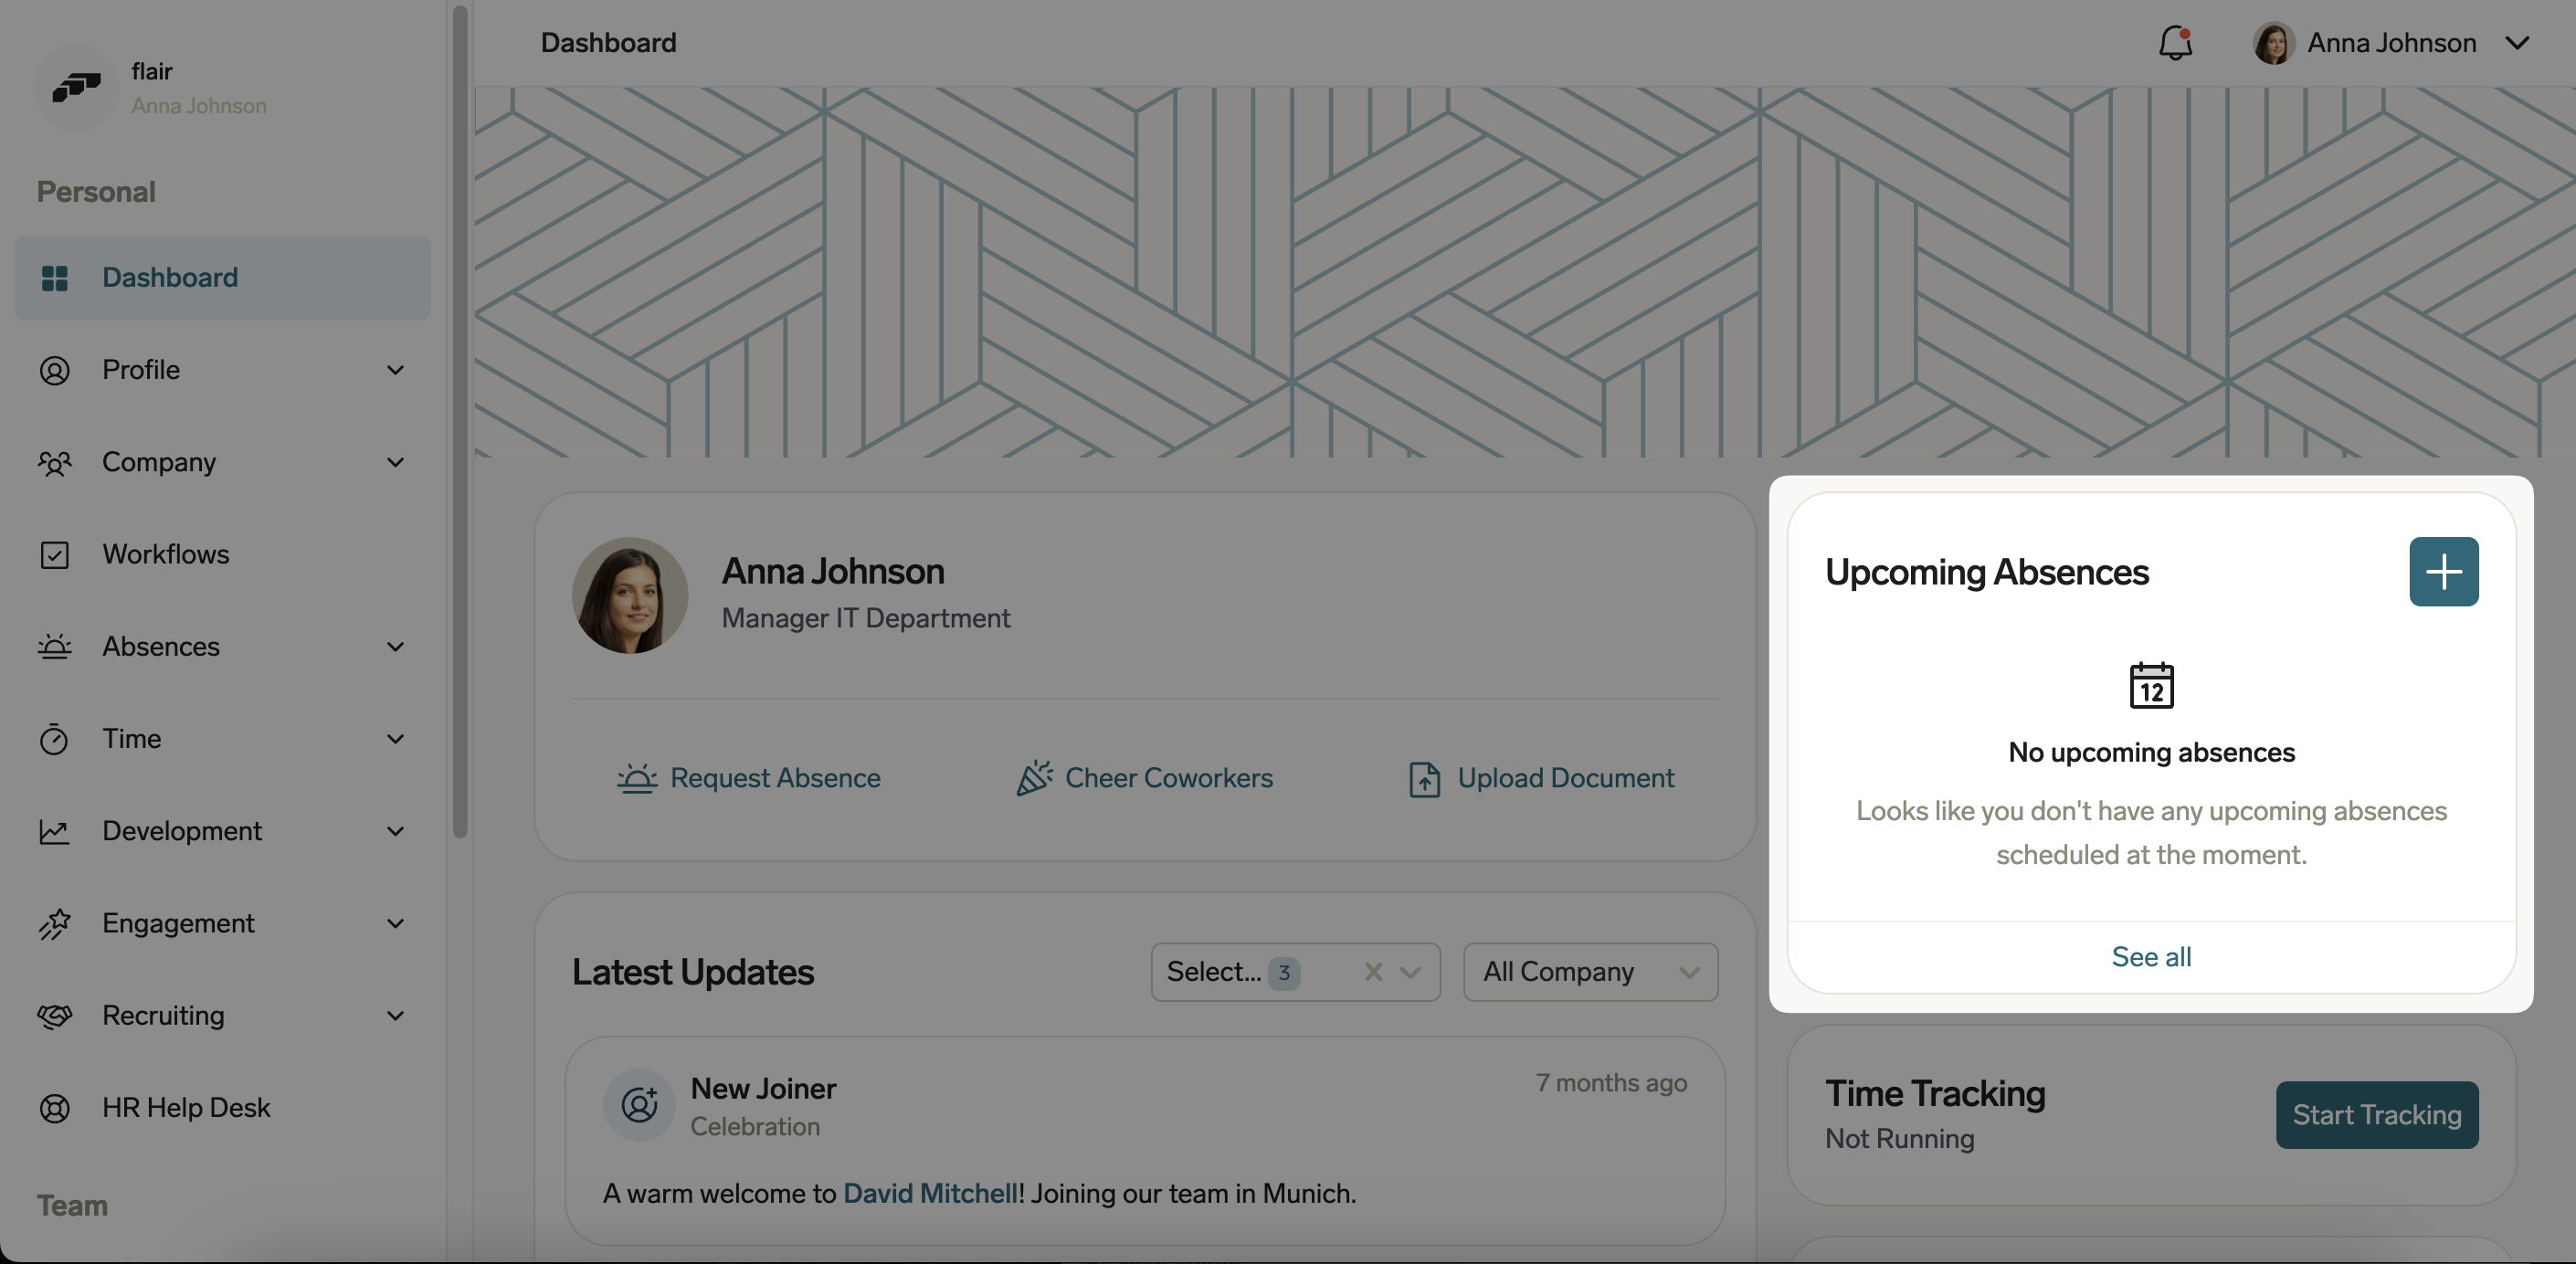
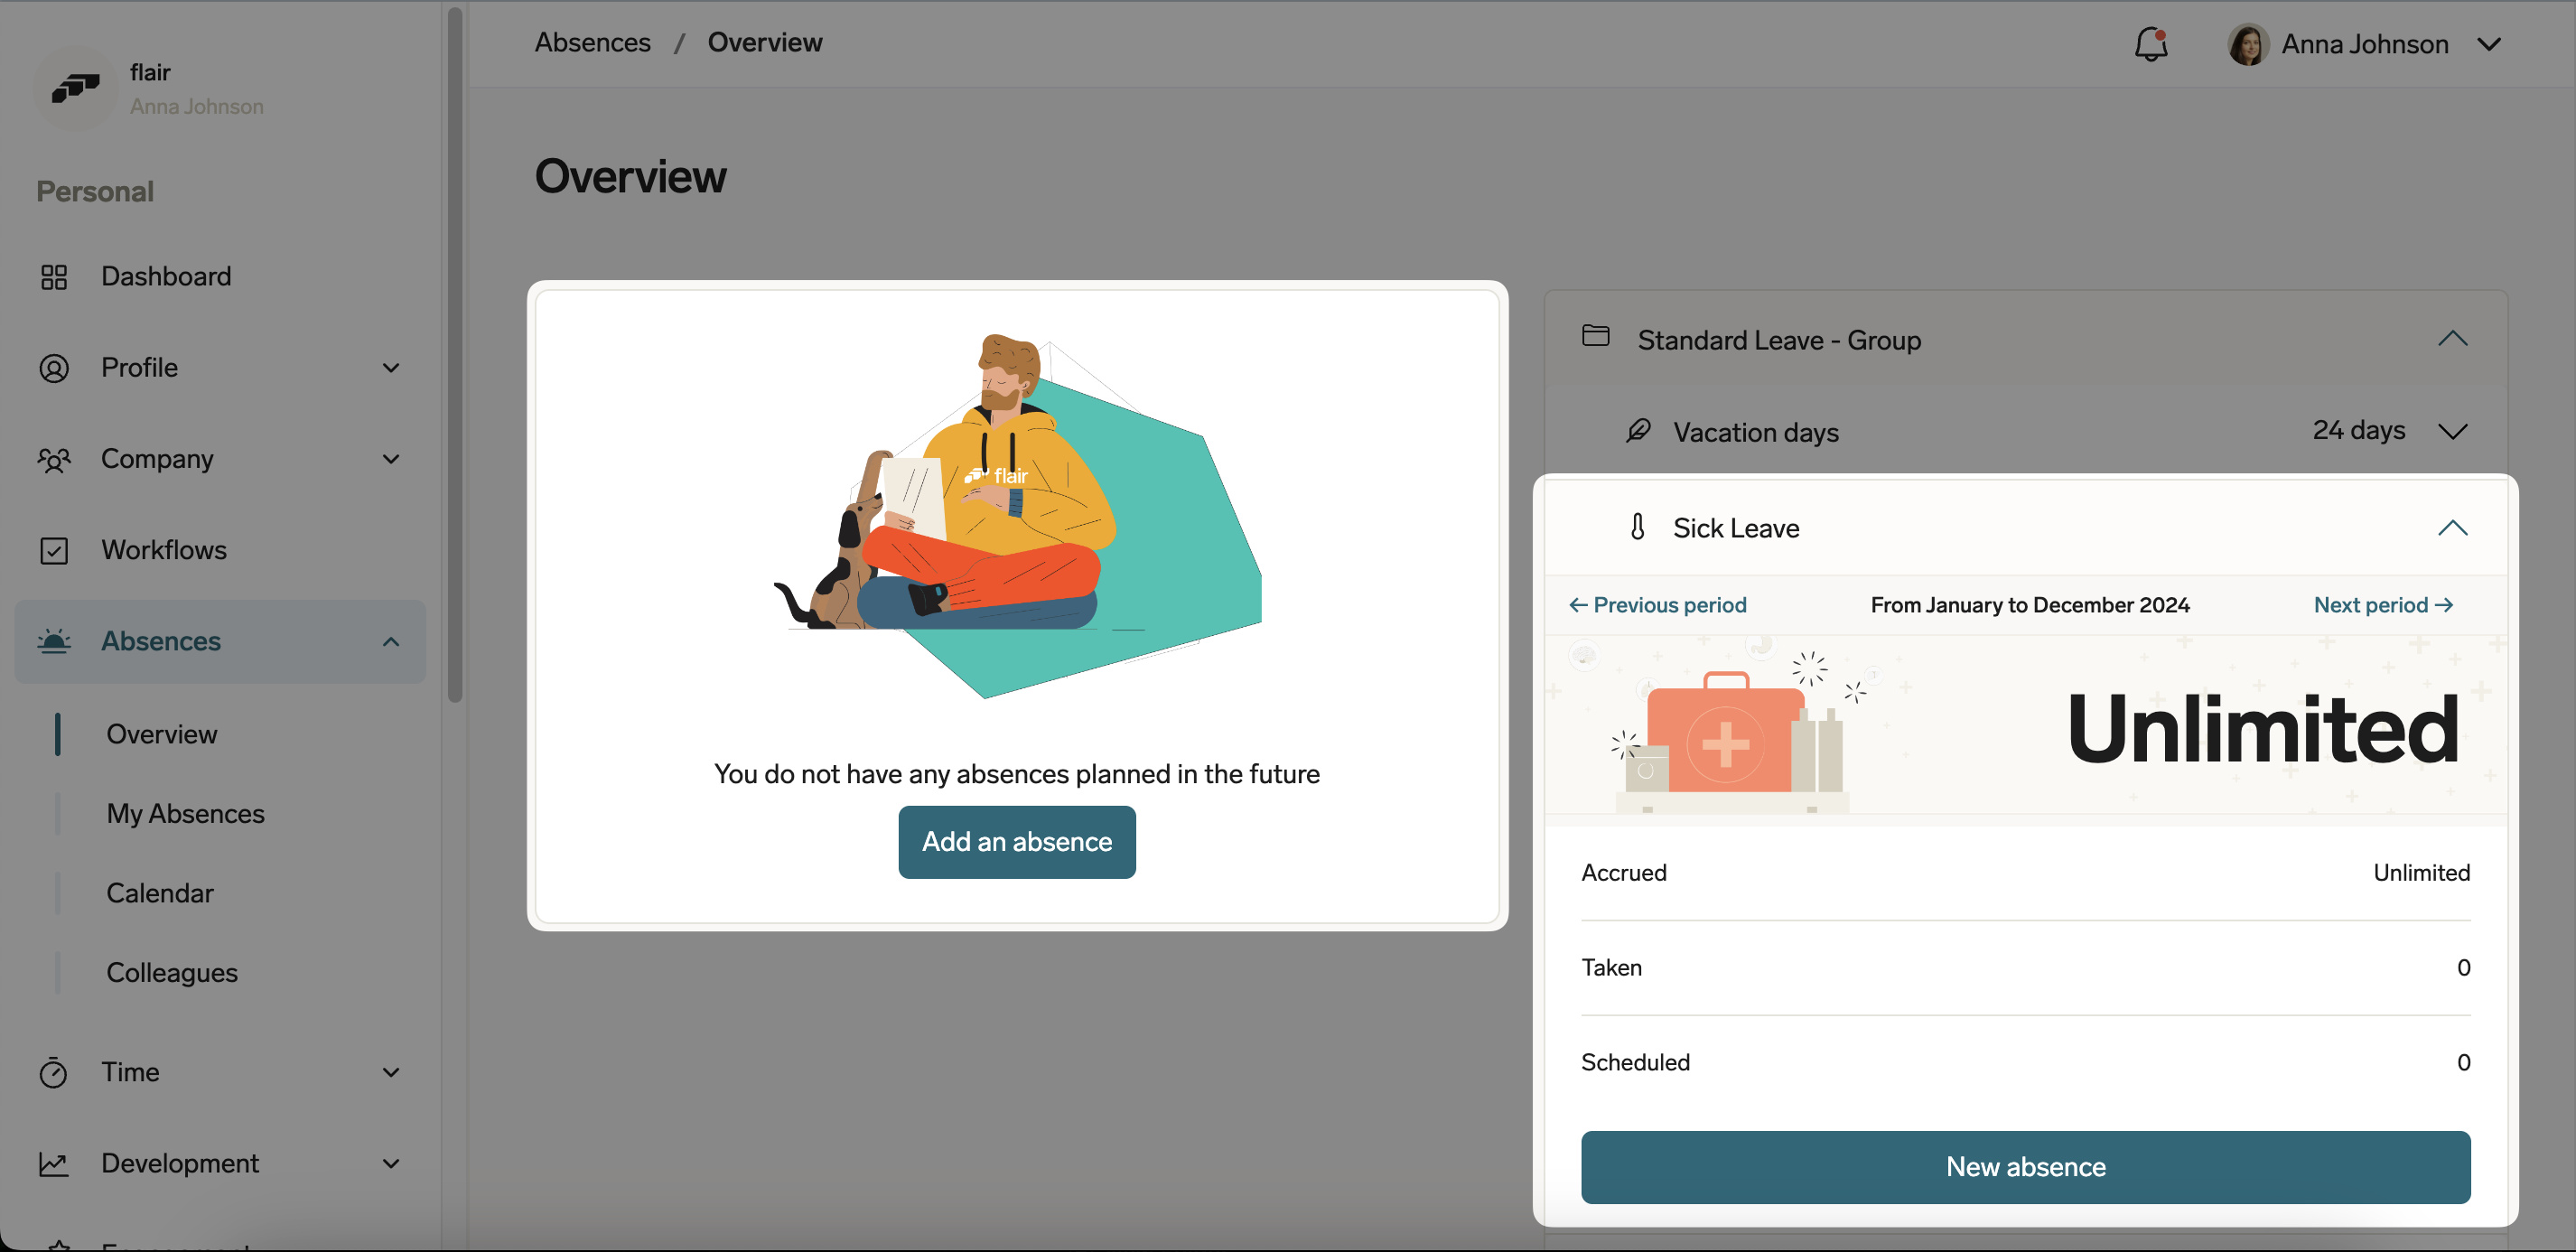
Absences tab: Selecting Absences from the menu pane on the left side of the screen will open your Absence Overview. If you have no scheduled absences, you can click Add an Absence to request time off. Alternatively, you can choose an absence category from the list on the right side of the screen and click New Absence.
Selecting either of these options will open a new pane on the right side of your screen.
- Absence Group: If your organization offers many different types of leave, they may be sorted into groups. Examples of groups could be standard leave, additional leave, and a group for occasions where you are out of the office but still working, such as business trips and working from home. The top dropdown menu allows you to select one of these groups.
- Absence Type: The second dropdown menu allows you to choose an absence type from the group you selected. If the absence type is not unlimited, you will also see how many days you have remaining.
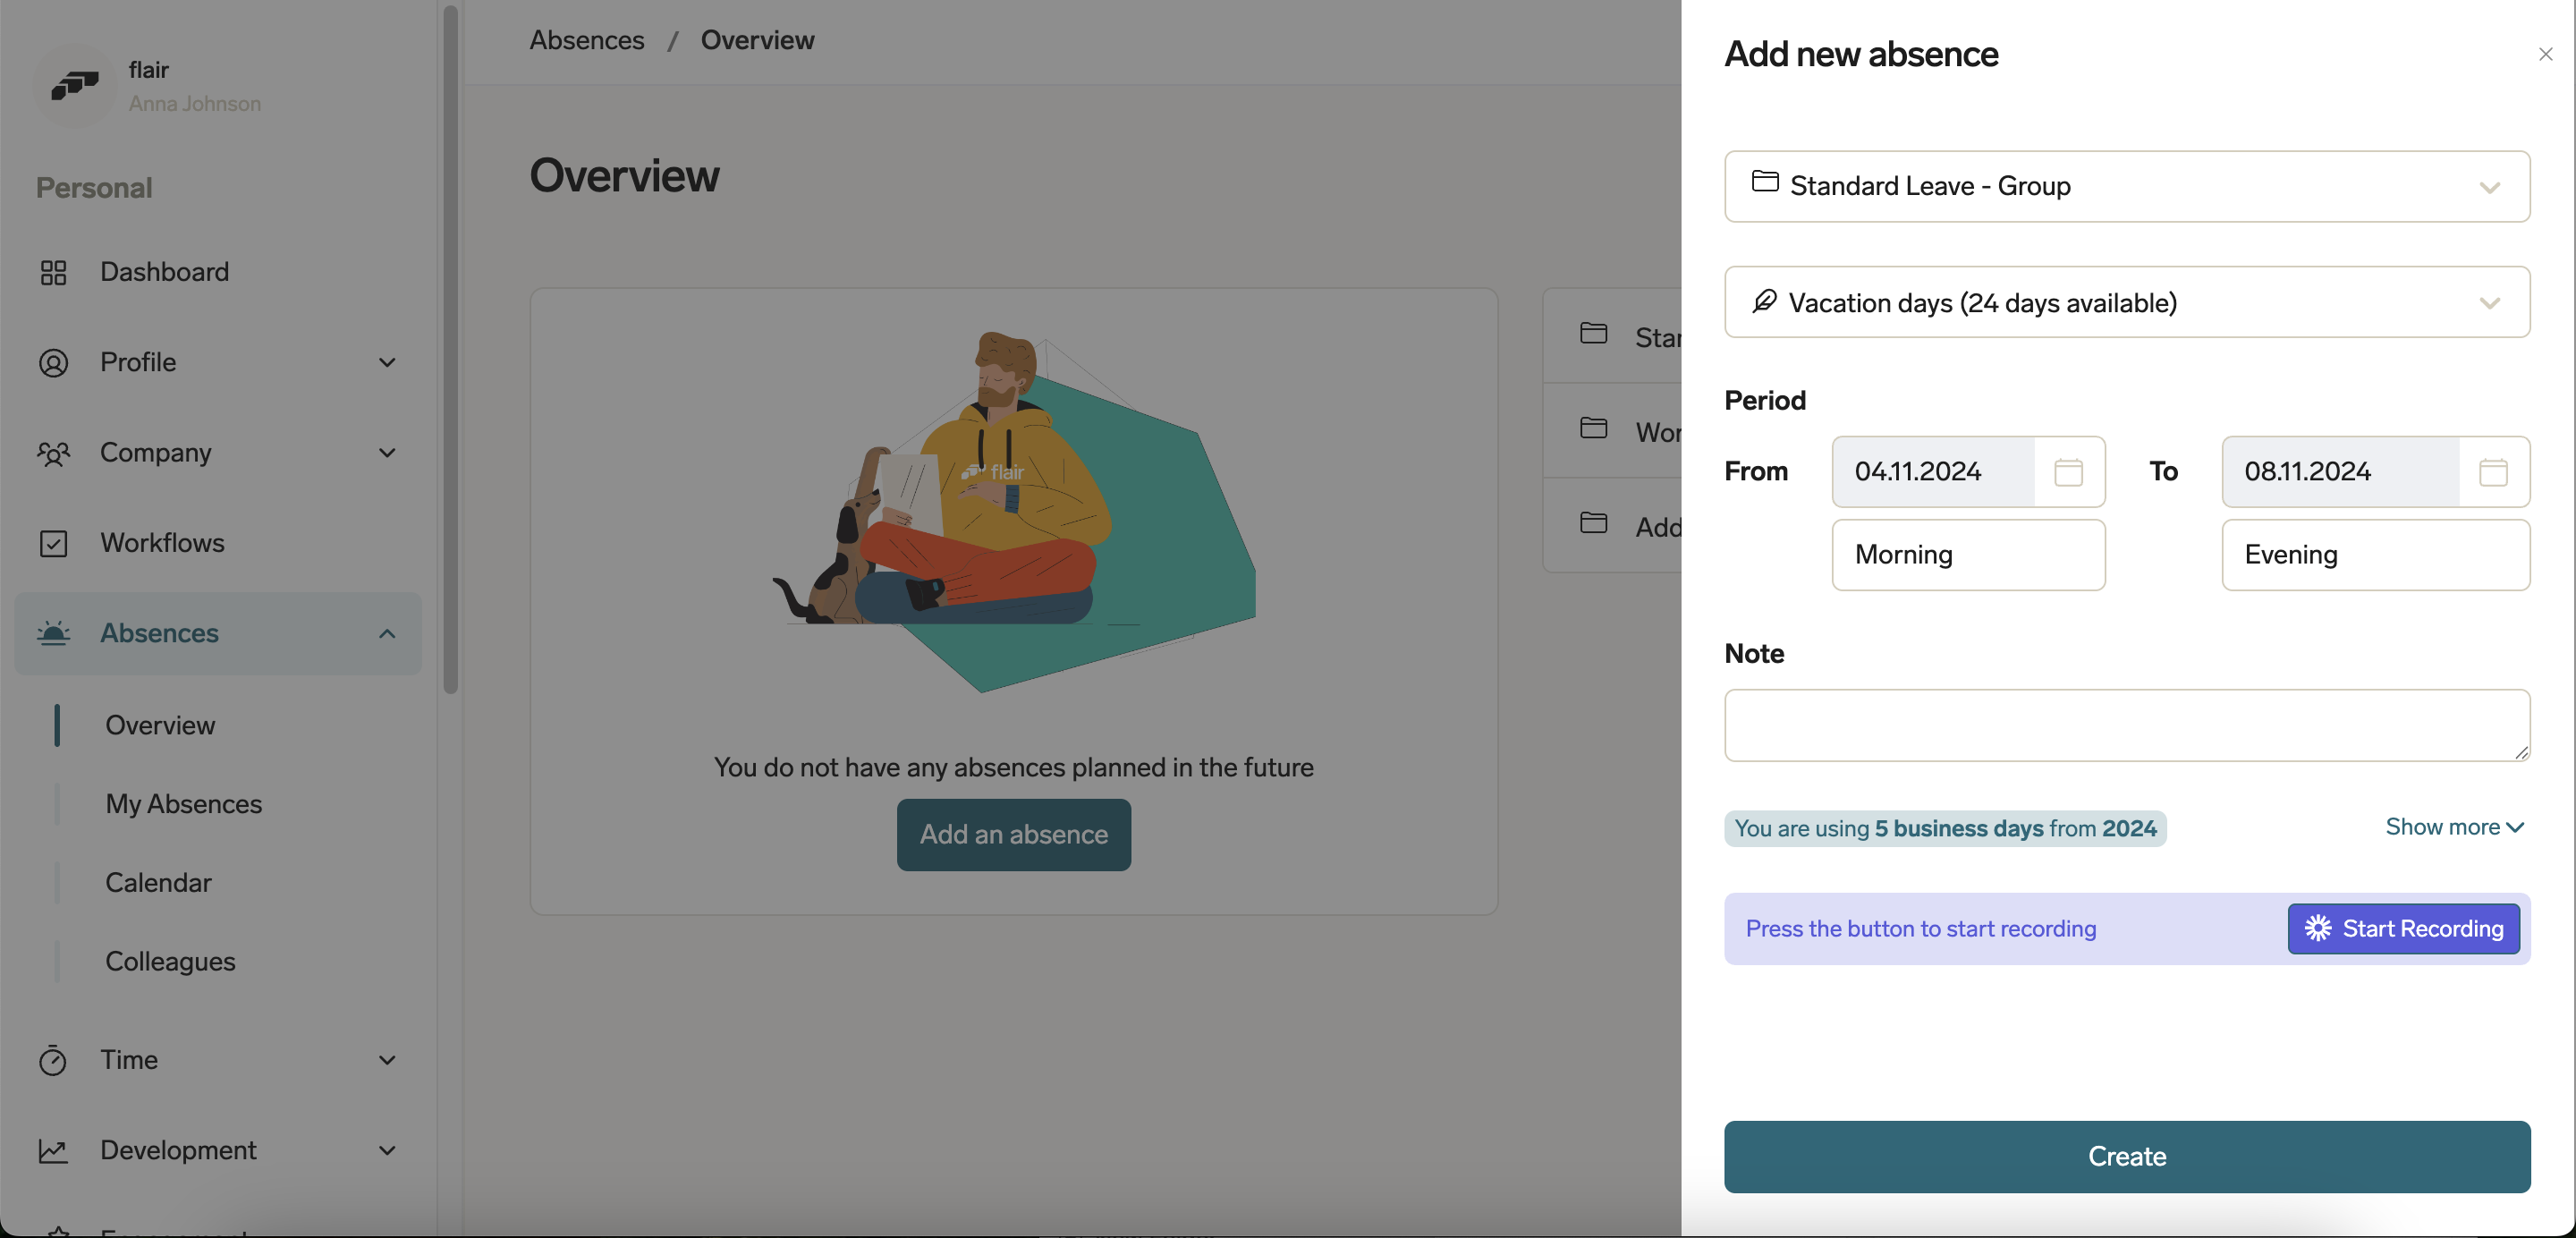
- Period: Click the empty boxes next to From and To to select the dates of your absence request. For half-day absences, you can choose a time of day by selecting Morning, Lunch, or Evening.
- Note: Here you can add any additional notes for the absence manager.
- Days Used: Once you have entered the dates of your absence, a message will appear to summarize how many days of absence you will use and from which period. Clicking Show More will give you a detailed view of how this is calculated and how many days of absence you will have remaining.
- Video Message: By clicking Start Recording, you can also record a video message to make your absence request more personal.
To submit your absence request, click Create. Depending on your company policy, your request will then be sent to your absence manager(s) for approval.
Multi-Day Hourly Absences
For hourly absence categories, you can create absences that span multiple days with different start and end times for each day. This is useful when you need to take time off across several days but with varying hours each day.
Creating a Multi-Day Hourly Absence:
- Select an hourly absence category from the Absence Type dropdown
- Select your From and To dates (the absence will span multiple days)
- A Daily Time Schedule section will appear showing each day in your absence period
- For each day, set the Start and End times
- The system automatically calculates the hours for each day and displays the total
Using Apply to All:
If you want to set the same start and end times for all days:
- Set the times for one day
- Click Apply to All
- The same times will be applied to all days in the absence period
Validation:
- The system automatically validates your absence request when you make changes
- It checks for overlapping absences on the same days
- It verifies you have enough absence credit available
- Non-working days (weekends, holidays) will show zero hours deducted
Viewing Multi-Day Hourly Absences:
After creating a multi-day hourly absence, you'll see a Variable Times button instead of the standard time display. Clicking this button opens a side panel showing:
- Each day in the absence period
- Start and end times for each day
- Number of hours deducted per day
Where Multi-Day Hourly Absences Are Supported:
Multi-day hourly absences with variable times are supported in:
- Employee Hub calendar view (hover to see details)
- Colleagues view
- Shift Planner (both daily and hourly views)
- Absence detail pages
- Salesforce absence records
Editing Multi-Day Hourly Absences:
HR managers can edit multi-day hourly absences in Salesforce:
- Open the absence record
- Click the Variable Times button
- Modify start and end times for individual days
- Use Apply to All to update all days at once
- Click Save
The system will re-run validation after any changes to ensure accuracy.
If your absence request overlaps with another of your planned absences, you will see a message in red informing you of the overlapping dates.
Your upcoming scheduled absence will now be displayed on your Employee Hub Dashboard screen and the Absences Overview. If your request requires approval, you will see the approval status here. You will also receive a notification in the Hub and via email when your request has been approved or declined.
Clicking the speech bubble icon allows you to read and respond to comments. Clicking the three dot button gives you the option to delete the request if your company policy allows deletion.

Editing Absence Files
For certain types of absences, you can edit the uploaded files after the absence has been created. This is useful if you need to replace a document (such as a medical certificate) with an updated version.
When Can You Edit Files:
File editing is currently available only for absences that meet both of these criteria:
- Do not require approval (auto-approved absences)
- Require document upload (e.g., medical certificates, doctor's notes)
If your absence meets these criteria, you'll see an Edit button when viewing the absence details.
How To Edit Absence Files:
- Open the absence you want to edit from your Absences Overview
- Click the Edit button (this will only appear if the absence meets the criteria above)
- The edit modal will open showing the absence form
- All form fields will be disabled except the file upload field
- Upload a new file to replace the existing one
- Click Save to update the absence
Important Notes:
- Status remains unchanged: Editing the file does not change the absence status - it stays in its current state (e.g., Approved, Auto-approved)
- Only files can be edited: Currently, you can only change the uploaded file. Other fields like dates, absence type, and notes cannot be edited
- Future enhancements: Full editing capabilities for all absence fields will be available in a future update
Why Are Public Holidays Not Showing for an Employee?
If public holidays are not appearing for a specific employee, this is typically because the employee's location is not correctly configured. Public holidays in flair are connected to the Location object.
To resolve this:
- Ensure that public holidays have been imported for the relevant location. Navigate to the Locations page in the flair HR app and check the public holiday calendar.
- Verify that the employee has a Location assigned in their employee profile.
- If the location is correct but holidays are still missing, try re-importing the public holidays from the location's calendar settings.
flair provides an automatically maintained public holidays database that you can use to import holidays for your country and region.
Absence Balance Widget
On the Absences Overview screen, opening the collapsible menu on the right of the screen allows you to see a detailed summary of your remaining allowance for a specific type of absence. Let's take a look at this example.
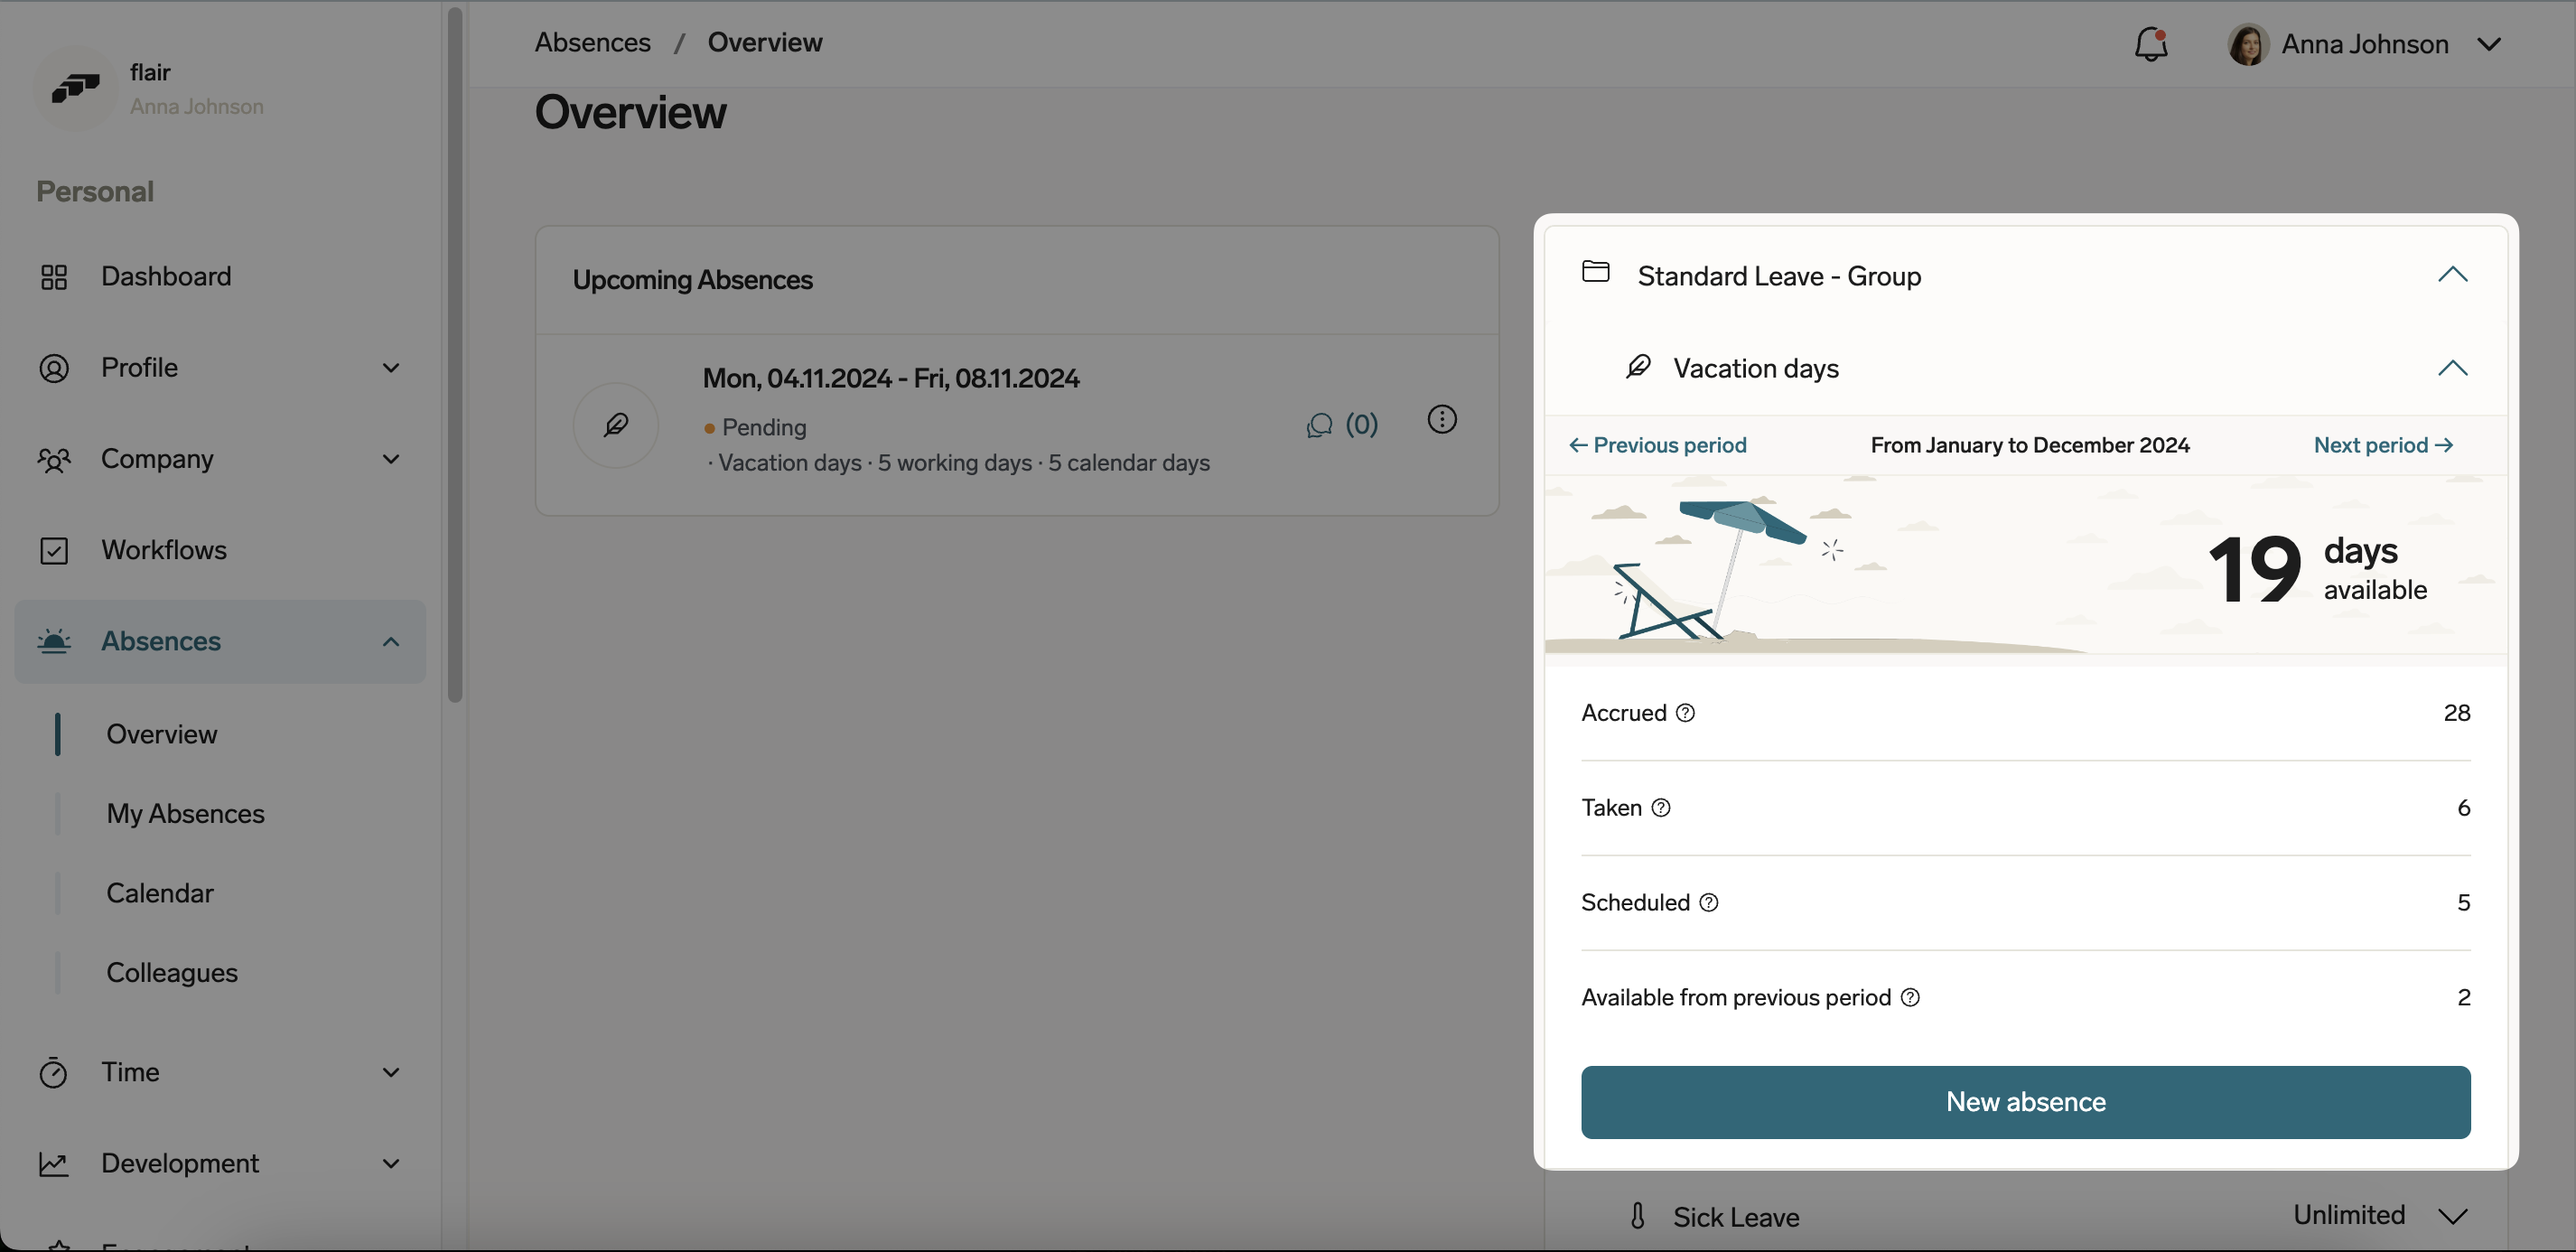
Absence Period: In most cases, this will be a calendar year, but may differ depending on your company policy. You can view past and future absence allowances by clicking on Previous Period and Next Period.
Days Available: This number shows how many days (or for hourly absence categories, hours) you have still remaining.
Accrued: This is the total number of days (or hours) that have been added to your allowance during this period.
Taken: How many days (or hours) of leave you have already taken during this period.
Scheduled: How many days (or hours) of leave have been requested. Requests pending approval will also count towards this number.
Available From Previous Period: Depending on your company's absence policy, you may be allowed to carry over a certain number of days from a previous period. These days will be shown here. Note, these days will be used first when requesting taking an absence.
Hovering over the question mark next to these items will display a detailed breakdown of how the numbers were calculated. If absences carried over from a previous period have an expiry date, you will also see this by hovering over the question mark next to "Available from previous period".
Commenting on Absences
Open and clear dialogue is important in the workplace. The flair comments feature for absences allows colleagues to communicate better. By adding a comment in the Absences section on the Employee Hub, you can clear up any queries or say thanks for a vacation approval.
To do this, click the speech bubble icon on an existing absence request and begin the conversation. You can also attach a relevant document, like a doctor's note. Send a link or add an emoji and an image. Then press Enter to send your message.
Absences in the Mobile App
If you have the flair mobile app, you can view and request absences from your smartphone. This is useful in a few situations. For example, if you don't have access to your work computer but still want to check when your colleagues are returning from vacation. Or if you're planning your next vacation while out and about.
On the home screen of the flair mobile app, you can see which of your colleague are absent and when they are returning.
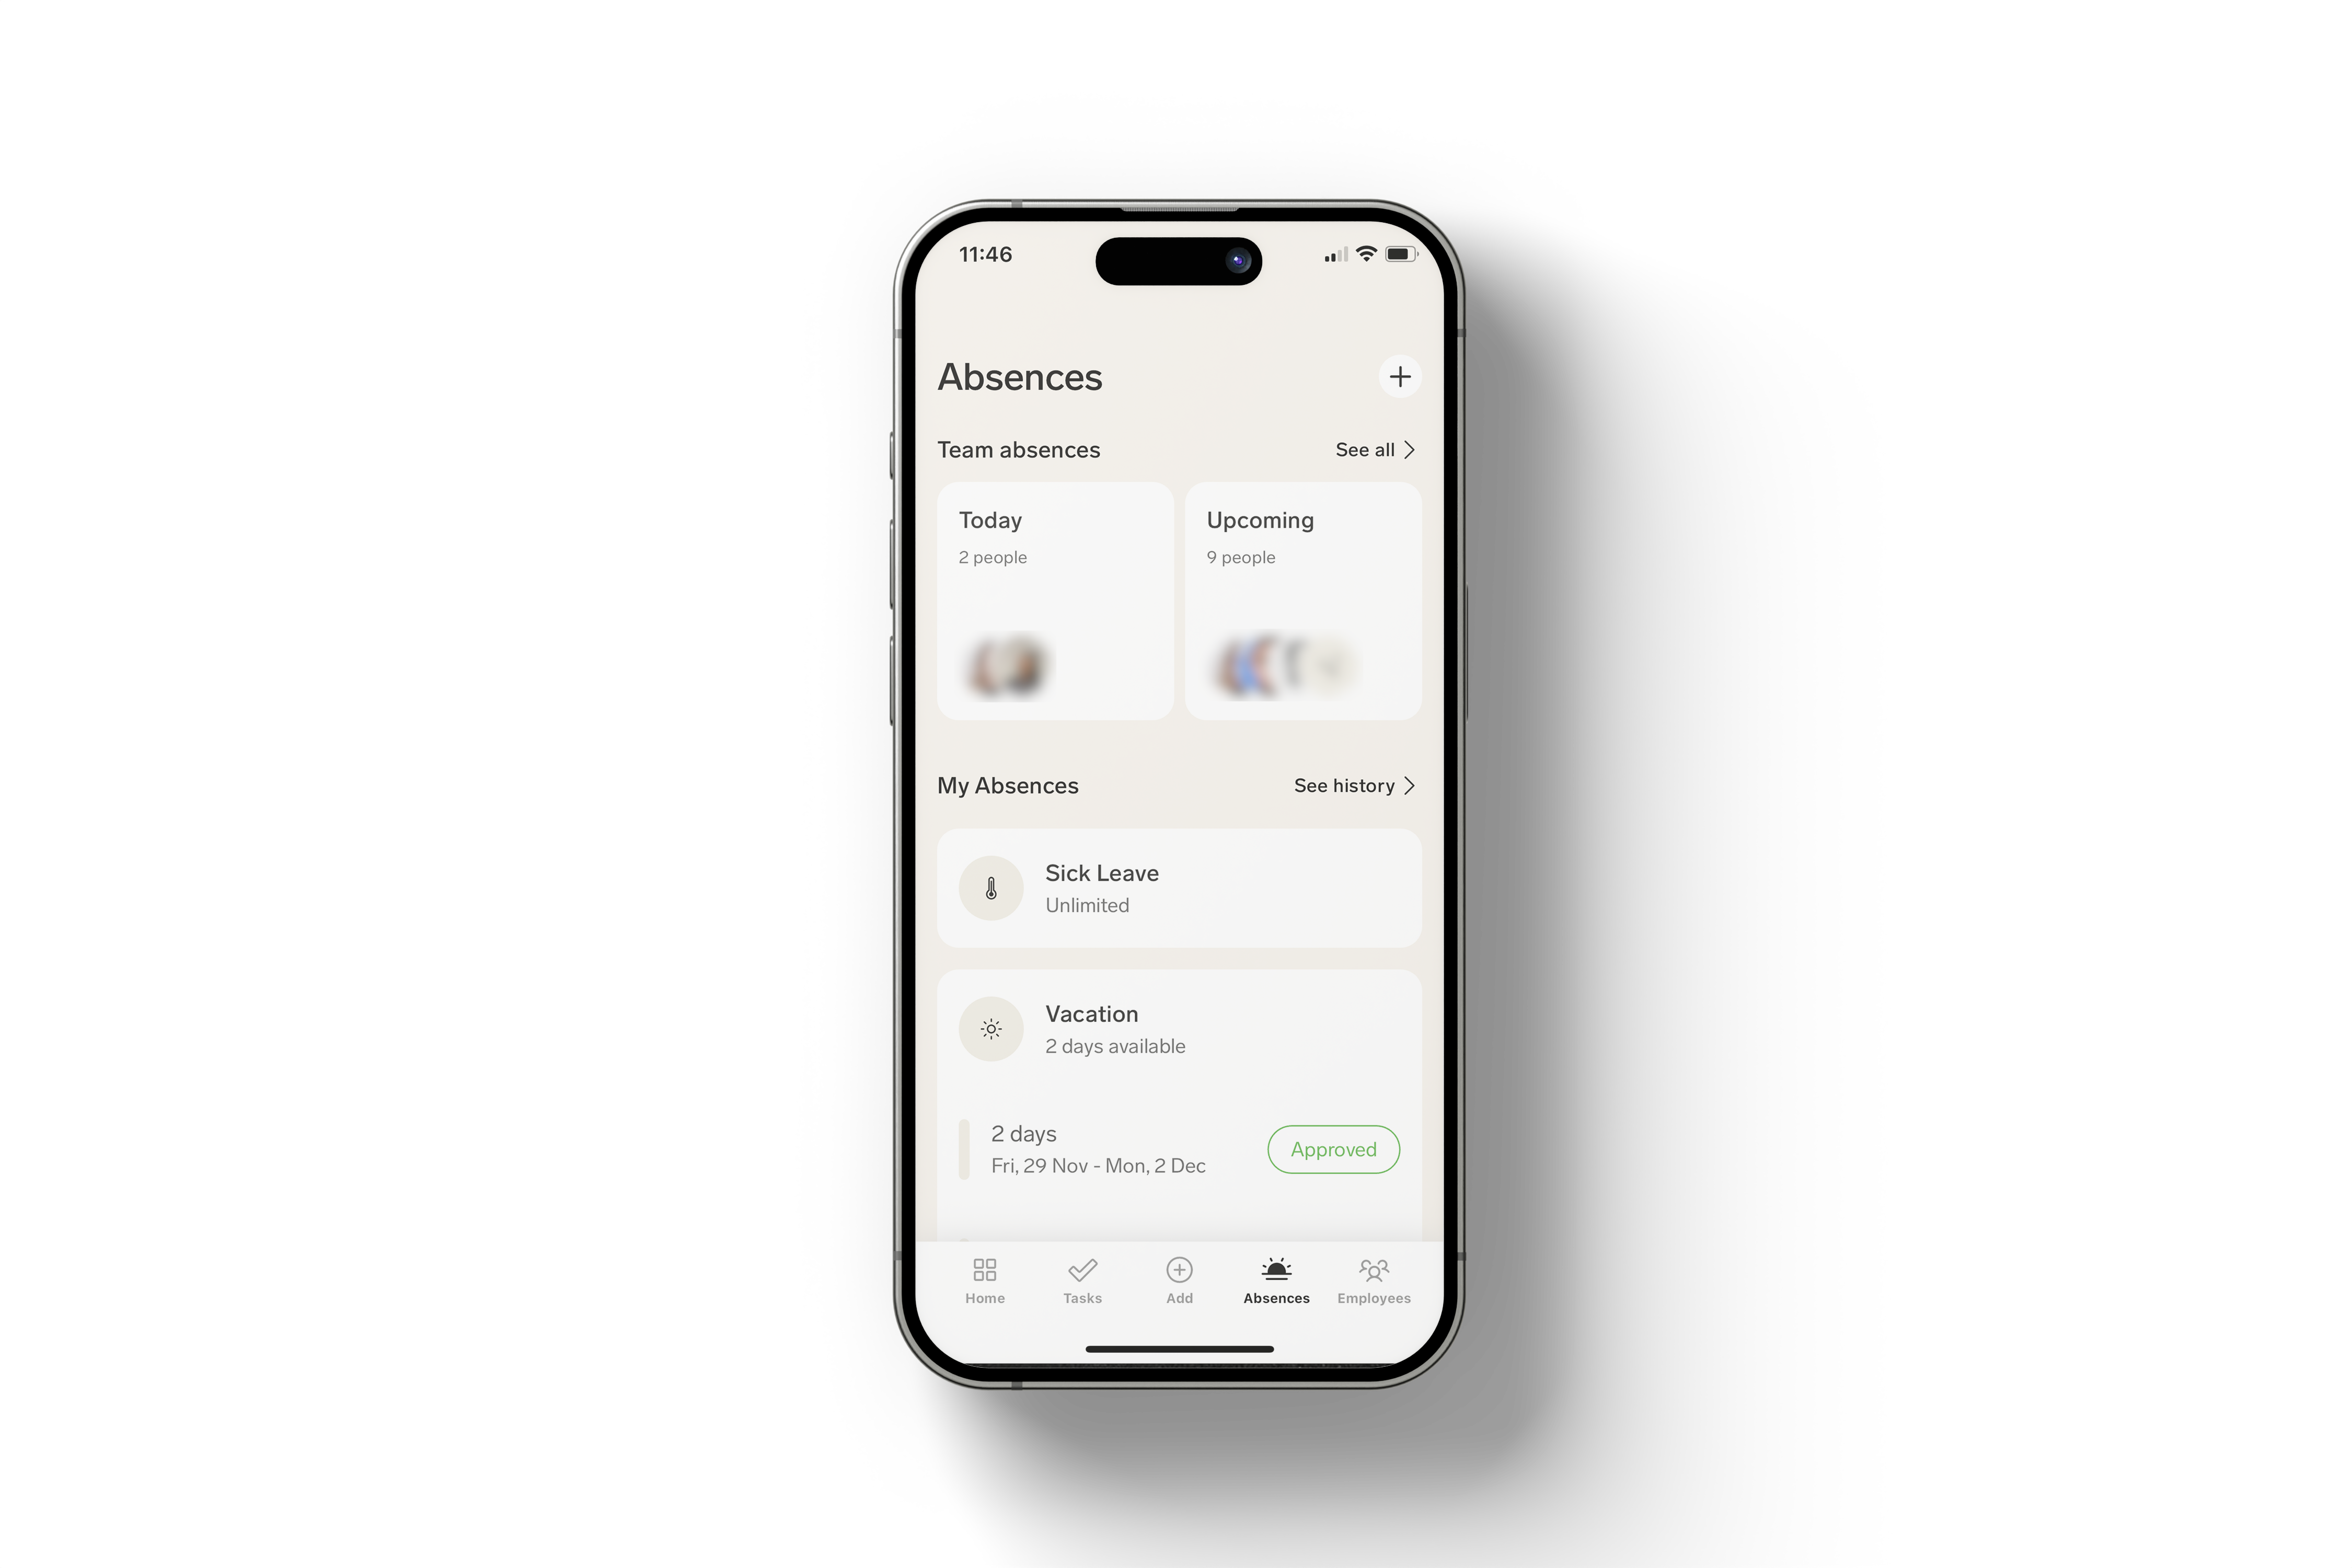
To request an absence using the flair mobile app, tap the Absences tab at the bottom of the screen. Here you will see your remaining balance for each absence category, any upcoming absences you have requested, and their approval status.
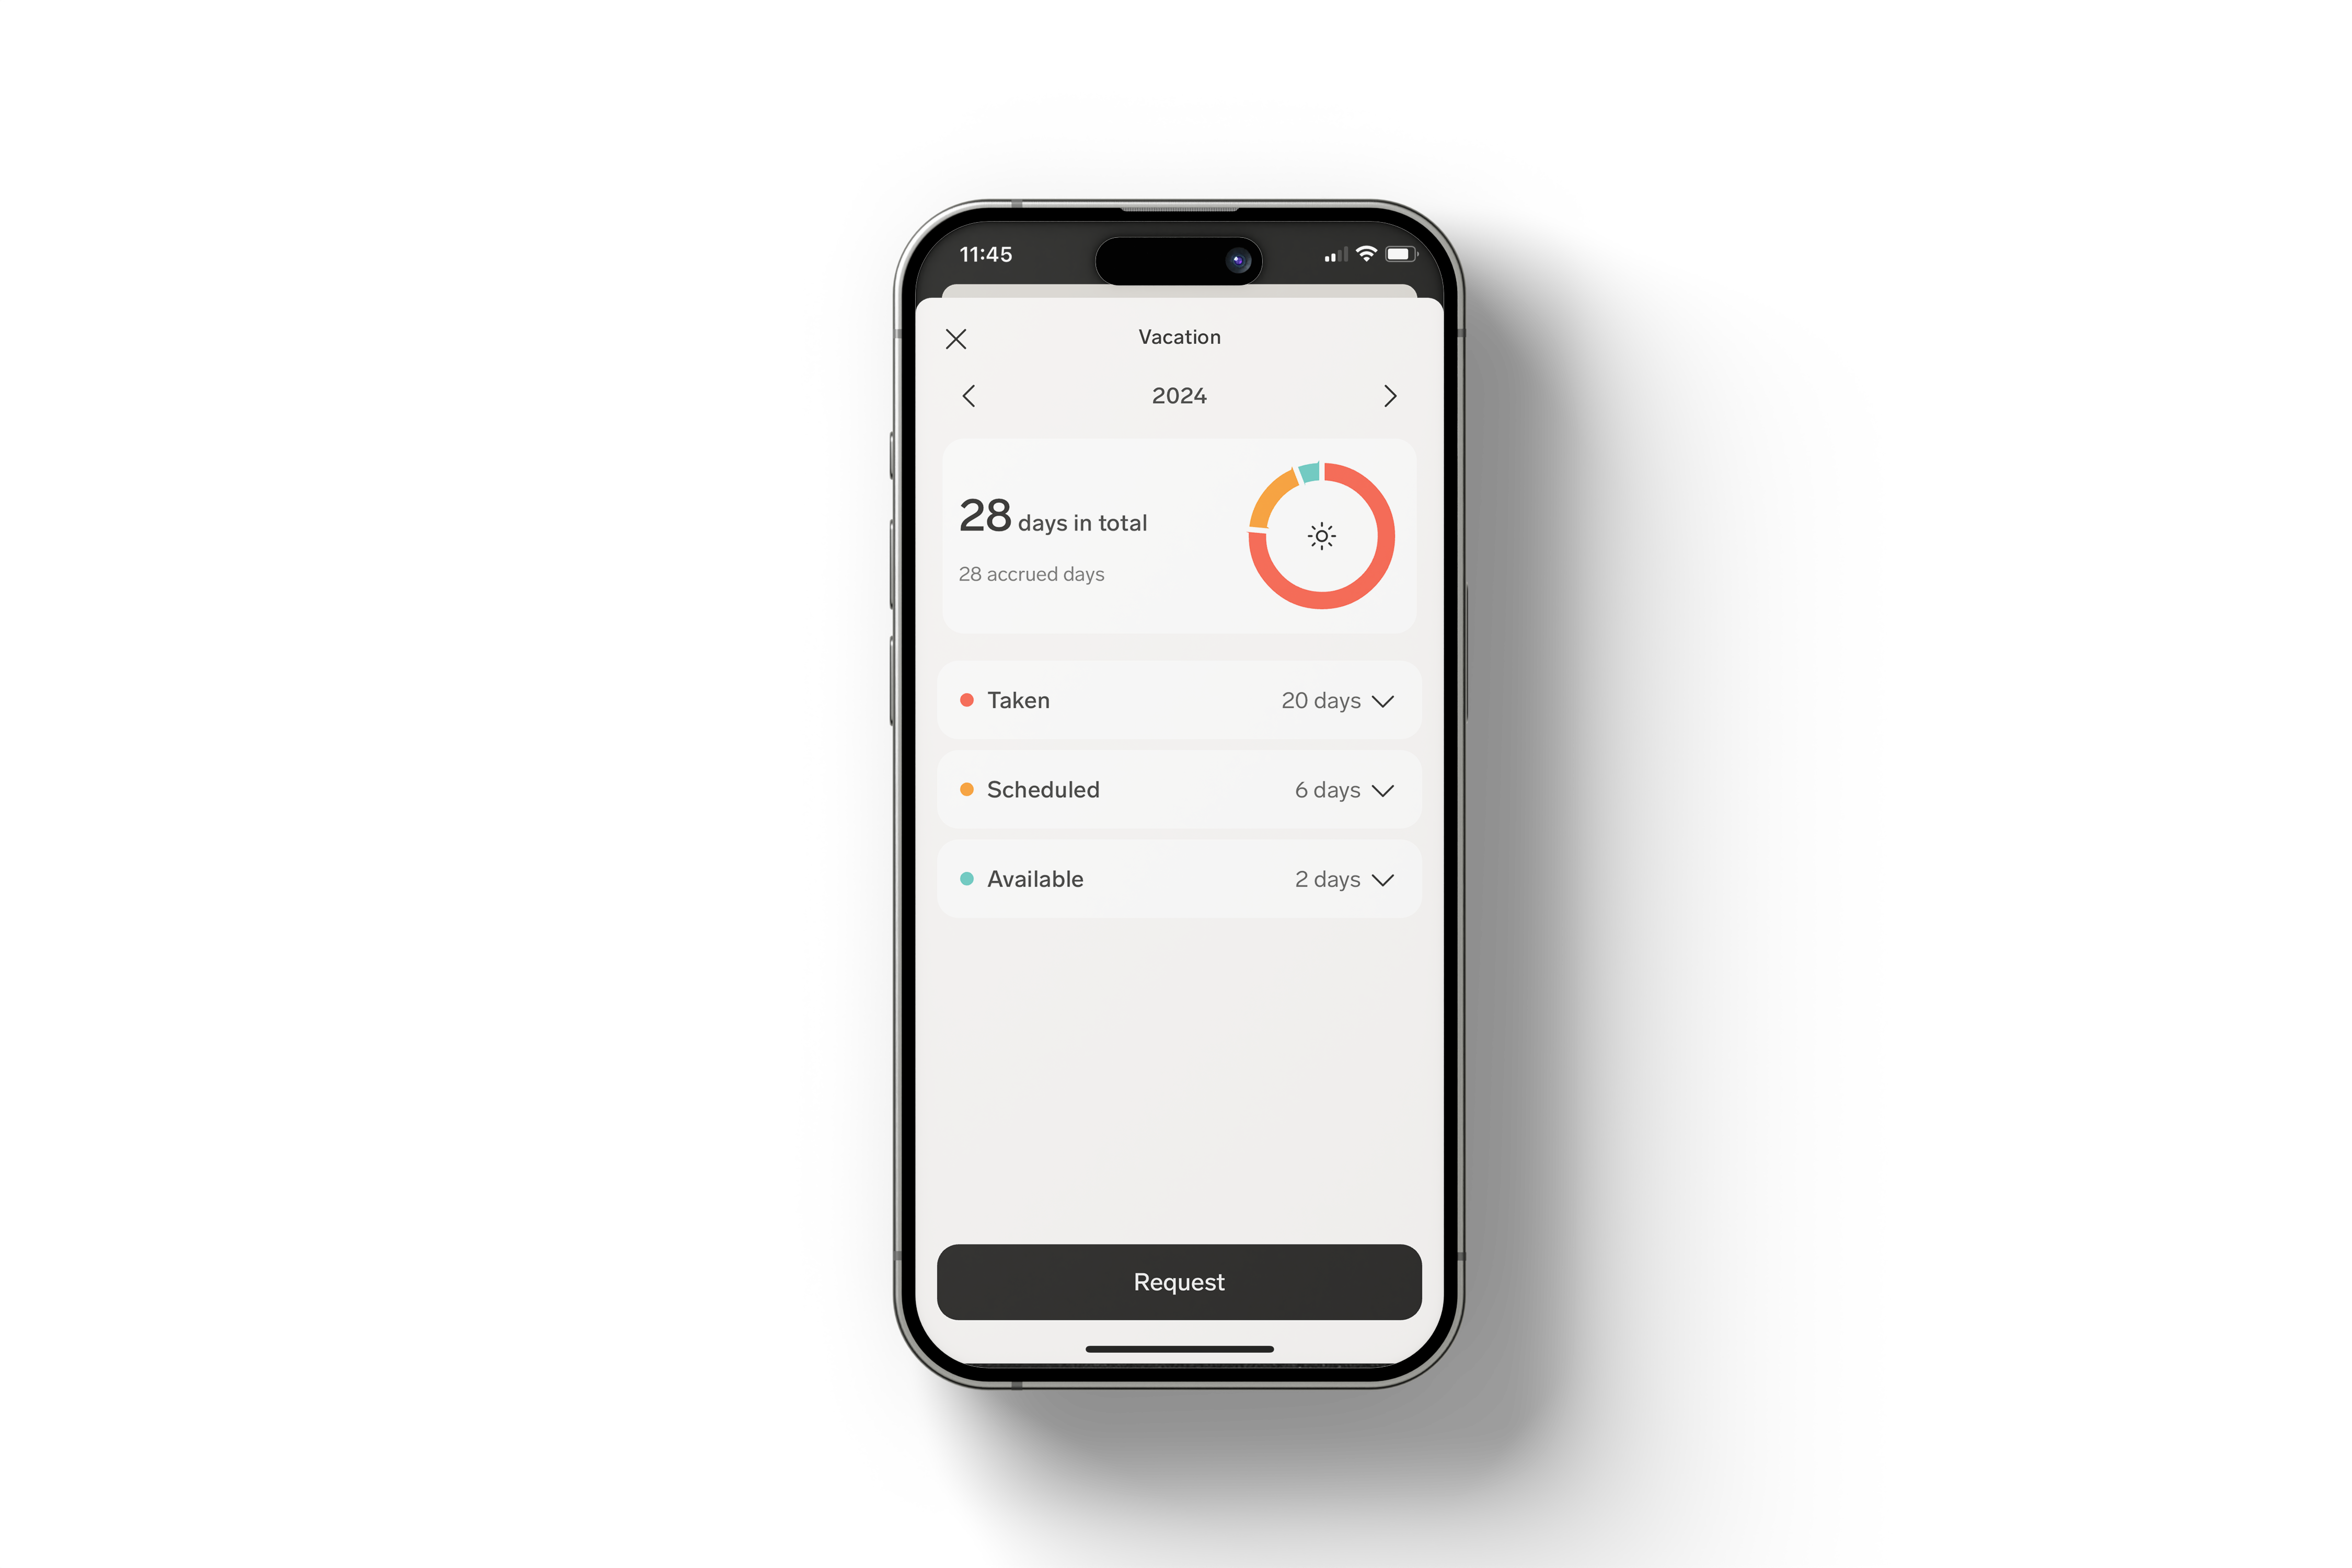
Tap on an absence category, such as Vacation or Sick Leave, to choose which kind of leave you want to take. You will then see your remaining allowance for this category, including all taken, scheduled, and available days. You can tap on these sections to expand them and see the dates of each absence. The arrows at the top of the screen allow you to view past and future absence periods.
To submit an absence, tap Request. For unlimited absence categories, this button is labelled Add Absence. You can then choose an absence Category and Duration, and add an optional note if required. The number at the bottom left of the screen show you how many days your request will use. Tap See Details to check how many days you have available before and after the request. Finally, tap Submit to send the request to your manager.
Download our free mobile app for iOS and Android.
Who Approves Absences?
flair has released a new Approval Framework that provides a more flexible and powerful way to manage approvals across your organization. The new framework offers centralized policy management, multi-step workflows, and segment-based approver assignment.
Learn about the new Approval Framework →
The documentation below describes the previous approval method using Additional Managers. This approach is still supported for organizations that haven't upgraded to the latest version.
By default, absence requests are sent to the person who is assigned as the employee's manager in the flair HR app. You can, however, assign additional people to approve absences.
If an employee's manager changes, any pending absences will be transferred to the new manager.
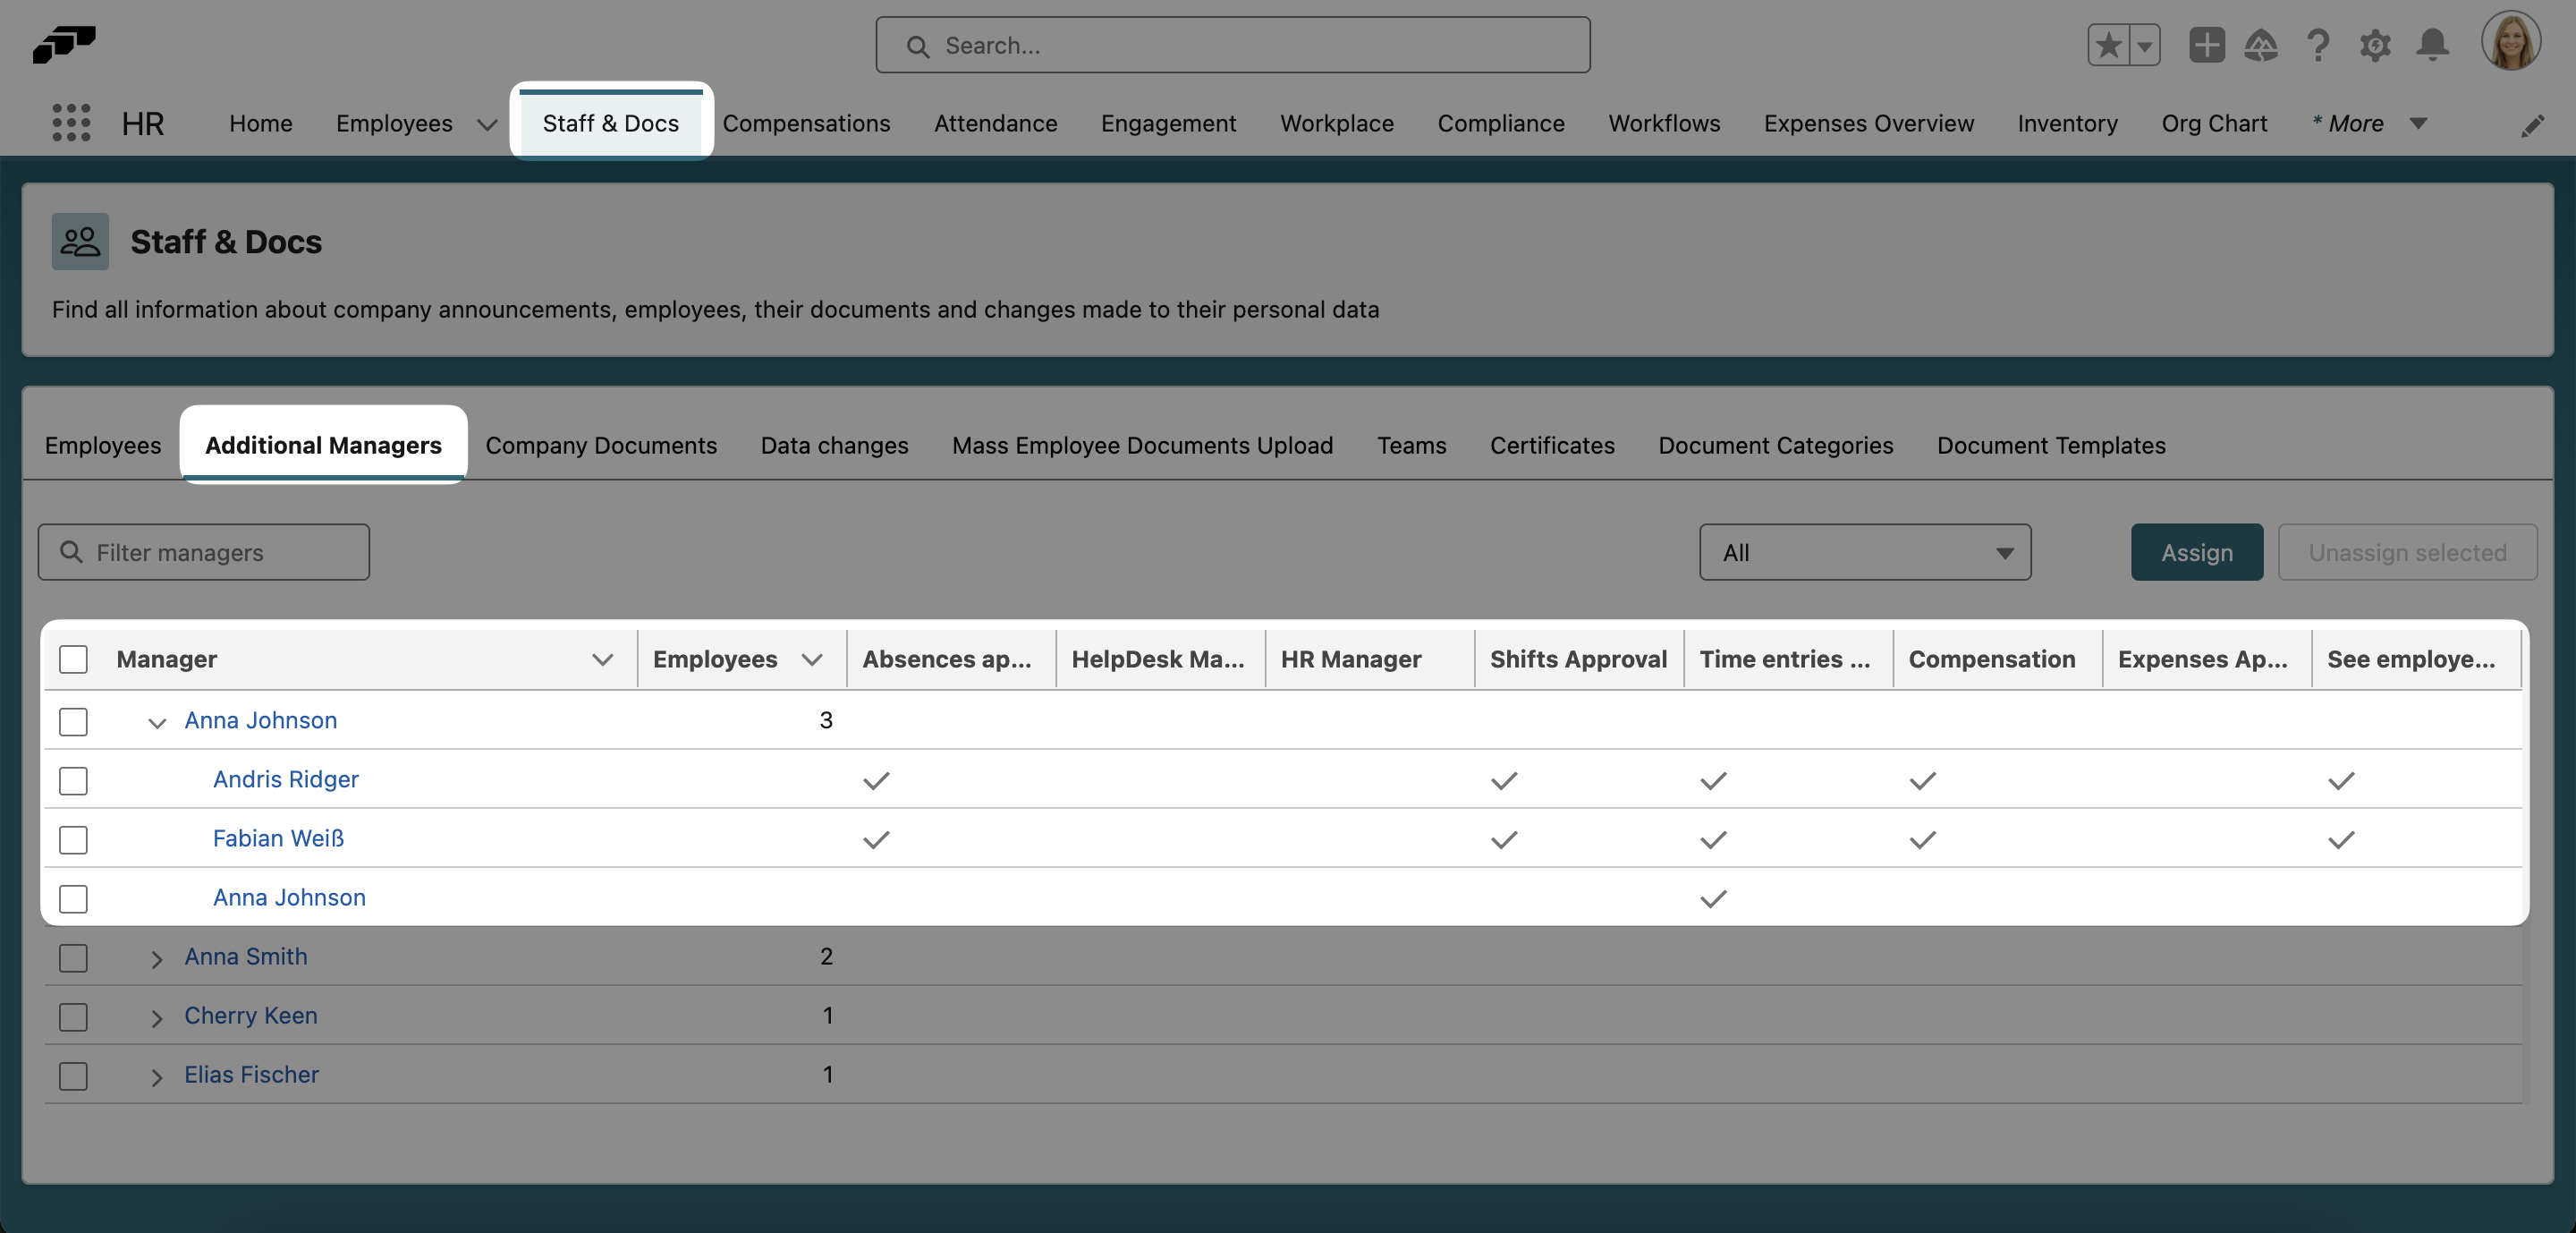
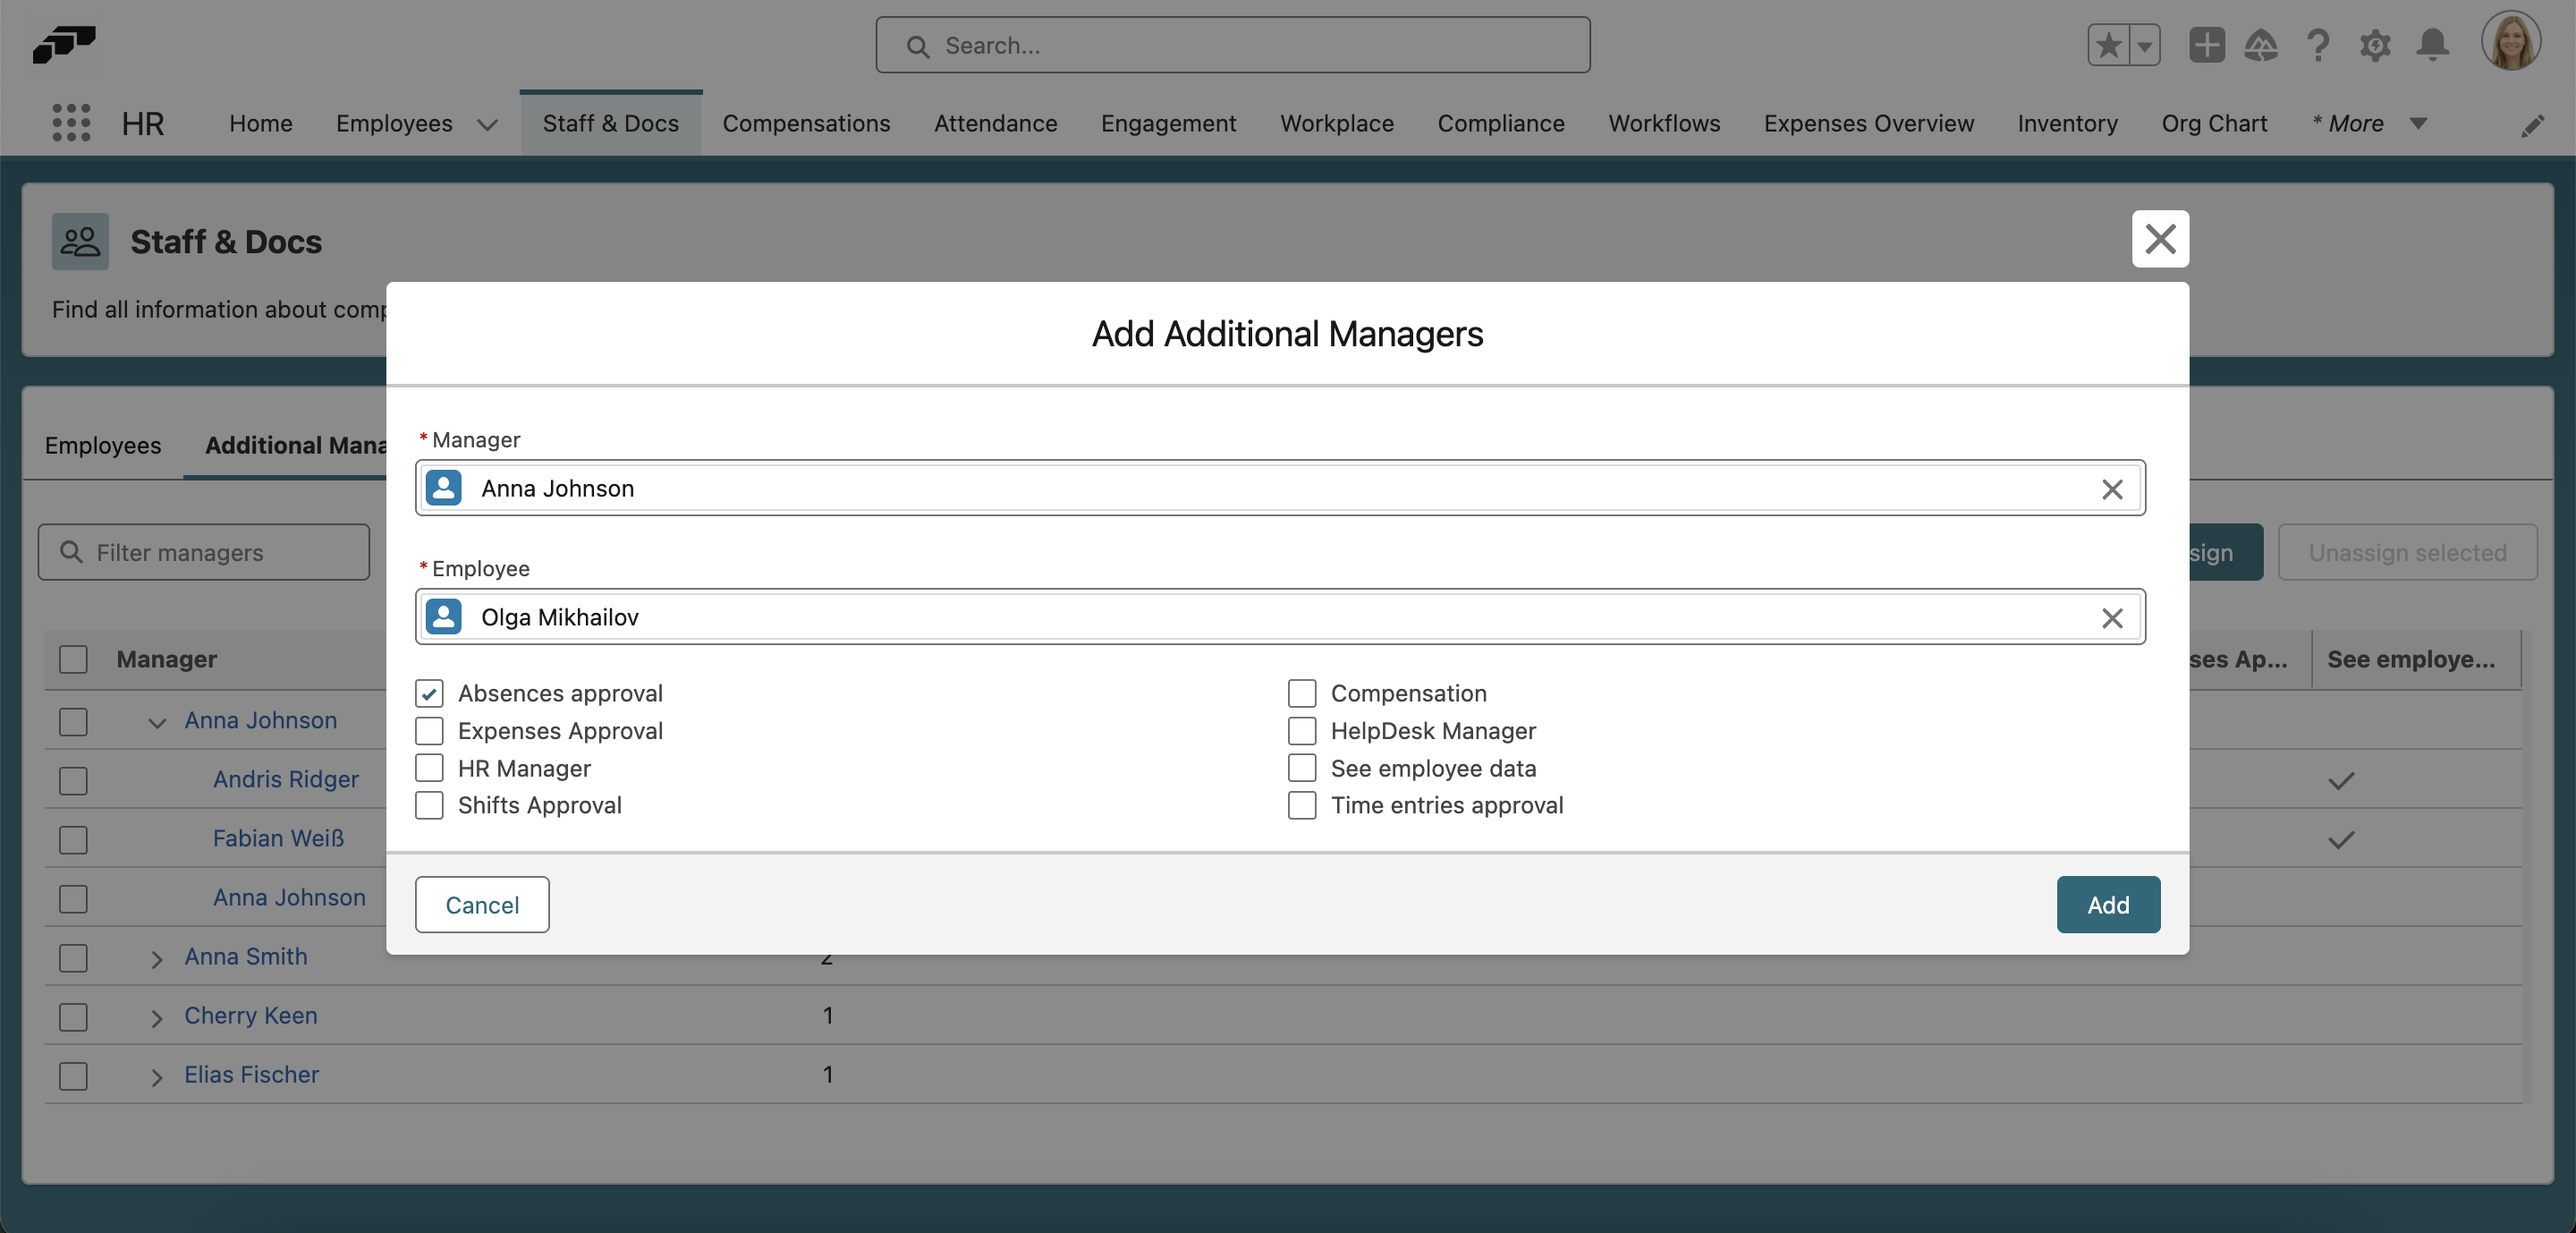
Open the Staff & Docs page in the flair HR app and select the Additional Managers tab. Here you will see a list of managers and the number of employees they are responsible for. The other columns refer to the various responsibilities and permissions they may have, such as approving shifts, time entries, expenses, and absences.
Click on the arrow next to a manager's name to expand the list and see which of these responsibilities they have. In this example, we can see that Anna Johnson is responsible for absences, shifts, and time entry approval, as well as compensation for two employees. She can also see their data. We can also see that she has permission to approve her own time entries.
To assign other absence managers, click the Assign button. Select a manager and an employee for whom they will be responsible. Then check the Absences Approval box and click Save.
Approving Absences in the Employee Hub
If you are assigned as a manger or absence manager in flair, you will receive a notification when one of your employee requests an absence. Depending on your notification settings, the notification will be sent via email, mobile, or Slack message. The link in the notification will take you directly to the request.
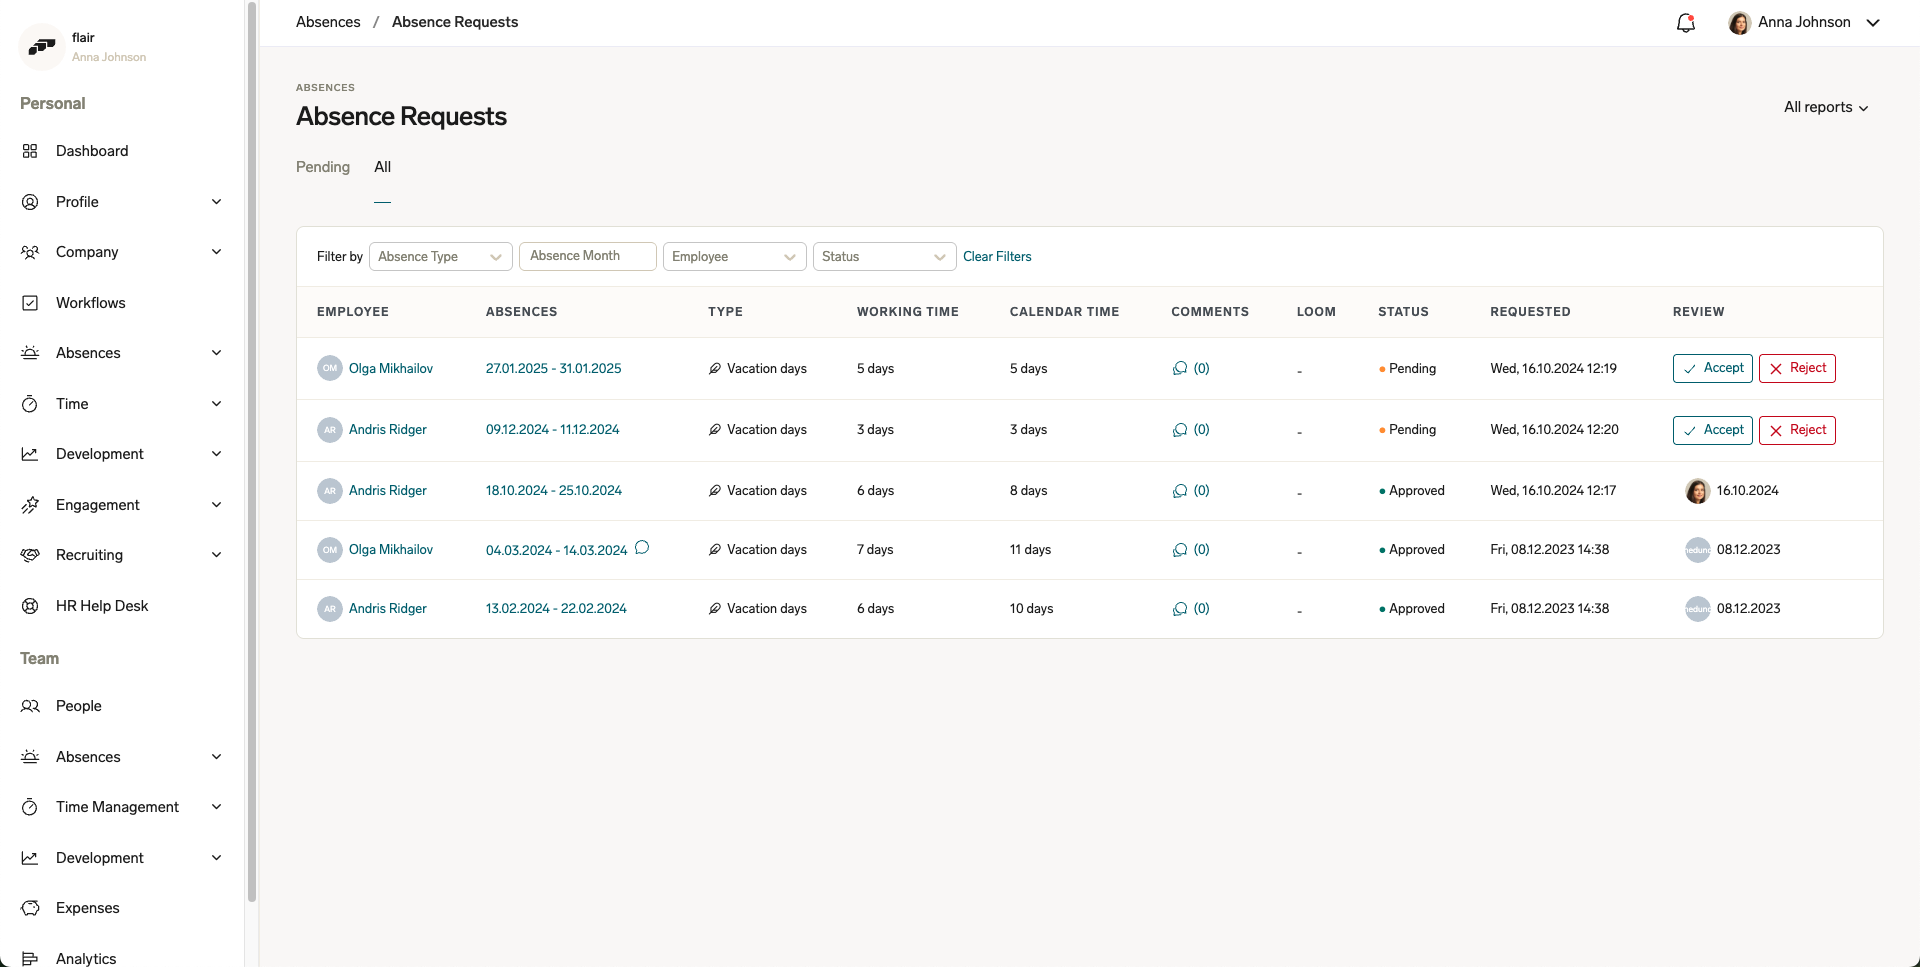
You can see all of your team's absence requests in the Employee Hub. In the left side menu, scroll down to Team and select Absences to open the Absence Requests screen. The enhanced Absences page provides two different tabs:
- Pending tab: Shows absences that require your approval, where you can accept or reject requests
- All tab: Displays all employee absences, including auto-approved ones like sick leave
You can filter by absence type, month, employee, and approval status. Simply click Accept or Reject in the Review column to quickly respond to pending requests.
Viewing Auto-Approved Absences
Managers can view all employee absences, including auto-approved ones that don't require approval. This provides complete visibility into your team's absence patterns for better workforce planning and team availability awareness.
To view auto-approved absences:
- Go to the Employee Hub
- Select Team > Absences
- Click the "All" tab
- View complete absence information including auto-approved entries
Auto-approved absences will appear in the list with their approval status clearly indicated, allowing you to see the full picture of your team's time off.
To see more details, click on the dates in the Absences column. This will provide you with additional information to support your decision, including the employee's remaining absence allowance and any overlapping absences.
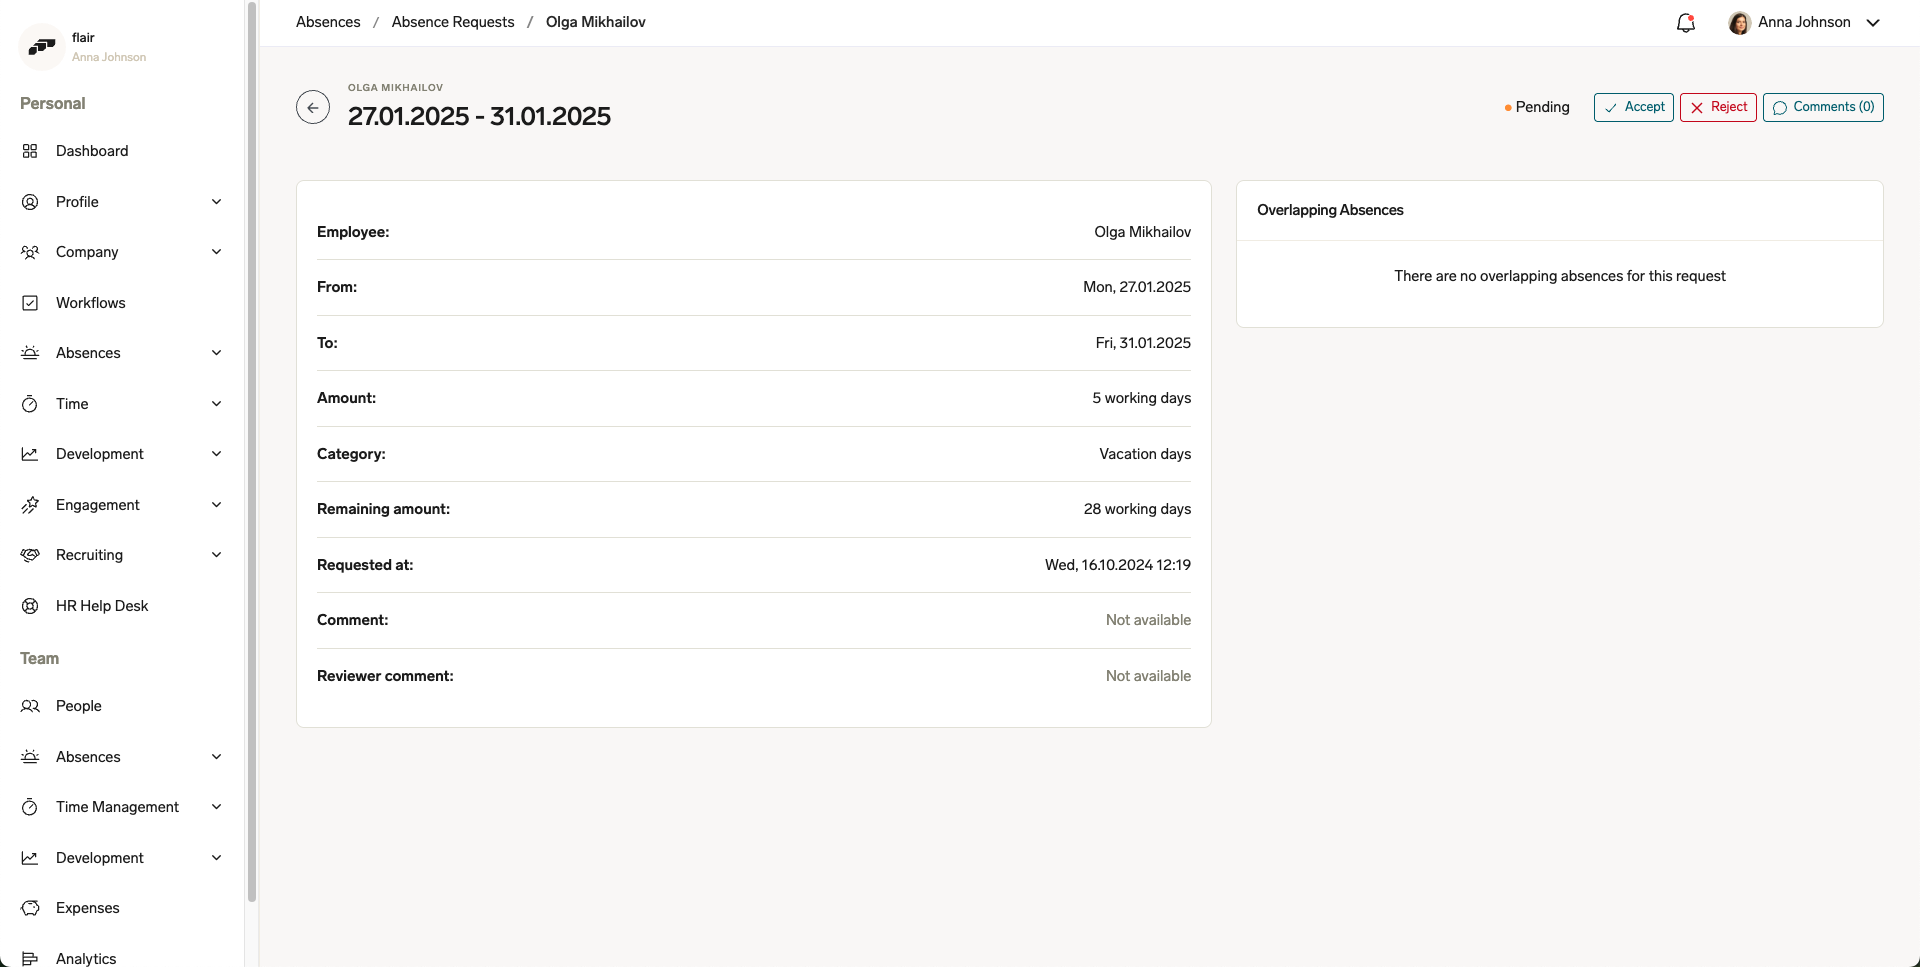
If you decide to reject the request, you will have the option to write a comment to explain your decision to the employee.
To see the complete approval workflow for absence requests, including who has approved and who is next in the process, see the Approval Path Visualization section in the Approval Framework documentation.
Visually Identifying Pending Requests in the Calendar
When an absence category is configured to visually separate pending requests, any absence with a Pending status from that category appears with a striped diagonal overlay in the absence calendars — employee, team, and manager views. Approved absences in the same category continue to display in their solid colour.
This makes it easy to spot at a glance which absences are still waiting for review without reading status labels on each entry.
Enabling the visual indicator
To turn on the striped overlay for an absence category, an admin needs to enable the setting in Salesforce:
- Open the Absence Category record in the flair HR app
- Enable Visually Separate Pending Requests
- Save the record
The striped pattern will then apply to all pending absences in that category across the Employee Hub and team calendars.
Managing Absence Requests in the Salesforce App
If you have access to the flair HR app on Salesforce, there are additional ways to manage employee absences.
Open the Absences page from your Salesforce navigation bar or by using the App Launcher 𓃑. Here you will find a list of all the absences recorded in your flair system.
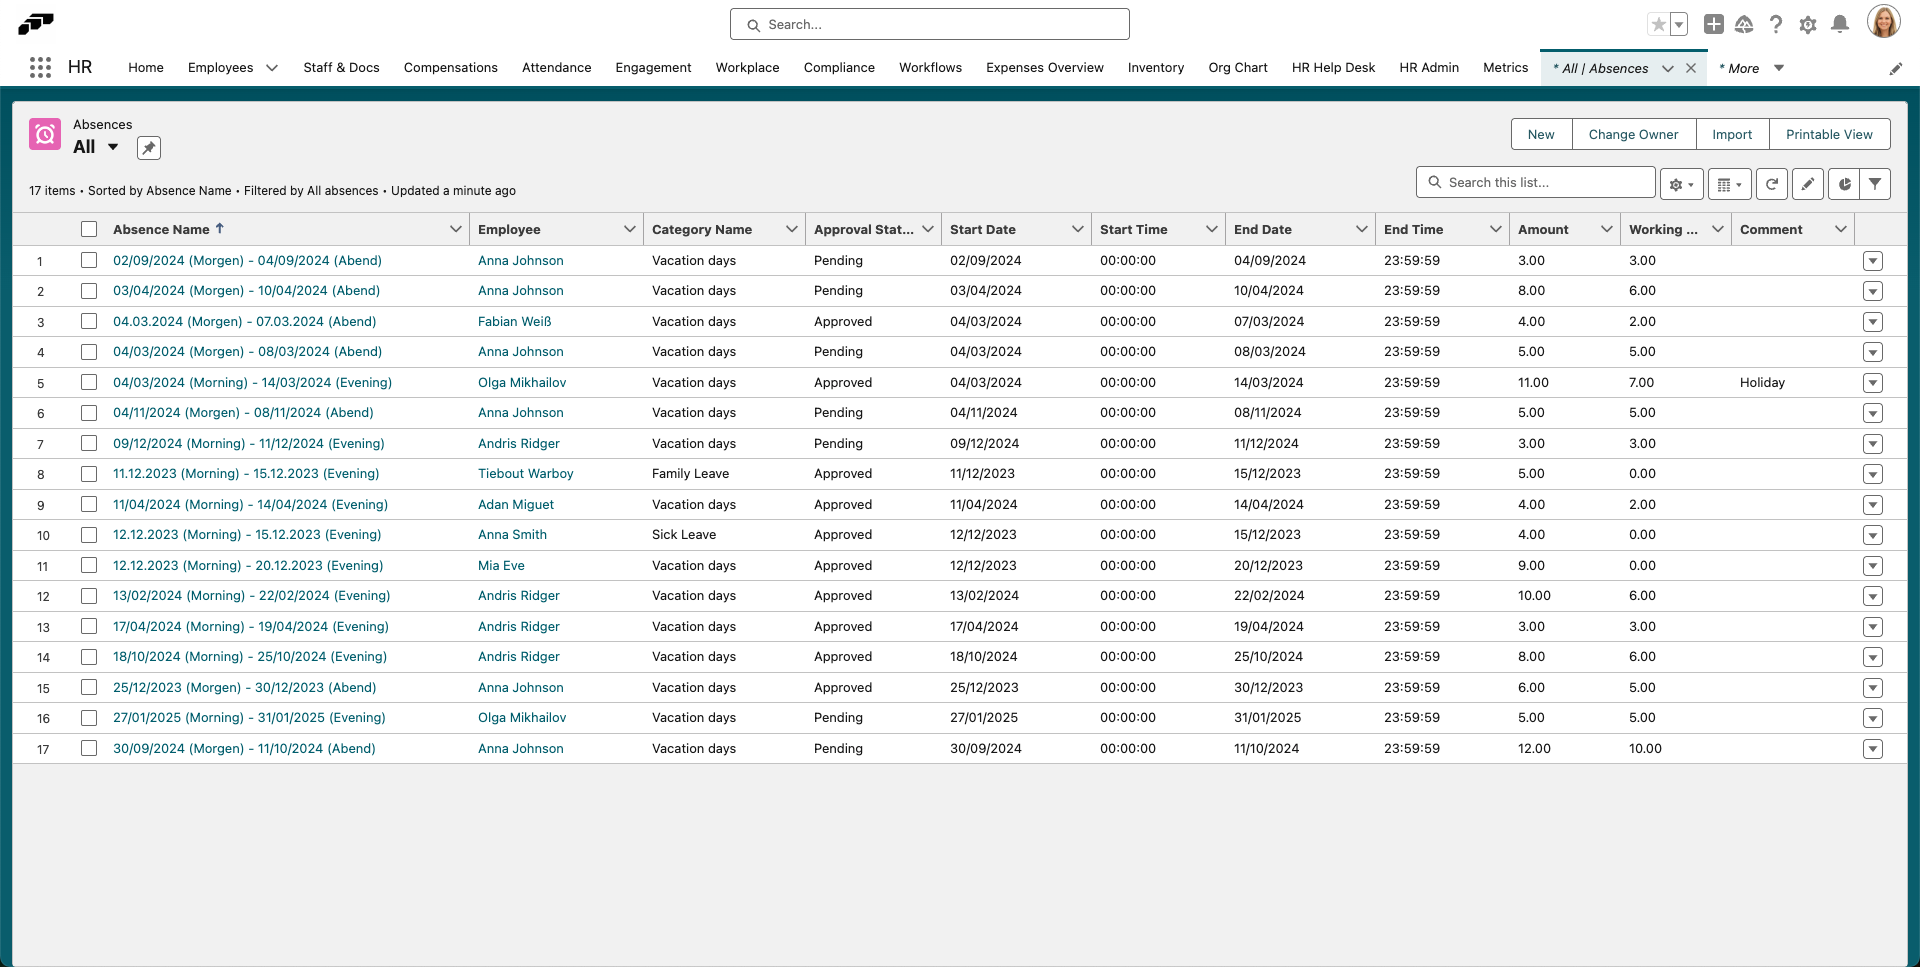
To find specific absences, you can click the column headers to sort by status, start date, employee, or another value. You can also use the search bar or filter button to further refine your search.
To respond to an absence request, click on the value in the Absence Name column. If you have the necessary permissions, you will now be able to view and edit values related to this absence. Click the pencil icon next to the Approval Status field and select Approved or Rejected. Then click Save.
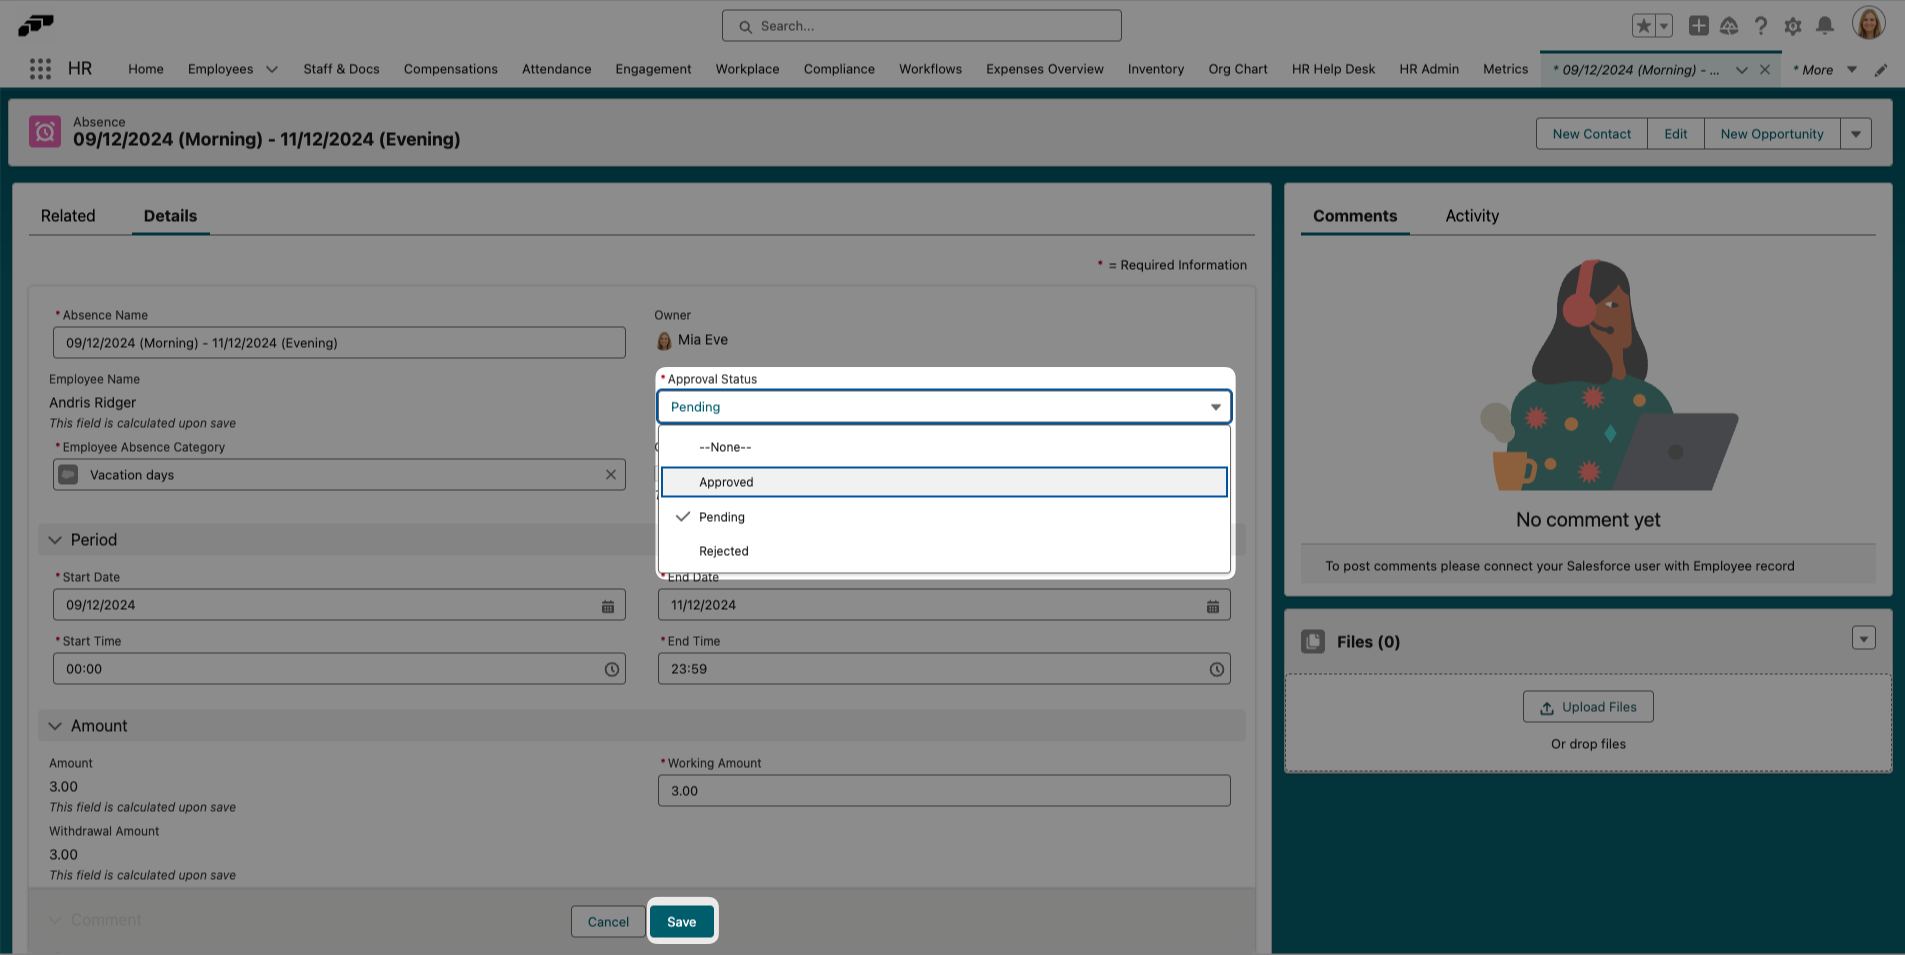
This can also be useful if you need to change the details of an absence, for example if an employee needs to change the dates of their absence.
If you need to remove an absence request, click on the down arrow ▼ in the top right corner of the absence and click Delete.
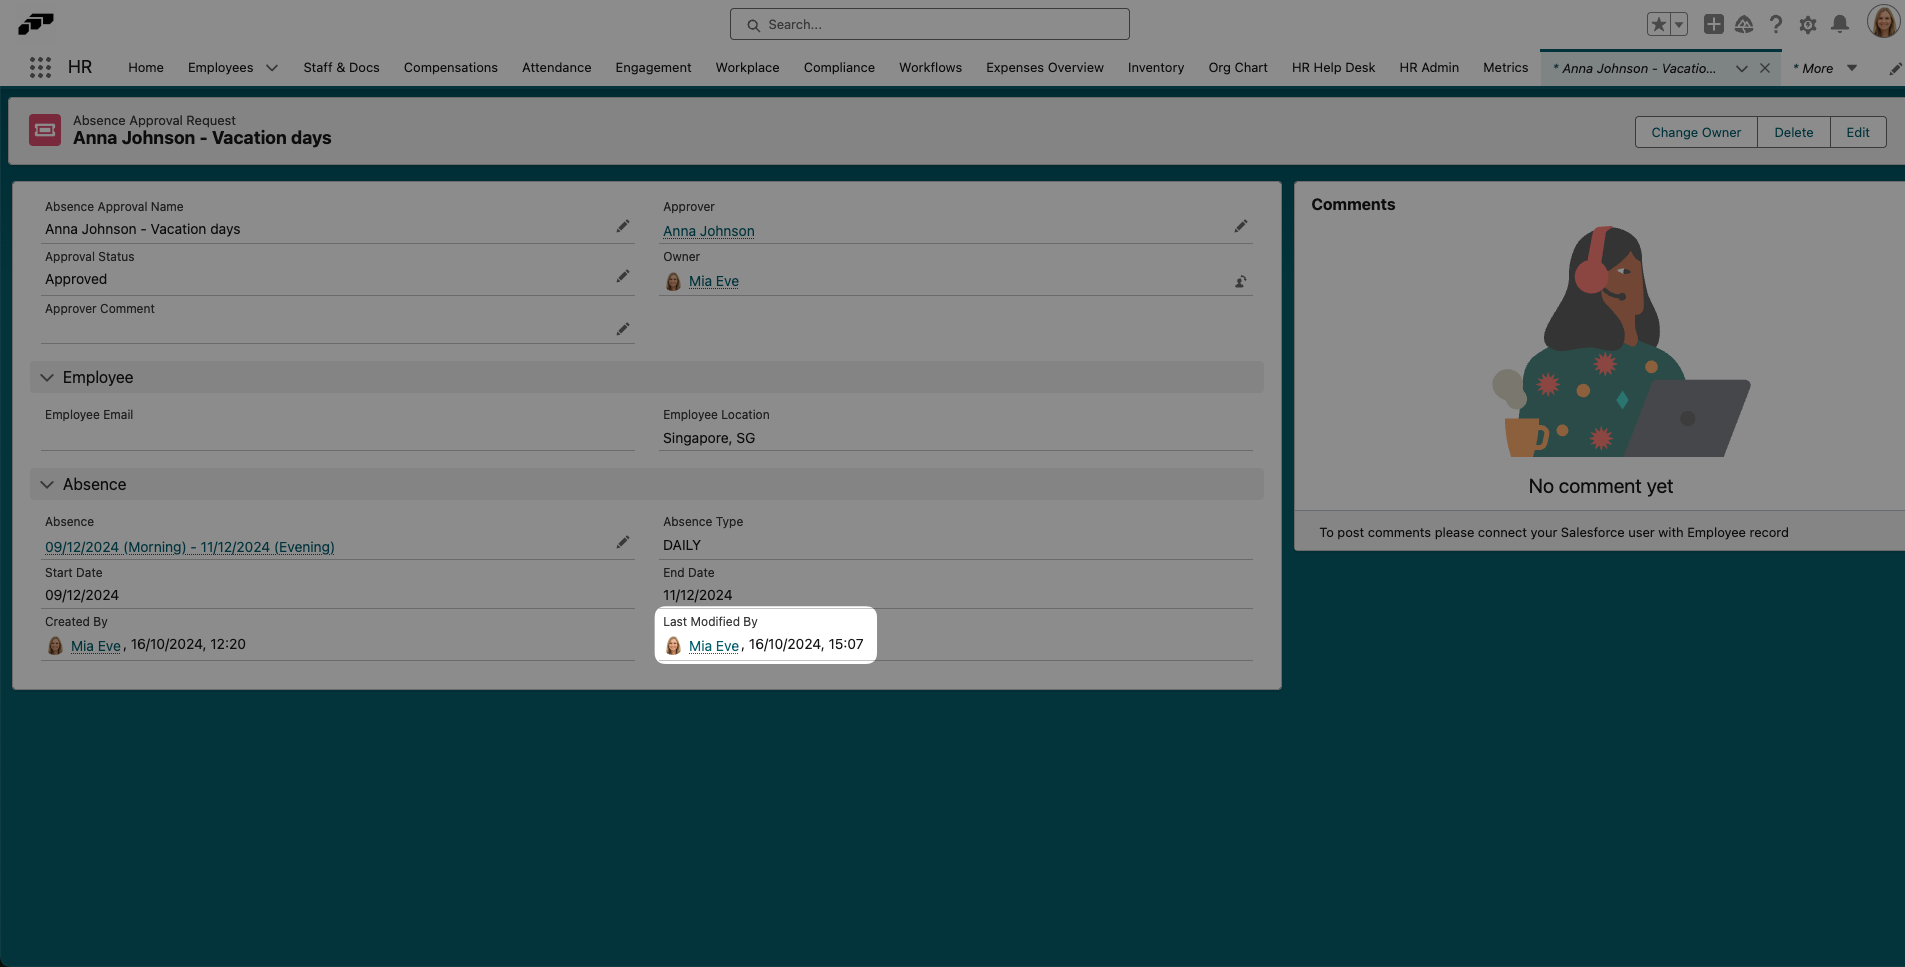
How To Check the Approver of an Absence Request
If you want to check who is responsible for approving an absence request, follow these simple steps.
Open the Absences page in the flair HR app and select the absence you're looking for. Now click the Related tab. Under Absence Approval Requests, you will see the name of the approver and the status of approval. If you click on the Absence Approval Name, you will see further details.
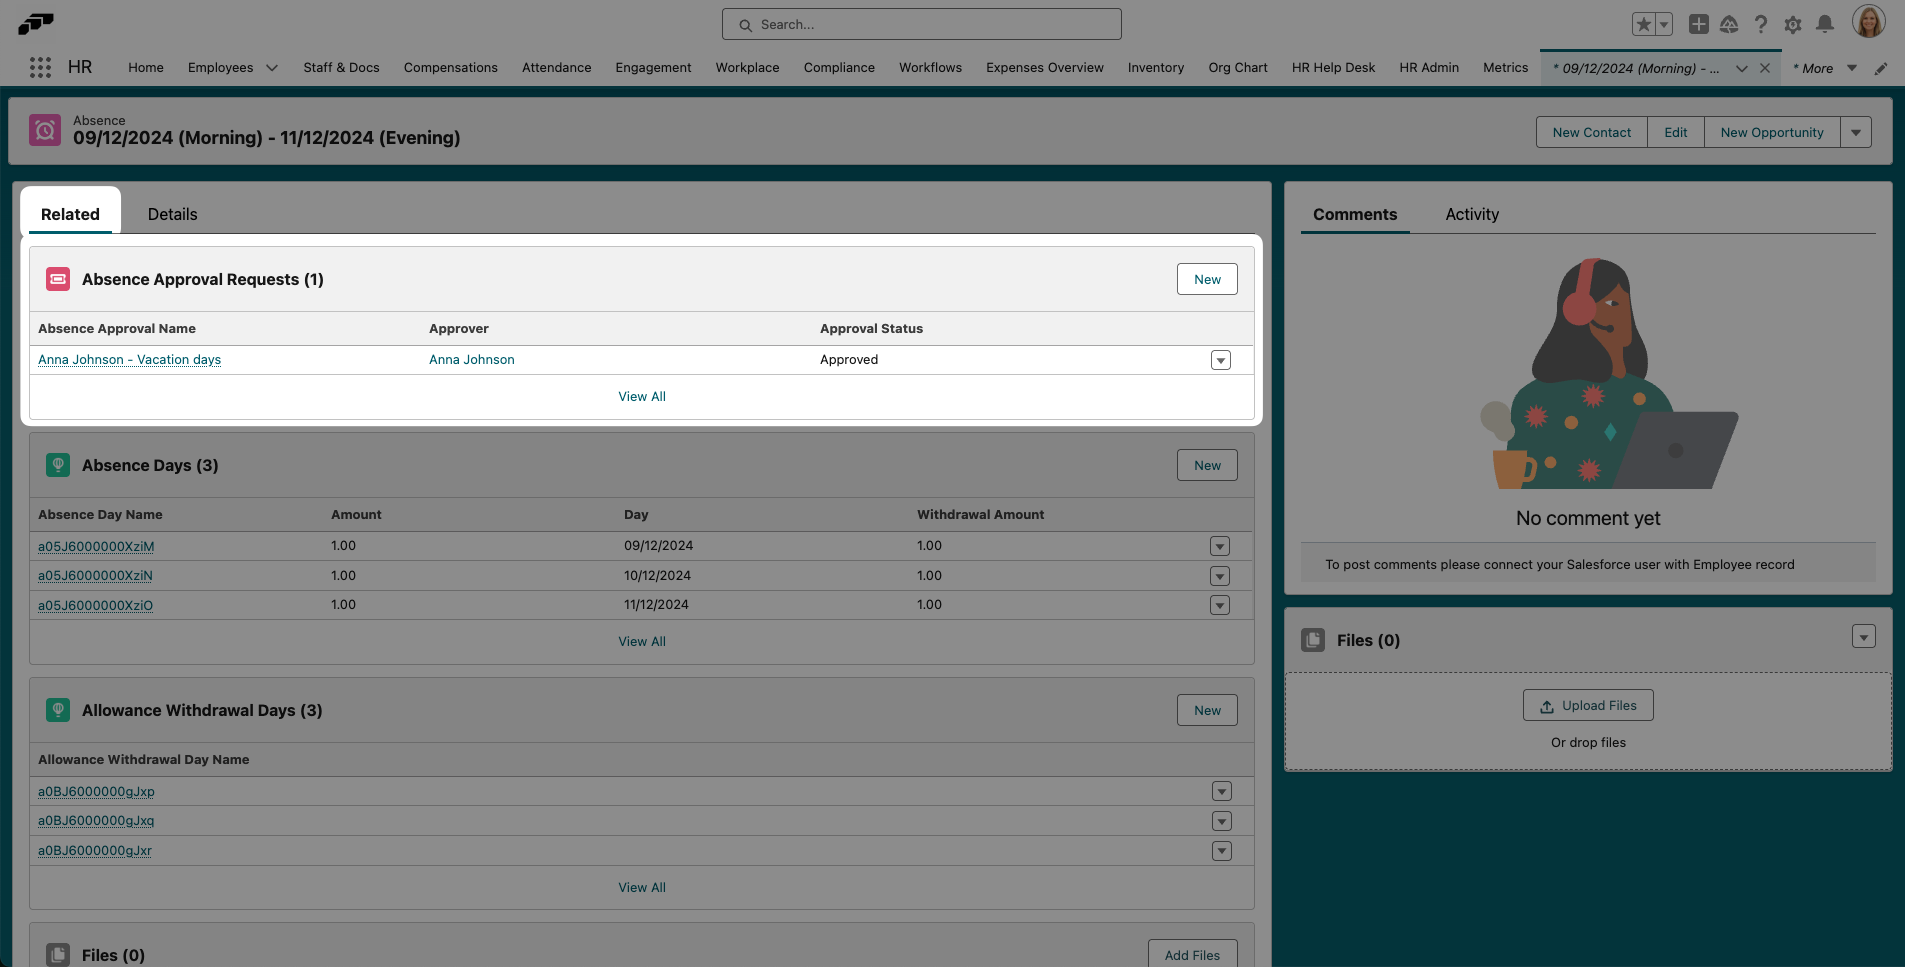
The Last Modified By field shows you who last made a change to this absence. This helps you identify who approved an absence request.