Configure time tracking
Prepare flair time tracking for employees by defining expected hours, tracking rules, approvals, labels, and Salesforce validation.
HR Admins and Salesforce Admins in Salesforce. Employees use the resulting configuration in the Employee Hub, mobile app, Slack, or connected devices.
Before you begin
- You can access the flair HR app and the relevant Salesforce Setup objects.
- Employee records have the employment dates needed for workload assignments.
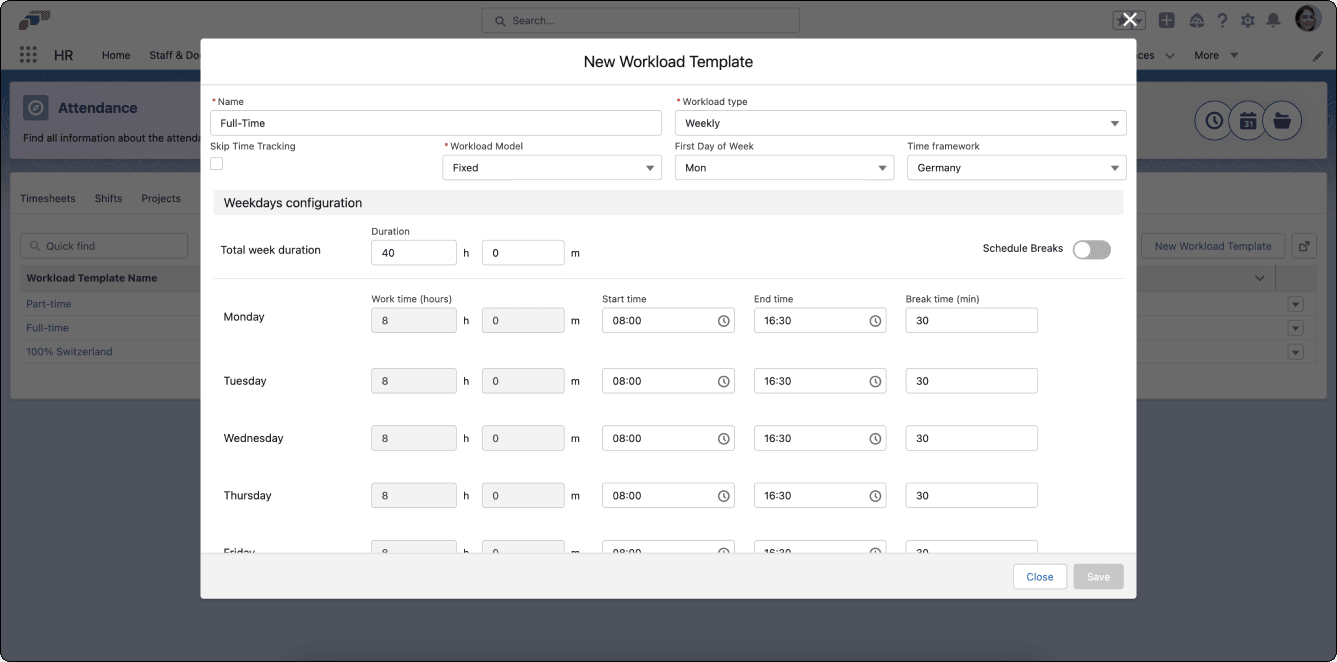
Configure a workload template
- In the flair HR app, open Attendance → Workload Templates.
- Click New Workload Template.
- Enter a descriptive name.
- In Counting Period, select weekly or monthly counting.
- Select the first day of the workweek.
- Select the applicable Time Framework.
- If the workload does not require time tracking, select Skip Time Tracking.
- Select a fixed or flexible workload model.
- Enter the required hours and break schedule.
- Click Save.
Configure a Time Framework
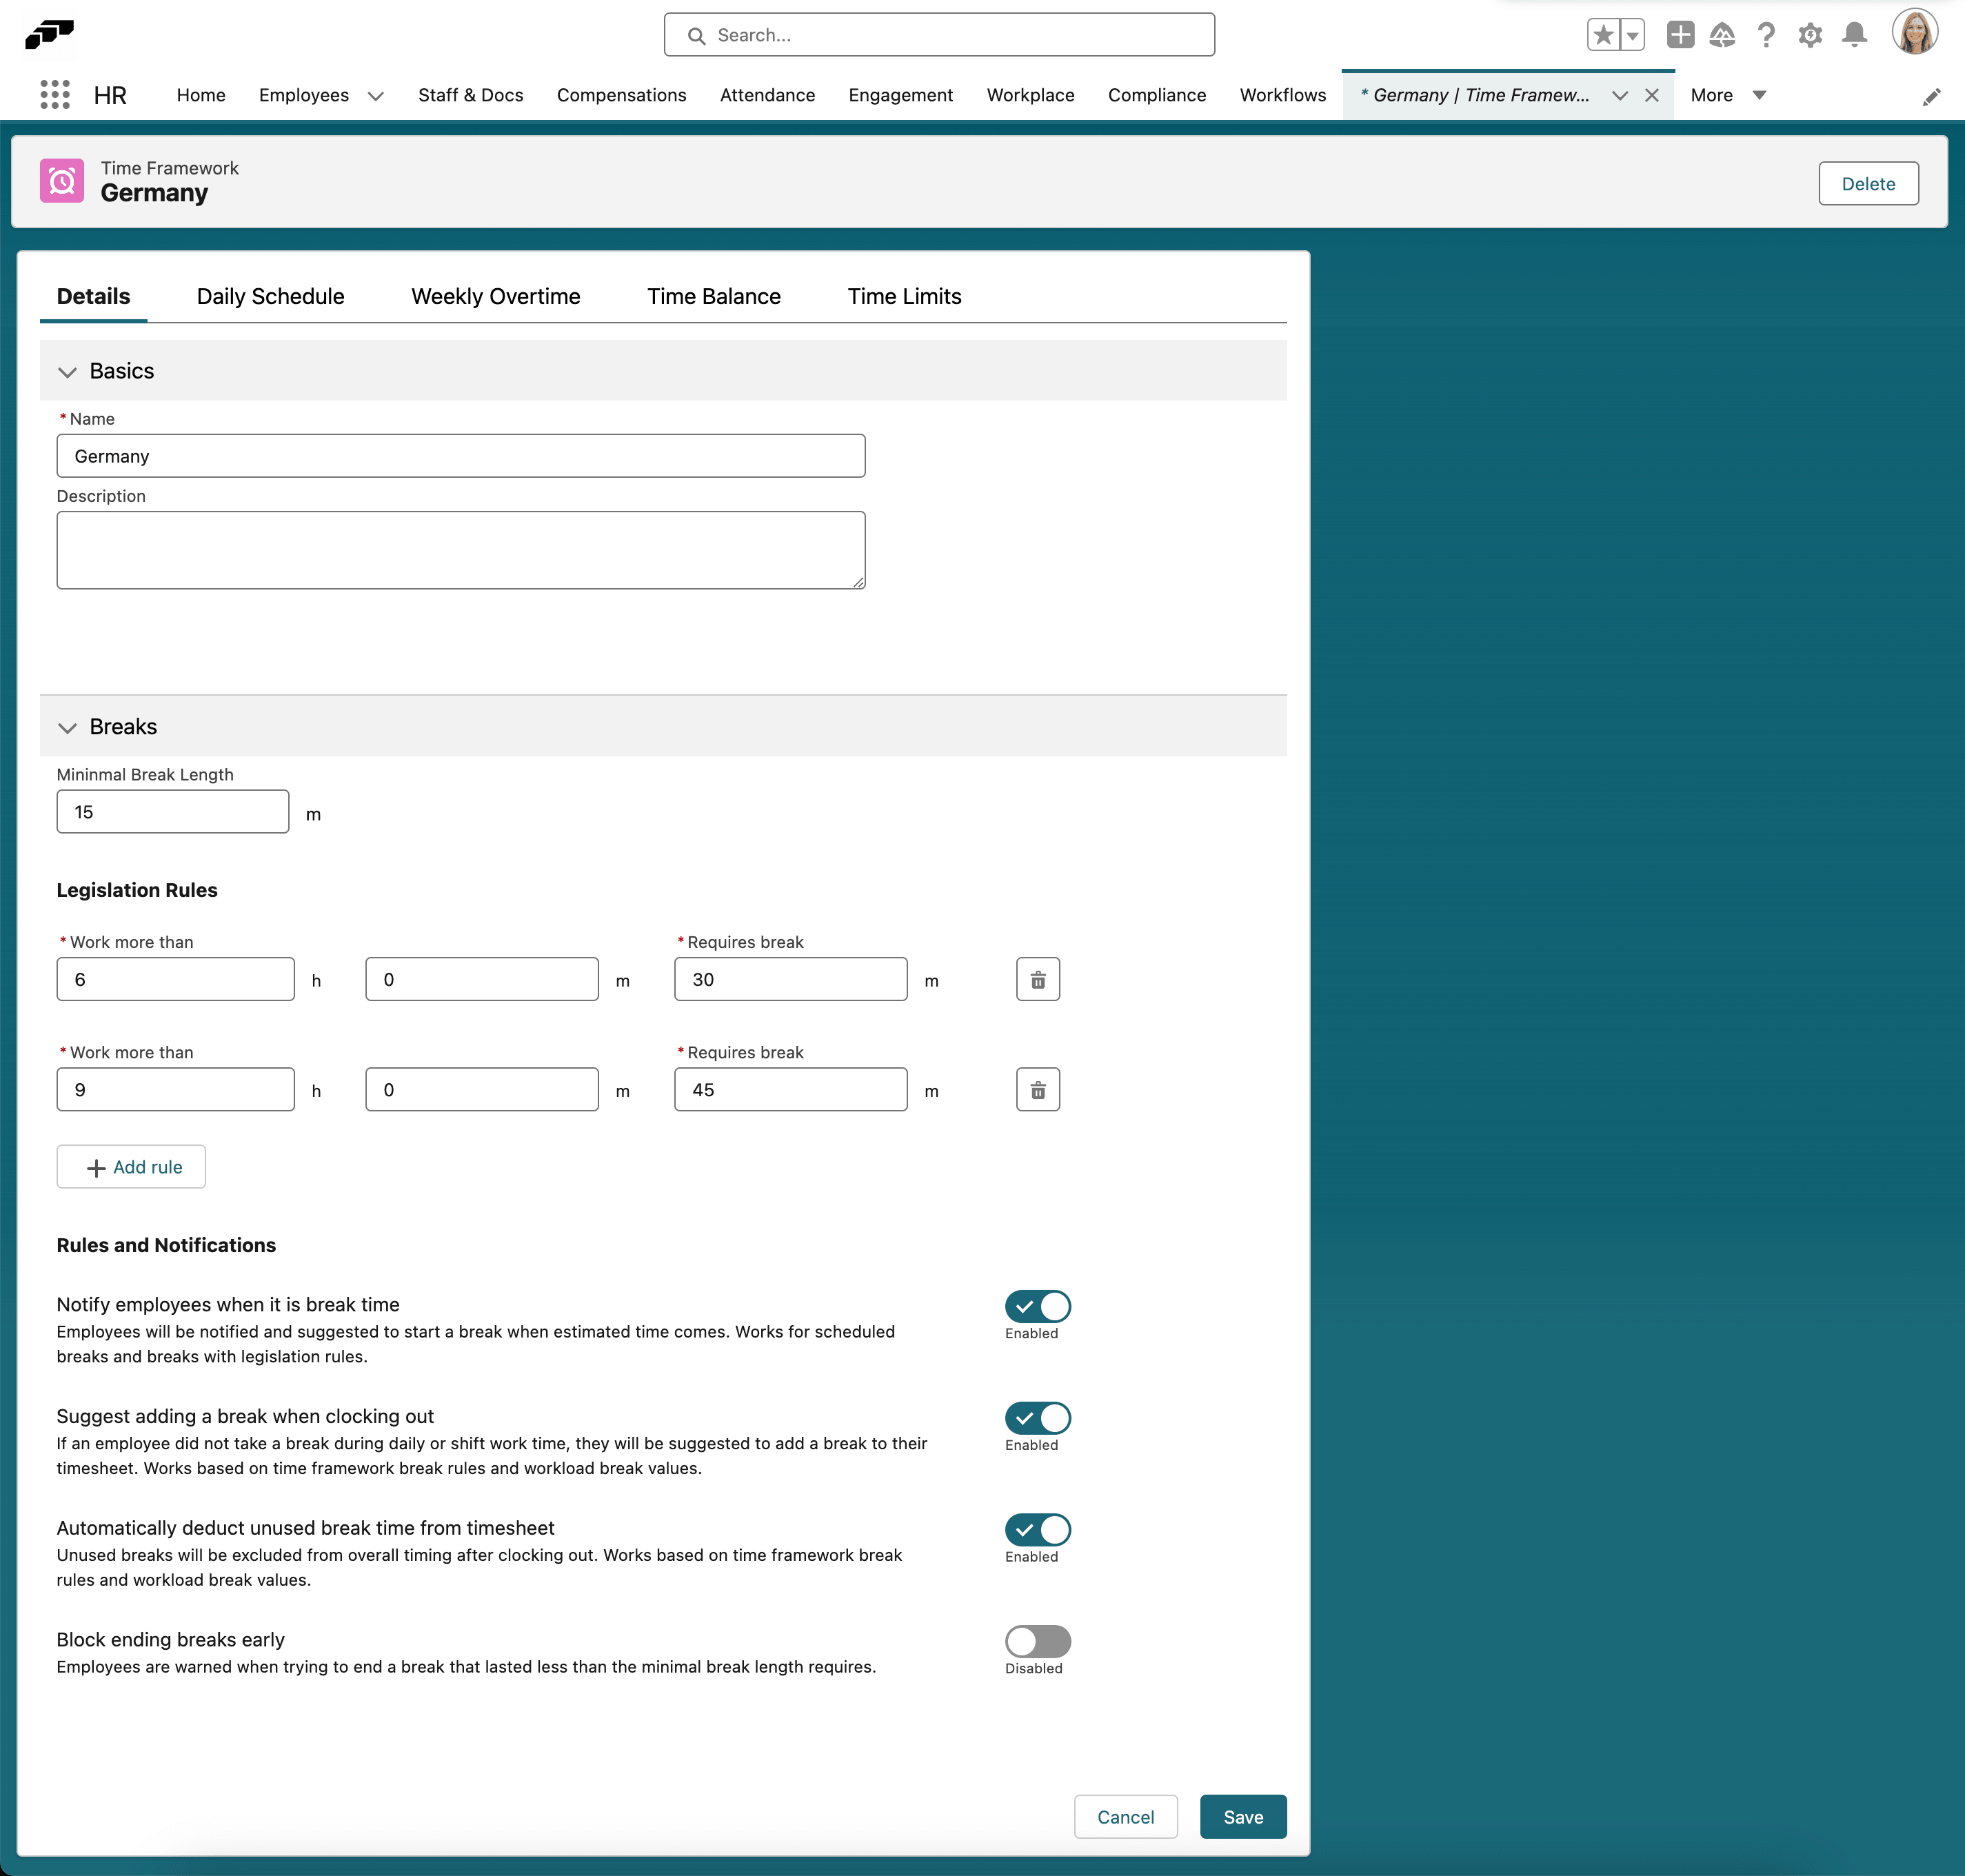
- In the flair HR app, open Time Frameworks.
- Click New.
- Enter a name.
- Configure working hours, break rules, overtime calculation, rounding, and time limits.
- Click Save.
Configure rounding
Time entries and breaks can use different rounding rules for different employee groups.
| Rounding Interval | Result |
|---|---|
| 1 minute | Removes seconds without further rounding. |
| 5 minutes | Rounds to a 5-minute boundary. |
| 10 minutes | Rounds to a 10-minute boundary. |
| 15 minutes | Rounds to a 15-minute boundary. |
| 30 minutes | Rounds to a 30-minute boundary. |
For intervals longer than one minute, select Nearest, Up, or Down as the Rounding Method.
Configure time limits
- Open the Time Framework.
- Open Time Limits.
- Select whether to allow unrestricted tracking, restrict hours by workload, or use a custom daily duration.
- Configure maximum daily hours, minimum break duration, and retroactive entry limits.
- Select whether flair clocks the employee out or allows tracking with a notification when the limit is reached.
- To prevent entries for later dates, enable Restrict Future Time Entries.
- Click Save.
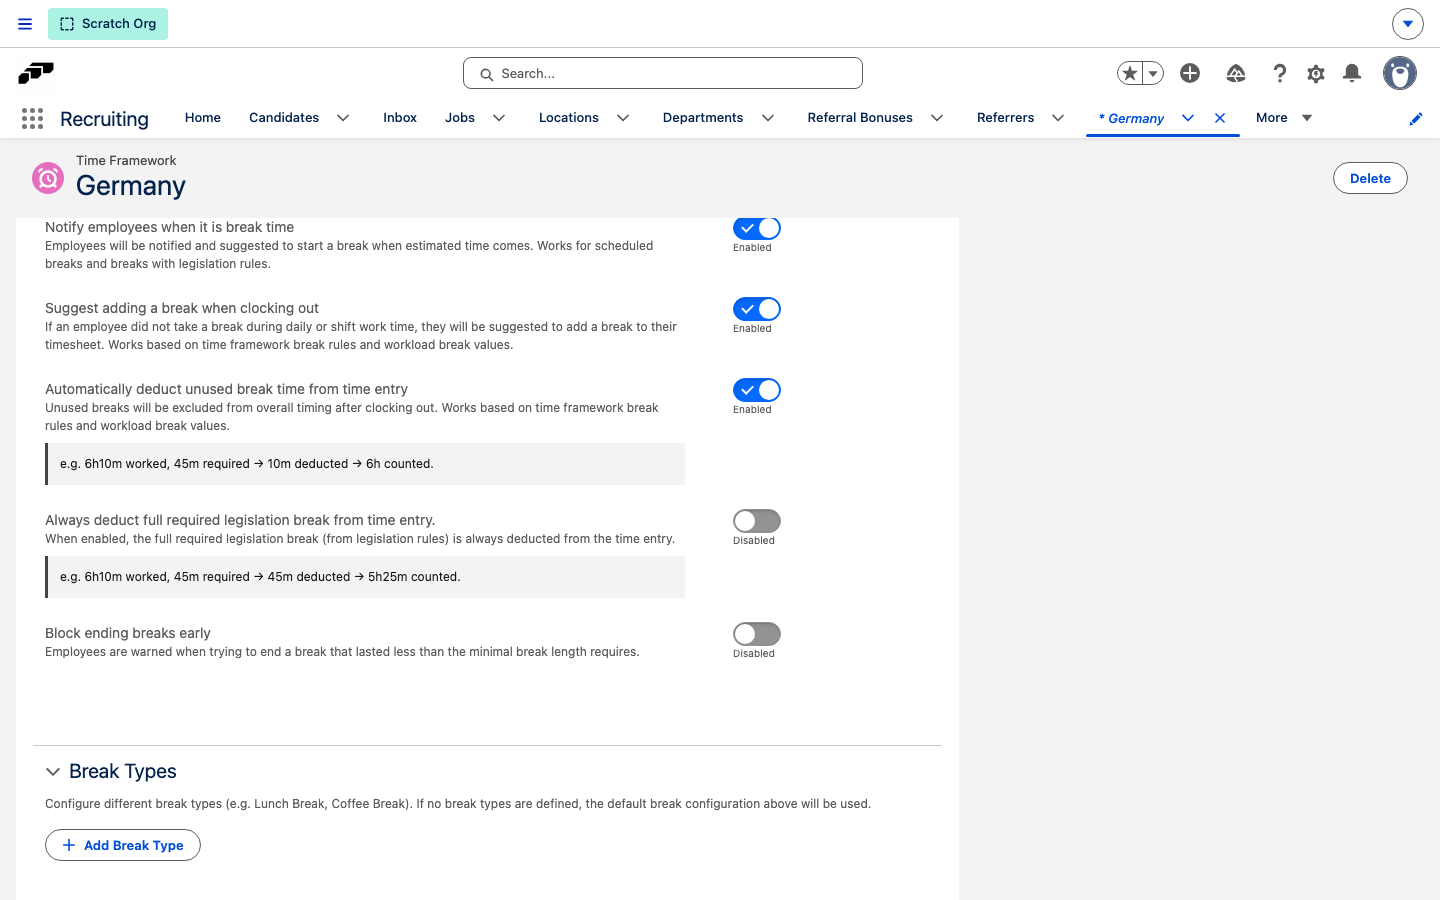
Deduct the full legislated break
By default, automatic break deduction removes only the difference between the tracked break and the legislated minimum. Enable this option to deduct the full legislated break instead, even when the employee took a shorter break.
- Open the Time Framework.
- Open the Breaks tab.
- Enable Always deduct full required legislation break from time entry.
- Click Save.
For a shift requiring a 45-minute break, this deducts the full 45 minutes even if only 10 minutes were needed to reach the minimum — 6h10m worked, 45m required → 45m deducted → 5h25m counted, instead of 10m deducted → 6h counted. The Employee Hub's automatic-break summary reflects the setting with "The full required legislation break is always deducted when clocking out."
Hide time tracking controls in Hub or mobile
Admins can hide the clock-in and clock-out controls while keeping timesheets visible, independently for the Employee Hub and the mobile app — useful for organizations that track time through a kiosk, a scheduler, or another system.
- Open the Time Framework.
- Enable Hide Time Tracking Controls in Hub to hide clock-in and clock-out in the Employee Hub, or Hide Time Tracking Controls in Mobile to hide them in the mobile app.
- Click Save.
Employees keep view access to their timesheets; they cannot start or stop time from the app where the control is hidden.
Assign approval responsibilities
flair sends an employee's timesheet to the manager who holds the Parent Position in the company hierarchy. You can review the main and additional managers on the employee record.
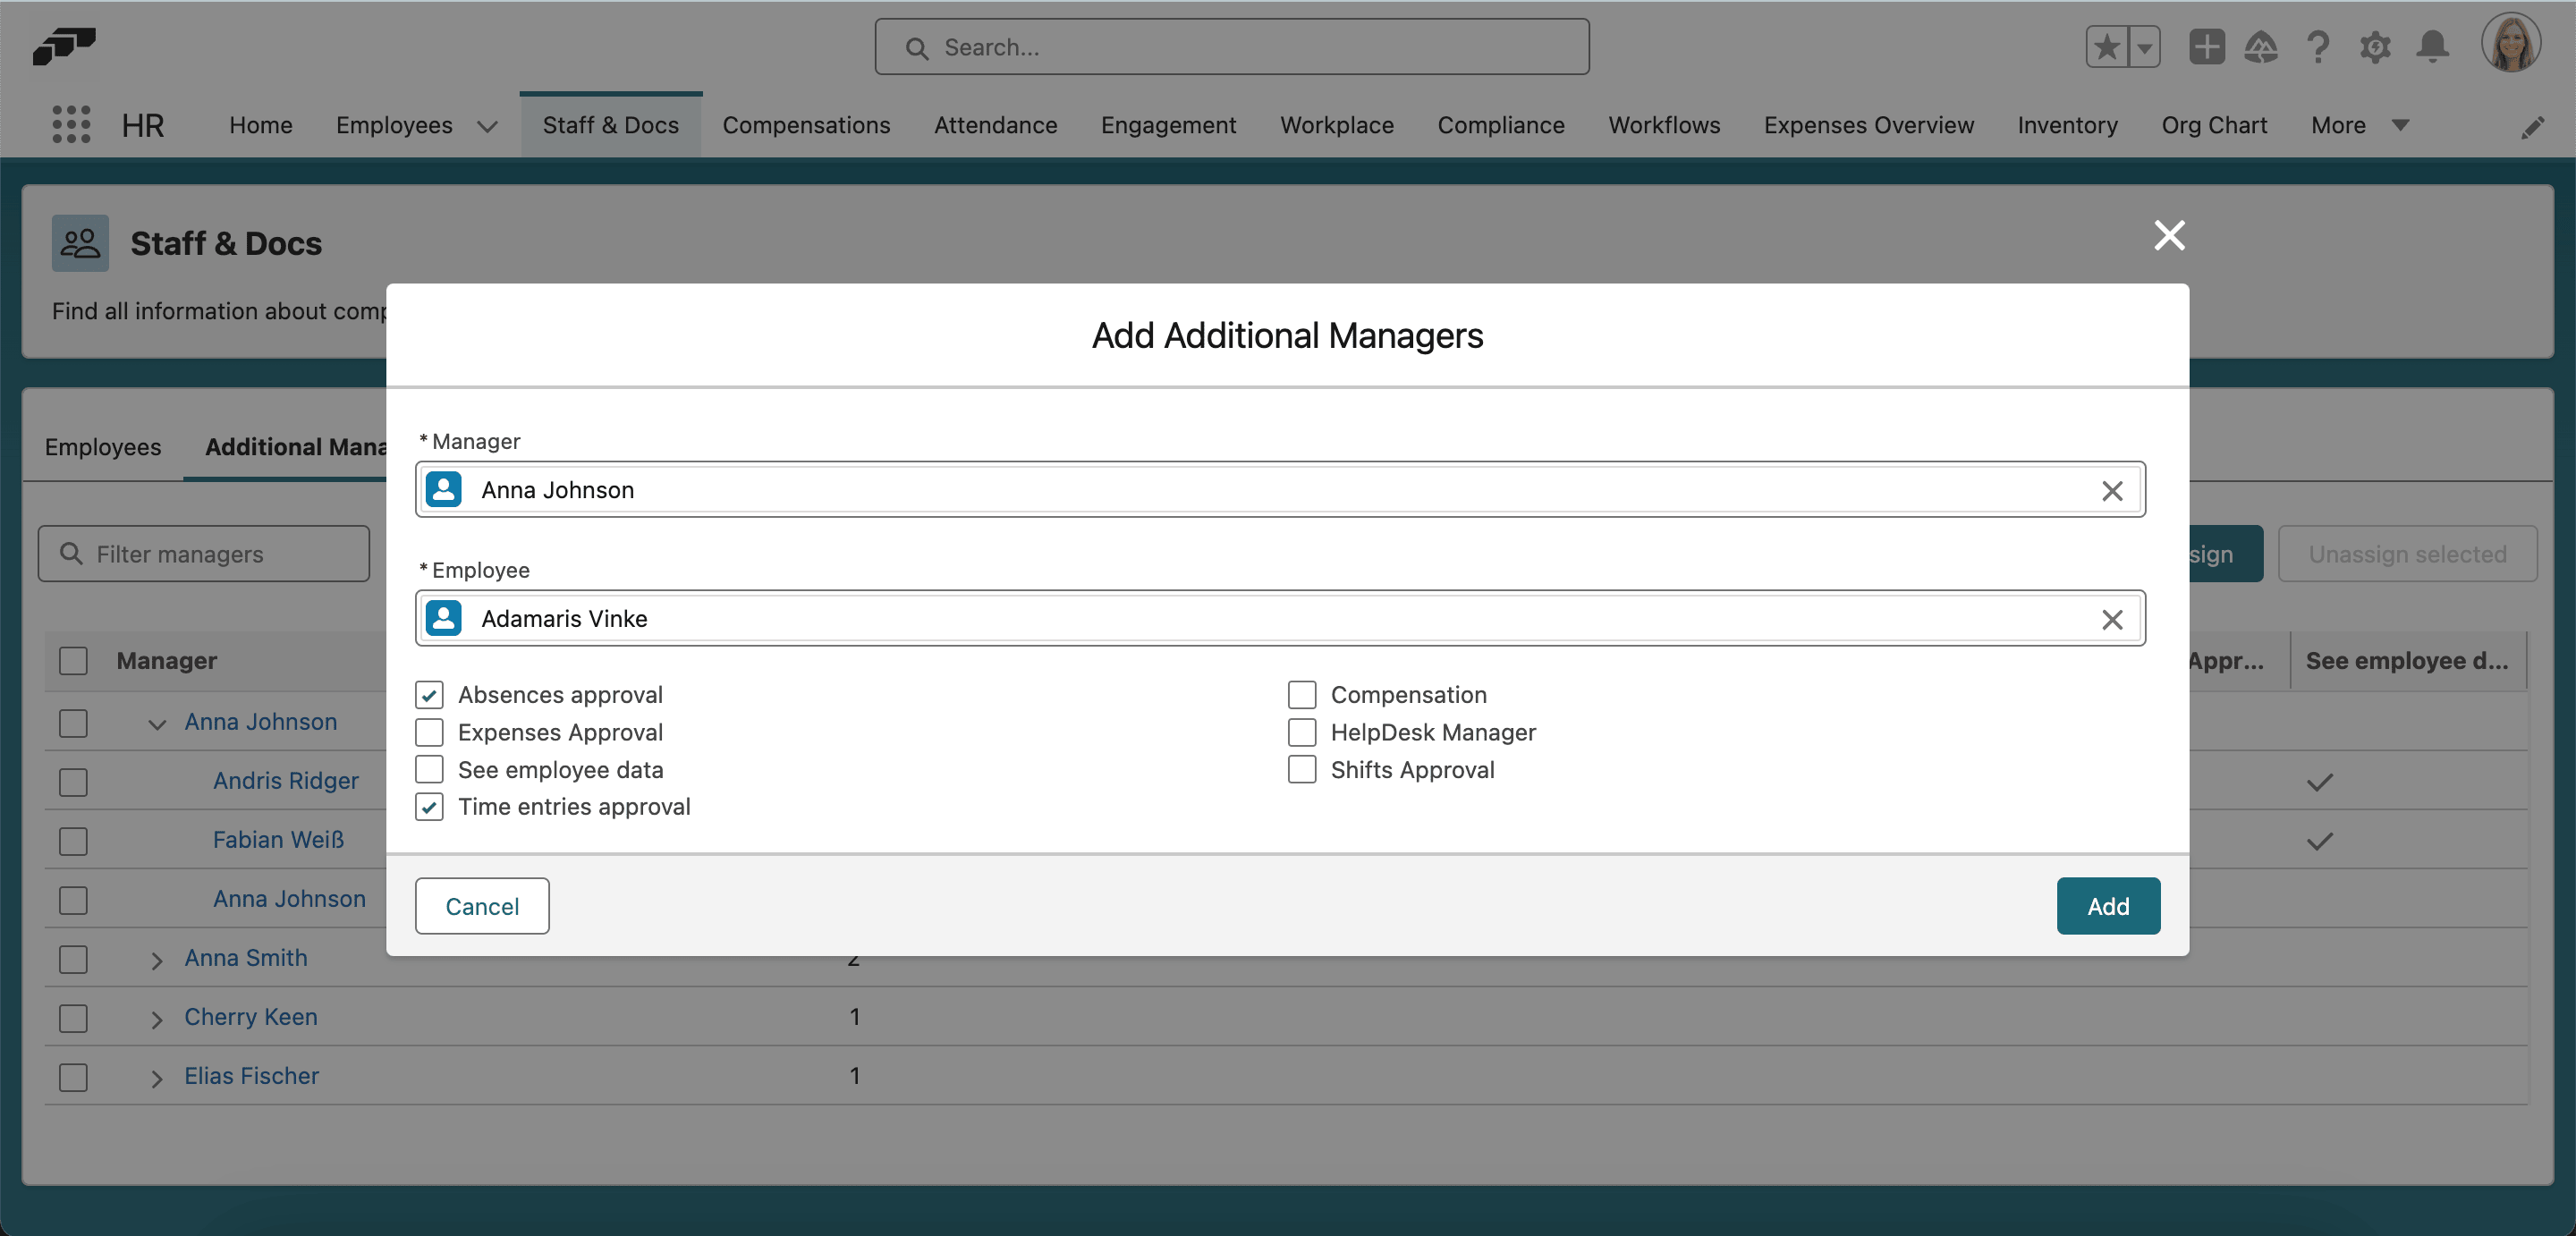
To assign an additional approver:
- In the flair HR app, open Staff (or the legacy Staff & Docs tab).
- Open Additional Managers.
- Click Assign.
- Select the manager.
- Select the employee.
- Enable Time Entries Approval.
- Save the assignment.
Configure break types
- In the flair HR app, open Time Frameworks.
- Select the Time Framework.
- Open Break Types.
- Click New.
- Enter the break type name.
- Configure its duration rules.
- Click Save.
Employees can select the resulting type, such as Lunch, Coffee, or Smoke, when they start a break in the Employee Hub or mobile app.
Block tracking during absences
- In the flair HR app, open Absence Settings.
- Create or edit the absence category.
- Enable Time Tracking Restricted.
- Click Save.
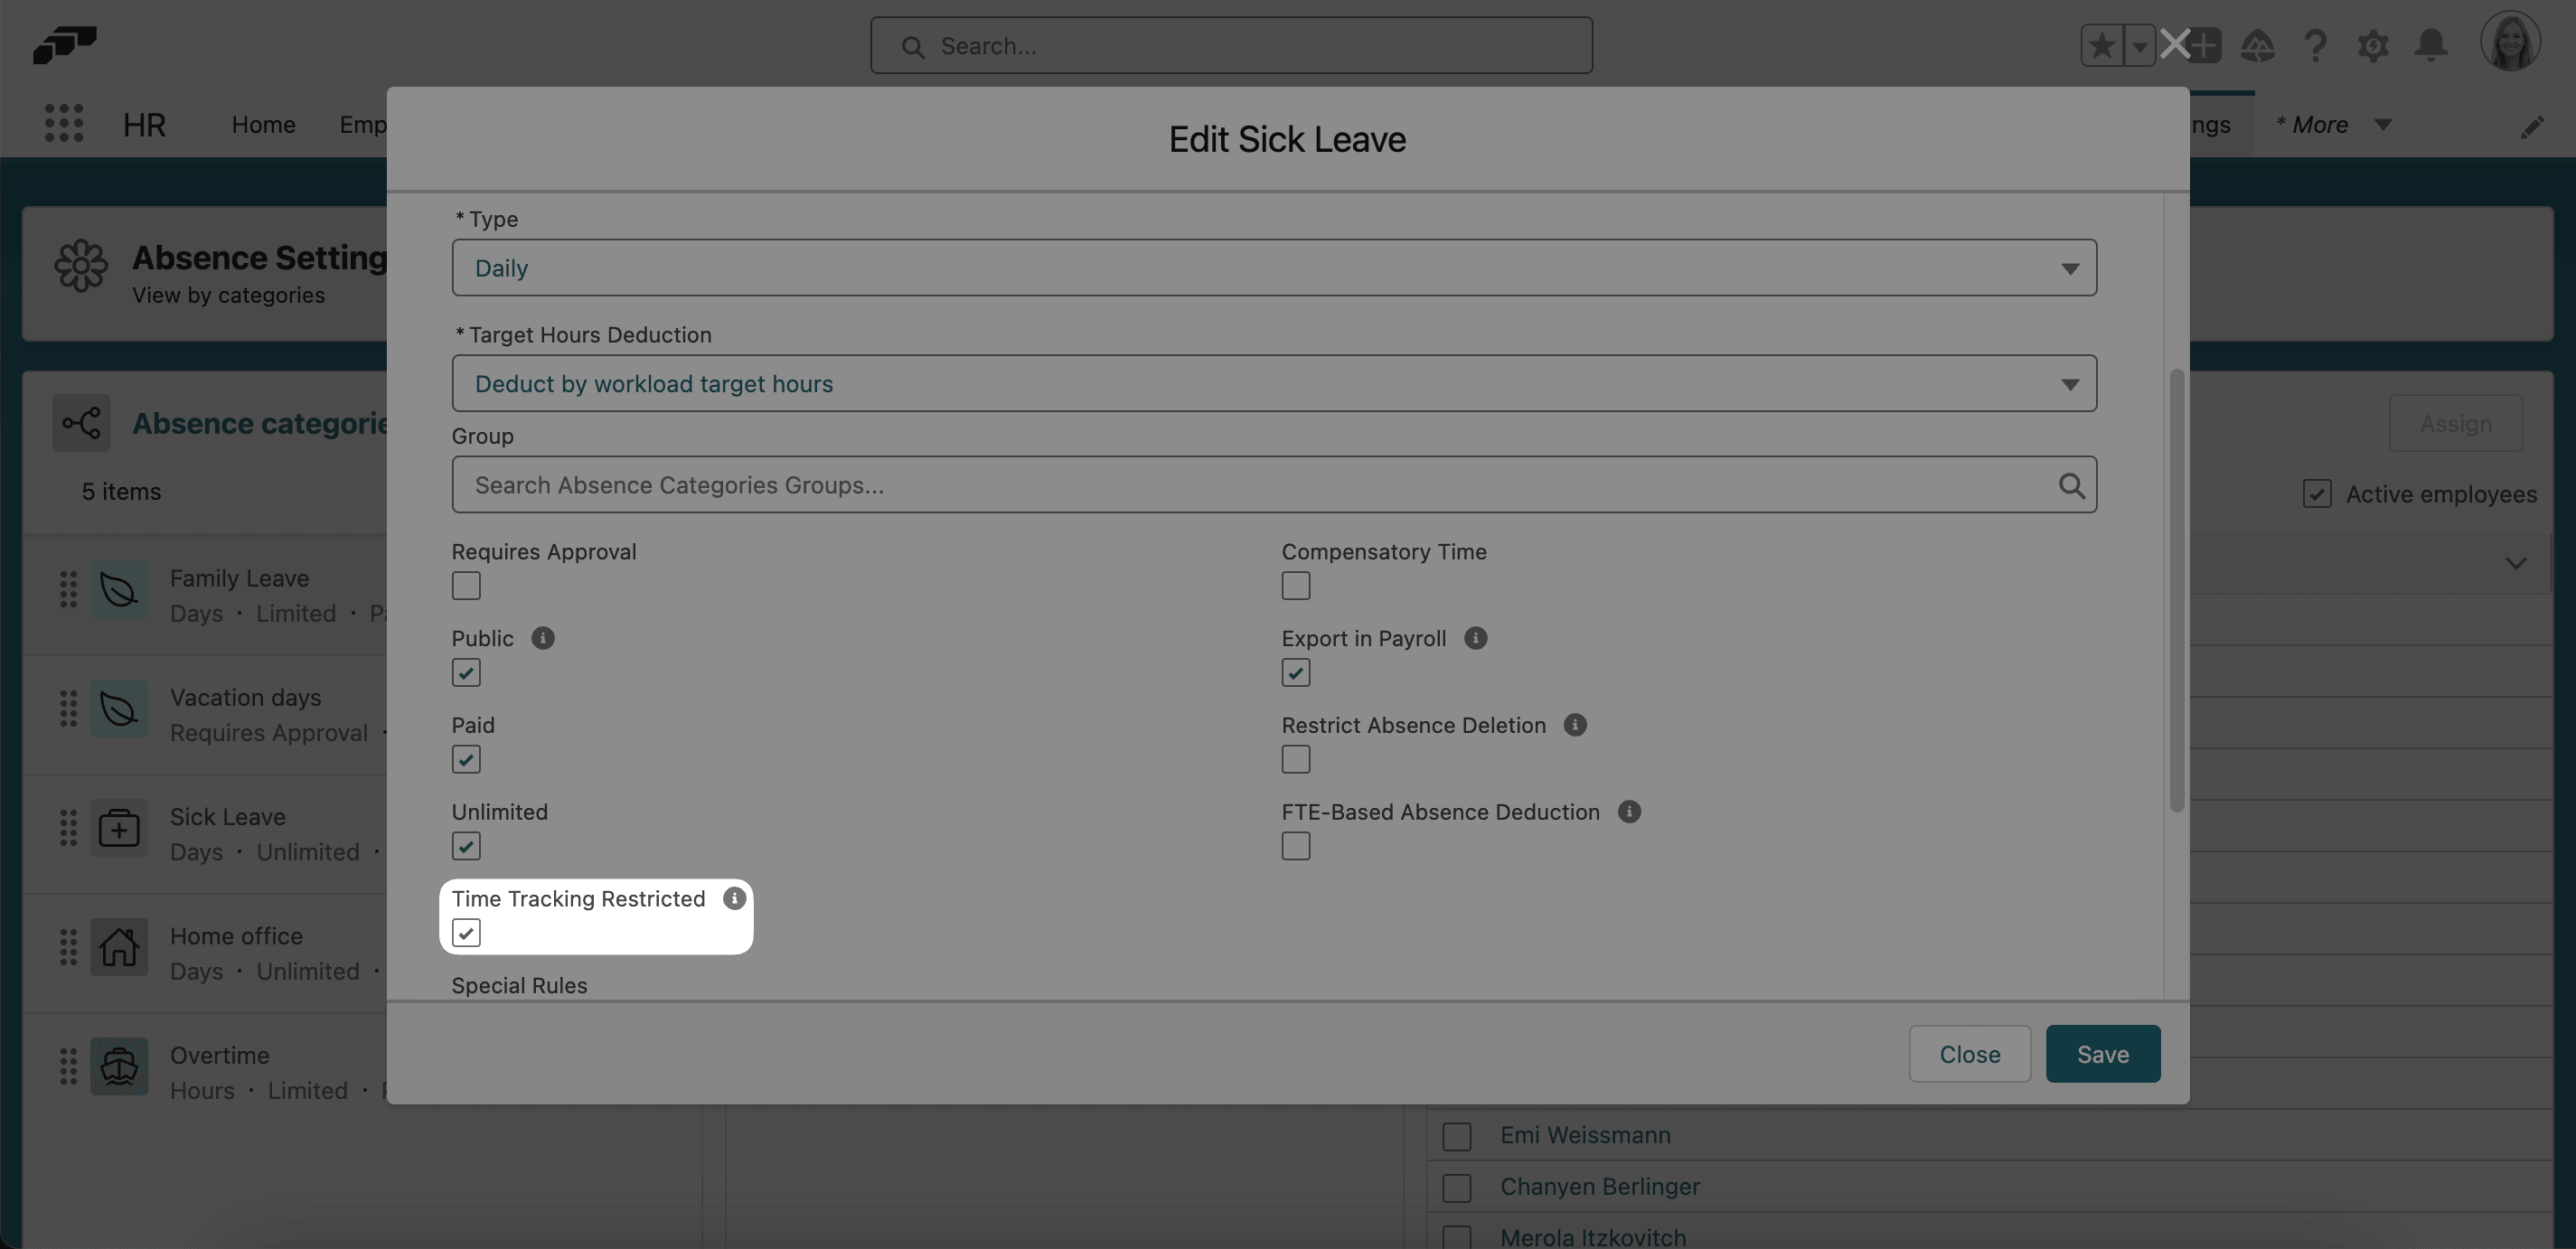
flair blocks tracking during approved absences in that category. An auto-tracking flow also skips days with full-time or part-time absences.
Keep entries within workload dates
flair prevents employees from creating time entries outside the active workload date range. When an employee's schedule changes, end the old workload and create a new workload for the next period.
Create a flexible workload
- In the flair HR app, open the employee record.
- Open Time And Workload.
- Click Add New Workload.
- Set the workload model to Flexible.
- Enter the employee's FTE percentage.
- For a completely flexible schedule, leave daily hours undefined.
- For a rotating schedule, set hours for the relevant dates in the calendar.
- Click Save.
For absence policies, configure FTE-based proration so leave entitlement follows the flexible workload.
End a workload
- On the employee record, open Time And Workload.
- From the active workload menu, select Edit.
- Enter the End Date.
- Click Save.
- If the schedule continues under different rules, create the next workload with a later start date.
Assign Time Frameworks in bulk
- From the App Launcher (⋮⋮ grid icon), open Employee Workloads.
- Select the All list view.
- Select the employees.
- Click Edit Time Framework: Item.
- Select the Time Framework.
- Enable Update selected items.
- Click Apply.
- Click Save.
Create and configure Time Types
Time Types label work such as regular work, travel, or on-call time. They can also split a worked period into regular and overtime parts on the timesheet.
- In the flair HR app, open Time Types.
- Click New.
- Enter the Time Type name.
- To apply the type only within the employee's workload, enable Regular Hours Only.
- To apply the type only beyond the day's workload, enable Overtime Hours Only.
- Click Save.
Leave both options disabled to apply the Time Type to the entire worked period. Time Framework overtime rules still determine when overtime accrues and how flair compensates it.
Block time tracking on selected weekdays
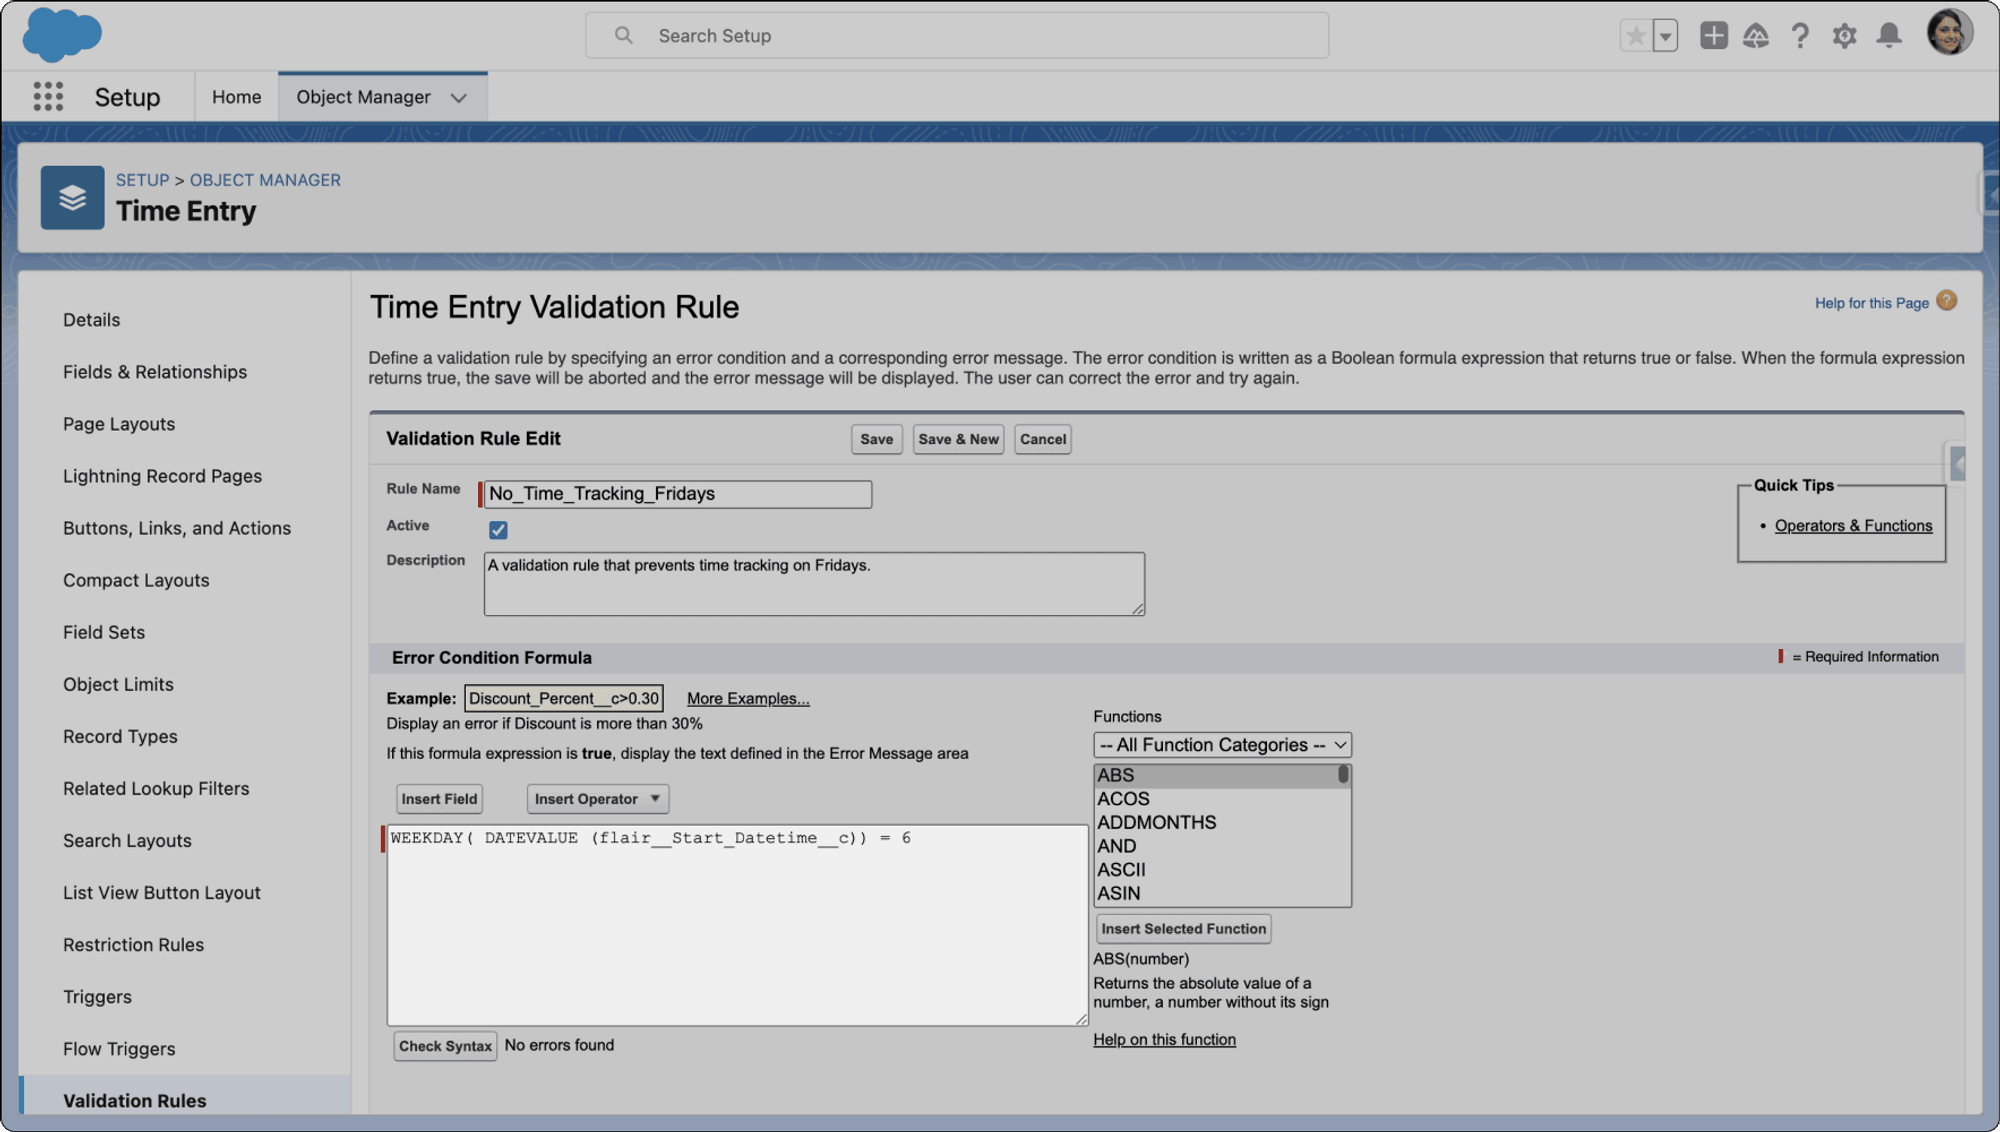
Create validation rules on both Time Entry objects so employees cannot use the tracker or add an entry on the selected weekday.
Block tracked entries
- In Salesforce, open Setup → Object Manager.
- Select Time Entry.
- Open Validation Rules.
- Click New.
- Enter
WEEKDAY(DATEVALUE(flair__Start_Datetime__c)) = 6as the formula to block Friday. - Enter the message employees should see in Error Message.
- Save and activate the rule.
The number represents the weekday, starting with Sunday as 1.
Block manually added entries
- In Object Manager, select Time Entry Change Request.
- Open Validation Rules.
- Click New.
- Enter the same weekday formula.
- Enter the error message.
- Save and activate the rule.
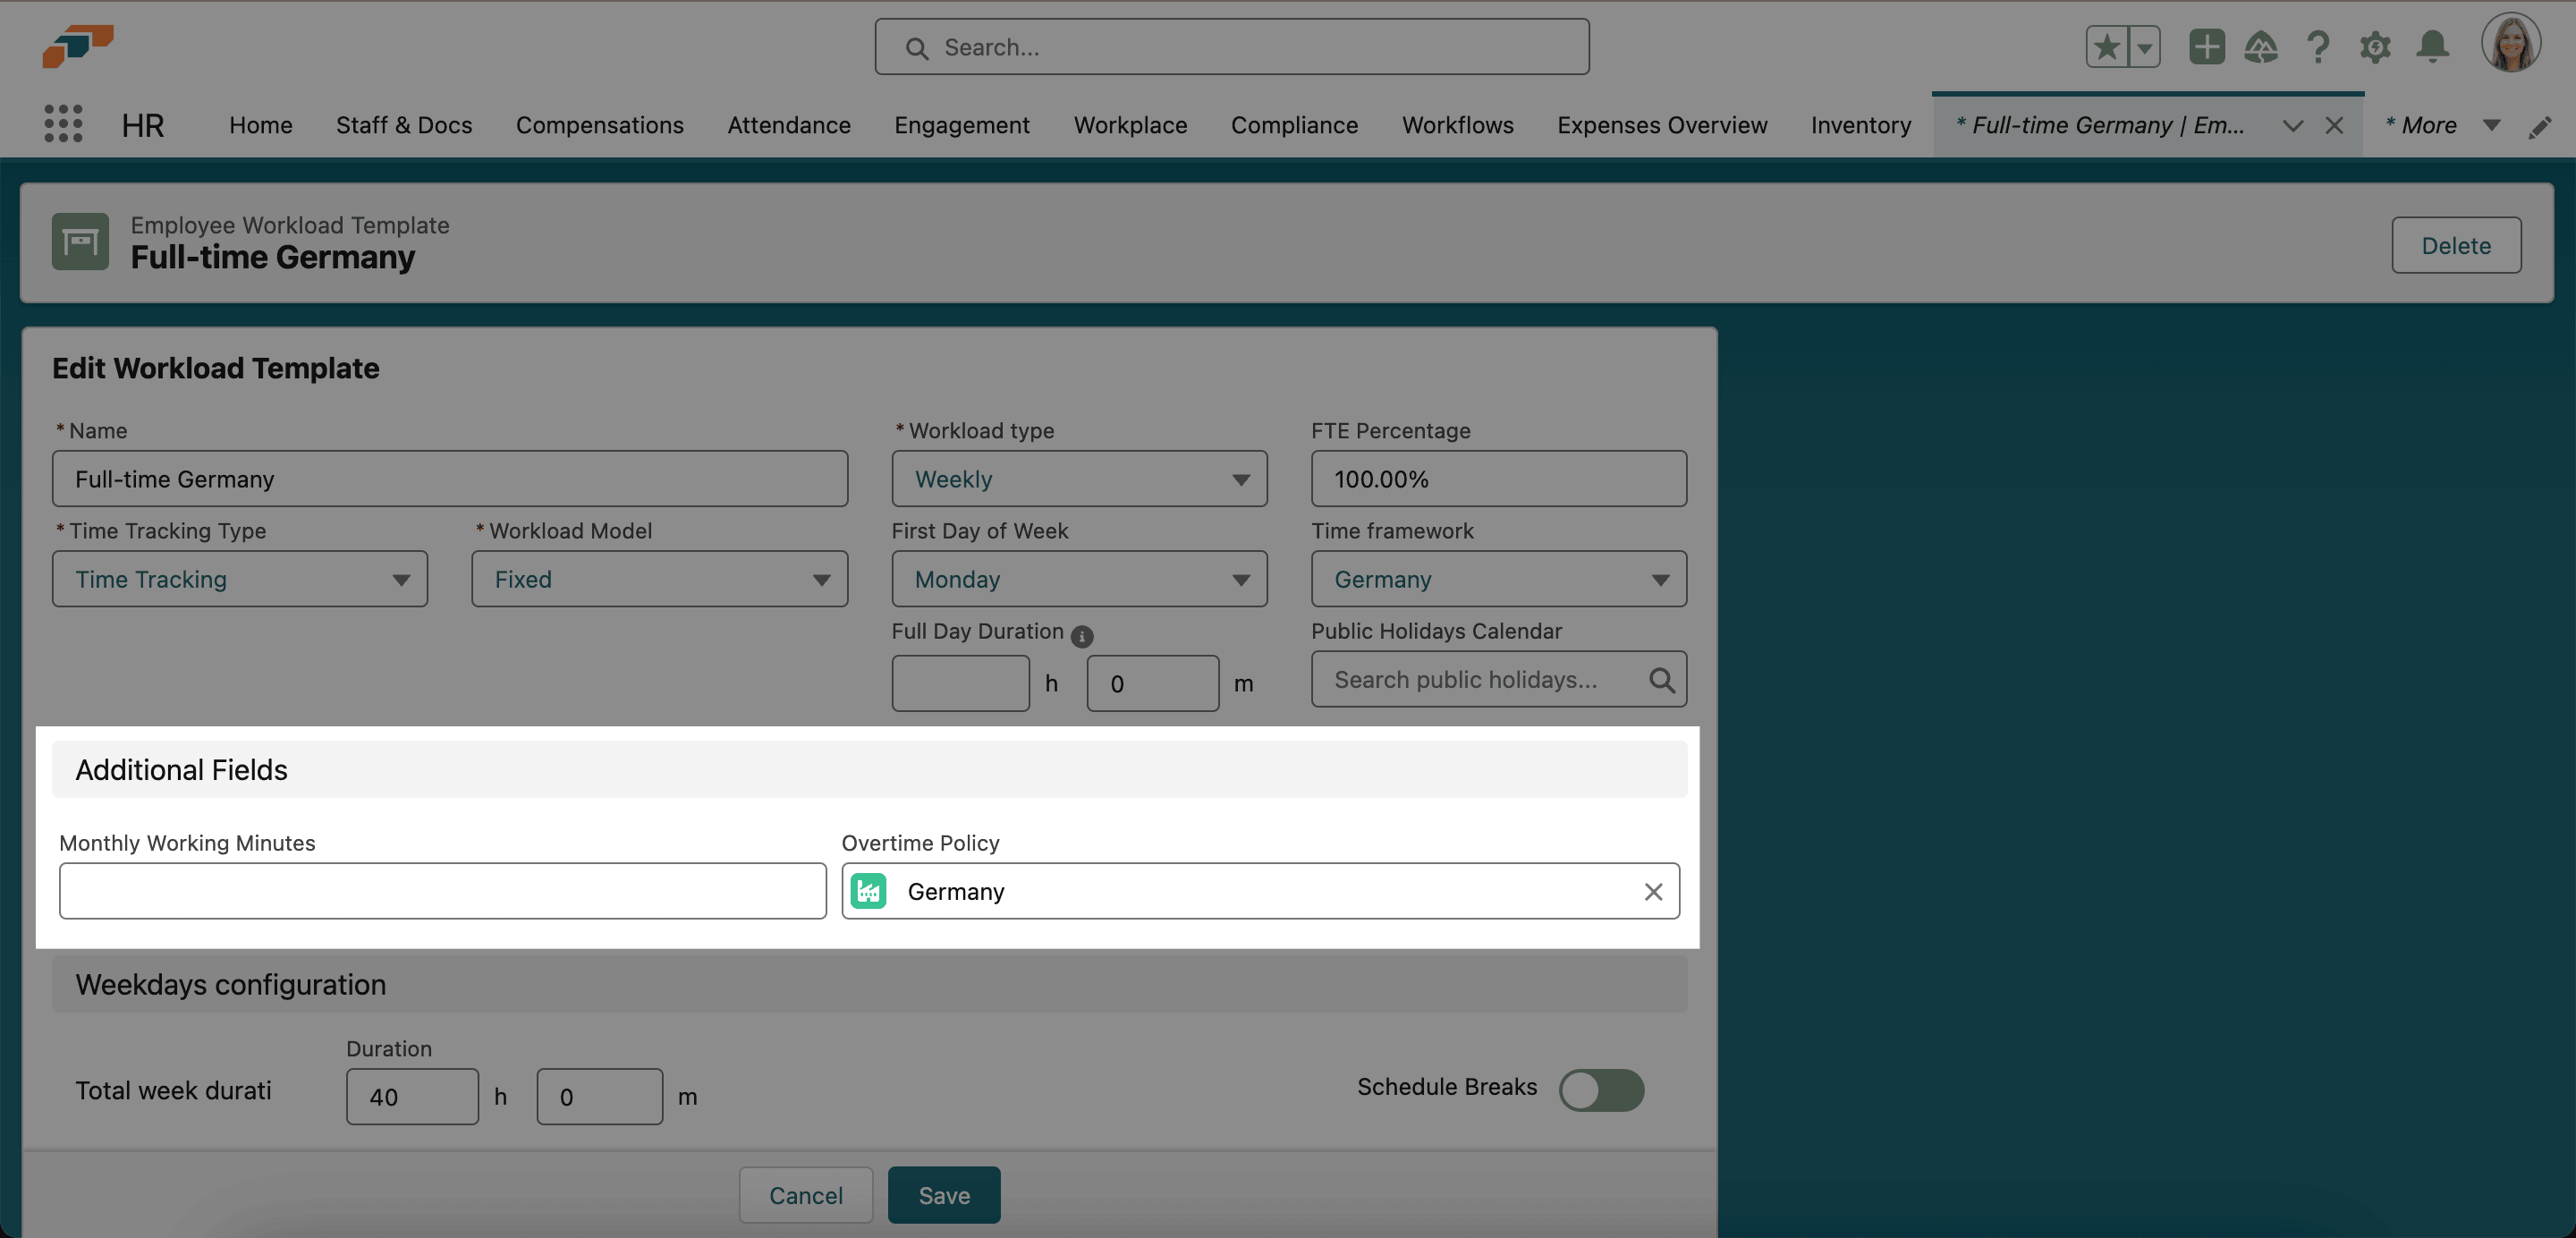
Add custom fields to workloads and workload templates
- From the App Launcher (⋮⋮ grid icon), open Employee Workload Templates.
- Select the template you want to change.
- From the gear menu, select Edit Object.
- In Object Manager, open Page Layouts.
- Click New.
- Leave Existing Page Layout set to None.
- Enter
CustomFormLayoutin Page Layout Name. - In Employee Workload Template Detail, edit Fields (Header Not Visible).
- Change Section Name to
IGNORE. - Drag the fields into Employee Workload Template Detail.
- Click Save.
- Return to the workload template, and then refresh the page.
CustomFormLayout must match this spelling and capitalization for the custom form to work.
Keep overnight shifts in one time entry
- In Salesforce, open Setup.
- In Quick Find, enter
Time Framework Configuration. - Open Time Framework Configuration.
- Enable Do Not Split Time for Overnight.
- Save the setting.
When enabled, an overnight shift remains one continuous time entry instead of splitting at midnight. Watch the overnight-shift configuration video.