Configure absence policies
Set up the categories, request rules, calendars, and assignments that control how employees request and use absences in flair.
HR Admins in Salesforce. Employees use the resulting policies in the Employee Hub and mobile app.
Before you begin
- Employees have active workloads for the periods covered by the policies.
- You can access HR Admin and Absence Settings in the flair HR app.
Open absence settings
- In the flair HR app, open HR Admin.
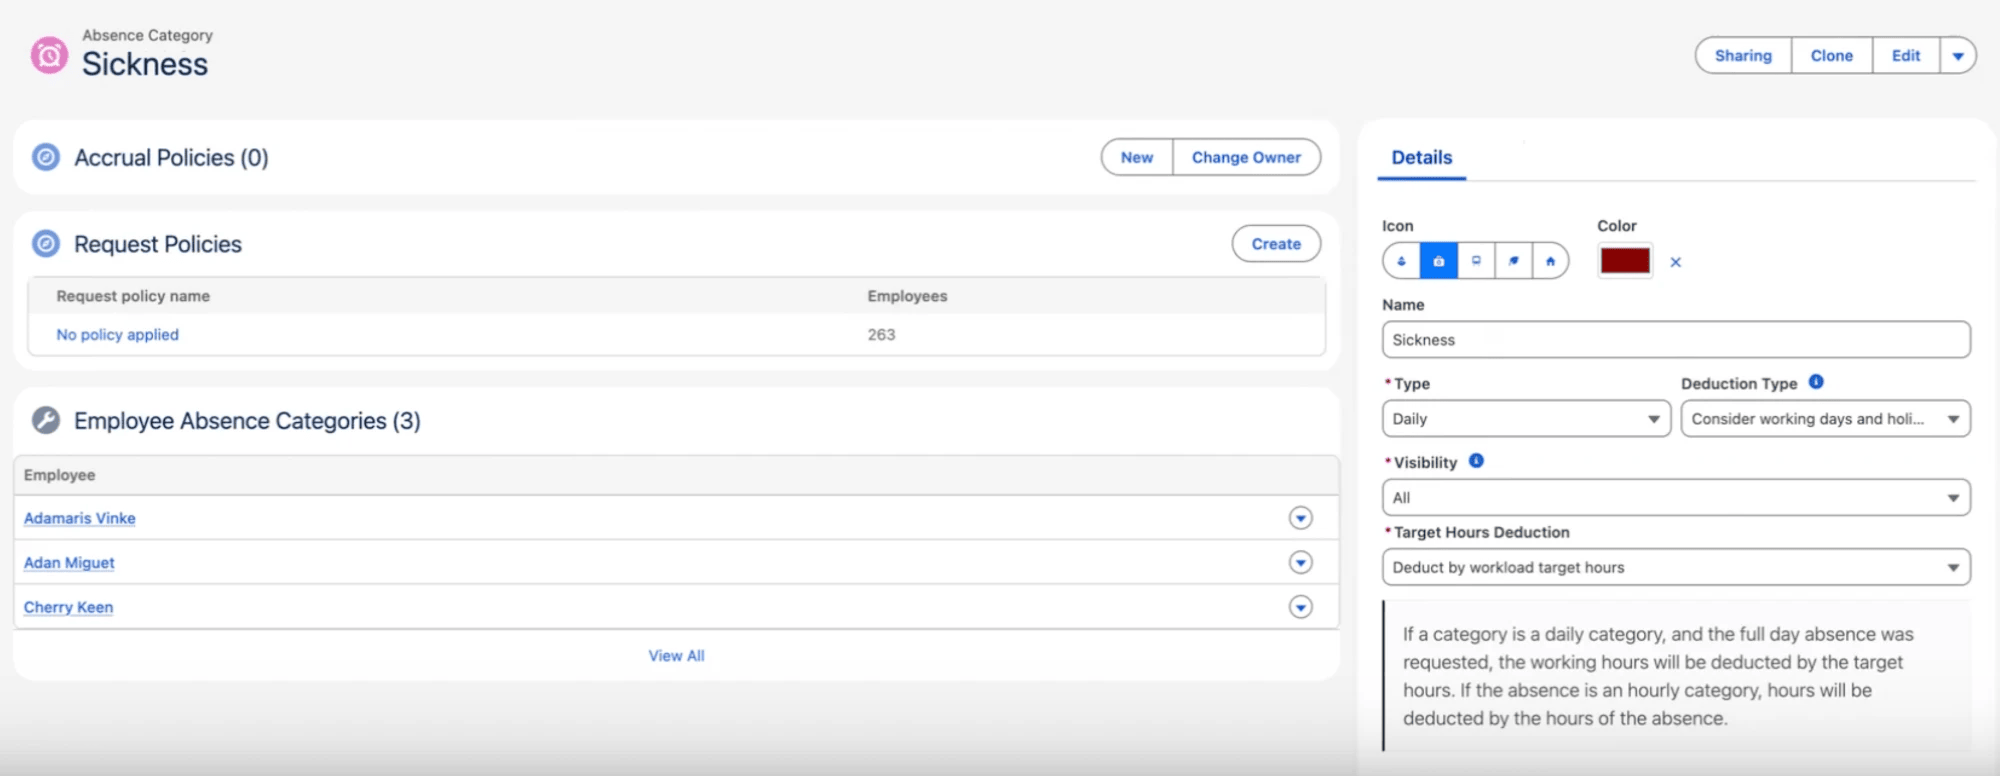
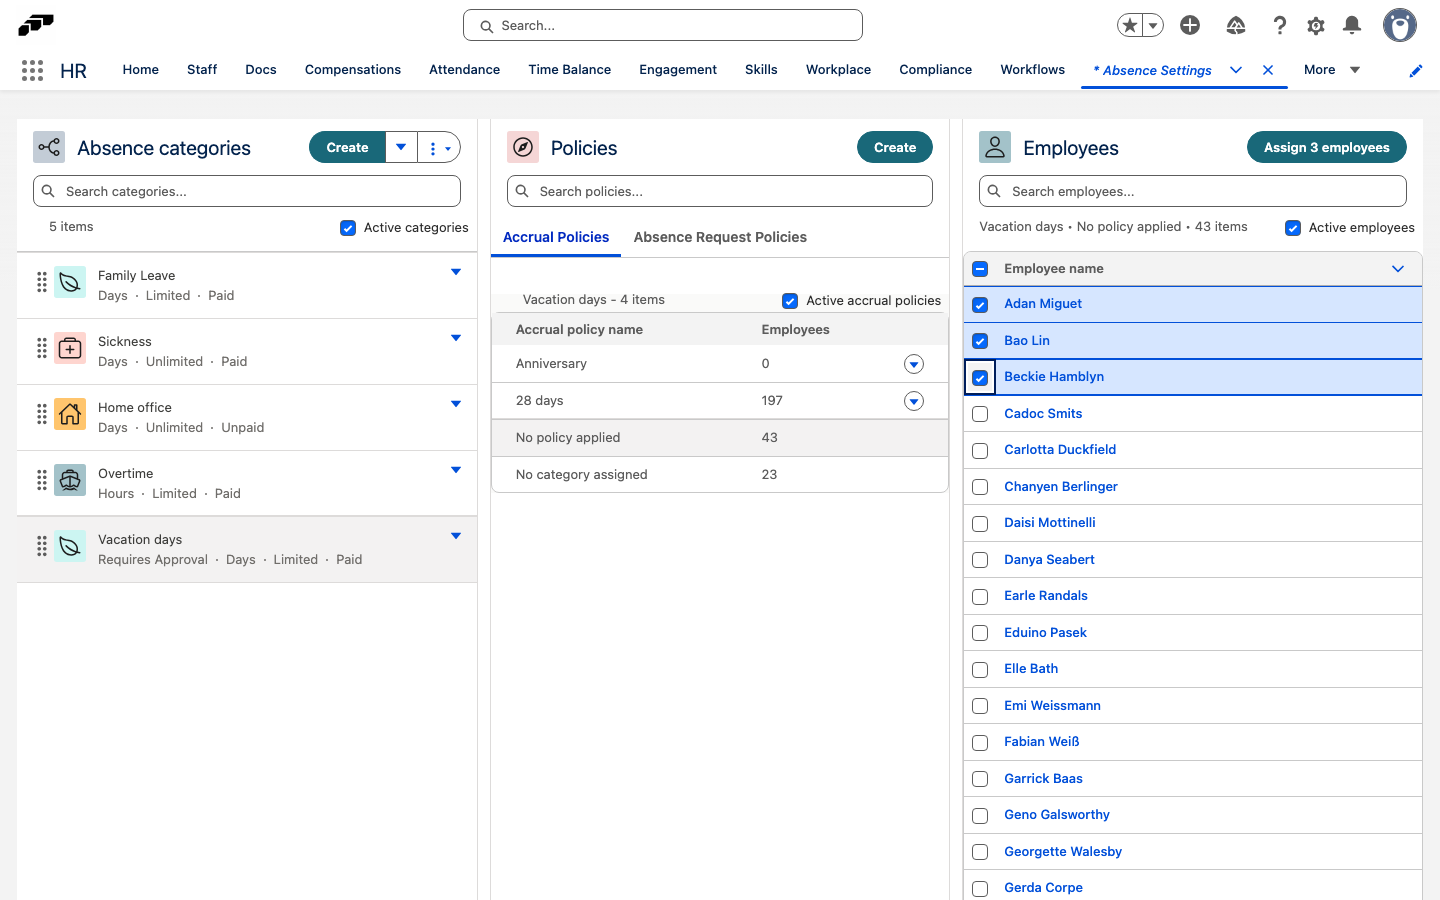
- Go to Attendance → Absence Categories and Policies. The page shows Absence Categories, a Policies panel, and employee assignments. The Policies panel has Accrual Policies and Absence Request Policies tabs.
Use the search field in each panel to filter categories, policies, or employees.
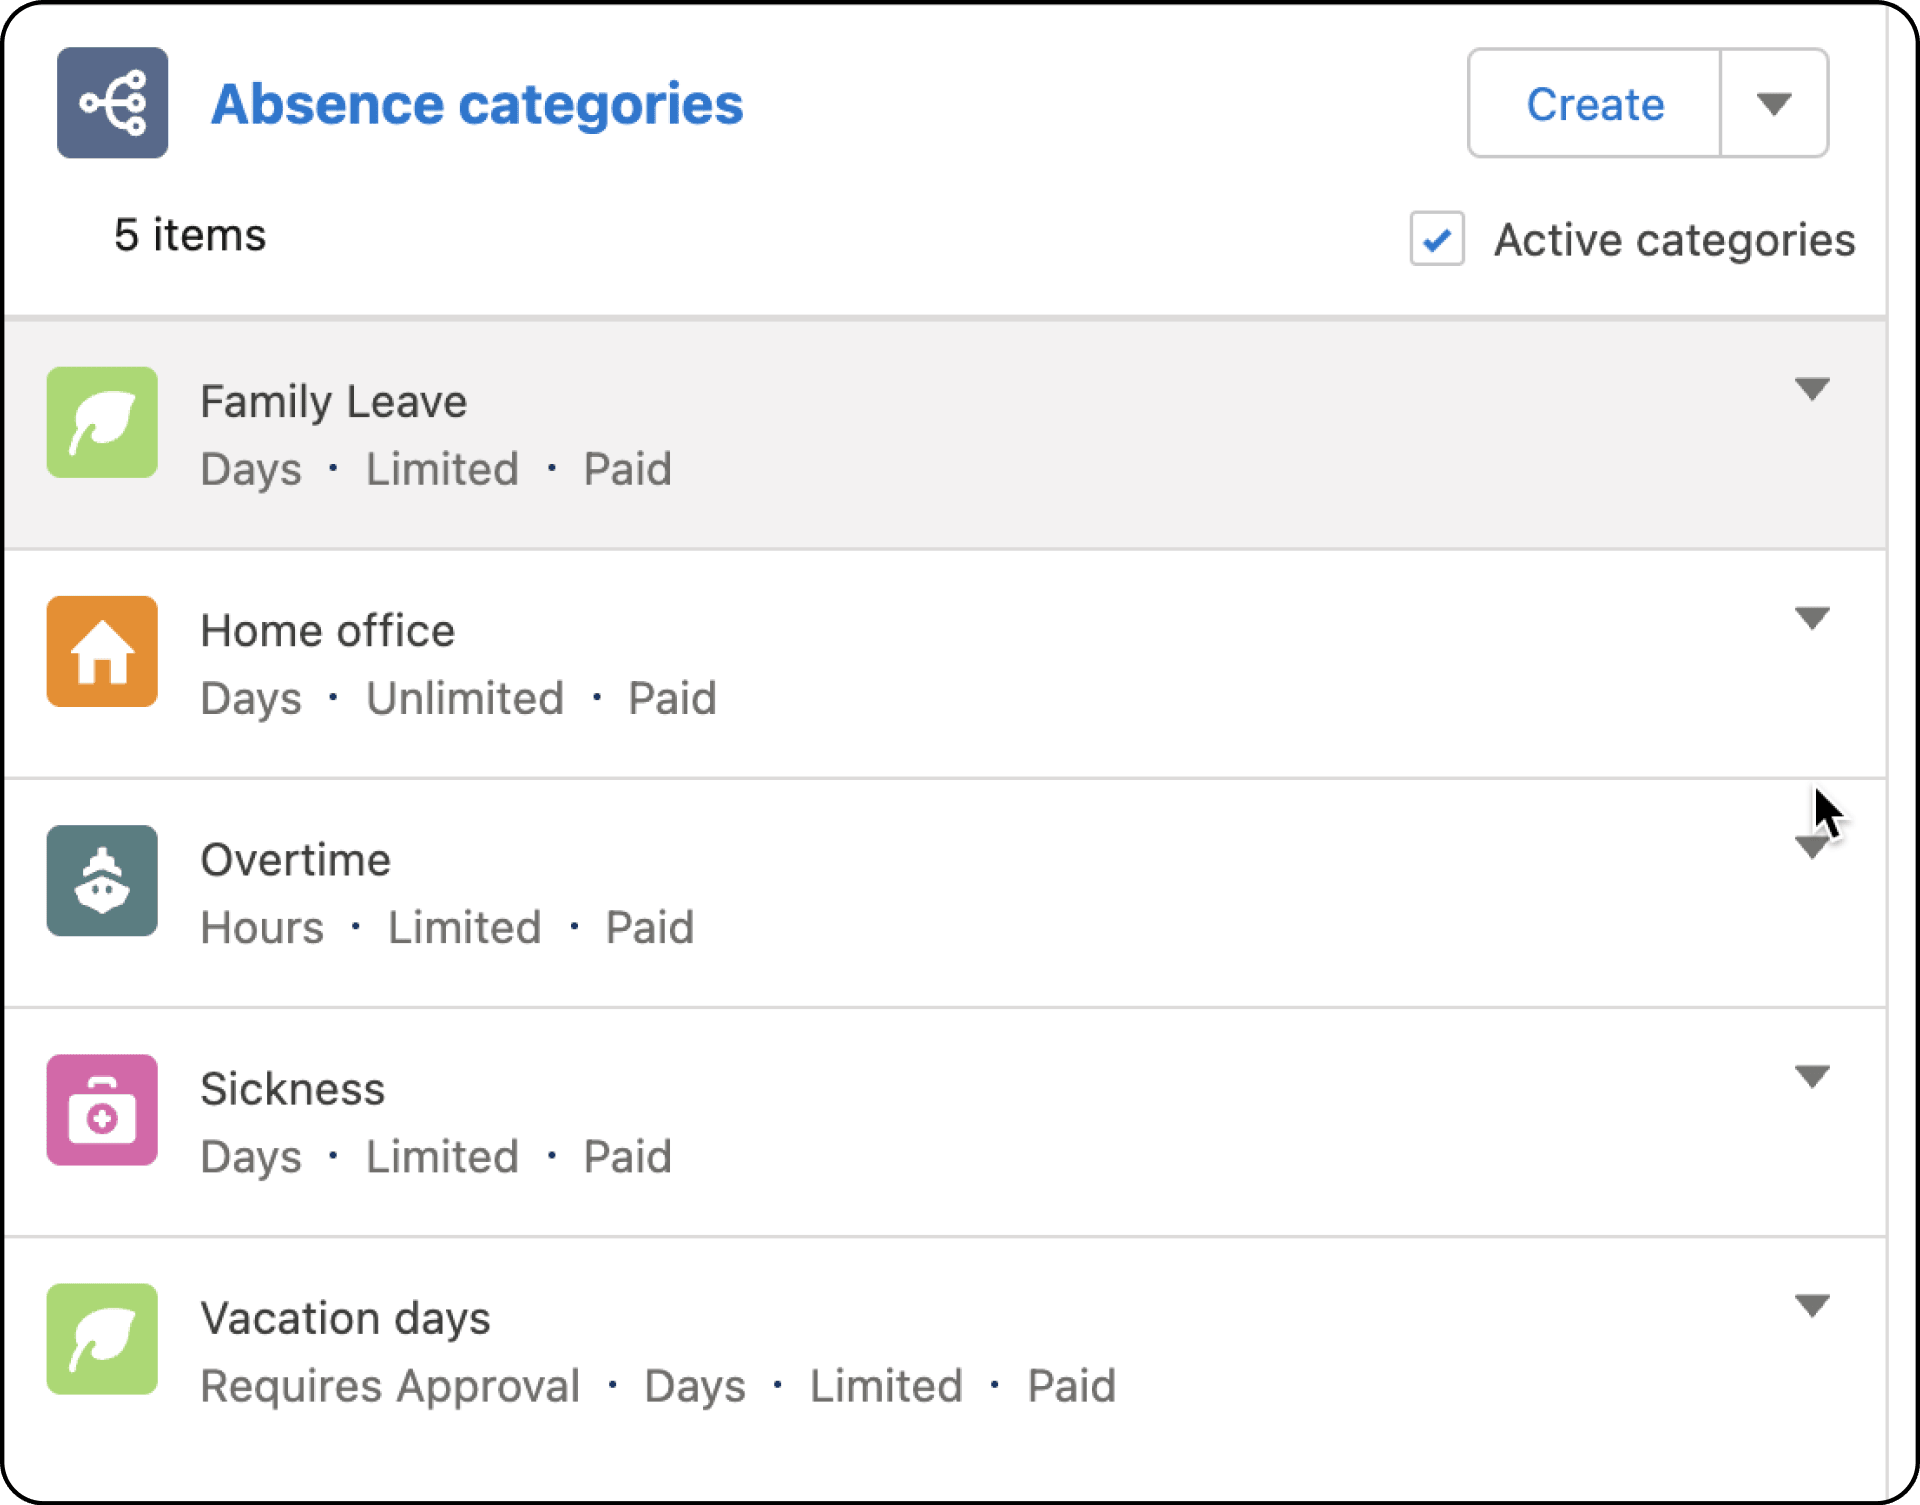
Configure an absence category
To start from a template instead, open the menu next to Create and select a template under Add from template. Selecting a template creates the category.
- On Absence Settings, click Create in the Absence Categories panel.
- Enter the category name.
- Select whether the category uses days or hours.
- Select a Deduction Type value.
- Configure how the category deducts time from an employee's workload target hours.
- Optional: In Color, enter a hexadecimal color code or use the color picker.
- For an hourly category, select an Hourly Deduction Mode value. See Choose how hourly absences are counted.
- Select a Default Visibility for New Records value.
- Click Save.
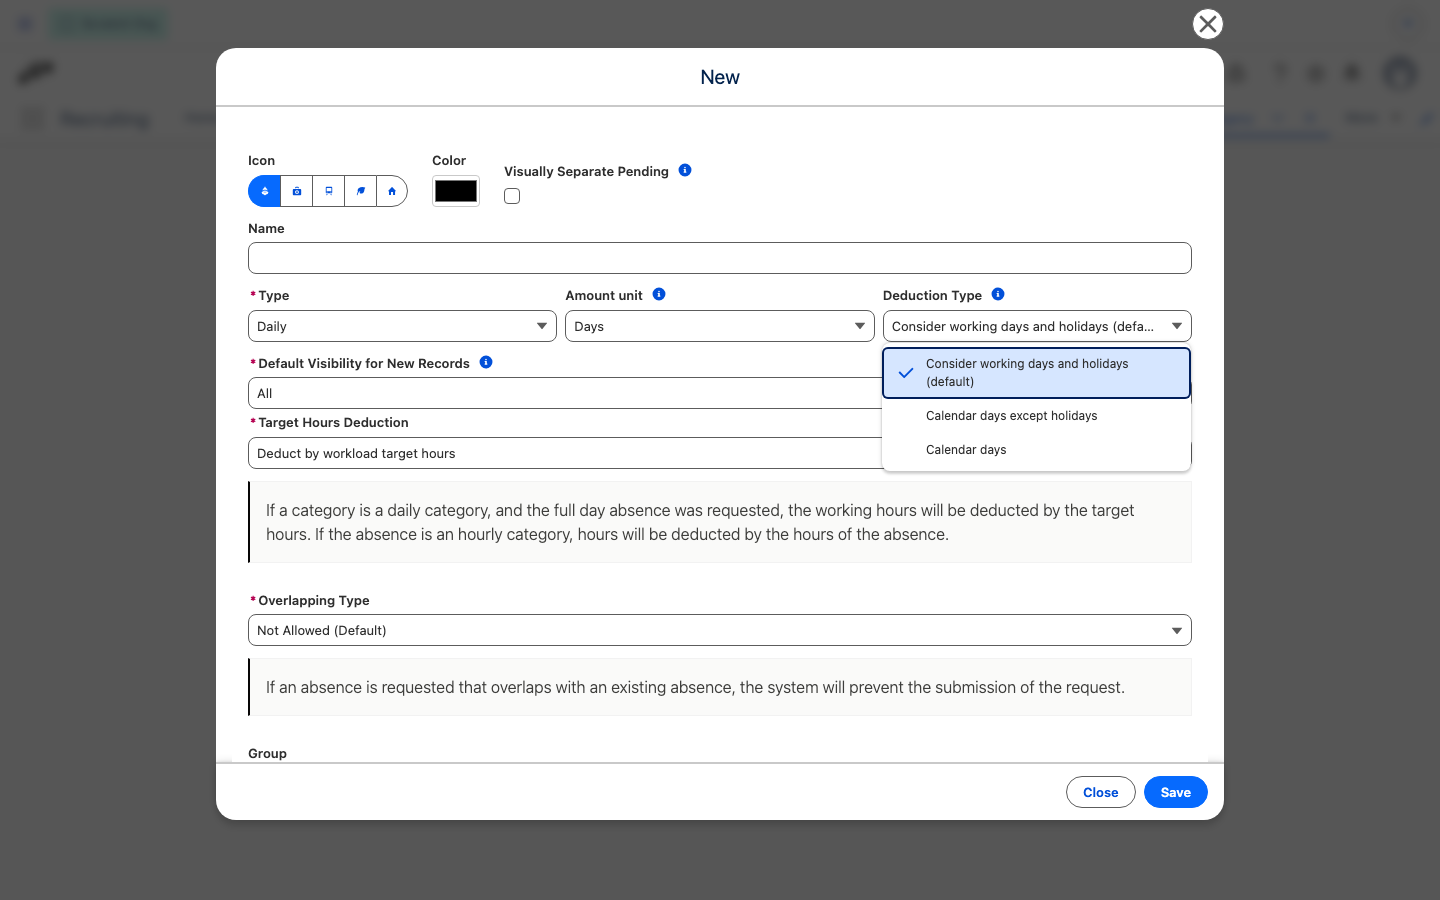
Choose a deduction type
The Deduction Type value controls which days in an absence's date range count toward its amount:
| Value | What counts |
|---|---|
| Consider working days and holidays (default) | Only the employee's scheduled working days. A full-day public holiday deducts nothing, and a half-day holiday counts as 0.5. |
| Calendar days except holidays | Every day in the range, including weekends and other non-working days. A full-day public holiday deducts nothing; half-day holidays don't reduce the amount. |
| Calendar days | Every day in the range, including weekends and public holidays. |
Changing a category's deduction type affects new absence records only.
Choose how hourly absences are counted
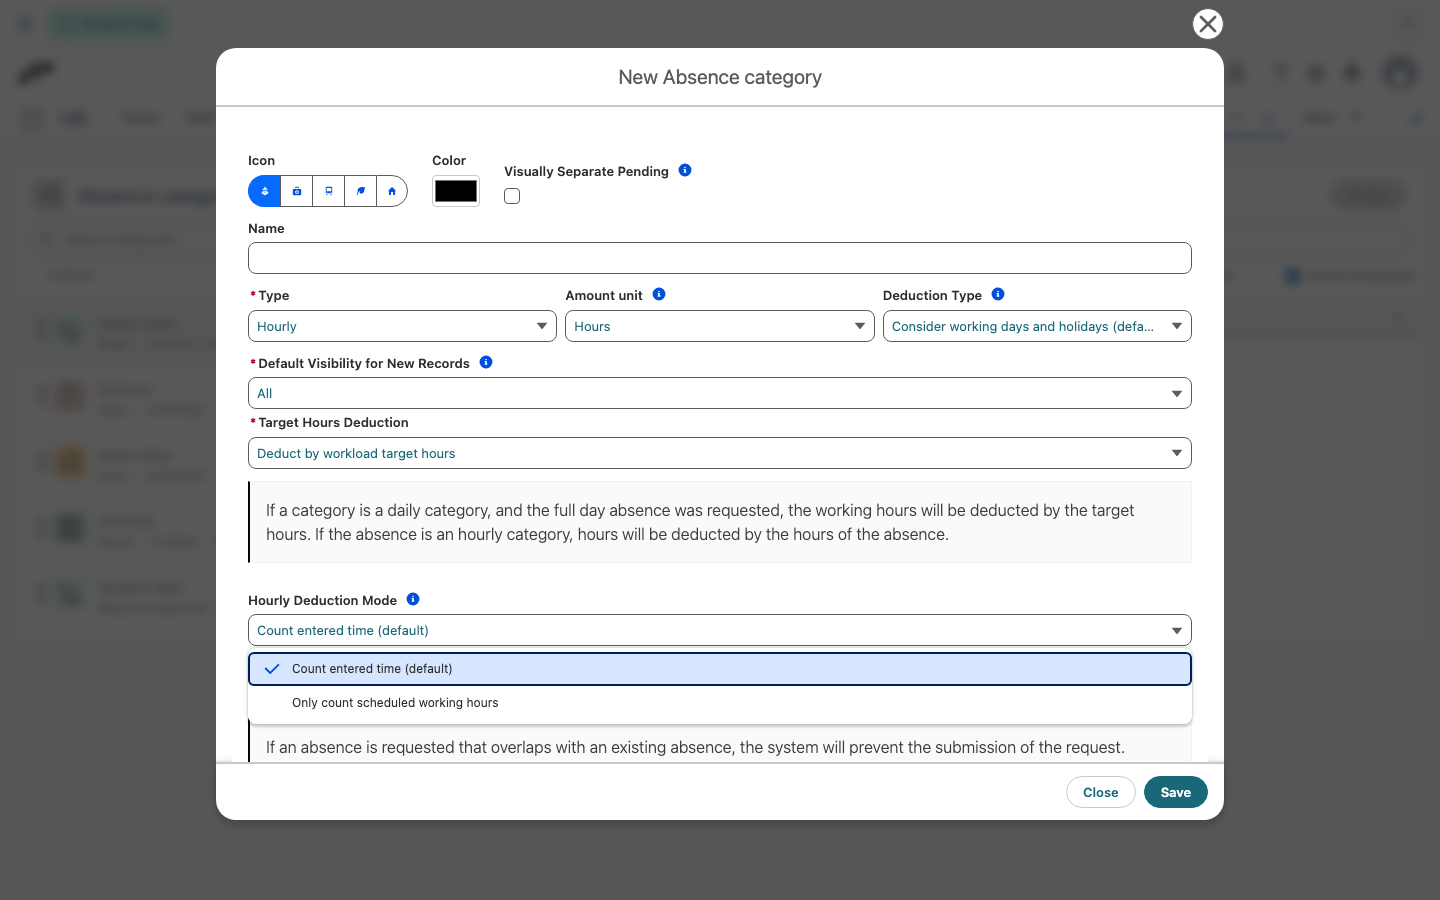
For categories with the Hourly type, Hourly Deduction Mode controls how much of the time an employee enters counts toward the absence amount. The field appears on the category form only when Type is Hourly.
| Value | What counts |
|---|---|
| Count entered time (default) | The whole time range the employee enters, capped at their working hours for that day. |
| Only count scheduled working hours | Only the part of the entered range that overlaps the employee's scheduled start and end times for that day. |
For example, an employee whose workload runs from 9:00 to 17:00 requests an absence from 7:00 to 11:00. With Count entered time (default), the absence counts 4 hours. With Only count scheduled working hours, it counts 2 hours.
Only count scheduled working hours needs fixed daily start and end times on the employee's workload. For hourly-based or flexible workloads, or days without start and end times, flair counts the entered time instead. Changing the mode doesn't recalculate absences that are already recorded.
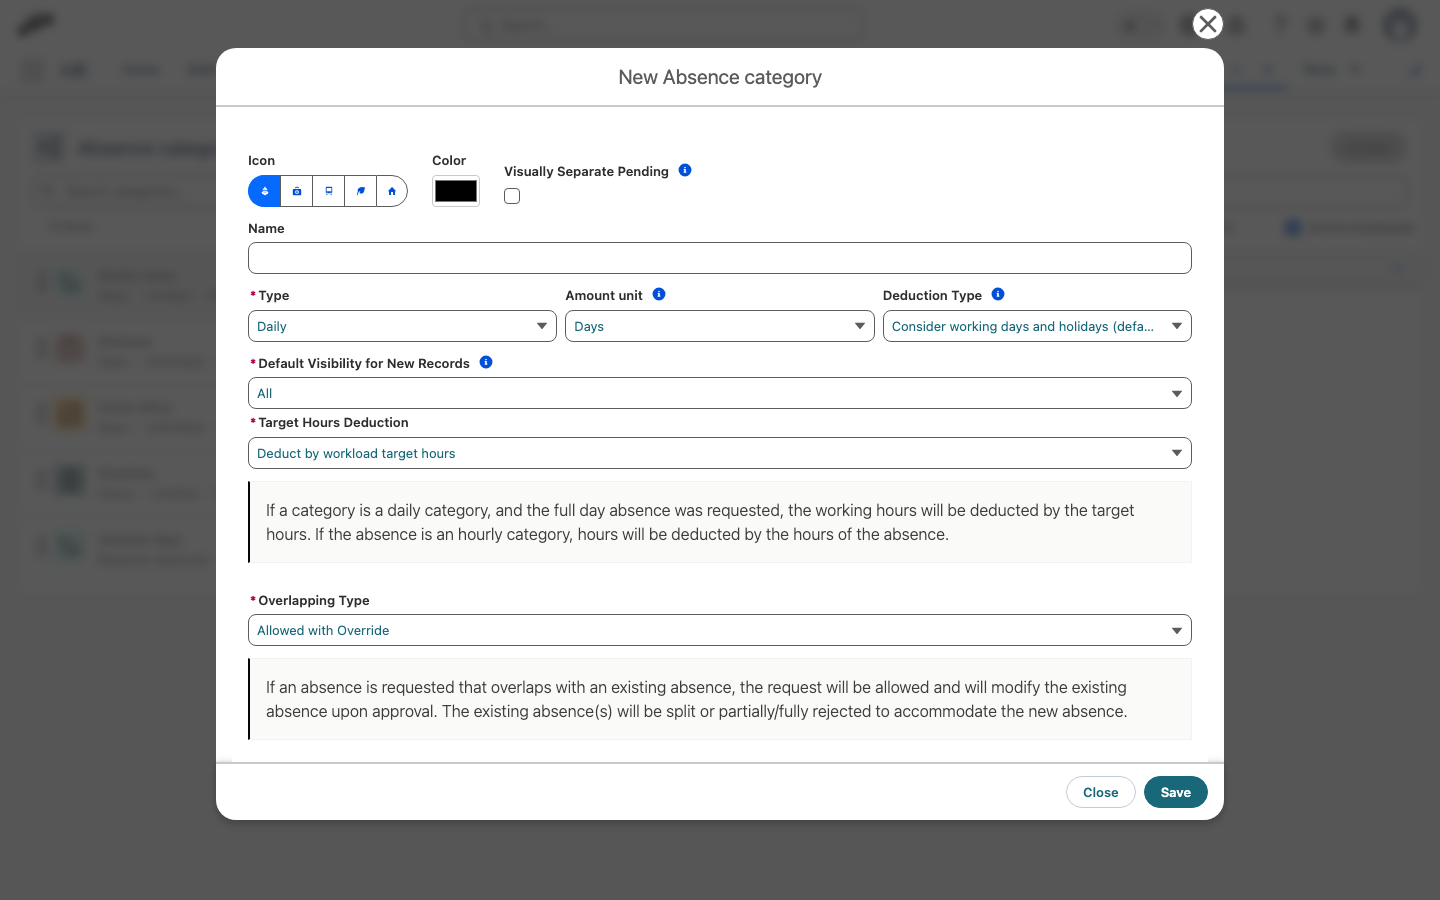
Choose how overlapping absences are handled
Overlapping Type controls what happens when an employee requests an absence in this category for a period that overlaps one of their existing absences:
| Value | What happens |
|---|---|
| Not Allowed (Default) | flair blocks the request. The employee must change the dates or remove the existing absence first. |
| Allowed | flair accepts the request. After approval, both absences stay active for the overlapping period, and neither is changed. |
| Allowed with Override | flair accepts the request. When the new absence is approved, it takes precedence, and flair adjusts the employee's overlapping absences to make room for it. |
With Allowed with Override, nobody has to resolve the overlap by hand. The override happens automatically when the new absence is approved, or when it is created if the category doesn't require approval. It applies to every overlapping absence of the employee that isn't rejected, in any category:
- An existing absence that lies completely inside the new one is rejected.
- An existing absence that overlaps the start or the end of the new one is shortened so that it ends before or starts after it.
- An existing absence that spans the whole new absence is split in two, with the new absence in the gap.
For example, set sick leave to Allowed with Override so that an employee who falls ill during an approved vacation can report sick leave for those days. flair then shortens or splits the vacation around the sick days.
Control whether employees can delete absences
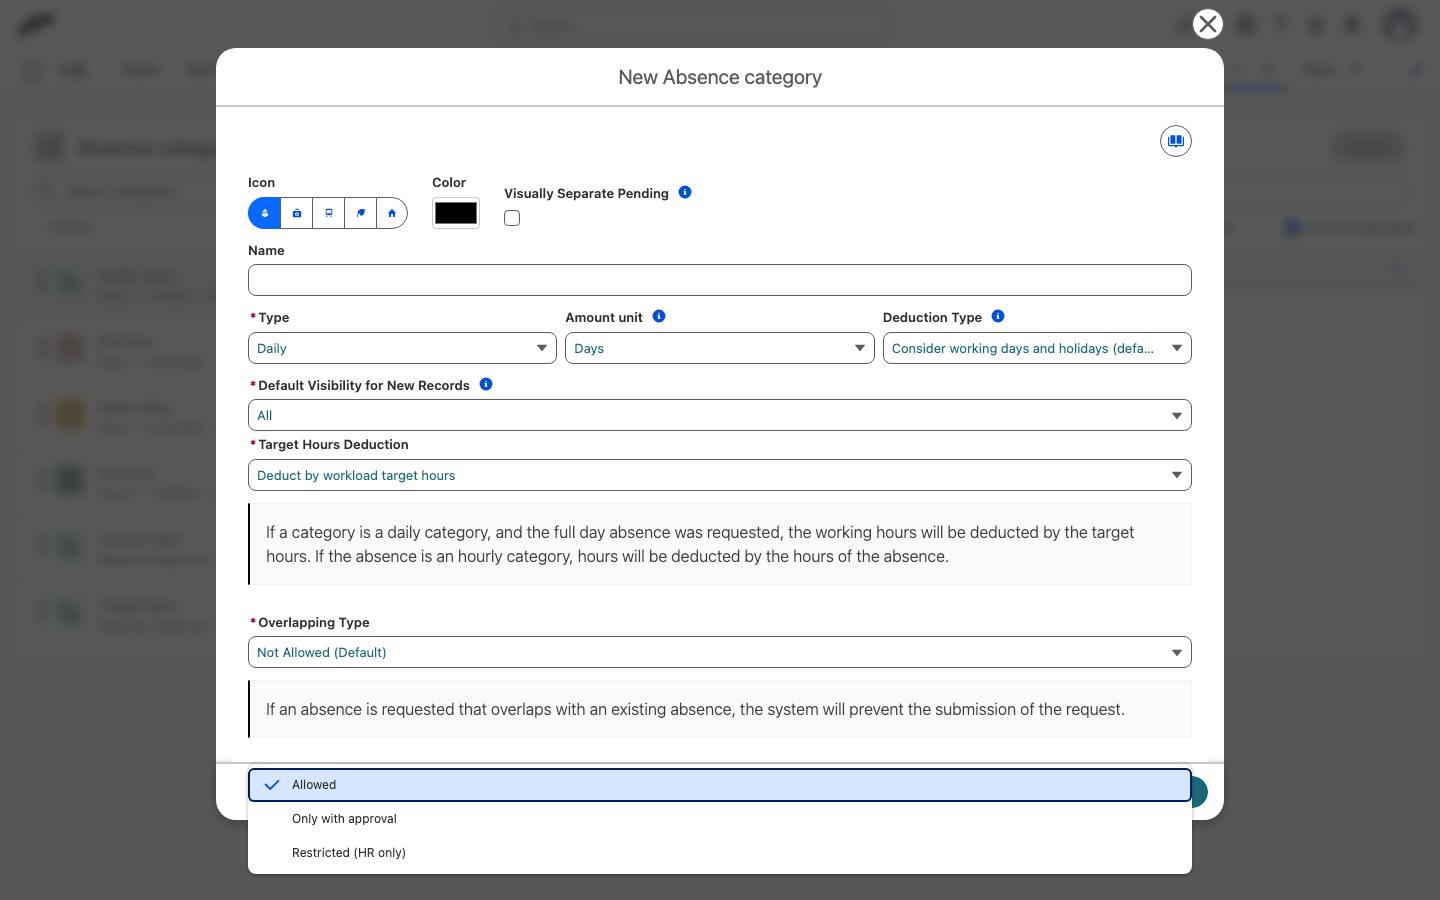
Absence Deletion controls whether employees can delete an approved absence in this category from the Employee Hub. It applies only to absences that haven't started yet, and employees can always delete a pending absence:
| Value | What happens |
|---|---|
| Allowed | Employees delete an approved absence directly. This is the default. |
| Only with approval | Employees send a deletion request instead. The absence stays in place and shows Deletion requested until the request is decided. Approving it deletes the absence, and rejecting it keeps the absence. |
| Restricted (HR only) | Employees can't delete an approved absence. HR deletes it in Salesforce. |
- On Absence Settings, create or edit an absence category.
- In Absence Deletion, select a value.
- Click Save.
Absence Deletion replaces the Restrict Absence Deletion checkbox. A category that had the checkbox selected opens with Restricted (HR only), and any other category opens with Allowed.
A deletion request goes through the same approval as a change to an absence: the seeded Default Absence Change Policy asks the employee's manager and the absence approver, and an assignment for the Absence object on another Approval Policy redirects it. The employee-facing steps are in Delete an absence.
The flair mobile app doesn't support deletion requests yet. When an employee deletes an approved absence in an Only with approval category in the app, flair sends a deletion request, but the app reports the absence as deleted. The absence stays until the request is approved. The employee sees the request and can cancel it in the Employee Hub.
Require a reason for rejected requests
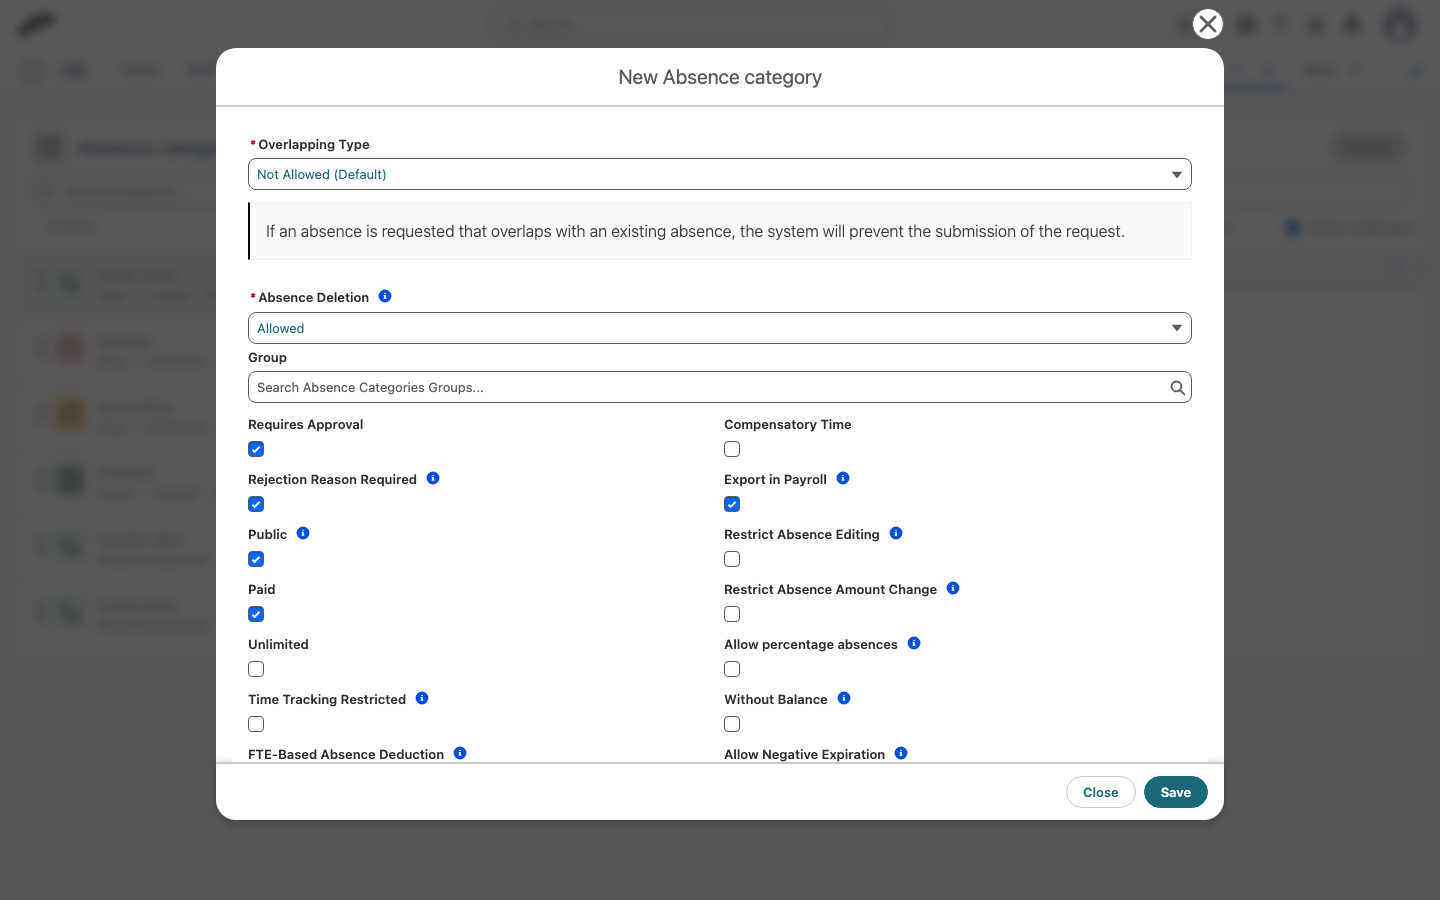
Rejection Reason Required makes approvers enter a reason before they can reject an absence request in this category. It is cleared by default, so a reason stays optional.
- On Absence Settings, create or edit an absence category.
- Select Requires Approval. Rejection Reason Required is available only while Requires Approval is selected.
- Select Rejection Reason Required.
- Click Save.
If you clear Requires Approval, flair also clears Rejection Reason Required when you save.
flair checks for the reason whenever an approver rejects a request in the category:
- In Salesforce, the Reject this request? dialog doesn't accept an empty reason.
- In the Employee Hub, the rejection dialog requires a Reason. In a bulk rejection that includes a request in the category, the dialog opens once and the reason applies to every selected request.
- In Slack, Reject opens a dialog in which the reason is required.
- In the flair mobile app, the note is still shown as optional. If the approver rejects without a note, the app shows an error saying that a reason is required for this absence category, and the request stays pending. The approver can open the request again and reject it with a note.
The employee sees the reason on the rejected request. Setting Approval Status directly on an absence record in Salesforce doesn't record an approver decision, so no reason is required there.
Allow optional document uploads
Let employees attach a document without making it mandatory for every request.
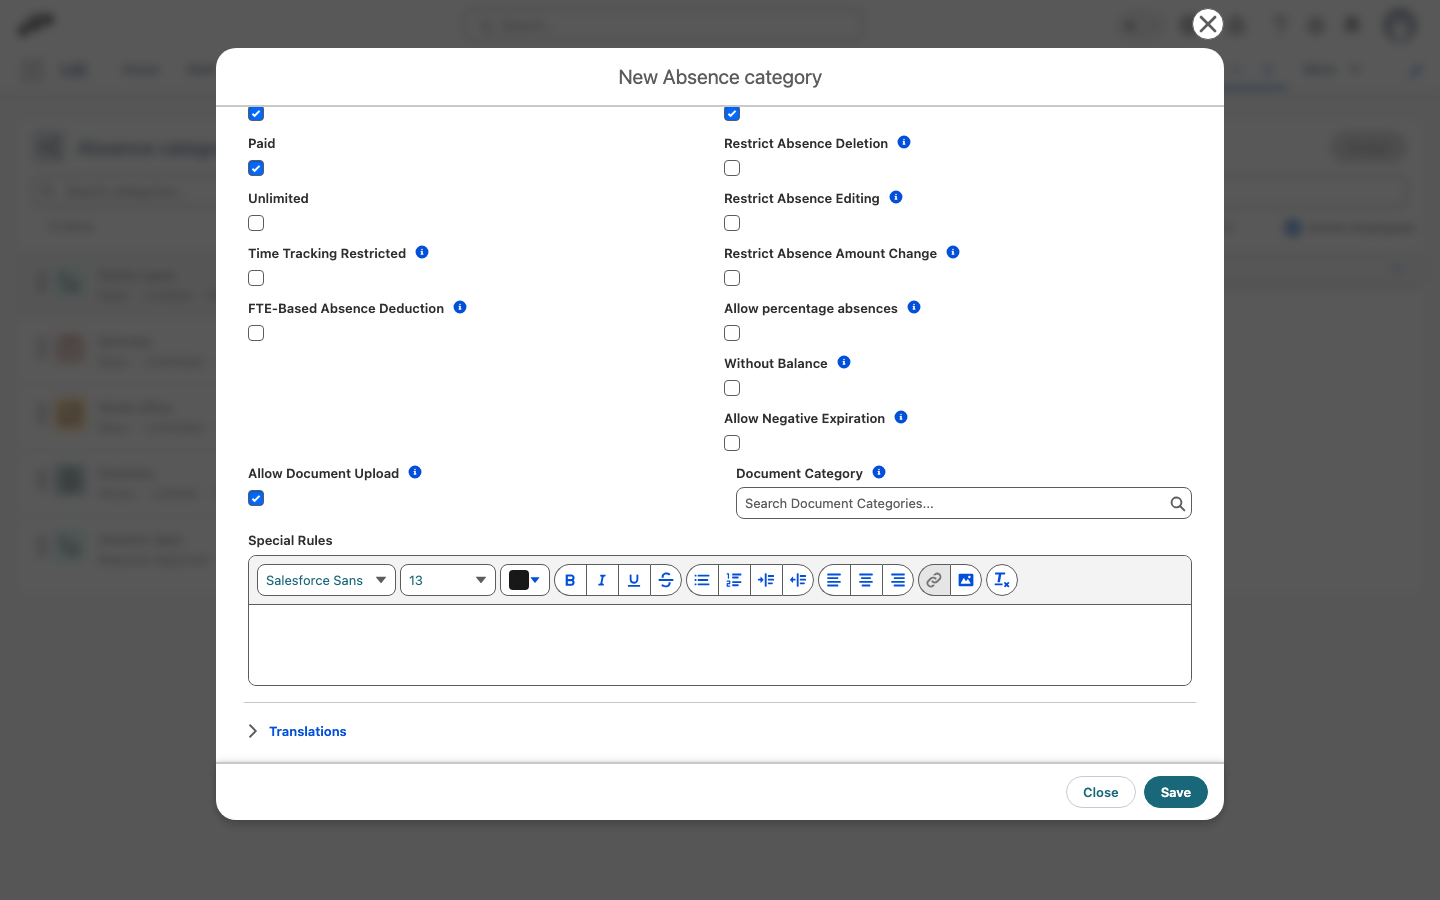
- In the absence category form, enable Allow Document Upload.
- In Document Category, select the category where the uploaded document is filed in the employee's documents.
- Click Save. The file field is available in the Employee Hub request form, but employees can leave it empty.
An Absence Request Policy with Require document upload makes the upload mandatory when the request reaches its minimum amount. Below that amount, the upload is optional only when Allow Document Upload is enabled; otherwise, the field is hidden.
Require full units only
Use Full units only on an absence category to require employees to request complete days or whole hours, blocking partial bookings.
- On Absence Settings, create or edit an absence category.
- Select Full units only.
- Click Save.
Depending on the category's Type, flair enforces full units as follows:
- Daily categories: Employees can only book full days. In Salesforce, the request form hides the half-day options (the morning, lunch, and evening selectors). The Employee Hub still shows half-day options, but flair rejects a half-day request when it is submitted.
- Hourly categories: Each requested day must be a whole number of hours (for example, 2 hours or 3 hours, but not 1.5 hours or 45 minutes). In Salesforce, the request form displays an error and blocks saving if the entered time includes partial hours. In the Employee Hub, flair rejects such a request when it is submitted.
You cannot enable both Full units only and Allow percentage absences on the same category. While one is selected, the other is unavailable. Existing absences created before enabling this setting are not changed.
Choose the amount unit
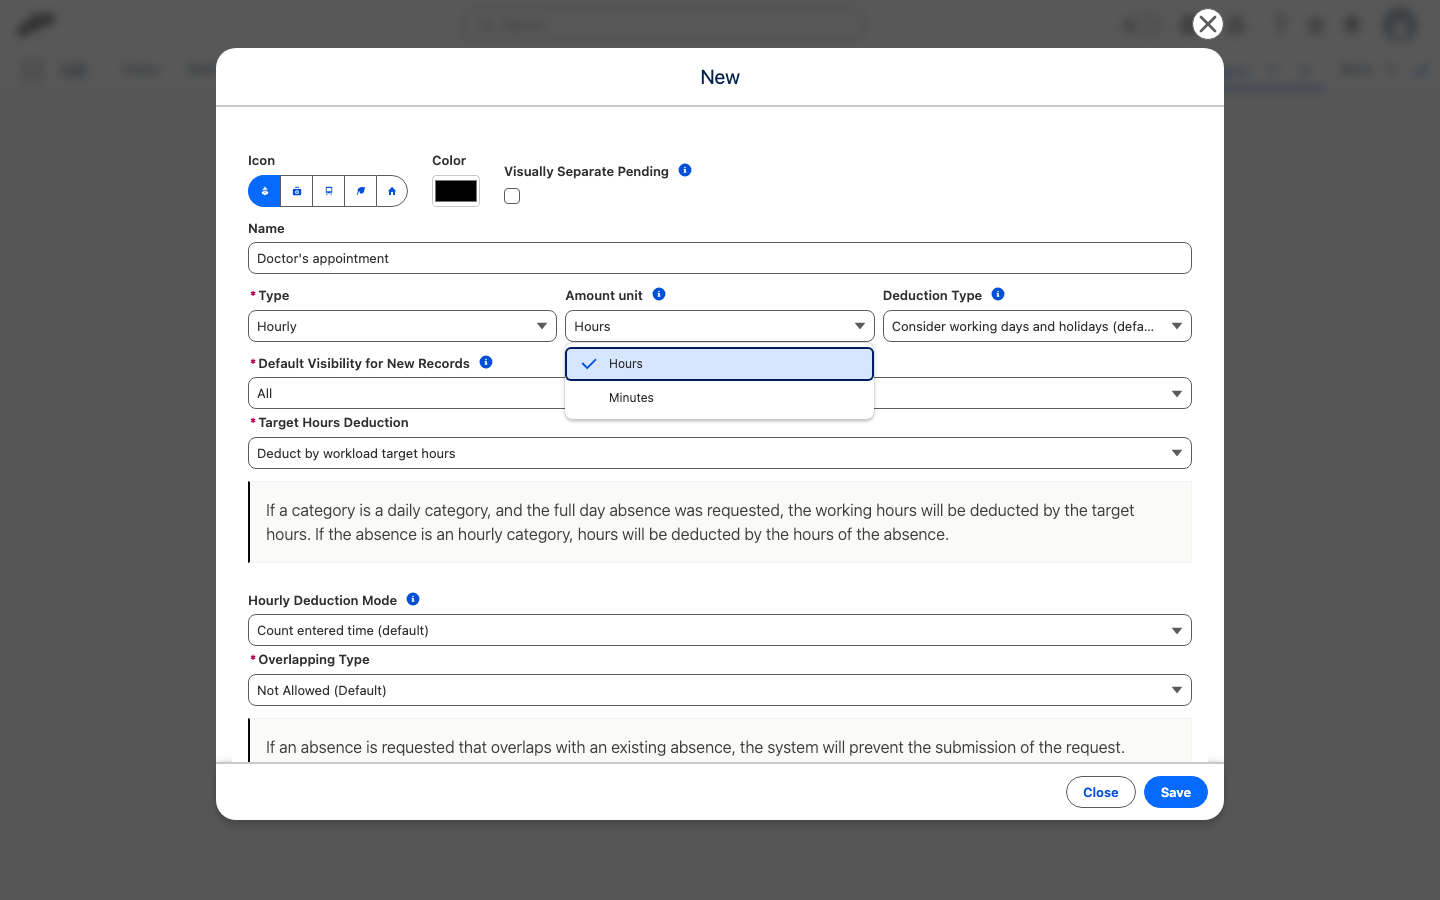
Amount unit sets the unit in which flair stores and displays every amount for the category — allowances, accruals, absence amounts, and withdrawals. Type still governs how employees request an absence (a date range with optional half days for daily categories, start and end times for hourly categories); Amount unit governs precision. It defaults to the type's natural unit and resets to it when you change Type.
The available units depend on Type:
| Type | Amount unit | Result |
|---|---|---|
| Daily | Days | Balances and deductions are counted in days. This is the daily default. |
| Daily | Hours | Employees request full or half days, but the balance is kept in hours. A full-day absence deducts that day's scheduled workload hours, so part-time and full-time employees deduct different amounts automatically. |
| Hourly | Hours | Balances and deductions are counted in hours. This is the hourly default. |
| Hourly | Minutes | Balances and deductions are stored in exact minutes, avoiding the rounding that hour-based storage introduces for short absences such as breaks or medical appointments. |
For a minute-based category, enter allowance, accrual, and request-policy amounts as hours and minutes; flair stores them as exact minutes and displays time amounts as Xh Ym.
You can no longer change Amount unit once any absence or allowance exists for the category, because changing it would reinterpret every stored amount. To move a live category to a different unit, create a new category instead.
Choose the default visibility for new records
The Default Visibility for New Records value becomes the default for new absences in the category:
| Value | Who can see the absence |
|---|---|
| All | All employees. |
| Employees, Teams, with their Managers | The employee, employees on the same team or with the same manager, and managers. |
| Employee only with their Managers | The employee and their managers. |
Managers, additional managers, and the employee can always see the employee's absences. Visibility affects the Employee Hub calendar, Colleagues, Absent Today, Shift Planner, and other absence views.
Changing a category affects new absence records only. HR managers can change visibility for an individual absence.
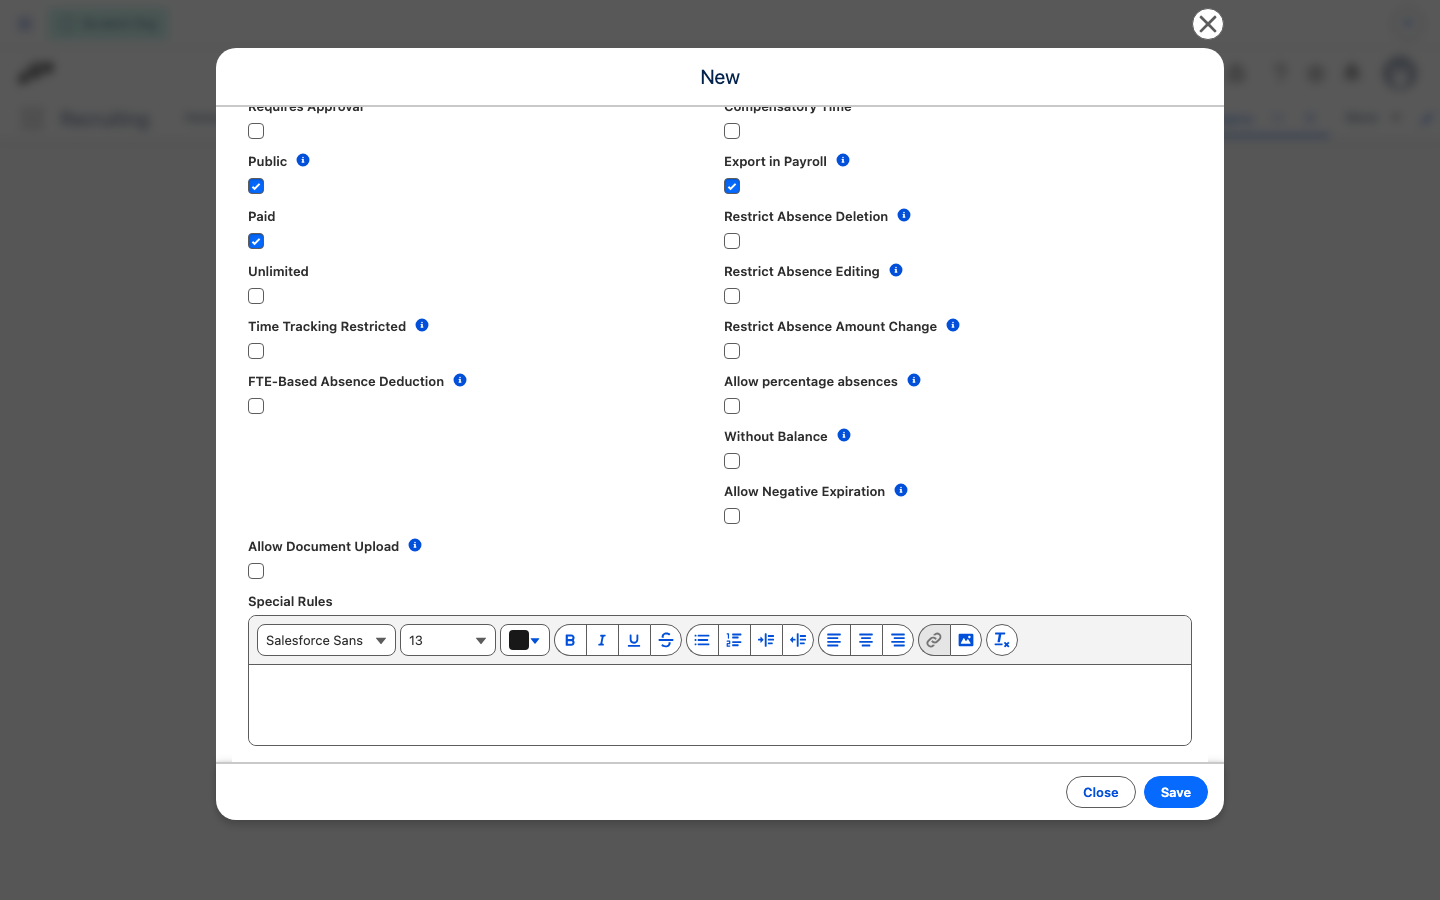
Allow requests without a balance
Use Without Balance for a category that employees can request without a limit or a balance.
- On Absence Settings, create or edit the absence category.
- Select Without Balance.
- Click Save.
For a category without a balance:
- flair doesn't check requests against the employee's balance, and absences don't deduct from allowances.
- The Accrual Policies panel on Absence Settings shows that accruing is not regulated automatically, instead of a list of accrual policies.
- The employee's absence category record in Salesforce hides the allowances tab.
- Absence Request Policies still apply, such as a maximum amount per period.
Translate the category name
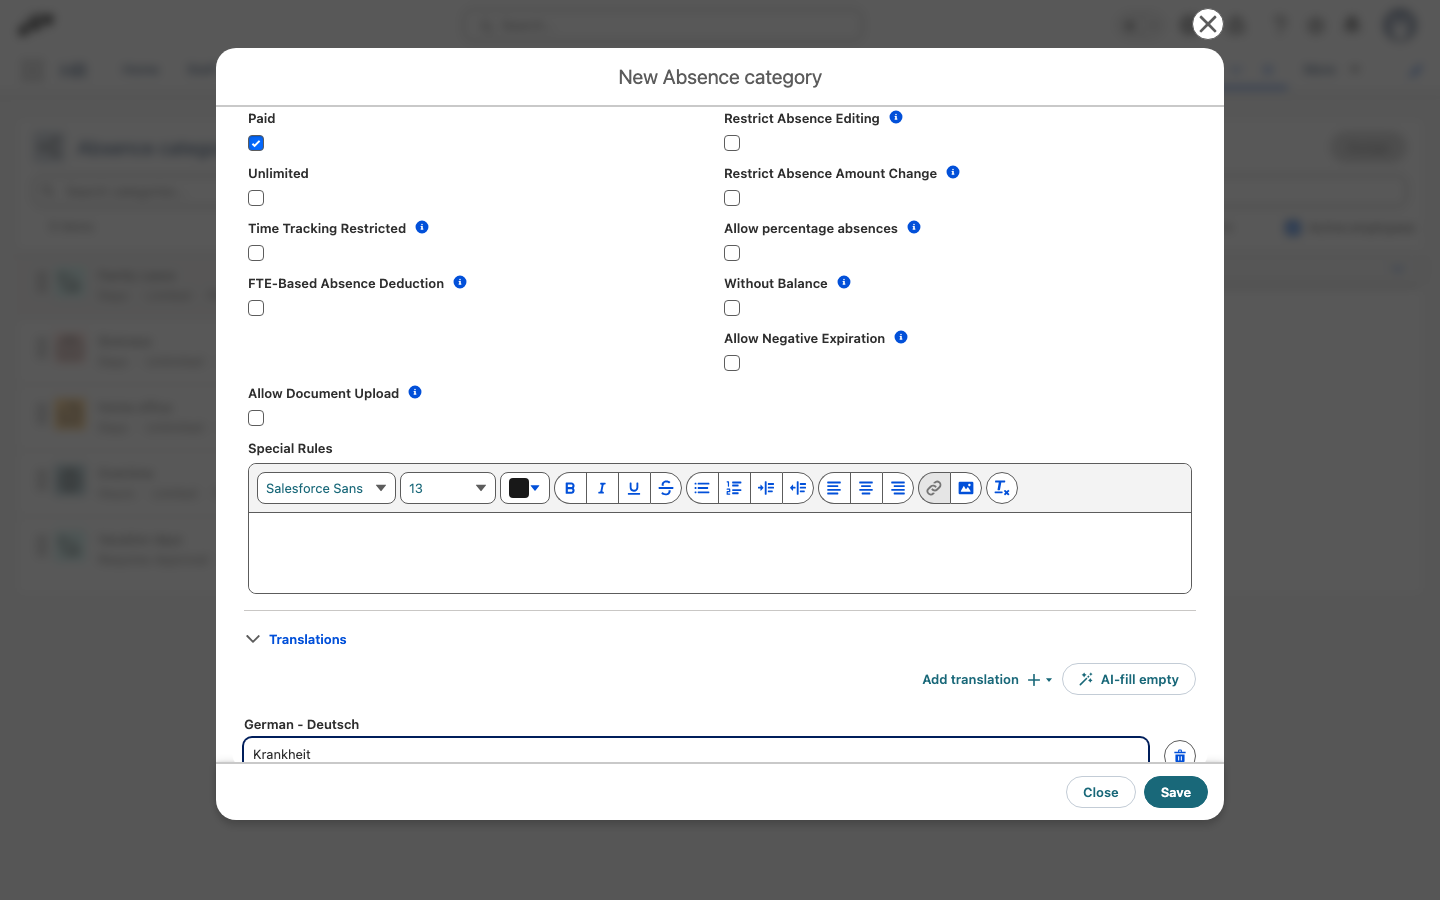
Give a category a name in each of your company languages instead of creating one category per language. Employees then see the category name in their own language.
- On Absence Settings, create or edit the absence category.
- At the end of the form, expand Translations.
- Click Add translation, and select a language: German, French, Italian, Spanish, Portuguese, Norwegian, or Russian. A field for that language appears.
- Enter the category name in that language.
- Optional: To have flair AI translate the name into every language that is still empty, click AI-fill empty. Existing translations are never overwritten. The button appears once the category has a name, and only if your subscription includes flair AI for HR or flair AI for Recruiting.
- To remove a translation, click the delete icon next to it.
- Click Save.
The translated name appears in the Employee Hub (absence lists, the request form, calendars, and balances), in the mobile app, in the flair Slack app, and in calendar subscriptions. In Salesforce, Absence Settings, the employee's absence categories, and the absence request form also show it in the user's language. If a category has no translation for a language, the original name appears instead.
Other Salesforce views still show the original name, for example absence emails, the absence calendars, HR Home, absences on timesheets, payroll, and the category list on the Allowances tab in Attendance. Your Slack status during an absence also uses the original name.
To edit translations, you need edit access to the translation fields on the absence category, which the Flair Absence Manager, Flair Manager, and Flair Employee Management permission sets include.
Group absence categories
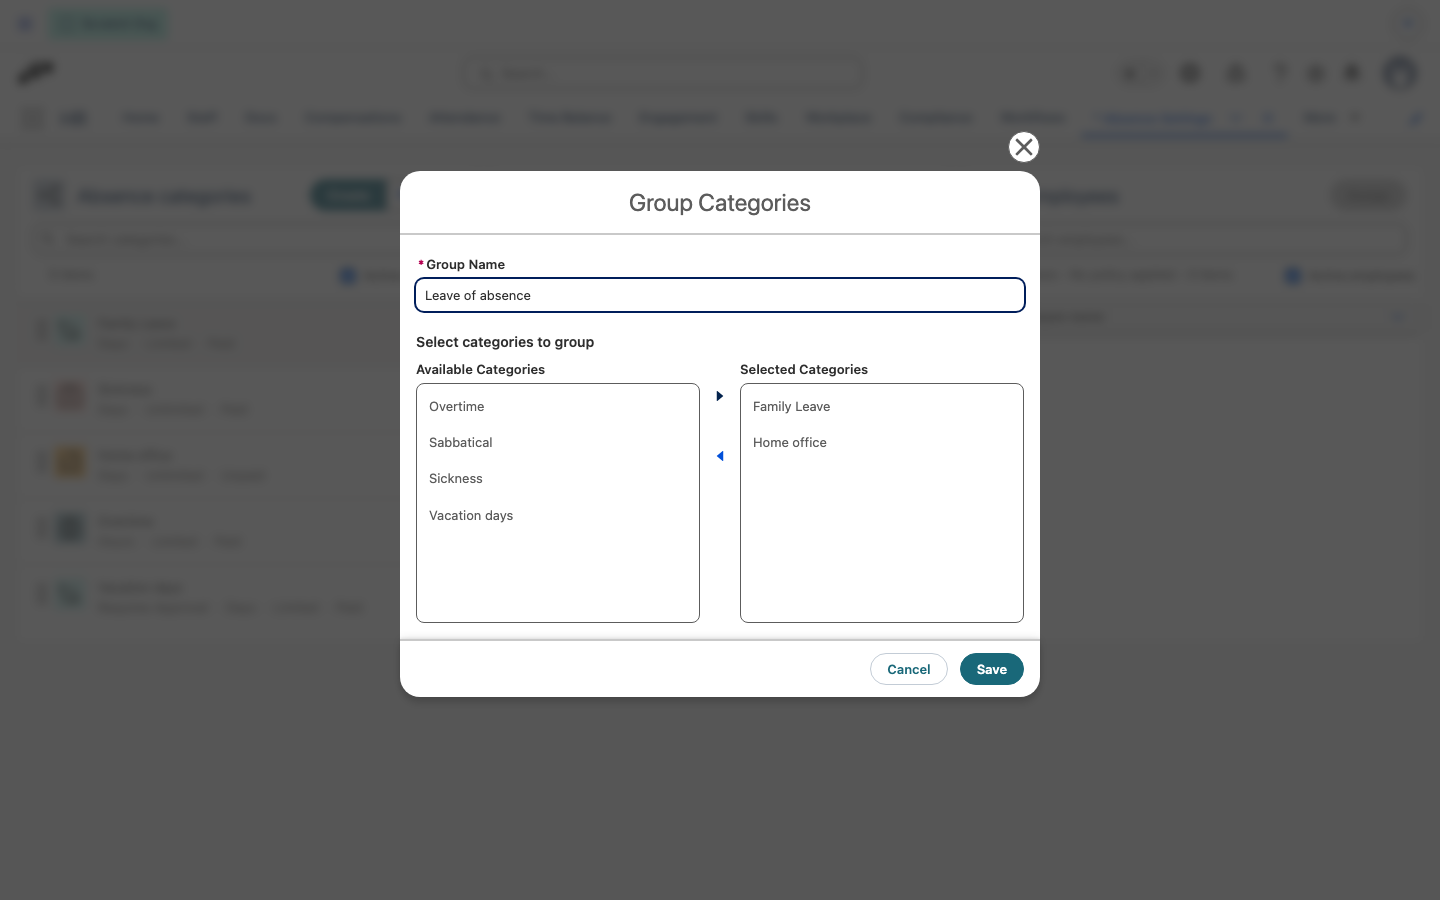
Groups bundle related categories, such as several kinds of special leave, under one name. In Salesforce and the Employee Hub, grouped categories appear together under the group name instead of on their own.
- On Absence Settings, open the menu (⋮) in the Absence Categories panel and select Group Categories.
- In Group Name, enter a name.
- Under Select categories to group, move the categories from Available Categories to Selected Categories.
- Click Save. The group appears in the Absence Categories panel with the number of its categories in parentheses.
To change groups later:
- To add a category that isn't in a group, open its menu in the Absence Categories panel and select the group under Add to Group. Subgroups are listed as
Parent › Subgroup. - To take a category out of its group, open its menu and select Remove from Group.
- To rename a group or change its categories, open the group's menu and select Edit.
- To dissolve a group, open the group's menu, select Ungroup, and confirm. Its categories are shown on their own again.
- To change the order of groups or of the categories in a group, drag them in the Absence Categories panel. Dragging is turned off while the search field contains text.
Nest absence categories into subgroups
To organize categories with greater detail, create subgroups inside a top-level group. Groups can be nested one level deep (Group › Subgroup › Category). A top-level group can hold subgroups or categories directly, while a subgroup must contain at least one category.
- In the Absence Categories panel, open the menu (⋮) on a top-level group and select Add Subgroup.
- In Group Name, enter a name for the subgroup.
- Optional: In Parent Group, select a different top-level group. It is pre-filled with the group you started from.
- Under Select categories to group, move at least one category from Available Categories to Selected Categories.
- Click Save. The subgroup appears nested under its parent group.
To manage existing subgroups:
- To nest an existing group, open its menu, select Edit, and select a top-level group in Parent Group. You can't change Parent Group for a group that has subgroups.
- To move a subgroup to the top level, open its menu and select Move to Top Level.
- When you ungroup a parent group that contains subgroups, flair ungroups its direct categories and promotes the subgroups to top-level groups.
Archive an absence category
Archive a category that employees should no longer use. Archiving hides the category from the Employee Hub and the employee record page. It doesn't delete the category or the absences already recorded in it.
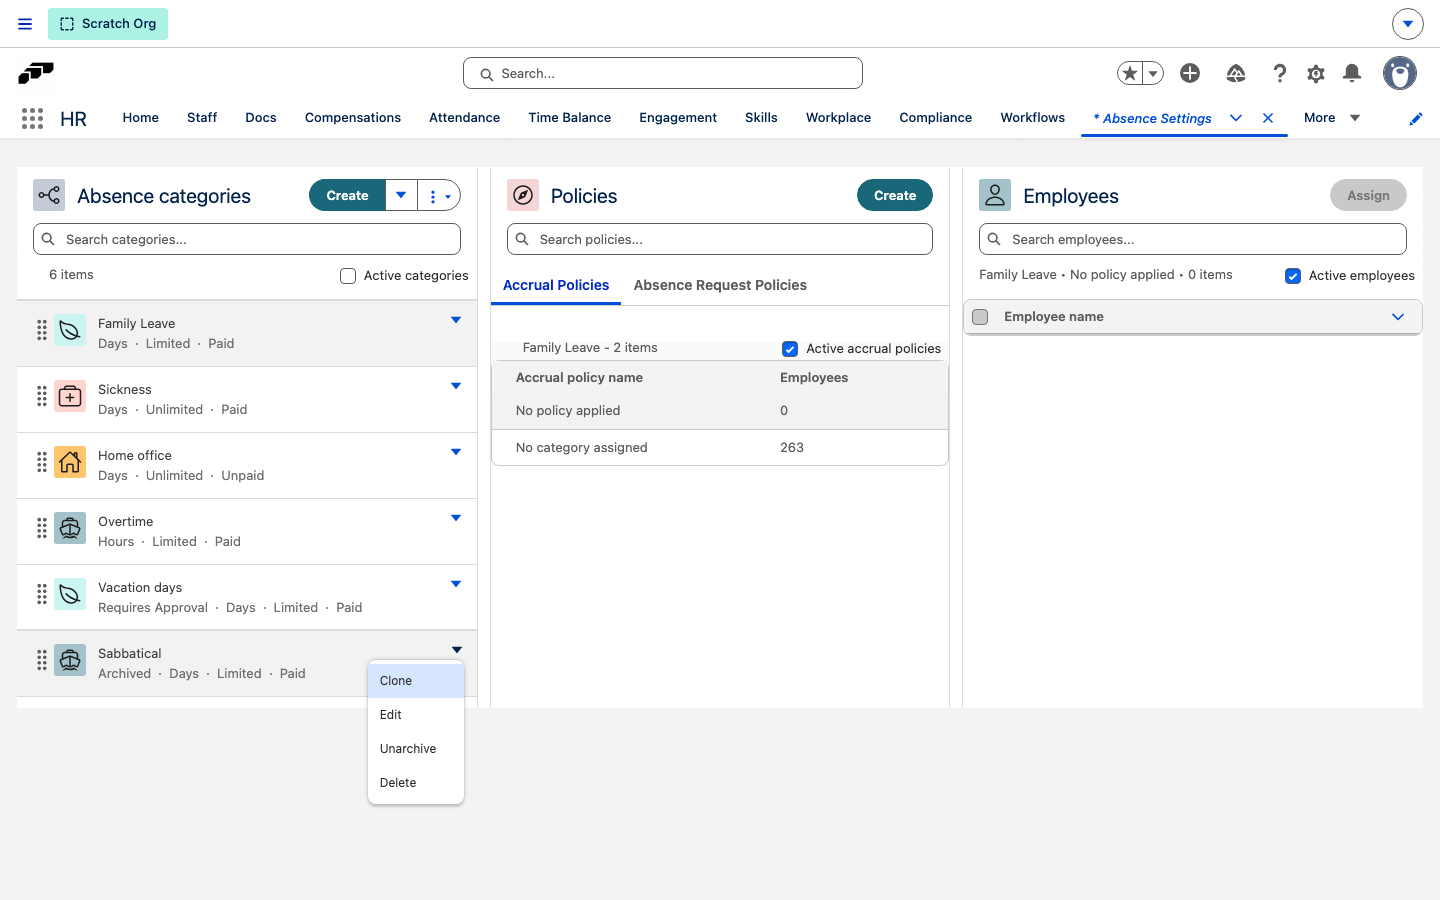
- On Absence Settings, open the category's menu in the Absence Categories panel.
- Select Archive. The category is hidden from the panel while Active categories is selected.
To see archived categories, clear Active categories. Archived categories are marked Archived. To restore a category, open its menu and select Unarchive.
Require a medical certificate
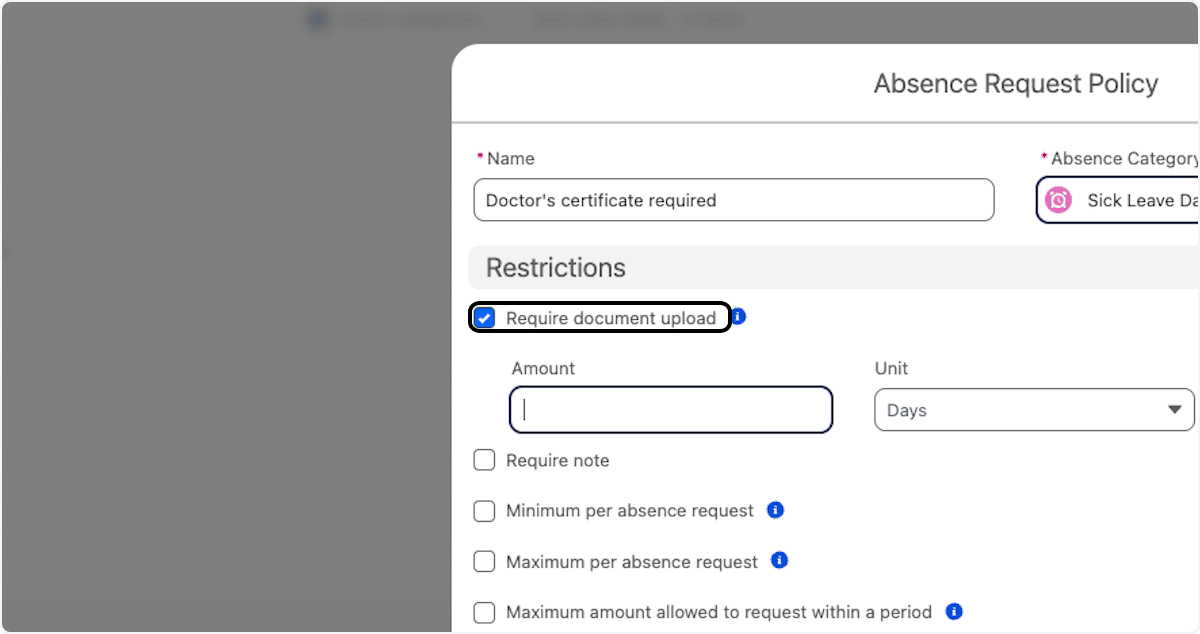
Absence Request Policies can require supporting documents, set minimum notice, or limit the duration of a request. This procedure applies a document requirement to sick leave.
- On Absence Settings, select the sick-leave category.
- In the Policies panel, click the Absence Request Policies tab.
- Click Create.
- Enter a policy name.
- Select Require document upload.
- Enter the absence duration that requires a document.
- Select the document category where flair stores the upload.
- Click Save.
- Open the new policy, and then click Assign.
- Select a start date or Use employee start date.
- Click Select Employees.
- Select the employees, click Add, and then assign the policy.
Set a minimum, maximum, or notice period for each request
An Absence Request Policy can set the smallest and largest amount a single request may cover, and how far in advance employees must request an absence.
- On Absence Settings, select the category.
- In the Policies panel, click the Absence Request Policies tab.
- Click Create.
- Enter a policy name.
- Optional: To set a lower limit, select Minimum per absence request, and enter the amount.
- Optional: To set an upper limit, select Maximum per absence request, and enter the amount.
- Optional: To require advance notice, select Minimum amount of notice required, enter the number, and choose Hours, Days, Weeks, or Months as the unit.
- Click Save.
- Open the policy, click Assign, and select the relevant employees.
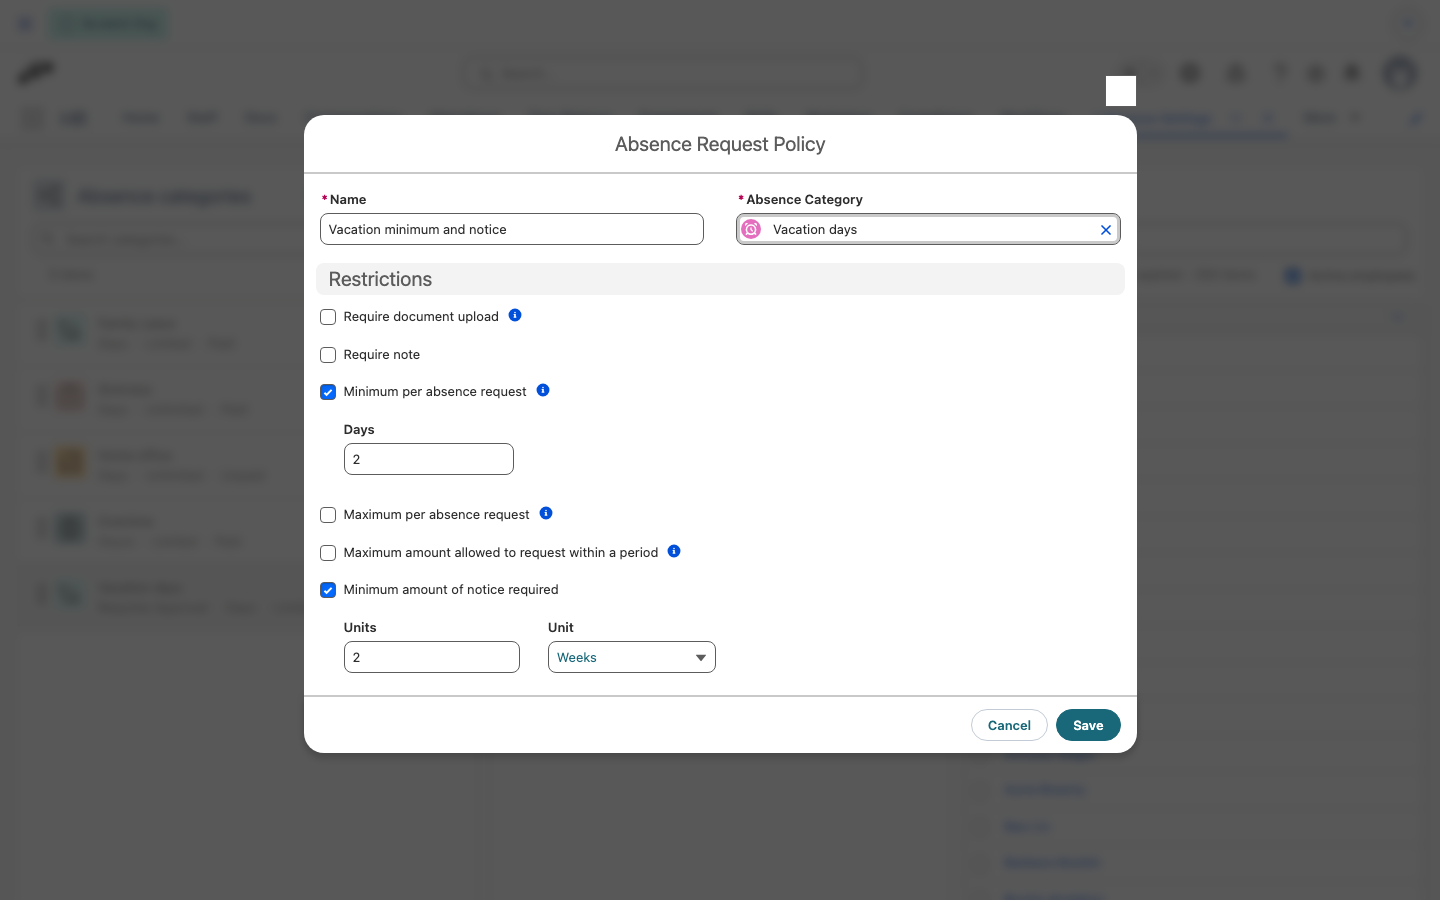
The minimum and maximum count working days or working hours of a single request, in the category's unit. Non-working days, such as weekends, don't count. For a daily category, enter whole days: the form drops any decimal part, so 0.5 becomes 0.
The notice period counts calendar time from the day the employee submits the request to the absence's start date. With 14 days of notice, a request submitted on March 1 can start on March 15 at the earliest. Weeks count as 7 days, and Months as calendar months. With Hours, flair compares the current time with the absence's start time. Hourly and daily categories use the same entry: a number in the selected unit. For 2 hours of notice, enter 2 and choose Hours.
The amount you enter next to Require document upload is a separate threshold. It doesn't block shorter requests; it only sets when the document upload becomes mandatory.
When a request in the Employee Hub or the mobile app breaks one of these limits, the request form shows a message, and the employee can't submit the request. flair checks the notice period first, then the minimum, the maximum, and the maximum per period, and shows the first limit the request breaks. For the messages employees see, see Request and approve absences.
When HR creates an absence for an employee in Salesforce, the absence form shows a warning for the same limits, but HR can still save it to make an exception. The form doesn't check the policy when HR edits an existing absence.
Limit how much employees can request per period
An Absence Request Policy can cap the total amount an employee requests in a category per year, month, or week. The employee's earlier pending and approved absences in the category count toward the cap, so employees can't get around it by splitting time across several requests. This also applies to categories that don't deduct from an allowance, such as unlimited categories.
- On Absence Settings, select the category.
- In the Policies panel, click the Absence Request Policies tab.
- Click Create.
- Enter a policy name.
- Select Maximum amount allowed to request within a period.
- Enter the maximum amount. The amount counts working days or working hours, in the category's unit. For a daily category, enter whole days; the form drops any decimal part.
- In Period, select Yearly, Monthly, or Weekly.
- Click Save.
- Open the policy, click Assign, and select the relevant employees.
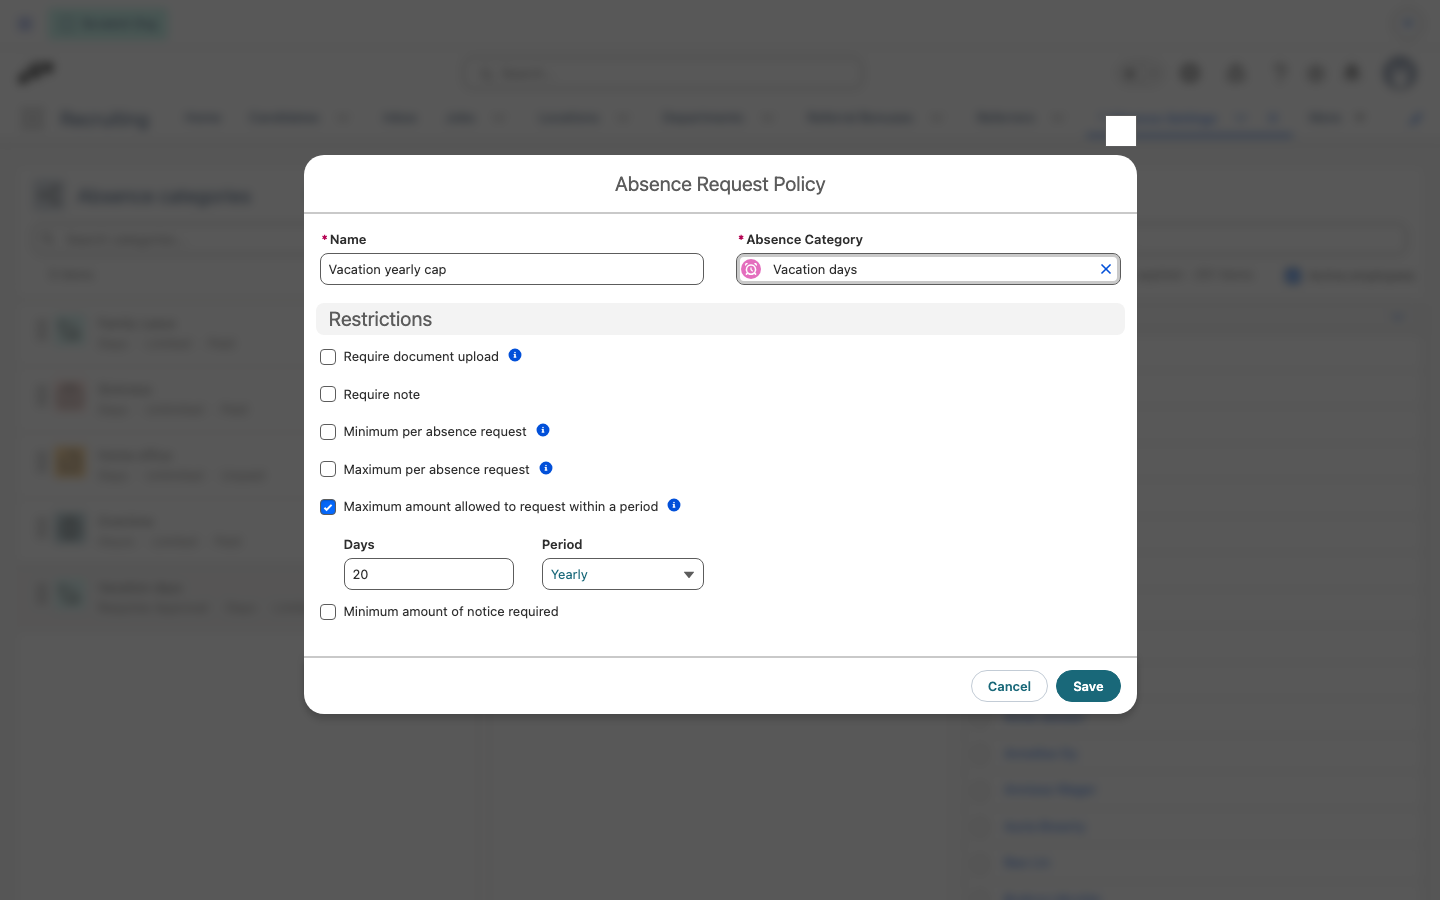
When an employee requests an absence in the Employee Hub that would exceed the maximum, the request form shows that the request exceeds the maximum for the period, and they can't submit the request.
When HR creates an absence for an employee in Salesforce, the absence form shows a warning if the absence would exceed the maximum, but HR can still save it to make an exception. The form doesn't check the policy when HR edits an existing absence.
Let employees request absence changes
Employees can ask for different dates on an absence that already exists instead of deleting it and requesting a new one. The change travels as a change request, so the absence stays untouched until it is approved, and a declined request leaves it as it was. The employee-facing steps are in Request a change to an absence.
Create the Absence change request form
The action stays hidden in the Employee Hub until the form exists. flair ships it as a template in English and German.
- In Salesforce, open HR Admin → Request Forms.
- Open the Templates menu, and select Absence change.
- Open the new form, and confirm that Active is on and Visibility covers the employees who should use it.
The template creates an Object Update Request form on the Absence object that lets the requester change the start date, end date, start time, end time, and comment, and that requires approval. See Create or edit a Request Form for the rest of the form settings.
Restrict what employees can change
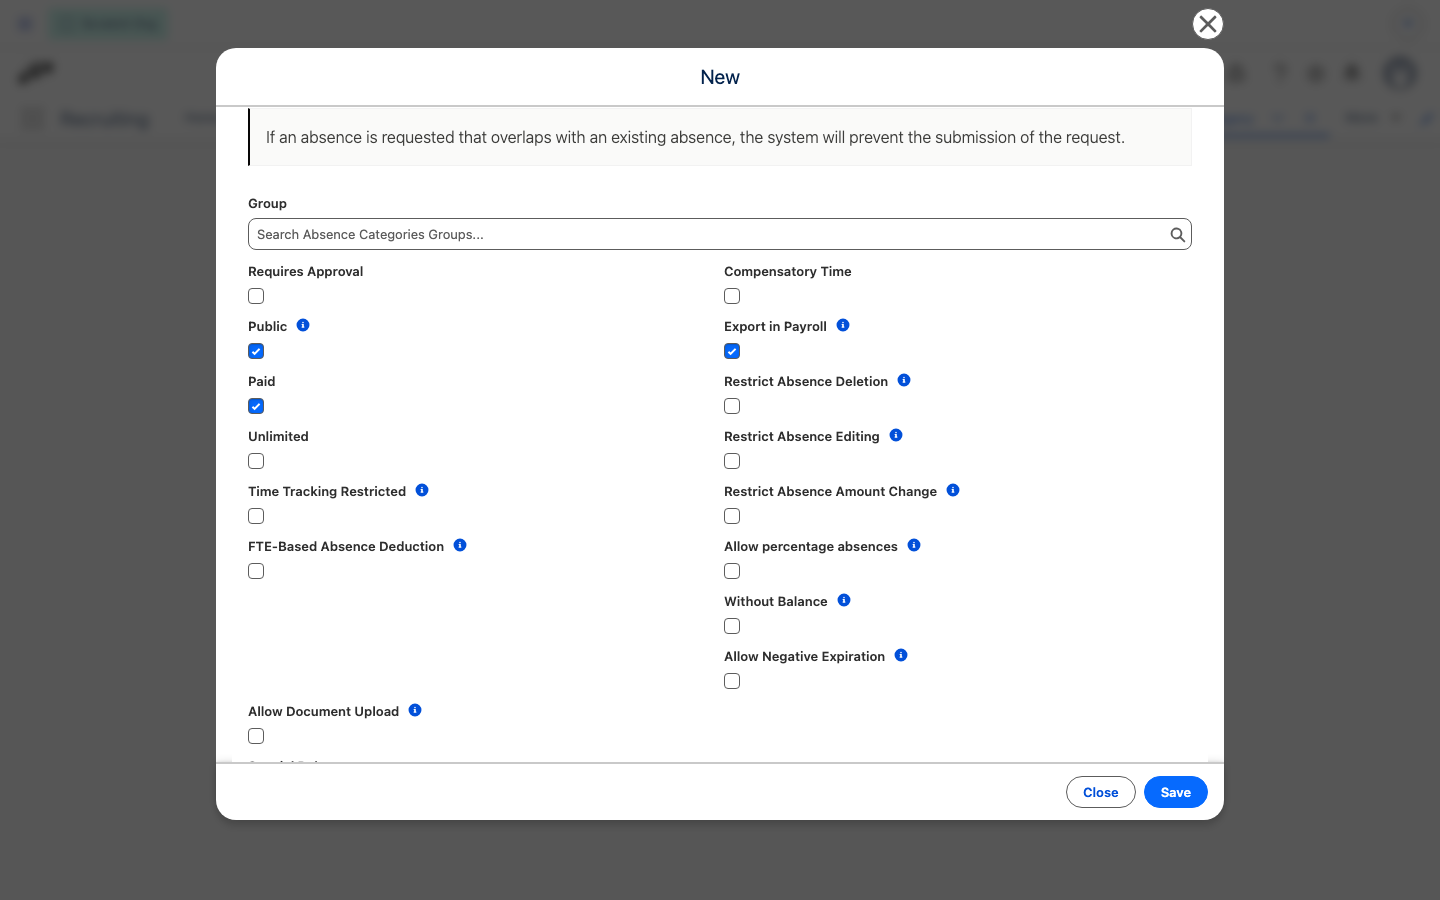
Two checkboxes on the absence category control the change request. Both are cleared by default.
| Setting | What it does |
|---|---|
| Restrict Absence Editing | Employees can't change an approved absence in this category at all. The change-request action and the direct edit are both hidden for those absences, and flair refuses the edit server-side. This mirrors Absence Deletion set to Restricted (HR only). See Control whether employees can delete absences. |
| Restrict Absence Amount Change | Employees can still request a change, but only one that keeps the withdrawn working amount the same. Moving an absence to different dates of the same length passes; extending it is rejected with a message naming the current and the resulting amount. |
Because workloads, public holidays, and half days all feed into the amount, flair validates Restrict Absence Amount Change by applying the requested change, comparing the recalculated amount, and rolling back. The employee sees the result in the request form before any request is created.
Route absence changes to the right approver
Absence changes follow the seeded Default Absence Change Policy, whose first step asks the employee's manager and the absence approver, so a change is approved by the same people who approve the absence itself. No setup is needed for that.
To send changes for one category elsewhere — for example sick-leave changes to HR and vacation changes to the manager — add an assignment on the target Approval Policy:
- In Salesforce, open the Approval Policy that should handle the change, and open Assignments.
- In Target Object, select Employee Data Change Request. flair shows the two related-record fields only for that object.
- In Related Record Object, select the Absence object, so the assignment matches only change requests whose related record is an absence.
- In Related Record SOQL Filter, enter conditions written in the absence's own fields, such as
flair__Employee_Absence_Category__r.flair__Absence_Category__r.Name = 'Sick leave'. - Set the assignment's Matching Priority between 1 and 4 so it outranks the seeded defaults, which sit at 5 and 10.
- Click Save. flair runs the filter on save and rejects an invalid one.
See Configure Approval Policies for how assignments, priorities, and steps work.
Configure maternity or parental leave
- On Absence Settings, create or edit an absence category.
- Enter the category name, such as
Maternity LeaveorParental Leave. - Set Type to Daily.
- Set Target Hours Deduction to Deduct by workload target hours.
- Configure the regulations required by your organization.
- Click Save.
- In the Policies panel, click the Absence Request Policies tab.
- Click Create.
- Enter a name for the request policy.
- Select Maximum per absence request.
- Enter the maximum number of days.
- Click Save.
- Open the policy, click Assign, and select the relevant employees.
Create separate categories and policies when maternity and parental leave use different maximum durations or regulations.
Calculate the Bradford Factor
The Bradford Factor scores how often an employee is absent, so frequent short absences weigh more than a few long ones. flair calculates it per employee and absence category and stores it in the Bradford Factor field of the employee's Employee Absence Category record. It only calculates the score for absence categories where Calculate Bradford Factor is selected.
How flair calculates the score
Three packaged flows do the work. They are active out of the box, and you find them in Setup → Flows:
| Flow | API name | When it runs | What it does |
|---|---|---|---|
| flair - Calculate Bradford Factor - RTF | flair_Absences_Calculate_Bradford_Factor_RTF | After an absence is created or updated | Runs when the absence's category has Calculate Bradford Factor selected, the absence starts today or earlier, and it ends within the last 365 days. Calls the subflow for the absence's Employee Absence Category. |
| flair - Calculate Bradford Factor - Scheduled | flair_Absences_Calculate_Bradford_Factor_Scheduled | Daily at 1:00 AM in your org's default time zone | Calls the subflow for every Employee Absence Category whose absence category has Calculate Bradford Factor selected. |
| flair - Calculate Bradford Factor - Subflow | flair_Calculate_Bradford_Factor_Subflow | When one of the other two flows calls it | Calculates the score and writes it to Bradford Factor on the Employee Absence Category. |
The subflow calculates S × S × D from the employee's absence days in the category, from 364 days ago through today:
| Value | What it counts |
|---|---|
| S | The number of separate absences with at least one absence day in that period. |
| D | The total amount of those absence days, in the category's unit. Days without working time, such as weekends, count as 0. |
The calculation counts absences regardless of their approval status. A rejected absence counts as a separate absence with 0 days. Days after today don't count yet, so an ongoing absence adds its remaining days as they pass.
For example, three one-day absences give 3 × 3 × 3 = 27, while one three-day absence gives 1 × 1 × 3 = 3. An absence from Friday to Sunday counts as one day.
The record-triggered flow updates the score right away when an absence is created or updated. In these cases, the score changes only with the next daily run:
- You delete an absence.
- You select Calculate Bradford Factor for a category that already has absences.
- An absence starts in the future, or an absence day drops out of the 365-day period.
If an employee has no absence days in the period, Bradford Factor stays empty.
Turn on the calculation for a category
flair doesn't show Calculate Bradford Factor on its absence settings pages or on the Absence Category Layout page layout. A list view can only edit fields that are on the page layout, so a Salesforce Admin first adds the field to the layout. Your profile or permission set needs access to the Calculate Bradford Factor and Bradford Factor fields.
- In Setup, go to Object Manager → Absence Category → Page Layouts, and open Absence Category Layout.
- Drag Calculate Bradford Factor from the Fields palette into the Information section, and click Save.
- From the App Launcher (⋮⋮ grid icon), search for and open Absence Categories, and then switch to the All list view.
- Click List View Controls (gear icon), and select Select Fields to Display.
- Move Calculate Bradford Factor to Visible Fields, and click Save.
- In the row of each category to score, click the pencil icon in the Calculate Bradford Factor column, and select the checkbox.
- Click Save.
See the scores
- Create a report with the Employee Absence Categories with Employee report type (in Other Reports), and add the Bradford Factor column. To show only scored categories, filter by Calculate Bradford Factor equals
True.
Assign policies to employees
Use this procedure for absence categories, absence request policies, and accrual policies.
- On Absence Settings, select the category and policy you want to assign.
- In the Employees panel, click Assign.
- Select the assignment start date.
- Optional: Select an end date.
- Click Select Employees.
- To narrow the employee list, click Show Filters, and then filter by fields such as Location, Department, or Position.
- Select the employees.
- Click Add.
- Click Assign To Employees. The policy applies for the selected date range.
For a limited category, the Accrual Policies list also includes No policy applied and No category assigned:
- Select No policy applied to list employees who have the category but no accrual policy. Select employees, and click the Assign button. In the form, choose an accrual policy and set its dates.
- Select No category assigned to list employees who are not assigned to the category. Select employees, and click the Assign button. The category is assigned immediately without a dialog or an accrual policy.
The button reads Assign until you select employees, then shows how many are selected, for example Assign 3 employees.
Import public holidays
- From the App Launcher (⋮⋮ grid icon), open Calendars.
- Click New.
- Enter a calendar name.
- Optional: Enter a start date and an end date.
- Set Type to
PUBLIC_HOLIDAY. - Click Save.
- In Calendar Subscription, enable Automatically add calendar periods.
- Click Define Country Calendar.
- Select the country and, when available, the state and region.
- Click Save and add holidays for this and next year.
- Open an Employee Workload Template.
- In Public Holidays Calendar, select the calendar, and then save the workload.
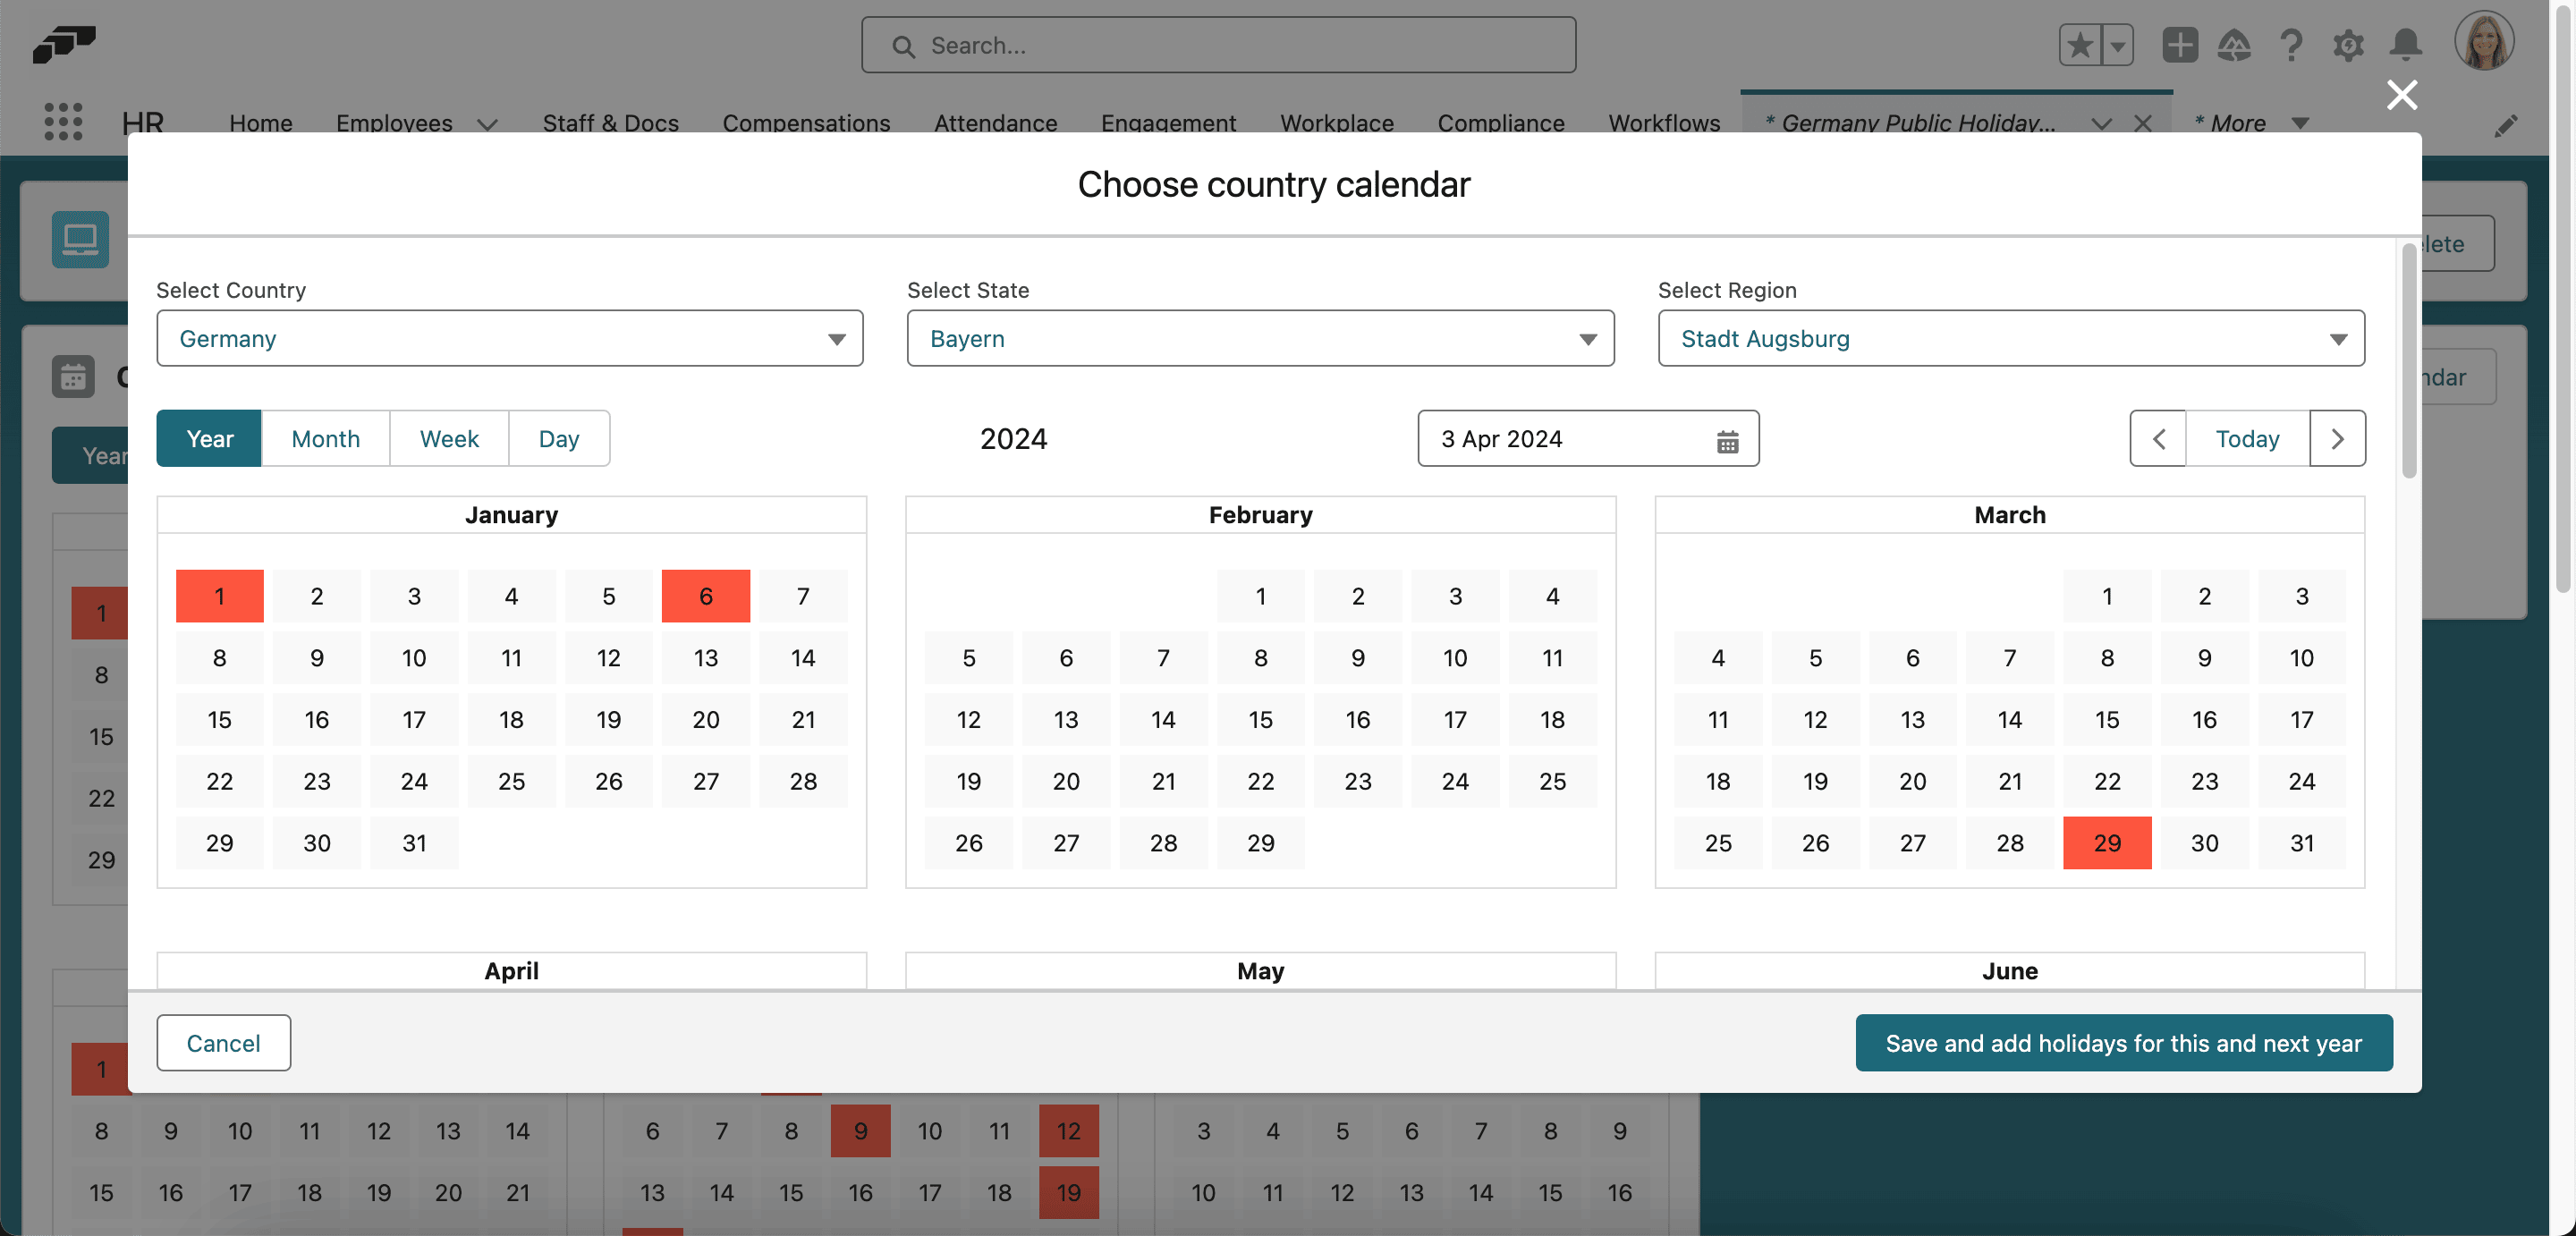
flair adds public holidays for the selected location for the next two years. The holiday names use the local language. You can also create calendars for every state or region of a country in one guided action; existing calendars are skipped.
Import holidays for a location
- Open Locations.
- Select the location.
- In Holidays, click Import.
- Select the year.
- Select the holidays to add.
- Click Import.
If flair cannot download the holidays, check the street, postal code, state, and country on the location record.
Customize an imported calendar
- To rename a holiday, open it in the monthly calendar, edit Calendar Period Name, and save it.
- To remove a holiday, open it, select the down arrow, and click Delete.
- To add an organization-specific holiday, click Add Period Manually, enter its name and dates, and click Save.
Create a mandatory absence from a calendar
- Open the calendar.
- In Calendar periods, click Add Mandatory Absence.
- Enter the Mandatory Absence Name.
- Set Type to Full day.
- Select the start and end dates.
- Select the Absence Category.
- Review the Included and Excluded employee counts.
- Save the period. flair creates approved absences in the background for included employees.
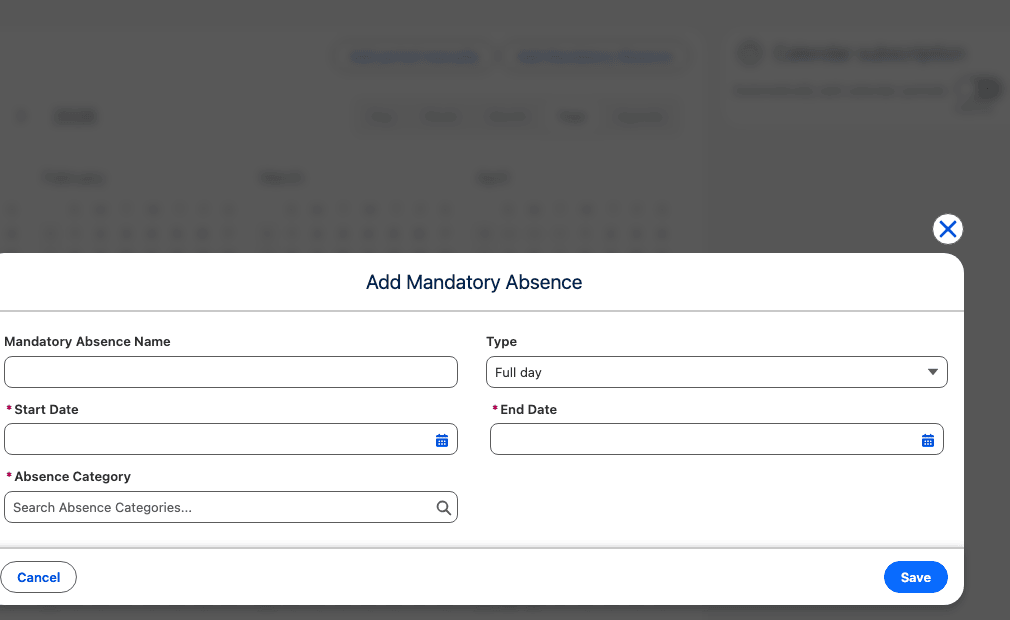
You cannot change the absence category after creating the period. Absences linked to the period cannot be edited individually, and deleting the period removes them.
Add a holiday to a location
Employees can have one primary employment location. For remote employees who need holidays from multiple regions, create a shared location and add the required holidays to it.
- From the App Launcher (⋮⋮ grid icon), open Locations.
- Select a location.
- In Upcoming Holiday, click New.
- Enter the holiday name.
- In Day, select the date.
- In Type, select half day or full day.
- If the holiday is official, select Official.
- Click Save. The holiday applies to employees assigned to the location without reducing their vacation allowance.
Add a manual allowance
Use manual allowances for one-time adjustments. Configure an accrual policy for recurring allowances.
- From the App Launcher (⋮⋮ grid icon), open Employees.
- Select the employee.
- Open Absence Categories.
- Select the accrual policy.
- Open Allowances.
- Click Add allowance.
- Enter a descriptive name.
- Enter the allowance amount.
- Select the start and end dates.
- Click Save. The manual allowance appears on the employee's record.